Introduction
The Microsoft Press book, Exam 70-462: Administering Microsoft SQL Server 2012 Databases, requires a substantial lab environment for the reader to follow along with the instructions in the kit. It recommends utilizing Hyper-V to setup a Domain Controller (DC) and an additional five domain members, all running Windows Server 2008 R2 Enterprise. While the book covers the hardware requirements needed to support the virtual lab, it does not provide the instructions for creating it.
This article will provide step-by-step instructions for creating the Hyper-V lab environment described in the 70-462 Training Kit. It assumes the reader has the necessary materials and software. Familiarity with Windows Hyper-V is not required. The instructions provided were documented using Hyper-V with Windows 8 Enterprise as the host machine and Windows Server 2008 R2 for the Hyper-V virtual machines.
Following the steps outlined in this post should leave the reader with the lab environment necessary to work through the entire 70-462 Training Kit book.
Lab Environment Overview
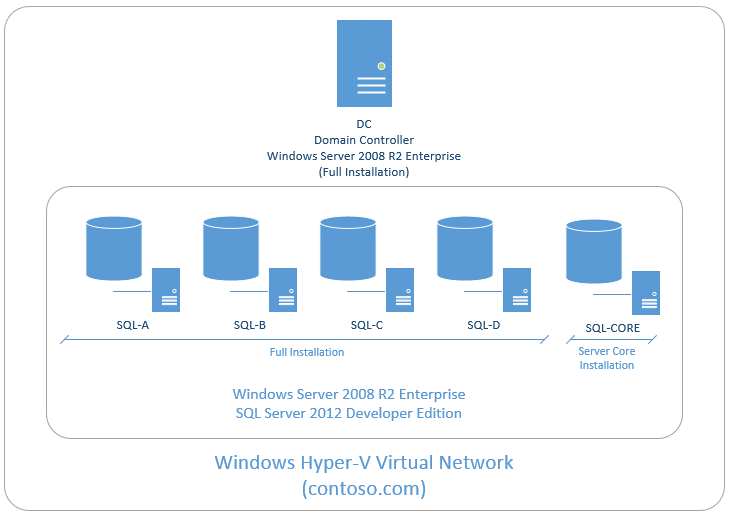
Our goal is to create a fully functional lab environment for use with the exercises in the book. All but one of the virtual machines will have the Full Installation of Windows Server 2008 R2 Enterprise edition; the other will have the Server Core Installation. The lab environment will contain the following virtual machines by name and purpose:
- DC: Windows Server 2008 R2 Enterprise (Full Installation) - Domain controller for the lab network, contoso.com
- SQL-A: Windows Server 2008 R2 Enterprise (Full Installation) - Domain member for hosting SQL Server
- SQL-B: Windows Server 2008 R2 Enterprise (Full Installation) - Domain member for hosting SQL Server
- SQL-C: Windows Server 2008 R2 Enterprise (Full Installation) - Domain member for hosting SQL Server
- SQL-D: Windows Server 2008 R2 Enterprise (Full Installation) - Domain member for hosting SQL Server
- SQL-CORE: Windows Server 2008 R2 Enterprise (Server Core Installation) - Domain member for hosting SQL Server
Requirements
To follow the instructions contained in this post, you will need the following:
- Windows computer with Hyper-V – This will host the virtual lab.
- Windows Server 2008 R2 Enterprise ISO – Evaluation copy will work fine, should be on your host machine.
For a complete listing of the hardware requirements of the host machine, see page xviii in the training kit.
Hyper-V Setup Steps
If it’s not already, the Hyper-V feature will need to be enabled on your Windows host machine. You will also need a virtual switch configured in Hyper-V; this allows the Virtual Machines to communicate on your virtual network. If you are familiar with Hyper-V and already have the Hyper-V feature enabled on your host machine with an available virtual switch, you can skip this section.
Enable Hyper-V Feature
To enable Hyper-V, enter Programs and Features and select the checkbox for Hyper-V.
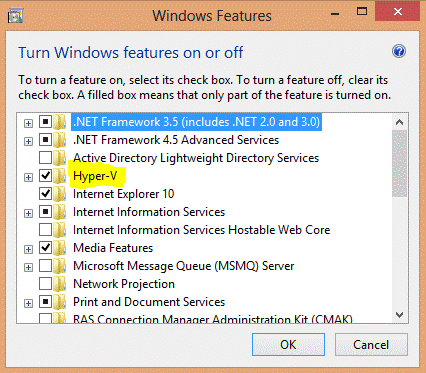
Close the dialog with the OK button and allow Windows to enable the feature. It should not require a reboot. For detailed instructions about enabling Hyper-V, see the following post on How-To Geek: http://www.howtogeek.com/76532/.
Create Virtual Switch
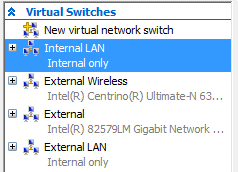
To create a virtual switch for use in the lab environment setup, follow the instructions below. This will configure an Internal virtual switch. If you already have a virtual switch, or you are familiar with configuring virtual switches and plan to use one with your own configuration, you can skip this section. For more about virtual networking, see Microsoft’s Configuring Virtual Networks page at http://technet.microsoft.com/en-us/library/cc816585.aspx.
- Launch Hyper-V Manager.
- From the Actions pane, left click on Virtual Switch Manager…
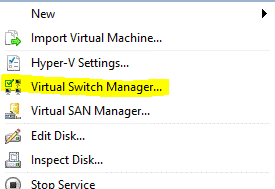
- In the Virtual Switch Manager dialog, select New virtual network switch and Internal. Then click Create Virtual Switch.

- Enter Internal LAN for the name in Virtual Switch Properties. Feel free to use a custom name, just remember to use it for subsequent steps.
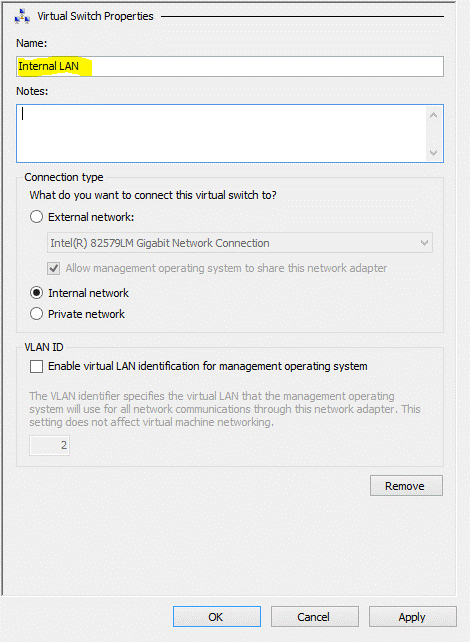
- Click OK. This will add the Internal LAN virtual switch. It will be available for use when we are setting up the Virtual Machines in later steps.
Lab Environment Setup Steps
This section will take you through all the steps necessary to create the lab environment. We will be leveraging differencing disks in Hyper-V. The instructions are contained below. For more detailed information regarding this configuration, visit Hyper-V Virtual Machine (VM) Parent-Child Configuration Using Differencing Disks.
Create the Parent Virtual Machine (VM) & Virtual Hard Disk (VHD)
This will be the “template” that will be used to create your lab VM’s. Once we create it and get it configured correctly, we will remove the VM and just keep the VHD. The VHD will serve as the parent VHD for the subsequent children VHD’s.
- Launch Hyper-V Manager.
- Right click your host computer name and choose New, Virtual Machine to bring up the New Virtual Machine Wizard.

- If Before You Begin displays, click through to the next step.
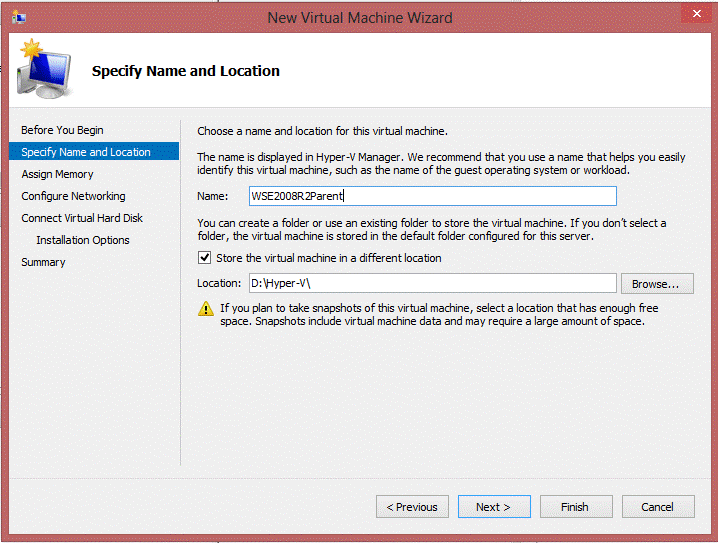
For Specify Name and Location, enter a name for your VM, e.g. WSE2008R2Parent. This VM will be discarded so the name does not matter.
Choose a different value for Location or leave it as default. To follow the examples in this post, create a custom location off the root of your preferred drive, e.g. D:\Hyper-V.
- Leave Assign Memory at the default value of 512. You can leave Use Dynamic Memory for this virtual machine unchecked as we will be deleting this VM after setting up the VHD.
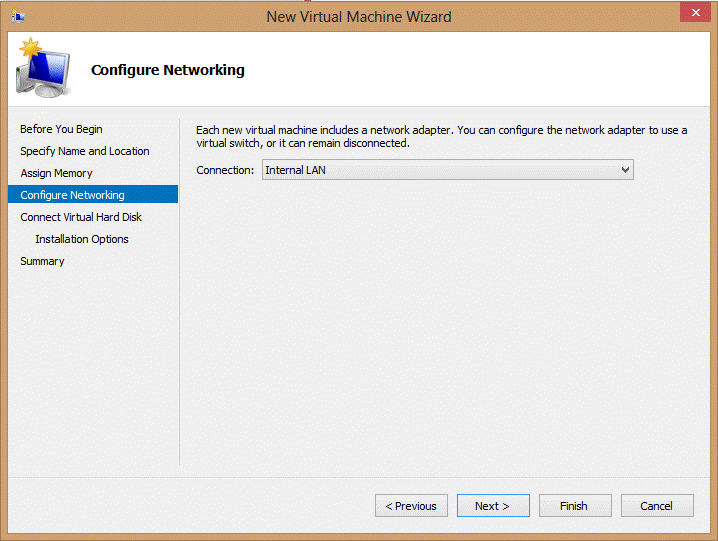
- For Configure Networking, choose the connection, Internal LAN. Feel free to use your own if you are already familiar with Hyper-V networking and you have a preferred configuration. For more about virtual networking, see Microsoft’s Configuring Virtual Networks page at http://technet.microsoft.com/en-us/library/cc816585.aspx.
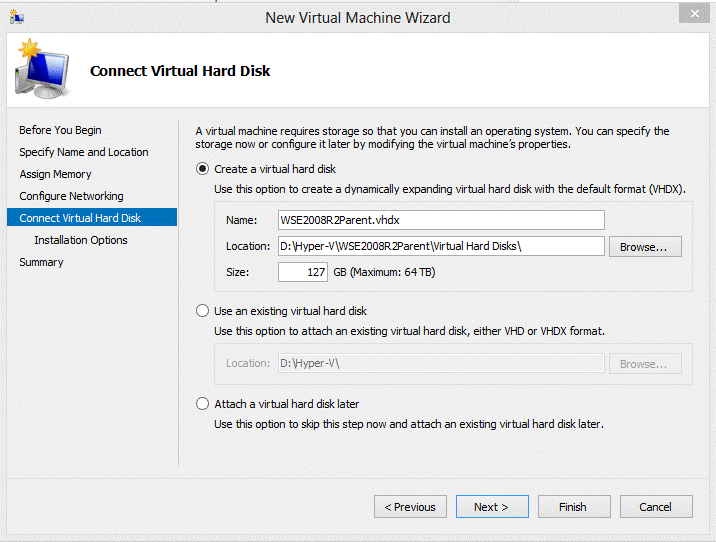
- For Connect Virtual Hard Disk, choose Create a virtual hard disk and enter WSE2008R2Parent.vhdx for the name. Then enter a location. In the example below, we are using D:\Hyper-V\WSE2008R2Parent\Virtual Hard Disks\. Leave the size at its default of 127 GB.
Choose Install an operating system from a boot CD/DVD-ROM for Installation Options. Enter the path to your Windows Server 2008 R2 Enterprise ISO file.
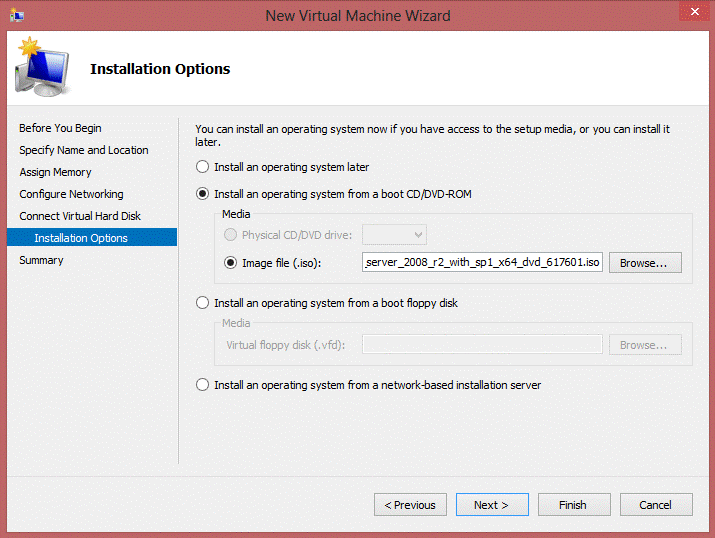
Clicking Next will display the Summary section where you can verify your choices. Then click Finish.
In Hyper-V Manager, right click on the VM you just created and choose Connect.
Then click the green button on the menu to start the VM.
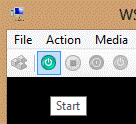
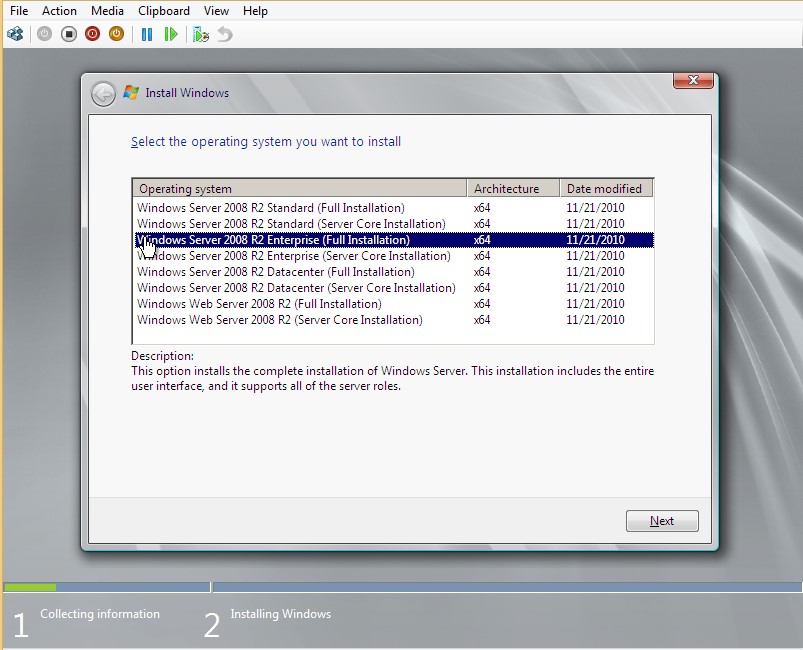
Starting the Virtual Machine will launch Windows Server 2008 R2 setup. Follow the setup instructions until you come to the dialog that asks you to select the operating system.
Choose Windows Server 2008 R2 Enterprise (Full Installation).
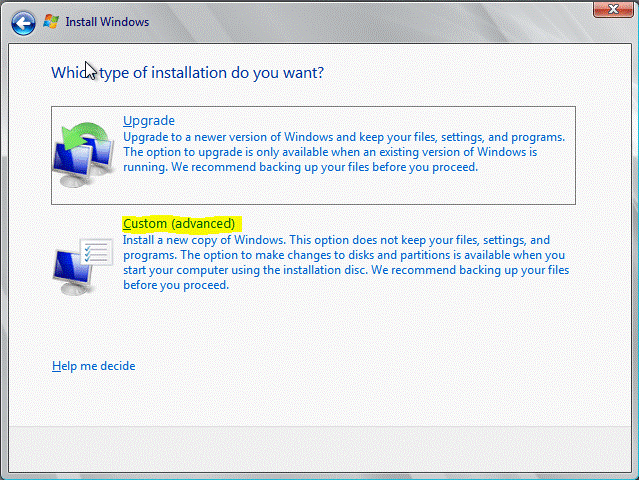
After you have accepted the license terms and are prompted about the type of installation, choose Custom (advanced).
Then choose Disk 0 Unallocated Space for the installation location. This should be the default selection.
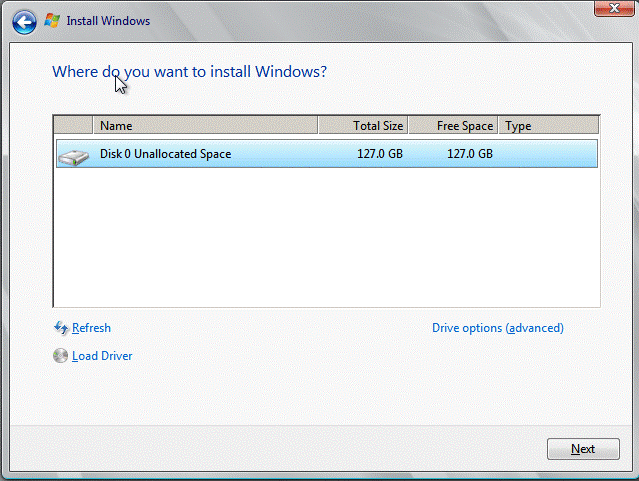
After you click Next the installation will begin. This can take some time.
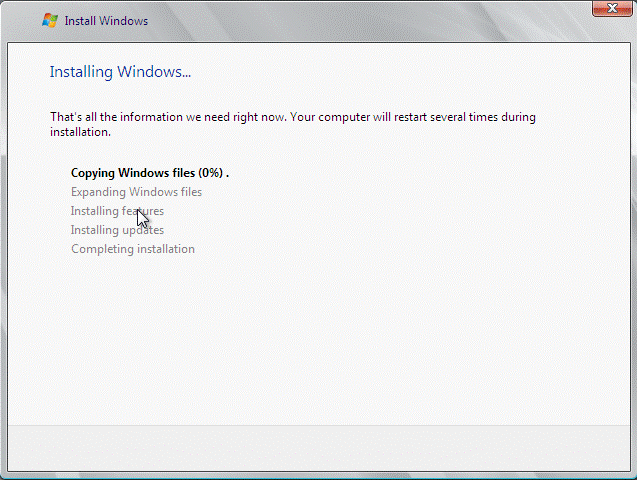
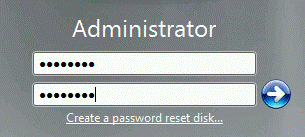
Once installation completes, the virtual machine will restart and you will be prompted to update your Administrator password.

Enter a password of your choosing that you are sure to remember. You can skip creating a password reset disk.
Once you have logged in, you will want to make any changes to the install that you want propagated to all your child virtual machines; this will be your virtual hard drive template. A few suggestions I incorporate into my environment before I start creating children from this parent Virtual Hard Drive:
- Adjust date/time to use my time zone.
- Enable Remote Desktop: I prefer logging into the virtual machines with Remote Desktop for a number or reasons.
Remember that you are going to be using Microsoft’s System Preparation (Sysprep) tool to generalize your VHD installations; profile specific updates will not be propagated, e.g. adding an item to the taskbar. We will be using Sysprep a little later in this section. For more information on Sysprep see http://technet.microsoft.com/en-us/library/hh824816.aspx.
Activation
Unless you have an explicit reason to do so, do not Activate Windows on your VM. If your test environment duration is less than 120 days, Microsoft recommends not activating the software and extending your activation grace period using the slmgr.vbs command-line interface. You can extend your grace period to a total of 120 days using this rearm functionality. You can read more about that at the following link: http://technet.microsoft.com/en-us/library/dd981009.aspx (see the section on this page titled Leverage the Activation Grace Period.) The following Activation Flowchart is also found there.
Activation Flowchart below from http://technet.microsoft.com/en-us/library/dd981009.aspx.
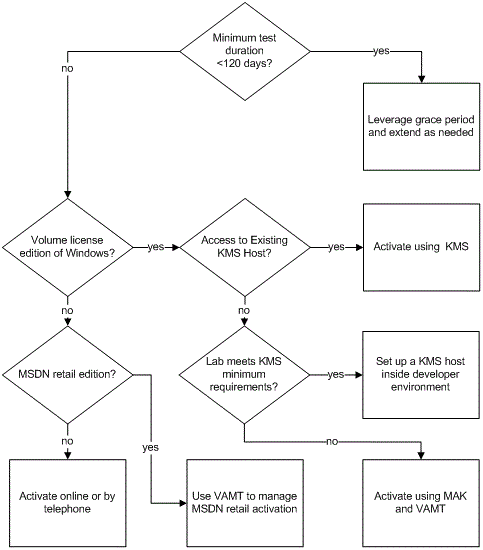
Activation Flowchart from http://technet.microsoft.com/en-us/library/dd981009.aspx.
Please note that there appears to be some discrepant information from Microsoft regarding activation grace period durations and whether or not to activate. The examples in this post did not use evaluation copies and did not activate. The activation process behaved as suggested in the documentation referenced above. The links below reference some of the articles with inconsistent information.
- http://support.microsoft.com/kb/948472
- http://technet.microsoft.com/en-us/windowsserver/bb414778
- http://www.microsoft.com/en-us/download/details.aspx?id=11093
System Preparation Tool (Sysprep)
We will use Microsoft’s System Preparation tool to generalize our VHD image before deploying multiple copies of it. You can read more about the details of Sysprep in Microsoft’s Sysprep Overview document at http://technet.microsoft.com/en-us/library/hh824816.aspx.
- Run Sysprep from an elevated command prompt to generalize installation, e.g. C:\Windows\System32\sysprep>sysprep.

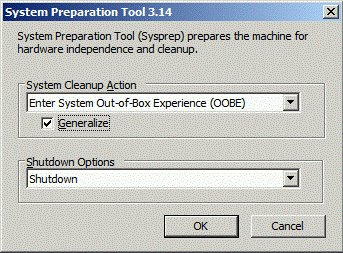
- This will launch the System Preparation Tool dialog. Leave the System Cleanup Action selection as Enter System Out-of-Box Experience (OOBE).
- Select the Generalize checkbox and then Shutdown for Shutdown Options. The dialog should appear as follows:
- Choose OK.
- Sysprep will run and then shut down the virtual machine.
Create Differencing Virtual Hard Drives
Now it is time to remove the VM we used in the previous steps and create multiple copies of the parent VHD.
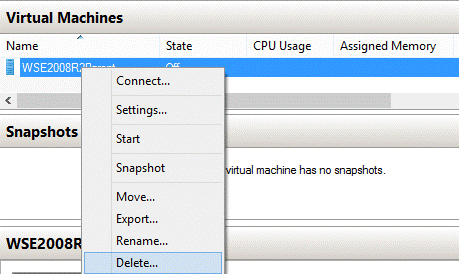
- Delete the virtual machine you used above. This will remove the virtual machine files and leave the virtual hard disk intact. In the example below, the WSE2008R2Parent VM is being deleted.
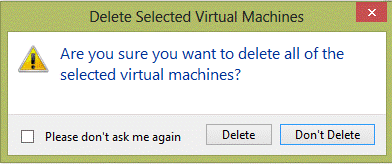
- When prompted, confirm that you want to delete the Virtual Machine.
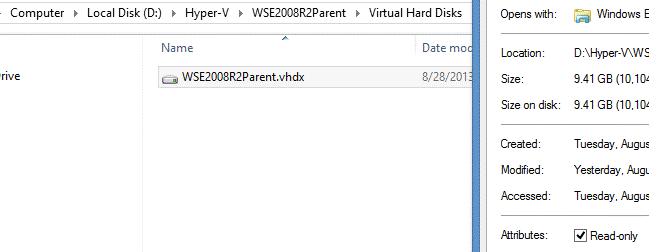
- Navigate to your virtual hard drive file and set it as read-only. This is going to be your template (parent) Virtual Hard Drive file; it is important that it does not change. Setting the file to read-only will help prevent unintended updates.
- From the Hyper-V Manager interface, right click on your machine name and choose New, Hard Disk… from the menu.

- Select VHDX in the Choose Disk Format step.
- Select Differencing for the Choose Disk Type step.
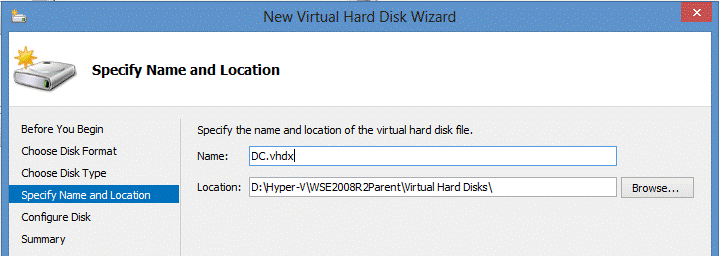
- For Specify Name and Location, use the name DC.vhdx and choose a location. We are using DC (Domain Controller) as the name for this VHD so that it will resemble the machine name in the training kit. In the example below, the location D:\Hyper-V\WSE2008R2Parent\Virtual Hard Disks\ is used to store the VHD files.
- For Configure Disk, enter the path to the parent VHD file that we created in the previous steps.

- Review the Summary for accuracy and click Finish if everything looks as expected.
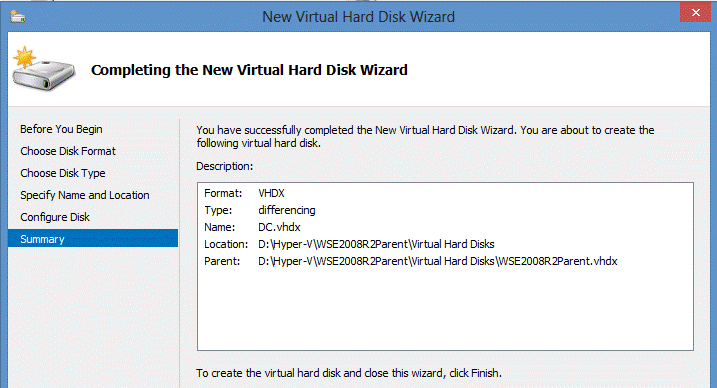
Now repeat steps 3 through 9 to create the Virtual Hard Drives listed below. Set the location for each VHD file as the same to follow the examples in this tutorial, e.g. D:\Hyper-V\WSE2008R2Parent\Virtual Hard Disks\. These VHD names resemble the naming conventions used in the training kit for the Virtual Hard Drives and naming them as shown will make the exercises in the book easier to follow.
- SQL-A.vhdx
- SQL-B.vhdx
- SQL-C.vhdx
- SQL-D.vhdx
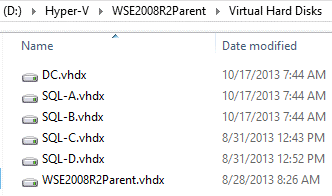
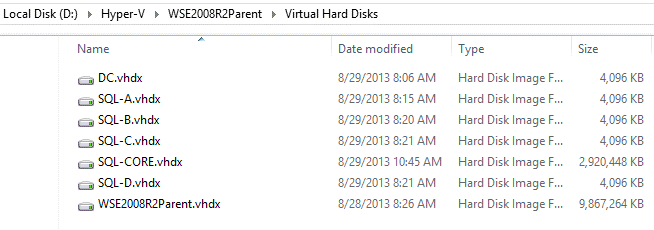
- If you’ve followed the steps up to this point and saved all of your VHD files to the same location, you should have a directory with six new VHD files:
Create Virtual Machines
It is time to create the Virtual Machines using the existing VHD’s that were just created in the previous steps. This example uses the same location for the VM’s to keep them in close proximity to each other. This is merely a preference. Feel free to use what works for you.
- From the Hyper-V Manager interface, right click on your machine name and choose New, Virtual Machine… from the menu.

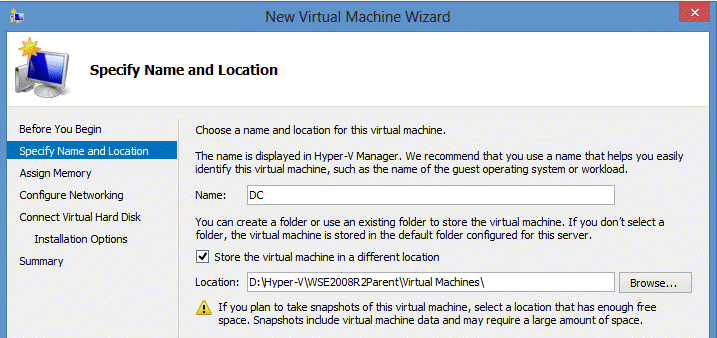
- For Specify Name and Location, use the name DC. To use a custom location, place a check in the Store the virtual machine in a different location checkbox and enter the path in Location. The example below uses the Virtual Machines directory alongside the directory for the Virtual Hard Drive files, D:\Hyper-V\WSE2008R2Parent\Virtual Machines\.
- Leave the default value of 512 MB for Assign Memory and place a check in the Use Dynamic Memory for this virtual machine checkbox.

- For Configure Networking, choose the built-in connection, Internal LAN. Feel free to use your own if you are already familiar with Hyper-V networking and you have a preferred configuration. For more about virtual networking, see Microsoft’s Configuring Virtual Networks page at http://technet.microsoft.com/en-us/library/cc816585.aspx.

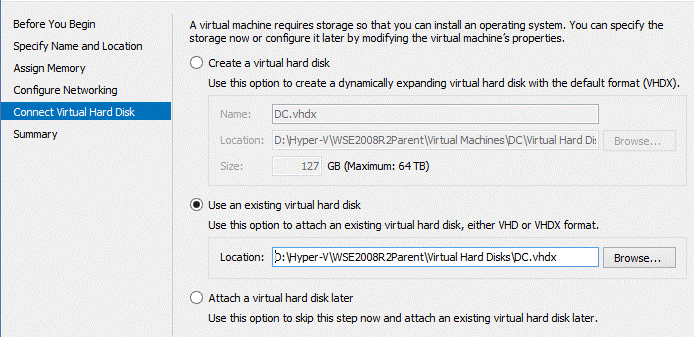
- Select Use an existing virtual hard disk for Connect Virtual Hard Disk. Enter or browse to the DC.vhdx Virtual Hard Drive file. In this example, the VHD file is located at D:\Hyper-V\WSE2008R2Parent\Virtual Hard Disks\DC.vhdx.
- Review the Summary page for accuracy and choose Finish if everything looks as expected.
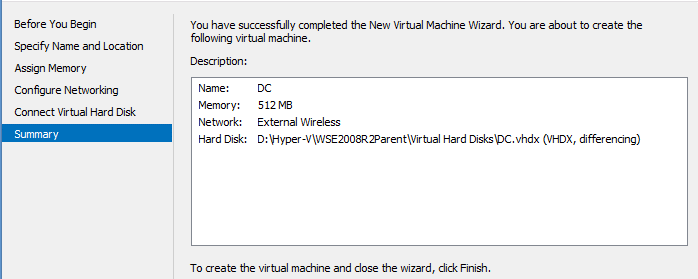
Now repeat steps 1 through 6 to create the Virtual Machines listed below. The VM names resemble the Virtual Machine naming conventions used in the book. The VM name should be matched up with the similarly named VHD file, e.g. the VM named SQL-A should use the VHD named SQL-A.vhdx. Pay close attention while repeating these steps. Mismatching VM’s to VHD’s will likely cause confusion when working through the training kit.
- SQL-A
- SQL-B
- SQL-C
- SQL-D
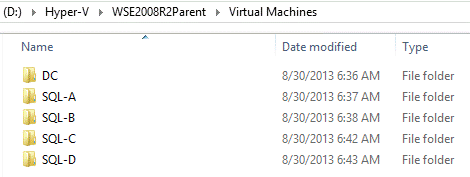
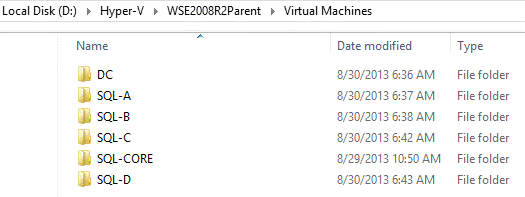
- If you’ve followed the steps up to this point and saved all of your VM files to the same location, e.g. D:\Hyper-V\WSE2008R2Parent\Virtual Machines\, you should have a directory with five new folders that contain your VM files:
Create SQL-CORE
The 70-462 Training Kit requires one more Virtual Machine for the lab environment. This VM will use the Server Core Installation of Windows Server 2008 R2 Enterprise. As this is a unique installation, there is no need to leverage our existing VHD parent. We will install this as a new Virtual Machine with a new Virtual Hard Drive.
- In Hyper-V Manager, right click your host computer name and choose New, Virtual Machine to bring up the New Virtual Machine Wizard.
- For Specify Name and Location, enter SQL-CORE as the name for your VM. To follow this example, choose a custom Location and place the VM in the same directory as the other VM’s, e.g. D:\Hyper-V\WSE2008R2Parent\Virtual Machines\.
- Leave the default value of 512 MB for Assign Memory and place a check in the Use Dynamic Memory for this virtual machine checkbox.
- For Configure Networking, choose the built-in connection, Internal LAN. Feel free to use your own if you are already familiar with Hyper-V networking and you have a preferred configuration. For more about virtual networking, see Microsoft’s Configuring Virtual Networks page at http://technet.microsoft.com/en-us/library/cc816585.aspx.
- For Connect Virtual Hard Disk, choose Create a virtual hard disk and enter SQL-CORE.vhdx for the name. Then enter a location. If you are following the example in this post, use the same location as the other VHD files, e.g. D:\Hyper-V\WSE2008R2Parent\Virtual Hard Disks\. Leave the size at its default of 127 GB.
- Choose Install an operating system from a boot CD/DVD-ROM for Installation Options. Enter the path to your Windows Server 2008 R2 Enterprise ISO file.
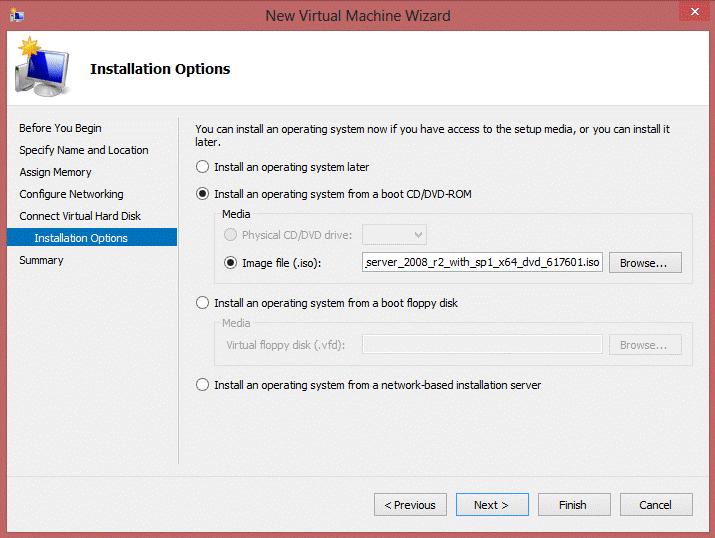
- Clicking Next will display the Summary section where you can verify your choices. Then click Finish.
- In Hyper-V Manager, right click on the SQL-CORE VM you just created and choose Connect.
- Then click the green button on the menu to start the VM.
- Starting the Virtual Machine will launch Windows Server 2008 R2 setup. Choose Windows Server 2008 R2 Enterprise (Server Core Installation).
- After you have accepted the license terms and are prompted about the type of installation, choose Custom (advanced).
- Then choose Disk 0 Unallocated Space for the installation location. This should be the default selection.
- Click Next and installation will begin. This can take some time.
- After installation completes, the virtual machine will restart and you will be prompted to update your Administrator password.
Validation & Final Steps
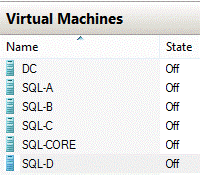
When finished, if you have set it up following the examples in this tutorial, your lab specific Virtual Machine names will look like this in Hyper-V Manager:
Your directory structure for the Virtual Machines will look like this:
And your directory with the Virtual Hard Drive files will look like this:
The first time you start your new Virtual Machines it will launch the setup process. This is because the Sysprep tool left them in a generic state. Each VM will need to collect information from you, e.g. accept the license terms, set a password, etc. After setup starts services, installs devices and applies system settings, it will restart your Virtual Machine.

And take you through the setup process.
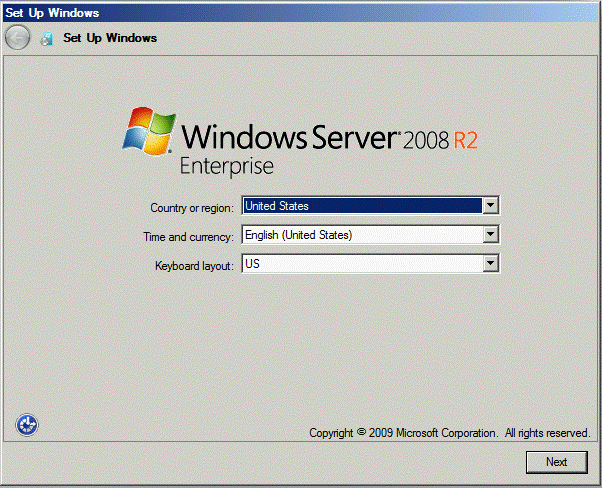
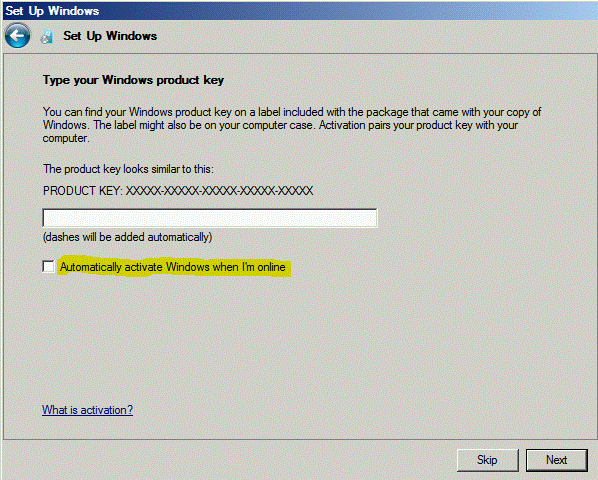
The product key is not required as there is no need to activate Windows on the VM’s. Be sure to uncheck Automatically activate Windows when I’m online, unless you explicitly want to activate for some reason. As noted in earlier steps, Microsoft recommends against activation for lab environments with a life expectancy of less than 120 days.
Accept the license terms and enter a password when prompted. The 70-462 Training Kit recommends a particular password throughout the book. I recommend using your own if you have an old standby for your personal lab environments.

After you have completed setup on each Virtual Machine, you are now ready to begin using your VM's by following the Practice Setup Instructions from page xix in the Introduction section of the Administering Microsoft SQL Server 2012 Databases book for Exam: 70-462. The book picks up from this point, first walking you through the creation of your Domain Controller in the contoso.com network.
Conclusion
This guide walked through the steps necessary to create a complete Hyper-V networked lab environment with a Domain Controller and five domain member machines. Anyone wishing to work through the Microsoft Press book, Exam 70-462: Administering Microsoft SQL Server 2012 Databases, will find this helpful as this environment is necessary to perform the exercises in the book. The book recommends utilizing Hyper-V but does not provide instructions for creating the environment; it assumes the reader has done this. Completing the steps in this guide will leave the reader with the Hyper-V lab environment prepared and ready to begin working through the 70-462 Training Kit. The guide is also useful for anyone wishing to understand more about how to utilize Hyper-V, Hyper-V’s Parent-Child Configuration Using Differencing Disks, or creating an environment for other purposes, e.g. experimenting with AlwaysOn Availability Groups in SQL Server 2012, etc. Please let me know if you find this information worthwhile, especially if you have any questions or input that will help improve it.
References
The following links were either linked directly in this post or were used when researching information to support it.
How to Install or Enable Hyper-V Virtualization in Windows 8
http://www.howtogeek.com/76532/
Configuring Virtual Networks
http://technet.microsoft.com/en-us/library/cc816585.aspx
How to extend the Windows Server 2008 evaluation period
http://support.microsoft.com/kb/948472
Hyper-V Virtual Machine (VM) Parent-Child Configuration Using Differencing Disks
Sysprep Overview
http://technet.microsoft.com/en-us/library/hh824816.aspx
Windows Activation in Development and Test Environments
http://technet.microsoft.com/en-us/library/dd981009.aspx
Windows Server 2008 R2 Evaluation (180 days)
http://www.microsoft.com/en-us/download/details.aspx?id=11093
Windows Server 2008 System Requirements


