

This article helps you to generate auto inventory of SQL Server Installations in your network so that you can either use this as report for installation or compare with your own excel tracking whether there is any mismatch.
When I first kick started this project, I searched in the internet on what are all the software’s or tools or utilities available to generate auto inventory.
Tools available to generate auto inventory
- SQL Ping by Chip Andrews
- Found Stone Sqlscan
- ListSqlServers - a VB Project
- SQLLHF v3.2 - written by MattW
- MSSQLScan v0.8 by patrik@cqure.net
- SQL.vbs by MAK (Attached with this article in the Resources Section below)
- OSQL -L (This lists only broadcasted servers, which mean servers that are currently running) - Comes along with SQL Server
- SQLCMD -L (Better than OSQL –L but still some servers are missing) - Comes along with SQL Server 2005
- SQL Scan exe (Part of SQLCritUpdPkg_ENU.exe from Microsoft)
- ADO.Net code for scanning SQL Servers
Tools Used in this project:
- BIDS 2005 – The Business Intelligence Development Studio is installed as part of SQL 2005 (Except SQL Express edition). This was used to design, test and deploy reports.
- SQL2005 Standard Edition - Stores the inventory data and fetches it for reporting.
- SQLPing3cl - Used to scan for SQL Installed instance throughout the network and the output saved as .CSV and then this CSV is Bulk copied to Inventory Table
A few tables are also needed. The first is called tblSQLVersion - This holds SQL Server Version numbers for reference. Ex: 9.0.3042 for SQL2005SP2. This table has to updated when there is new SP release which is installed.
To create this table, first create a new database called DBReporting. Then connect to the query window and run this script.
  USE[DBReporting]
  GO
  /****** Object: Table [dbo].[tblSQLVersion] Script Date: 07/31/2008 05:06:34
  Author: Sakthivel Chidambaram******/
  SET ANSI_NULLS ON
  GO
  SET QUOTED_IDENTIFIER ON
  GO
  SET ANSI_PADDING ON
  GO
  CREATE TABLE [dbo].[tblSQLVersion](
  [Version] [int] NOT NULL,
  [Serial] [char](10)NOT NULL,
  [Descr] [varchar](25)NOT NULL
  ) ON [PRIMARY]
  GO
  SET ANSI_PADDING OFF
Data to be filled in this table:
| 2005 | 9.0.1399 | RTM |
| 2005 | 9.0.2047 | 2005SP1 |
| 2005 | 9.0.3042 | 2005SP2 |
| 2000 | 8.0.2039 | 2000SP4 |
| 2000 | 8.0.2026 | 2000SP4Beta |
| 2000 | 8.0.0760 | 2000SP3a |
| 2000 | 8.0.0534 | 2000SP2 |
| 2000 | 8.0.0532 | 2000SP2Beta |
| 2000 | 8.0.0384 | 2000SP1 |
| 7 | 7.0.1063 | 7.0SP4 |
| 7 | 7.0.961 | 7.0SP3 |
| 7 | 7.0.842 | 7.0SP2 |
| 7 | 7.0.835 | 7.0SP2Beta |
| 7 | 7.00.699 | 7.0SP1 |
| 7 | 7.00.1094 | 7.0SP4Hotfix |
The second SQL Table is SQLInv. It holds the CSV data from the SQLPing3cl application. Run this script to create this table:
USE[DBReporting]
  GO
  /****** Object: Table [dbo].[SQLInv] Script Date: 07/31/2008 05:03:46
  Author: Sakthivel Chidambaram******/
  SET ANSI_NULLS ON
  GO
  SET QUOTED_IDENTIFIER ON
  GO
  SET ANSI_PADDING ON
  GO
  CREATE TABLE [dbo].[SQLInv](
  [ServerIP] [char](15)NULL,
  [TCPPort] [int] NULL,
  [ServerName] [varchar](55)NULL,
  [InstanceName] [varchar](55)NULL,
  [BaseVersion] [char](20)NULL,
  [SSNetlibVersion] [char](20)NULL,
  [TrueVersion] [char](20)NULL,
  [ServiceAccount] [varchar](55)NULL,
  [IsClustered] [varchar](25)NULL,
  [Details] [text] NULL,
  [DetectionMethod] [varchar](55)NULL
  ) ON [PRIMARY] TEXTIMAGE_ON [PRIMARY]
  GO
  SET ANSI_PADDING OFF
How to get the inventory report?
Step 1: We have to run the SQLping3cl.exe with either IPRange where SQLServers are located or if you have a text file with list of SQL Server IP Addreses then you can use that too.
Complete Syntax to run SQLPing3cl.exe:
sqlping3cl.exe -scantype [range,list, stealth] -StartIP 127.0.0.1 -EndIP 127.0.0.1
-IPList [Filename] -UserList [Filename] -PassList [Filename] -Output [Filename]
The syntax I used to run SQLping3cl.exe is:
SQLPing3cl.exe -scantype range -startIP 100.100.101.0 -EndIP 100.100.101.254 -Output 100.csv
Once we run this command, SQLPing exe will scan the IP range specified and it will output the list of discovered SQLInstances to 100.csv, which is given as output file name. Once the discovery operations are completed then move to Step2.
Step 2: By now we should have the database and tables created. The CSV file from SQLPing.exe should be ready. Now we have to copy the data in 100.CSV file to the SQLInv table. I have optimized the datatype but please change it for better performance if you have a better solution.
How to copy?
There are different methods. I have used Import/Export wizard in SQL2000. Go to Start | Program Files | Microsoft SQL Server | Import and Export Data. The steps to follow are:
- Click "Next"
- In the data source select "Text File" and in the file name select "100.csv", click "Next"
- Select "First row has columns" and Leave others settings to default in the next window
- In the next window make sure that "Comma" is selected and click "Next"
- Here select the destination server where you have created the database and two SQL tables mentioned above. Click "Next"
- Now select the destination table name as SQLInv. Click preview to see whether data is going properly into the table. Click "Next"
- Select "Run Immediately". Click "Next" and then click "Finish"
Now the data in CSV is copied into table successfully!
Step 3: Now we have the data ready in a SQL table and we need to deploy a report to the reporting server. I have attached the RDL, which has the complete design of a report that will look like the one below.
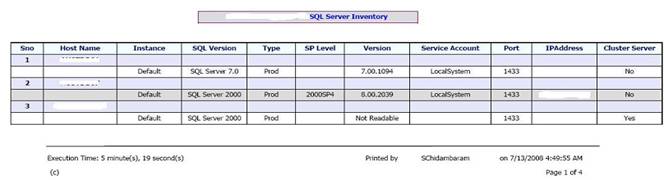
You can always design your own report as well.
How to deploy the RDL:
- Open BIDS(SQL Server Business Intelligence Development Studio) from Start Menu\Programs\Microsoft SQL Server 2005\SQL Server Business Intelligence Development Studio.
- Click File | New | Project | Select Report Server Project
- Specify the Name for the project as DBReport, Select the location and give name for solution as DBReporting or as per your wish. Click OK
- Now in the right window Right click Report and select Add Existing Item.
- Now select the SQLInv.dll which you should have downloaded the attachment and stored in your local computer.
- Now open the Inventory.rds.txt and in the data source change the SQLInstance name to point to your server and save the file as Inventory.rds
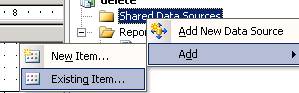
- Now right click Shared data sources | Add Existing Item.
- Select the Inventory.rds file which you have modified above.
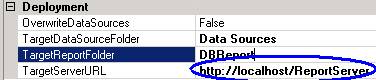
- Now right click the project name in the right window. Select Properties and enter your TargetServerURL where Reporting Server is running.
- Now Select the production mode and deploy the reports. Automatically your browser will open and show you the complete list of SQL Servers in your environment.


![]()
Advantages:
1) A Complete SQL Server List, whether the Server is stopped or Running can be generated. This is very much needed because when you run OSQL –L or SQLCMD –L it is missing lot of servers that are either stopped or not running. This method pings each IP and reads the instance name from SSNETLIB.DLL and reports complete list of instances.
2) Details with Instance Name, Version, SP Level, Service Account, and TCP/IP Port can be generated. So this makes it a complete report since except for the SQL Server edition, all other details are available in this report and in a way it can be presented or reported to management.
3) Reporting Services gives the ability to export in PDF with more graphics for presentations. So you can run this report at any point of time and export in the required format. The task of discovering the SQL Servers can be done once in a month so that the inventory will be updated always.
Known Issues:
1) We cannot detect the edition of SQL Server (Standard or Enterprise). Regarding this issue, I had a conversation with Chip Andrews. The latest update is ssnetlib.dll from where this information is fetched is not delivering this information. So may be may need to run @@Version to get all these details and add to the table. Someone else can take up this enhancement?
2) For SQL 2000 and below the true version may still have a mismatch with the SQL Server Version. So please double check once again in case you get any mismatch.
Conclusion:
This helped me lot since our Excel sheet has little mismatches and we cannot connect to each server and get these details. We are managing around 200 servers with more than one instance on some servers, so that would take too much time. Also I gave security permissions so that only our team can login to view these reports. So from next time incase management needs the data or for our team use, We can get it within seconds!