
Authentication is the process of verifying that a principal—a user or process that needs access to SQL Server databases—is who or what it claims to be. A principal needs unique identification so that SQL Server can determine which permissions the principal has, if any. Correct authentication is a necessary first step in providing secure access to database objects.
SQL Server supports two paths to authentication: Windows Integrated Authentication and SQL Server authentication. The path you use depends on the network environment, types of applications that will access the database, and the types of users of those applications.
- Windows Authentication: This form of authentication relies on Windows to do the heavy lifting—validating identity when the user logs in to Windows. Permissions to access SQL Server objects are then assigned to Windows logins. This type of authentication is available only when SQL Server runs on a version of Windows that supports Windows NT or Kerberos authentication, which has pretty much been standard since Windows 2000.
- SQL Server Authentication: SQL Server can take care of authentication entirely on its own. In this case, you can create unique user names—called logins in SQL Server—and passwords. A user or application connects to SQL Server and supplies those credentials for access. Permissions are then assigned to that login either directly or through membership in a role.
Configuring authentication in SQL Server isn't a simple either/or choice between these two types. You can configure authentication in either of two ways:
- Mixed Mode Authentication: The server supports both SQL Server and Windows authentication.
- Windows Only Mode: The server supports only Windows authentication.
Microsoft strongly recommends using Windows authentication whenever possible. Windows has robust authentication options, including password policies, but Windows authentication isn't always practical in real applications. SQL Server authentication can hook into some of those Windows authentication features, but it just isn't as secure.
Windows Authentication
If you configure your SQL Server to operate in Windows authentication mode, SQL Server assumes a trust relationship with Windows Server. It assumes that Windows authenticated the user when they logged in to Windows. SQL Server then checks the user account, any Windows groups, and any SQL Server roles the user may be a member of to determine whether that user is allowed to work with various SQL Server objects.
Windows authentication has several advantages over SQL Server authentication, including:
- A single login by the user, so she doesn't have to log into SQL Server separately
- Auditing features
- Simplified login management
- Password policies (on Windows Server 2003 and later)
Another big advantage of Windows authentication is that any changes you make to Windows users and groups are automatically reflected in SQL Server, so you don't have to administer them separately. However, if you make changes to a Windows user while they are connected to SQL Server, those changes won't become effective until the next time the user connects to SQL Server.
Configuring SQL Server Security Settings
When you install SQL Server, you can select the authentication mode that the server instance will allow. Later you can change the setting in the Server Properties dialog box available in SQL Server Management Studio. These settings apply to all databases and other objects in the SQL Server instance. So if you need to use SQL Server authentication for any database, you have to set mixed mode for the server.
Figure 2.1 shows the Server Properties dialog box in Management Studio with the Security page selected. To open this dialog box, right-click the server instance name in the Object Explorer, and select Properties from the pop-up menu, and go to the Security page. You change the authentication mode simply by clicking the appropriate radio button and clicking OK to commit the change.
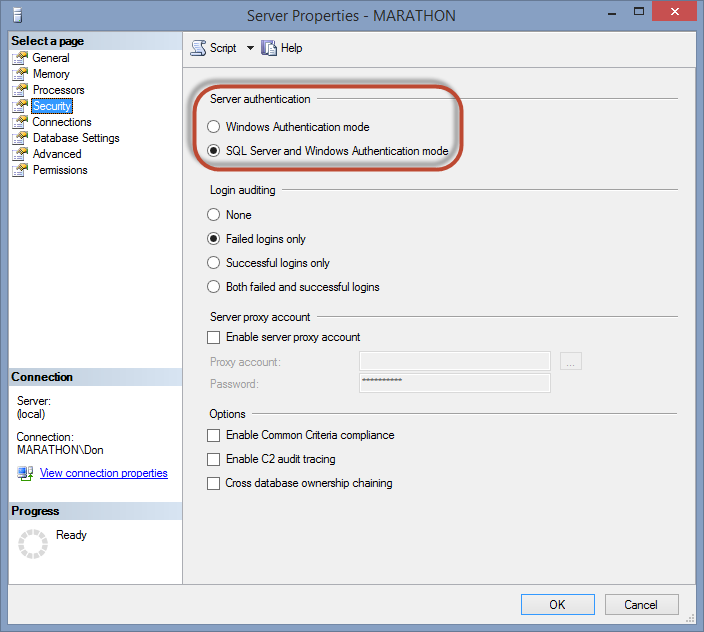
Figure 2.1. Configuring the authentication mode for the SQL Server instance.
Adding a Windows Login
To use Windows authentication, your users will need a valid Windows login account before they can access SQL Server. You can then grant permissions to a Windows group to connect to SQL Server, or you can grant permissions to individual Windows users if you don't want to grant collective permissions.
One of the nice things about using Management Studio to manage security is that you can set up logins and provide database access at the same time. To enable a Windows login to access SQL Server and the AdventureWorks2012 database, use the following steps, which assume that the local machine already has a JoeStairway login defined.
- Open SQL Server Management Studio and make sure that the Object Explorer window is visible and that you are connected to a SQL Server instance.
- Expand the tree view of the server's objects, then expand the Security section. You'll see several child nodes, as shown in Figure 2.2.
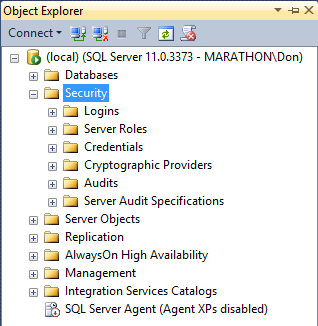
Figure 2.2. The security section of a server's Object Explorer, where you can define logins.
- Right-click the Logins node and select New Login from the pop-up menu to open the Login – New dialog box.
- Make sure that the Windows authentication radio button is selected.
- You can select the Windows login in either of two ways. The first way is to directly type in the domain or machine name, then a backslash and the Windows login name for the user.The second, and generally easier, way is to click the Search button to open the Select User or Group dialog box. Type the user name and click the Check Names button to find the exact name. If the user is found, the full name will appear in the box, as shown in Figure 2.3. Click OK to select that user.

Figure 2.3. Finding a Windows login to add to SQL Server.
- Back in the Login – New dialog box, set the AdventureWorks2012 database as the login's Default Database. This is the database that is used when the user connects to the server and doesn't specify a database. It doesn't limit the user to accessing only that database.Figure 2.4 shows the resulting login for the Windows JoeStairway user on a machine named Marathon, with a default database set to the sample AdventureWorks2012 database.

Figure 2.4. The Login – New dialog box enables a Windows login to access a SQL Server instance.
TIP:
Never leave the default database set to the master database. I speak from painful experience: It is far too easy to connect to a server and forget to change the database. If you then run a script that creates hundreds of database objects in the master database, you'll have a very tedious job deleting those objects manually to clean up the master database.
- Next, give the user access to a database. Select the User Mapping page from the list on the left side of the dialog box. Grant the user access to the AdventureWorks2012 database by checking the box next to the database name. SQL Server automatically maps the user to a user with the same name in the database, as you can see in the third column in the table, although you can change the user name if you want. Assign Sales as the user's default schema in the database, either by typing it in the Default Schema column or clicking the ellipsis (…) button to select it from a list. The dialog box should look like Figure 2.5.
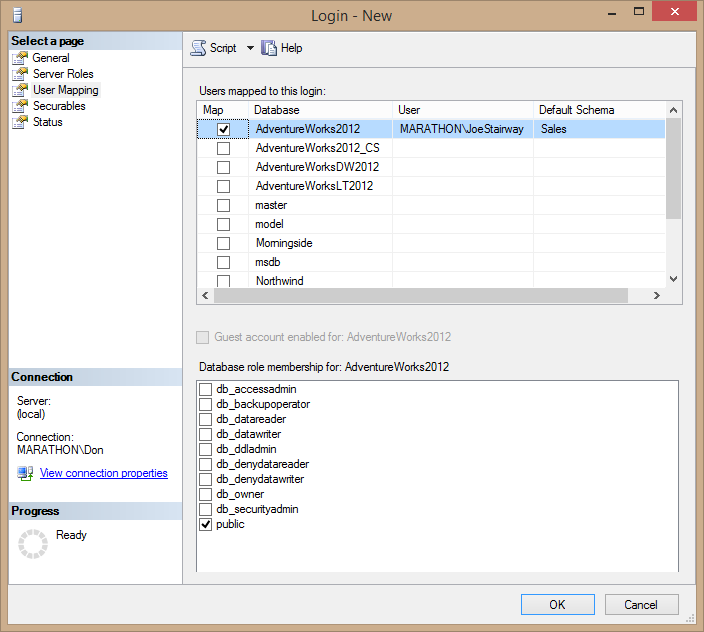
Figure 2.5. Granting a Windows login access to the AdventureWorks2012 database.
Tip:
There is a difference between setting a default database for a login and granting access to the database. A default database simply means that SQL Server attempts to change the context to that database when the user logs in without specifying a database. But this doesn't grant any kind of permissions to do anything in the database, or even allow access to the database. This means that it is possible to assign a default database that the user can't access at all. For the user to do anything useful once a database is accessed, you'll need to explicitly grant the user permissions.
- By default, new Windows logins have access to the server. But if you want to explicitly deny a login access to the server, select Status from the list of pages on the left side of the Login – New dialog box and select the Deny radio button. You can also temporarily disable the login by selecting the Disabled button. Figure 2.6 shows these options.
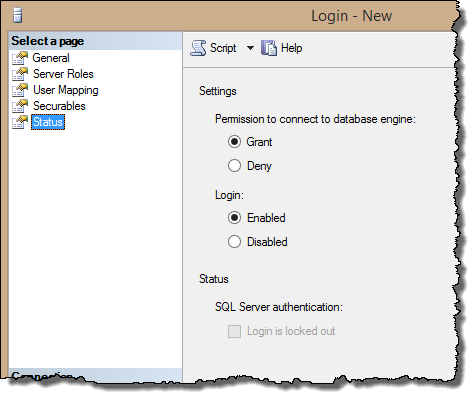
Figure 2.6. Options to grant or deny access to the server and to temporarily disable a login account.
- Click OK to create the user.
You can also add a Windows group to SQL Server in the same way. In that case, any member of the group will have access to the database server, with whatever access you give the group to objects in a database.
SQL Server Authentication
When you use SQL Server logins for authentication, client applications have to provide a valid user name and password in order to connect to a database. These SQL Server logins are saved in SQL Server, without reference to Windows. When logging in, if no account matches the user name and password, SQL Server raises an error and the user cannot access SQL Server.
Even though Windows authentication is more secure, you may elect to use SQL Server logins instead in some situations. SQL Server authentication is easier to administer for simple applications that don't have extensive security needs, and it allows you to avoid getting tangled up with Windows security. And if the client is running on older versions of Windows (basically, anything older than Windows 2000) or a non-Windows operating system, you'll have to use SQL Server logins.
To create a SQL Server login, use the same Login – New dialog box as for Windows logins. But instead of selecting a Windows login, type a unique login name without a domain or machine name, and supply a password. For example, Figure 2.7 shows how to create a new SQL Server login Casper and make AdventureWorks2012 his default database.
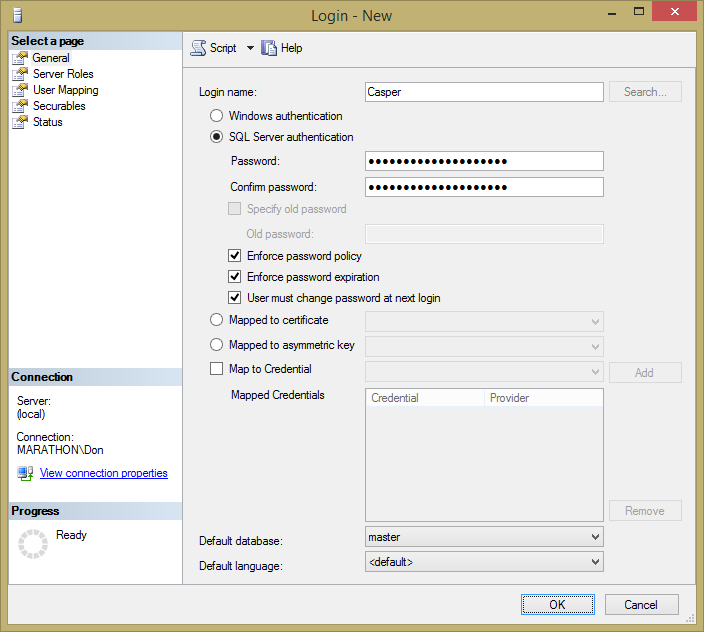
Figure 2.7. Creating a SQL Server login.
All of the other options for user mapping and status are the same SQL Server logins as they are for Windows logins.
SQL Server Logins via Transact-SQL
You can also perform the same actions with Transact-SQL code. The CREATE LOGIN code in Listing 2.1 creates a SQL Server login Topaz with a fairly strong password:
CREATE LOGIN Topaz WITH PASSWORD = 'yBqyZIPT8}b]b[{5al0v';
GO
Listing 2.1. Code for creating a new SQL Server login with T-SQL.
Then, to grant Topaz access to the AdventureWorks2012 database, use the CREATE USER statement and assign a default schema, as shown in Listing 2.2.
USE AdventureWorks2012;
GO
CREATE USER Topaz FOR LOGIN Topaz
    WITH DEFAULT_SCHEMA = HumanResources;
GO
Listing 2.2. Code to create a database users associated with a SQL Server login.
Tip:
As with the Level 1 Stairway, you'll probably need to make some changes to the code samples if you want to run them in your local instance of SQL Server. The code in Listing 2.2 assumes that you have the AdventureWorks2012 database installed. Later code samples assume that you are running the code on a machine named Marathon and have a JoeStairway user in Windows. Feel free either to name your machine Marathon or create a user with that name, or change the code as appropriate.
Like Windows logins, you can map the server login Topaz to some other name in a database. The code in Listing 2.3 maps Topaz to the TopazD user in the AdventureWorks2012 database:
DROP USER Topaz;
GO
CREATE USER TopazD FOR LOGIN Topaz WITH DEFAULT_SCHEMA = HumanResources;
GO
Listing 2.3. Code to drop an existing user then add a database user with a name different from login name.
Beware of the sa Login
If you configure your SQL Server to support SQL Server logins, there is one built-in SQL Server login that you need to watch out for—the sa login—which you may have noticed hanging around in the Logins node in Object Explorer. The sa, or system administrator, login is included mainly for backward compatibility with older versions of SQL Server. The sa login is mapped to the sysadmin fixed server role, and anyone who logs in to SQL Server as sa is a full system administrator, with irrevocable rights over the entire SQL Server instance and all the databases in it. This is a powerful login, indeed.
You can't modify or delete the sa login. If you select Mixed Mode authentication when you install SQL Server, you're prompted for a password for the sa user. Without a password, anyone can log in as sa with no password, and play “let's administer the server.” Needless to say, this is the last thing you want your users doing. Log in using the sa login only as a backdoor if other system administrators are unavailable or have forgotten their Windows passwords. If that happens, you probably need new admins!
Never, EVER, use the sa login for access to a database in an application. Doing so could give a hacker admin-level control over your database server if the hacker is able to get control of the application. In the distant past, this has been an easy way to attack servers and is a horrible practice. Instead, either set up a custom Windows or SQL Server login for the application to use, and give that login the absolute minimum permissions necessary to run the application (which implements the principle of least privilege).
Tip:
In fact, you should consider disabling the sa login entirely, using the Status page of the Login Properties dialog box that you saw earlier. That way an attacker can't use this all-powerful login to gain control of your server instance, whether you have a strong sa password or not.
Password Policy and Enforcement
In versions of SQL Server before 2005, there was no easy way for a system administrator to enforce password policies that could help make a system more secure. For example, SQL Server had no way to force users to create strong passwords of a minimum length and a mix of alphanumeric and other characters. If someone wanted to create a login with a single letter for a password, you couldn't configure SQL Server to prevent it. Likewise, there was no way to cause passwords to expire on a regular basis, such as every three months. Some people rightly saw this as a major reason not to use SQL Server logins.
More recent versions of SQL Server can hook into the password policies of Windows Server 2003, Windows Vista, or later versions. The passwords are still stored in SQL Server, but SQL Server makes a call into the NetValidatePasswordPolicy() Windows API method, which was first introduced in Windows Server 2003. This API function applies the Windows password policy to SQL Server logins and returns a value that indicates whether the password is valid. SQL Server calls this function when a user creates, sets, or resets a password.
You can define the Windows password policies via the Local Security Settings applet among the Windows Control Panel's Administrative Tools. The Password Policy section is shown in Figure 2.8 with the default settings. The applet has a separate Account Lockout Policy section, shown in Figure 2.9, which goes into effect when a user makes too many unsuccessful login attempts. By default, the lockout policy is disabled in a fresh Windows install.
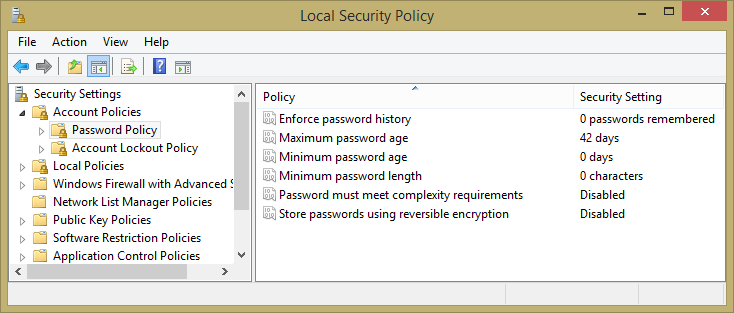
Figure 2.8. The Windows Local Security Policy applet, showing the default password policies.

Figure 2.9. The Windows Local Security Policy applet, showing the default account lockout policies.
Table 2.1 lists the password policies along with the default values and some notes about how they work.
| Category | Policy Name | Default | Notes |
| Password Policy | Enforce password history | 0 passwords remembered | Prevents users from reusing old passwords, such as alternating between two passwords. |
| Minimum password length | 0 characters | Use this to require longer passwords to make them harder to break. | |
| Password must meet complexity requirements | Disabled | Minimum mix of alphanumeric and other characters, and does not contain the user name. | |
| Password Expiration | Maximum password age | 42 days | Number of days before a user is prompted to change their password. |
| Minimum password age | 0 Days | Number of days before a user is allowed to change a password. | |
| Account Lockout Policy | Account lockout duration | Not applicable | Time in minutes that the account is locked out if the lockout threshold is enabled. |
| Account lockout threshold | 0 invalid login attempts | Maximum number of unsuccessful login attempts before the account is locked out. | |
| Reset account lockout counter after | Not applicable | Time in minutes after which the counter of unsuccessful attempts is reset; enabled when the lockout threshold is enabled. |
Table 2.1. Windows password policy settings.
You can enable or disable password policy enforcement when you create a login. The Login – New dialog box has a section under the login name that is enabled when you create a SQL Server login, shown in Figure 2-10.
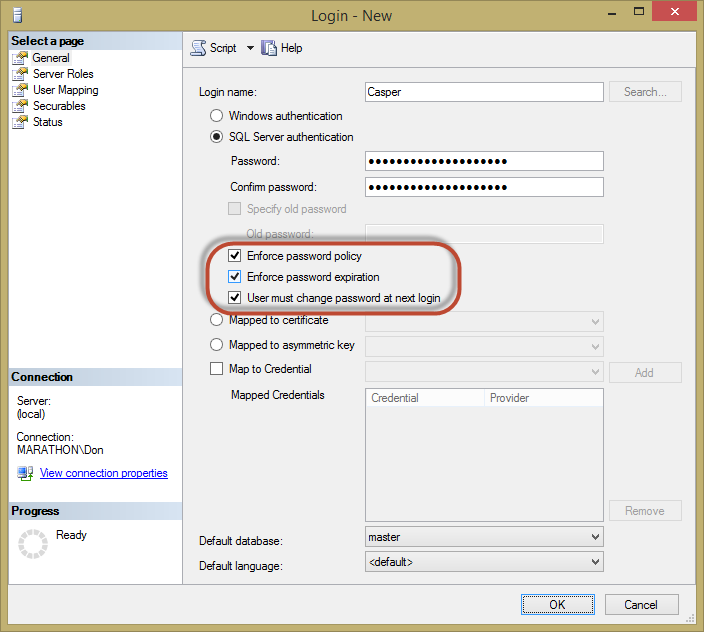
Figure 2-10. Enforcing password policies for a new login.
Password policies apply when you use Transact-SQL to create logins as well. For example, if you are running SQL Server on Windows 2003 Server or later and have password policies enabled, the code in Listing 2.4 will fail.
USE master;
GO
CREATE LOGIN SIMPLEPWD WITH PASSWORD = 'SIMPLEPWD';
GO
Listing 2.4. Attempting to create a login with a password that violates password policy.
The reason this code fails is that the password can't be the same as the user name.
You can control the policies when you create or alter logins. The code in Listing 2.5 turns off the options to check expiration and policy.
ALTER LOGIN Topaz WITH PASSWORD = 'yBqyZIPT8}b]b[{5al0v',
    CHECK_EXPIRATION = OFF, CHECK_POLICY = OFF;
Listing 2.5. Code that changes a login to disable password policy for this login only.
The CHECK_EXPIRATION option controls whether SQL Server checks the age of the password against policy and CHECK_POLICY applies to the other policies. A MUST_CHANGE option is available that forces the user to change the password at the next login.
If a user makes too many unsuccessful attempts to log in, exceeding the number set in the account lockout policy, an administrator can reset the account using the UNLOCK option, as demonstrated in Listing 2.6.
ALTER LOGIN Topaz WITH PASSWORD = 'yBqyZIPT8}b]b[{5al0v' UNLOCKListing 2.6. Code to unlock a login that was locked because of too many failed login attempts.
You can enable the Enforce Password Policy when running SQL Server on versions of Windows before Windows Server 2003. But SQL Server uses default settings of a minimum length of six characters, checks that the password doesn't match all or any part of the login name, and is a mix of uppercase letters, lowercase letters, numbers, and other characters. You cannot change these defaults. But hopefully you aren't running SQL Server on such an old version of Windows, if only because of the vast security improvements since then!
Summary
In this level of the Stairway to SQL Server Security, you've learned about a number of the authentication options available in SQL Server. Windows Integrated authentication is the most secure but is not always feasible, and Microsoft has made SQL Server authentication better and more secure over the years. But if you used mixed mode authentication, don't forget to give the sa login a very strong password or, even better, disable it! Like most security objects, you can create and change them using either the nice GUI interface in Management Studio or T-SQL code. And if you're running SQL Server on a modern version of Windows, you can hook into the password policies of the local security policy.