Welcome to part 3 of the "Creating a 2 Node SQL Server 2008 Virtual Cluster" guide. In this part we will create the base Windows cluster and install the SQL Server components into a clustered configuration.
You can read the first two parts from the links below:
- Creating a 2 Node SQL Server 2008 Virtual Cluster Part 1
- Creating a 2 Node SQL Server 2008 Virtual Cluster Part 2
Now that all previous steps have been carried out, you should have 2 operational nodes joined to your domain with functional storage attached. With all this complete, the Windows 2008 cluster may now be verified\created, but first we need to enable the required Roles and Features in Windows 2008 Roles and Features Manager. You will find this in Server Manager as shown below.

Click "Roles" then "Add Roles". Step through the wizard and select the role "Application Server", a pop up dialog will indicate that required components need to be installed (such as .NET 3.5 framework), click "Add Required Features". Continue through the wizard until you come to the "Select Role Services" screen. On this dialog, select the checkboxes for incoming and outgoing remote transactions as shown below.

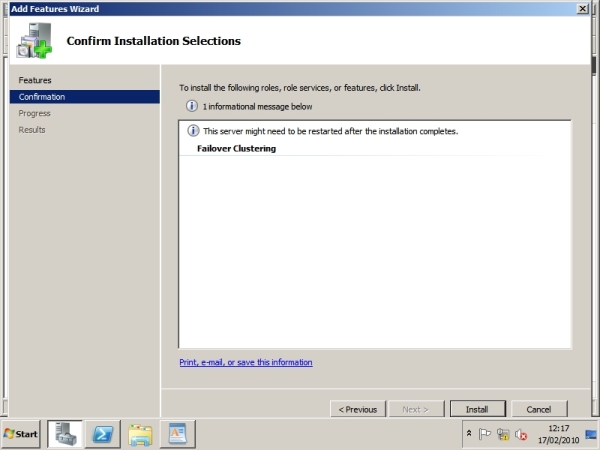
Continue through the wizard and complete the installation. Next we need to add the Failover Cluster features, to add further features click "Add features" in the Server Manager console. Step through the wizard and select the Failover Clustering checkbox as shown below and click "Next".
Note: 3.51 Framework is already installed and is also required for the SQL Server 2008 installation

Click "Install" to proceed.

Review any errors or warnings and click "Close" once the installation finishes.

With the Failover Cluster feature installed, Open Failover Cluster manager from the Administrative Tools menu. Once you have the console open, select the option to create a cluster.

Review the "Before you begin" screen and click "Next". Select the server(s) to include in the cluster as shown below and click "Next". I prefer to create the cluster on the first node and then launch the Add Node wizard to bring the second node online. You may of course select both nodes into the dialog below if you wish.

Review the validation warning. Select the radio button shown below and click "Next" to start the cluster validation wizard. This is required to be eligible for Microsoft support if it is ever needed.

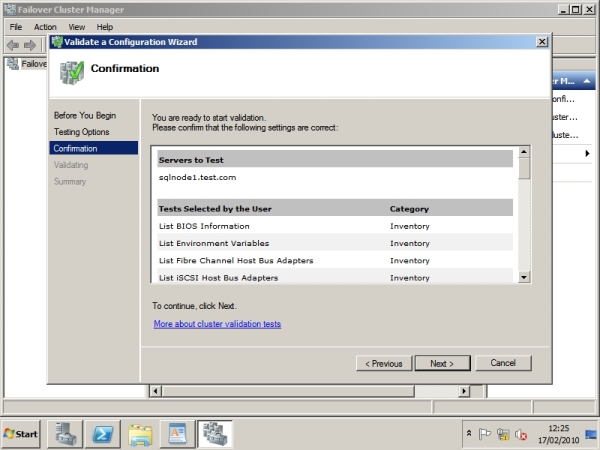
Review the "Before you begin" screen and click "Next". On the following screen, select the option to "Run all tests" and click "Next". This will thoroughly test all storage, networks, operating system, etc.

Click "Next" to start validation

Once validation has completed you may review the report. When you have finished click "Finish".

If you have any failures you must re mediate these before you may continue.
The cluster installation will now continue if the tests were successful. Supply a unique cluster virtual network name and virtual IP address and then click "Next".

Click "Next" to confirm the details.

The cluster configuration starts.

Once the wizard completes you may review the report and finally click "Finish".
Note the Quorum type used by Windows 2008 MSCS. We will change this later for our 2 node cluster.

If you elected only to install the first node into the cluster during the steps above you must now launch the Add Node wizard and select the remaining node. This action is wizard driven and straight forward and so will not be shown here for brevity.
With the cluster created, change the Failover Cluster Manager network names to match their intended use. Check the properties of each and set the network usage. The Public should allow cluster and public communications. The Private (if you have one) should allow cluster communication only and the iSCSI should allow no cluster or public communications.

We have no Storage available, so add the disks now by clicking "Add a disk".

Our disks appear in the selection screen, ensure they are all checked and click "OK".

Now that the disks are added to the cluster storage we can start to re configure the Quorum settings to use a disk instead of a majority node set share. Select\highlight the cluster in Failover Cluster Manager then select "Action" > "More Actions" > "Configure Cluster Quorum Settings".

Once the wizard starts review the "Before You Begin" screen and click "Next" to continue.
On the following screen select the option "No majority: disk only" below for our virtual 2 node cluster and click "Next".
For more information on majority node sets check the online Technet documentation. Although not recommended, this option will work best for our VMs. You may always change this later.

Select the storage resource to use for the Quorum drive and click "Next".

Review the confirmation screen and click "Next".

Cluster reconfiguration progress!

Finally click "Finish" to complete the re configuration.

Disk 1 (Q drive) now set as the Quorum witness resource. To reconfigure the quorum, you simply need to revisit the process above and select the appropriate option, once you understand Majority Node Set quorums.

Create the Clustered MSDTC Resource
Next we need to create a cluster resource and group for the Distributed Transaction Coordinator service. This action is wizard driven in Windows 2008 Failover Clustering. In Failover Cluster Manager right click 'Services and applications' .

Review the "Before you begin" screen and click "Next". On the next screen select the "Distributed Transaction Coordinator" and click "Next".

Supply a unique virtual network name and virtual IP address and click "Next".

Select the storage drive to use!

Click "Next" to create the clustered service.

Click "Finish" to complete the wizard

The DTC clustered service is now configured and online.

You should have already created the user account(s) for the SQL Server services and also the Windows groups for the clustered services (if you are not using SID based security). With that done it's now time to start the installation.
Note: The installation process between SQL Server 2005 and SQL Server 2008 has changed extensively.
Due to the issues with the RTM version of the SQL Server 2008 installation media (does not affect 2008 R2) it is preferable to 'Slipstream' the Service Pack media to create a trouble free installation. You may also slipstream a cumulative update (which we will do here) alongside the SP using the /CUSource parameter. Retrieve and extract the appropriate SP and \or CU update and supply the /CUSource parameter alongside the /PCUSource parameter when invoking setup from the command prompt.
See my SSC article Slipstreaming SP\CU During Setup for more details.
I am using SQL Server 2008 SP1 and CU5 for SP1 during this exercise. Firstly extract the SP executable to a temporary folder using the following syntax at the command prompt.
C:\en_sql_server_2008_sp1_x64.exe /x:C:\SP1
Now extract the CU executable using the following
C:\SQLServer2008-KB975977-x64.exe /x:C:\CU5
Launch the latest version of the support files installer, which in this case is in folder;
C:\CU5\x64\setup\1033\sqlsupport.msi
After the support files have been installed, launch the SQL Server 2008 setup from the command prompt as shown in the screenshot below. Once executed, this window must remain open but minimized, until all installations have been fully completed;

At the SQL Server 2008 splash screen, select "Installation" from the left menu, then select "New SQL Server failover cluster installation". This option is to be selected for each new clustered instance you create.

The installation will start and the following screen will shortly appear, click "OK" when prompted.

Click "Install" to install setup support files.

After the support rules have been checked, click "Next" to continue

Enter your license key or select an eval edition (must be Standard or Enterprise) to install and click "Next". On the next screen select the features you wish to install and supply the path for the shared files.

Supply a unique virtual network name and an instance name (notice the currently installed and active SQL Server instance in the lower pane of the dialog),

Review the space requirements and click "Next". On the following screen either select the default name offered for the SQL Server cluster resource group or select a free group that already exists (displays a green tick).

Select the disk resources and click "Next",

Supply an IP address (you may use DHCP if you wish) and click "Next",

Supply the security group resources for the clustered SQL Server services or use the new Service SID security (recommended) and click "Next",

Supply your service account details and passwords and click the "Collation" tab,

Select the collation and click "Next",

Provision administrator accounts and any data directories as shown below, then click "Next".
You must elect Windows accounts or groups to be provisioned as Sysadmins as the Builtin\Administrators group no longer has unrestricted access to SQL Server.


Review the cluster installation rules and click "Next",

Click "Install" to create the clustered instance of SQL Server 2008. The arrows below indicate that this installation is slipstreaming Service Pack 1 and CU5 for SP1.

Once installation finishes click "Next"

When the installation completes click "Close" to finish and you will be returned to the SQL Server 2008 splash screen. If you have finished deploying new instances of SQL Server, close the splash screen and the active setup in the command window will complete, you may now close the command window.

=========================================================================
========================================================================
Add Cluster Node
Before launching the installer you will need to perform exactly the same steps as you carried out for the installation of the first node (slipstream initiation). The setup will slipstream the SP and CU to ensure a smooth installation.
To add a node to an existing instance, from the Installation Center, select "Add node to a SQL Server failover cluster". The Add cluster node wizard is exactly the same as the initial install up to the point where you specify license key details. From this point on the installation continues as shown below.
Confirm the instance you wish to join and click "Next",

Supply any passwords and click "Next" to continue,

Review the install rules and click "Next",

To add the cluster node click "Install". The arrows indicate that this installation is slipstreaming the service pack.

Setup progress completes, click "Next" to finish setup.

Click "Close" to finish.

If you have finished adding cluster nodes or deploying new instances Of SQL Server exit the Installation Center screen and the command window completes. The node has now been added to the failover cluster.
Multiple Clustered Instances
To install further new clustered instances of SQL Server make sure you have extra storage provisioned and attached to both nodes. You will also need extra unique virtual network names and virtual IP addresses. The installation will automatically create a new cluster application in Failover Cluster Manager.
The environment deployed here should be perfect for an educational or test platform. Skills acquired here will go on to aid you in your Production systems and give you more confidence to fully support these types of SQL Server installation. I hope you find this useful and would appreciate your feedback.
FreeNAS
For those wishing to know how to create a virtual FreeNAS RAID10 array, this will be covered in a separate doc which is available upon request.


