

For sometime now, it seems the requirements for the modern DBA have been changing. Prospective employers not only require the DBA to be an expert in their field (not unreasonable) but also to possess extensive knowledge of the Windows Sever platform and even to the extent of infrastructure technologies such as clustering, DNS, DHCP and Active Directory. Thinking about it more carefully, it seems this is not unreasonable. If you are going to have your DBA administer the SQL Server failover cluster, they should at least understand clustering, DNS and more importantly Active Directory as Microsoft Cluster Service relies upon these technologies.
Storage technologies also play a large part of the SQL Server systems, clustered or not. Most companies would have the luxury of a storage administrator but what about the smaller companies that cannot extend to these lengths, they need a hybrid personality who is an expert in their field but is flexible and technically strong enough to hold their own in the infrastructure arena.
Hypervisors now play an even bigger part too, with many companies seeking to virtualise whole server estates in some cases. This article seeks to address all of these technologies mentioned above and give you, the DBA, unrestricted access to your own virtual infrastructure for testing and educational purposes. Once you are confident with these technologies you may then be able to "step up to the plate" if required!
The 2 parts of this guide will cover:
- Installation and base configuration of the VMWare Server 2.0.x software.
- Creating and configuring a virtual NAS box
- Creating LUNs on the NAS box
- Creating the Windows Server VMs required for clustering
- Presenting the LUNs to the Windows servers
- Forming the base Windows cluster
- Clustering the MSDTC Resource
- Installing a clustered SQL Server Instance
This article covers the basic VMWare and NAS setup. The rest is covered in Part 2.
To support the Windows 2008 cluster we need to re create appropriate storage mediums in the virtual environment. Windows 2008 storage requirements have become a lot more stringent, Windows requires either FC, iSCSI or SAS media for shared storage. The FreeNAS software provides an excellent iSCSI platform for our virtual scenario.
You will need to obtain the VMWare server 2.0 installer and license key and also the Freenas ISO image. Both are freely available at the following links:
- http://freenas.org/downloads
- http://downloads.vmware.com/d/info/datacenter_downloads/vmware_server/2_0
Before we get started, let's a have a quick cluster overview
Microsoft Cluster Service involves 2 or more computers (they don't have to be physical you can use virtual machines too) configured into a cluster relationship, however they do all have to use the same edition of the Windows OS (i.e. Enterprise or Datacentre). This technology requires a central, shared storage (it cannot exist on the machine itself, with the exception of Geo clusters which are beyond the scope of this guide). Clusters use Virtual Server Names and Virtual IP Addresses to create a reference for the network connection to the clustered SQL Server instance.
For example, SQL Node 1 has a computername of SQL-NODE-1 and IP Address of 10.20.0.120. SQL Node 2 has a computername of SQL-NODE-2 and IP Address of 10.20.0.121. The installed SQL Server instance, 'INST1' has a virtual server name (basically a unique computername) of SQL-CLUS01 and IP Address of 10.20.0.126. All network calls to the SQL Server instance 1 are made through the virtual server name and IP address, not the node's actual name or IP Address. During fail-over this virtual name is de registered and re registered in DNS and along with the IP address, passed to the partner node like a ticket, re-directing network calls to the new node.
For the purposes of this guide the following apply
| Fail-Over | A Microsoft Cluster implementation method |
|---|---|
| SSMS | SQL Server Management Studio |
| T-SQL | Transact_SQL (the native SQL Server command language) |
| MSCS | Microsoft Cluster Services. The underlying technology for SQL Server Fail-Over clustering |
| NIC | Network interface card |
| Virtual IP Address | A unique computer name in the domain. During fail-over this computername is passed from one node to another |
| Virtual Server Name | A unique IP Address in the network. During fail-over this IP Address is passed from one node to another |
| NOS | Network Operating System |
| Node | A host which participates in a cluster |
| Quorum | The centralized repository used by MSCS |
Without further ado let's get started by installing and configuring the VMWare Server 2.0.x software.
Note: For this to be workable you must have sensible hardware available. You will need a multi socket, multi core machine and plenty of RAM and disk space.
Install and Configure VMWare Server
Register on the VMWare download site for VMWare Server 2.0 and receive your free license key and software download.
Launch the VMWare installer and follow the install wizard, for the most part just accept the defaults. When prompted supply your license key provided to you during registration. Administrators automatically have access to the VMWare Server Console, so ensure your domain or local account is in the local administrators group on the host server. Permissions can be reduced but that is outside of the scope of this document, separate guidance can be provided if required. Double click the "VMWare Server Home Page" icon, login to the VMWare Server console supplying your domain\local account and password and you will see the following

The first thing we need to do is to configure the virtual network stacks, Open the VMWare "Manage Virtual Networks" option from the Start menu and go straight to the "Host virtual adapters" tab as shown below. Add a new virtual adapter for VMnet2 and VMnet3 then click "Apply".

Now go to the DHCP tab as shown below and remove any DHCP assignments (click each item and remove) then click "Apply". We will track and assign our IP Addresses manually

Go to the "Host virtual network mapping" option as shown below and change the subnets to be used for VMnet 1, 2 & 3. Do this by clicking the arrows (indicated) and selecting "Subnet" from the pop-up menu

For VMnet1 set the IP address to 172.168.10.0 and click "OK"

For VMnet2 set the IP address to 10.10.10.0 and click "OK"

For VMnet3 set the IP address range to 192.168.93.0 and click "OK"

Click "OK" to exit the virtual network editor. It's a good idea to open your host machine network connections and rename the virtual LAN adapters to something a little more meaningful, as I have done below:

Go back into the VMWare server console, Click the "Refresh networks list" option to refresh the virtual networks. With the VMware Server console installed and the virtual networks created, it's now time to create a datastore to hold all the ISO images we wish to install from. Under "Commands" on the right pane click "Add datastore":

At the dialog box supply a datastore name (I have used ISOs) and a local path (I have used "C:\ISOs") then click "OK":

Don't forget to copy all your install ISOs into the folder you have specified in the "Add Datastore" dialog above, you'll need these to install the VM OS, etc.
You may also want to add a further datastore for extra virtual machine files, this is optional.
Create and Configure the NAS VM
With datastores configured, the first VM we need to create is the NAS server. Create a new VM with the following properties:

Add a 2GB virtual hard disk and a network adapter. Bind the virtual NIC to whichever virtual switch you want to use for the iSCSI network (VMNET2 in my case). Add a virtual cd drive and select the "use iso image" option and click next. Browse to the Freenas ISO image and click "Next", then click finish to complete adding the hardware.
Power on the VM and boot the ISO image accepting all defaults. Once the NOS has booted (shown below), select option 9 from the menu.

You want to install the Full OS using the 3rd option. Select the third option and answer "OK" to continue

Answer "OK" to continue

Select the CD drive and click "OK"

Select "OK" for the virtual disk install target,

Supply the OS partition size of 512MB,

Select "yes" to add a swap partition,

Supply the swap partition size of 1024MB,

Installation completed, press "Enter" to continue.

Now select "Exit" to finish. At this point shutdown and restart the NAS VM.

Once the VM has rebooted, we need to set the LAN IP address. Select option 2 from the menu

The LAN configuration starts as follows. Select whether to use DHCP (no for our scenario)

Enter the new LAN IP address

Supply the Network mask (using CIDR notation),

Select "no" for the IPv6 configuration,

Press "Enter" to continue,

Shutdown the server using option 8 from the menu as we now have to create\attach the virtual hard disk to the NAS VM that will hold our iSCSI LUNs.
In the VMWare server console ensure you highlight the NAS VM in the inventory pane and under the command pane click the "Add hardware" option and add a new disk 20GB in size, pre allocating all disk space (shown below).

Power on the VM and and from the host machine login to the Freenas console using the URL http://xxx.xxx.xxx.xxx (where xxx.xxx.xxx.xxx is the IP address assigned previously). Login to the NAS web management page using the username "admin" and password "freenas" (without quotes).

Go to "Disks" > "Management". Click the + sign as indicated,

Select the disk and use ZFS pre formatted file system, then click "add". After adding the disk you must click the "Apply changes" button.

After adding the disk click "Disks" > "ZFS". Select "Pools" > "Virtual device". Click the + sign

Supply a device name and select the disk then click "Add", you must click the "Apply changes" button afterwards.

Now click "Management" as shown below and then click the + sign

Supply a name and select the virtual device then click "Add", you must click the "Apply changes" button afterwards.

Once this is done you may then go to "Services" > "iSCSI target". The first task is to enable the iSCSI Target by checking the box indicated and then clicking "Save and restart".

Go to the "Initiators" section and click the + sign.

If you want all initiators to connect click "Add" (you could lock down which machines connect by specifying their IDs here), you must click the "Apply changes" button afterwards.

Click "Portal group" and then click the + sign

Specify the portal (accept the default in our case) then click "Add". You must click the "Apply changes" button afterwards.

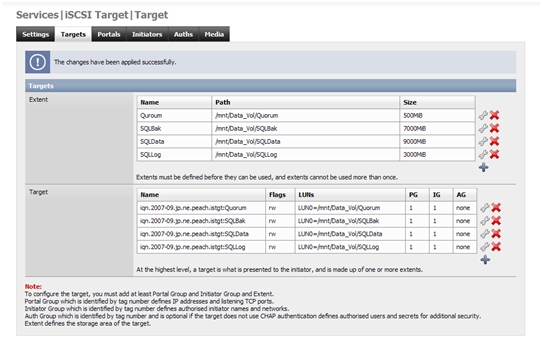
Now click "Targets". You may now set up the LUNs you wish to present to the cluster nodes. Click the + sign to add an extent.

Supply the extent name, type, path and size. Remember to click "Apply changes" button when prompted.

Extents added! Now click the + sign next to targets and configure those.

Configure the following options for each target (Quorum, SQLData, SQLLog, SQLBak).

Targets added! The target name is the label presented to the computer node over the iSCSI network.
All LUNs have now been created and are ready to be presented to the nodes so that's it for part 1. Check part 2 where we will deploy and configure the Windows 2008 server VMs and attach the newly created iSCSI storage to the cluster nodes.
