In this post I will show a procedure to add a new disk or drive to a SQL Server failover cluster. I already have a two node SQL Server 2008 R2 Enterprise Edition cluster installed on Windows 2008 Enterprise Edition. The below procedure is also applicable for a SQL Server cluster installed on Windows 2008 R2.
I have a SQL Server Cluster, with two nodes already set up, and the disks are been presented to each node. This article will show how to add a new disks to the SQL Server cluster. There is no downtime required to perform this activity; there is no service disruption and zero downtime.
How to Add a Drive in Windows Server
Right-click on "My Computer" and click "Manage." Expand computer management (local) and then storage. Left-click on "Disk Management."
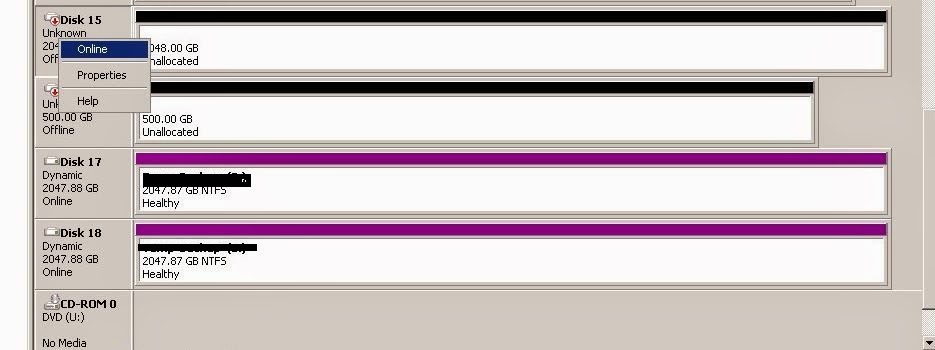
Right-click on "Disk Management" and click "Rescan Disks." The disk management console will look for newly attached disks and display them in the bottom-right pane. You will see your new drive listed as "Unknown" and "Not Initialized."
In the below screenshot, the new disks, 15 and 16, are shown as "Unknown" and "Not Initialized."

Right-click the Disk, (Disk15 and Disk16) which are the disks we wish to add on the bottom-right pane of the disk management console. Now click "Initialize." This writes a signature to the disk drive and changes the status to "Basic" and "Unallocated."
I'm bringing the disks online on Node1 only, as we are going to use these disks for our failover cluster.
In the below screenshot, Disk 15 is initialized and brought online.
Right-click the unallocated space on the disk you wish to add on the bottom-right pane of the disk management console, and click "New Partition."
Click "Next," choose "Primary Partition" and click "Next." In the partition size field, choose all the unallocated space and click "Next." Choose to format the drive as "NTFS," enter a name for the volume (or accept the default), and then click "Next" and "Finish."
In the below screenshot, Disks are assigned with letters O, P, and R.

Click on "Start," "All Programs," "Administrative Tools," "Cluster Administrator" to open the Cluster Administrator. Click "File," "Open Connection," enter a cluster name and click "OK" to connect the cluster.
Right click the storage in the console tree on the left-hand side of the Cluster Administrator tool.
In the below screenshot, select storage, right click, and select "add a disk."

The tool will prompt for all the available disks that can be added to cluster. Select the disk or disks that you want to add and click OK.
In the below screenshot, I have added all disks to the cluster.

Now the disks are added to available storage pool in cluster manager console. We can also see this disks available from my computer.
In the below screenshot, the tool shows disks in the available storage

How to Add a Disk to a SQL Server Cluster Service
We are done with only adding disks in the Windows cluster. We now have to add the disks we will be going to use for the SQL cluster. Right click on the SQL Server Service on the left-hand side of the Cluster Administrator tool. Select "Add storage" and the tool will prompt all the new available disks from storage.
In the below screenshot, click add storage option

Select the disks and click OK.
In the below screenshot, you can see I have selected the disks.

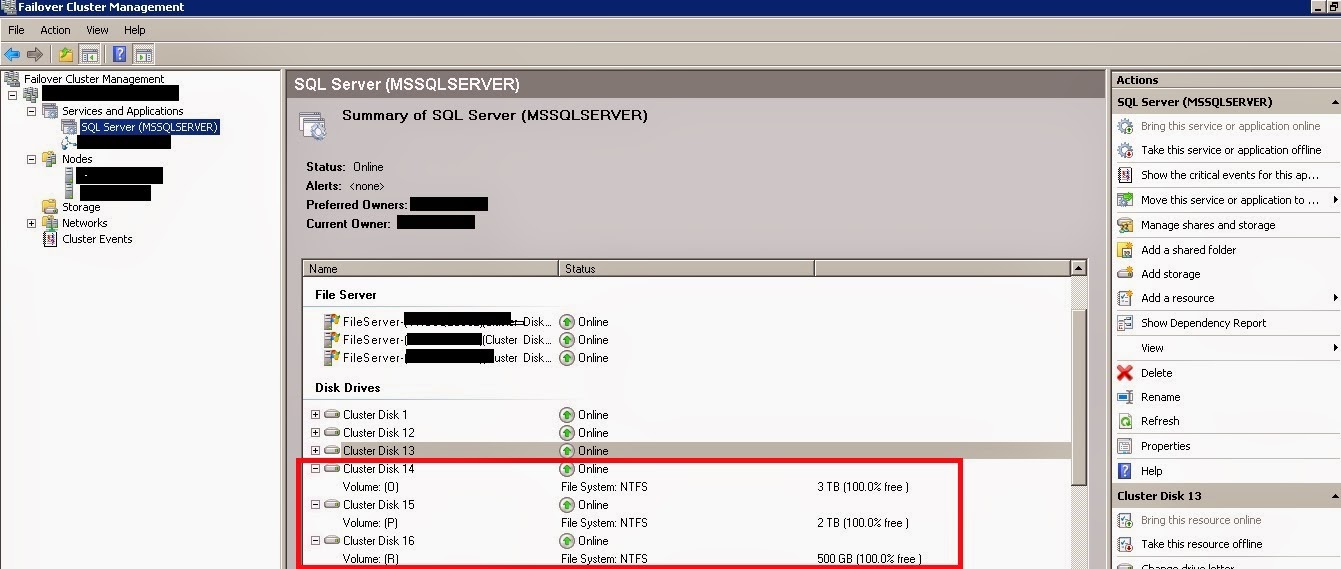
In the below screenshot, the clustered disk 14 and the clustered disks 15 and 16 are available to the SQL Server cluster.
Add Dependencies to a SQL Server Resource
We need to select the SQL Server resource. Open the Properties dialog box, and use the Dependencies tab to add the disk to the set of SQL Server dependencies.
In the below screenshot, I am selecting the SQL Server properties.

In the below screenshot, we have added the resource dependencies for clustered disk 14 and clustered disk 15.

We can check the dependency of SQL Server by selecting the show dependency report.
In the below screenshot, we can see the dependecy report for SQL Server resources.


We can now test by creating the database files on new drive.
In the below screenshot, we are creating the sample databases on the newly added disks.

That's it, and we now have new disks available to a SQL Server cluster.
Regards,
Ganapathi varma
Senior SQL Engineer, MCP
Email: Gana20m@gmail.com