
Welcome to Level 5 of the stairway. In this article we will look deeper at Failover Cluster Instances and their requirements. We’ll also look at how to deploy a Failover Cluster Instance (FCI) of SQL Server. After completing this level the user will have a clearer understanding of Failover Cluster Instances and the dependencies they have on the infrastructure.
Let us start by looking at the core requirements for a SQL Server instance. We’re not distinguishing between clustered and non-clustered instances here. For the core requirements, an FCI is no different to a standalone instance; it requires exactly the same components with the addition of one more item: shared storage. At a very basic level, a SQL Server instance (clustered or non-clustered) requires the following
- An IP address
- A computername
- A TCP port
- A SQL Server Service (and its agent)
- Disk storage (local or shared)
The difference with an FCI is that some of the objects above are classed as "Virtual", specifically the IP address and computername. When referencing the virtual computername for a clustered instance of SQL Server we refer to it as a virtual Networkname. A virtual Networkname still follows the same rules as a computername. A computername under Windows must;
- be a maximum of 15 characters in length
- Not use special characters
- Not consist wholly of numbers
Although a standalone instance uses the IP and name objects directly from the computer on which it is installed, in reality, they’re still the same essential resources.
When referring to our sql server instance we use the Servername label, this also has a built in parameter @@Servername within each SQL server instance. The Servername is an amalgamation between the computername if standalone or Networkname if clustered and the instance name used during installation.
To look at this further let's look at specific details for standalone and clustered instances. We'll also look at the differences in name and IP resource usage via a short example of how the IP Address and computername are abstracted from the node the instance is actually running on when installing a clustered instance of SQL Server.
Refer to diagram 1 below for a pictorial representation.
Standalone Named Instance
Once we have installed our named instance "INST1" to the computer, "WINSQLSA03", and assuming the use of TCP port 58001, the instance Servername will inherit from the Computer object directly. The connection parameters could be used as any one of the following:
- WINSQLSA03\INST1
- WINSQLSA03,58001
- 192.168.0.150\INST1
- 192.168.0.150,58001
As we know, the Servername is an amalgamation of the computername and the instancename, where the instance is a default instance, just the computername is used. For a default instance on computer "MYSQLSERVER", the Servername would be "MYSQLSERVER". For a named instance "INST1" on computer "MYSQLSERVER", the Servername would be "MYSQLSERVER\INST1". For a standalone SQL Server, when installing further instances they will still inherit from the Computer object directly, simple so far, right?
Clustered Named Instance
Now we'll see the difference. Once we have installed our named instance "INST1" to the 2 cluster nodes using the Networkname, "SQLCL01", the instance Servername will be abstracted away from the actual computer nodes. Assuming the use of TCP port 58001 again, the connection parameters now could be any one of the following:
- SQLCL01\INST1
- SQLCL01,58001
- 192.168.0.175\INST1
- 192.168.0.175,58001
Now, bearing in mind that each new clustered instance requires a new Networkname and IP address resource (as well as new shared disks), what would be the connection parameter options for a new named instance "INST2" using TCP port 58002, Networkname "SQLCL02" and IP 192.168.0.176?
If you got the same results as below, give yourself a pat on the back, if you didn't then go back to the start of this stairway and have another read through.
- SQLCL02\INST2
- SQLCL02,58002
- 192.168.0.176\INST2
- 192.168.0.176,58002
Diagram 1

Node: From the diagram above you can clearly see how the clustered instances virtual Networkname and IP address are abstracted away from the individual nodes IP addresses and computernames.
The rules for the instance Servername apply exactly the same to clustered instances as they do standalone instances. The big difference is, the computername or virtual Networkname portion will be unique for each clustered instance and so, for each clustered instance Servername. For example, we have two cluster nodes, BOB and FRED, and we have a Windows cluster called SMITH.
We install 2 clustered named instances, as shown in this table:
Networkname Instancename Servername
VSMITH1 INST1 VSMITH1\INST1
VSMITH2 INST2 VSMITH2\INST2
Both instances do not use the same virtual Networkname. The network names must be unique.
Service Startup Type
Traditionally, after installing your standalone SQL Server instance you may well go and set the startup option for the SQL Server service and the Agent service to "Automatic". That's not the case here with a clustered instance, the service startup type will be set to manual and should be left as such. Why is this?
All control of the services must be handled by the cluster service, the cluster service stops or starts the services on any particular node as required, for example during a manual failover. Setting the services to automatic would simply cause event log errors on a node that doesn't own the appropriate disk resources but attempts to start the SQL Server service.
Service Startup
When a clustered instance of SQL Server starts there are a set of steps that the service performs, the virtual IP address is bound to the Public network NIC on the physical cluster node. The virtual Networkname is dynamically registered and its Service Principal Name is registered in Active Directory.
All of this occurs seamlessly when the SQL Server service runs under the context of th built in account LocalSystem.
Service Startup
When the SQL Server service runs under the context of a low privilege domain account the SPN registration usually fails. This can be negated by granting the user account the following Active Directory permissions
- readServicePrincipalname
- writeServicePrincipalName
If the permissions are continually revoked for the user account, an Active Directory administrator will be required to ensure that the SPN is correctly registered against the user account.
Service Principal Names are used by Active Directory to enable Kerberos secure authentication on the network.
Note: Kerberos is not used by SQL Server authenticated logins within the instance, only Windows logins use this protocol.
Service Shutdown
When the SQL Server service shuts down it performs similar steps. The service will attempt to unregister the Service Principal name, it will also unbind the virtual IP address from the Public network NIC on the currently active node ready to pass to the new owner node.
Pre Stage AD Computer Objects
Firstly, before we start the SQL Server deployments, let's take a minute or two to discuss the creation of Active Directory Computer Name Objects (CNO) and Virtual Computer Objects (VCO).
During this guide you have deployed your own domain controller and 4 Windows server cluster nodes, you have likely run as the domain administrator and you won't have encountered any permission issues. However, in reality, before you the DBA receive your nice new shiny Windows Server Cluster, the core deployments would likely have been carried out by the infrastructure team. All server builds and storage provisioning would have been covered for you as you likely have a low privilege domain user account. When attempting to install the FCI (or indeed, the AlwaysOn listener) as a low privilege user, you will almost certainly encounter an error where the computer object creations fail. Due to changes in the way failover clustering works, it is necessary to pre stage the relevant computer objects if the user carrying out the install has insufficient privileges in the Active Directory domain catalog. For the most part, you only need to complete step 3 of the KB below.
Pre Stage Cluster Computer Objects: http://technet.microsoft.com/en-us/library/dn466519.aspx
If you would like to deploy the Windows Server Failover Cluster (deployed in Part 2) as a low privilege user you would also need to complete the first steps of the link above to Pre stage the Cluster Name Object. This computer account then requires privileges assigned to allow it to automatically create the Virtual Computer Objects in step 3 of the KB. The VCOs are required for the FCI networkname and the AlwaysOn listener networkname.
Deploying A SQL Server Failover Cluster Instance
Now that we have covered the core components, let us walk through a typical installation and review each step of the setup process.
The instance deployment is launched from the SQL Server installation center. Executing SETUP.EXE will open the installation center and on the left hand menu under "Installation", you may deploy either a New Standalone instance (the first option) or a New Failover Clustered Instance (the second option). The third option is used to add a cluster node to an existing Failover Cluster Instance of SQL Server. See below diagram 2.
Diagram 2

Install The Instance
I'll be starting the installation from Node 1. The first task is to ensure that the pre staged cluster application\role and its disks are online on Node 1. If they're not, move the role now (you will have mastered this from Level 4 of the stairway). As we wish to deploy a new clustered instance we need to select the second option from the installation center, select this now to start the installation.
The first few screens of the wizard are fairly simple, the first dialog checks the setup rules. Ensure there are no issues and click "OK" through this dialog. On the next dialog you will be required to provide a licence key or select a free edition to install. Click "Next" through this dialog too after making your selection. Accept the End user Licence Agreement terms and click "Next" to continue.
At the Product Updates dialog, either check or uncheck the option to download SQL Server updates and click "Next". This new feature allows the installer to slipstream any updates it receives from the Microsoft Update site and as you can see an update has been found.
However, for now i'm going to skip this. Click "Next" here to continue, see diagram 3.
Diagram 3

Proceed through the setup support files install by clicking "Install" to continue. At the "Install Failover Cluster Rules" dialog, review and click "Next" to continue, see diagram 4.
Diagram 4

At the "Setup Role" dialog, select your option "SQL Server feature installation", and click "Next" to continue, see diagram 5
Diagram 5

On the "Feature selection" dialog, we select the features we wish to install, and also set the shared feature and instance root installation directories. Click "Next" to continue, see diagram 6.
Diagram 6

Review the feature rules and click "Next" to continue, see diagram 7.
Diagram 7

This is the point during installation where you must supply a unique virtual Networkname. This is the virtual Networkname or Virtual Computer Object we have discussed previously. The virtual Networkname computer object is validated at this point to ensure it's not in use already. Supply an instance name too or select a default instance, and then click "Next" to continue, see diagram 8.
In this case I am installing a named instance. For my network name I'm going to be using SQL2K14CL-01, and for the instance name I'll use AOINST1
Diagram 8

Select the cluster resource group. If you have pre-staged a clustered role and shared disks, use the Drop Down Listbox box to select the role name. See diagram 9.
Diagram 9

On the cluster disk selection, select any disks that are required. See diagram 10.
Note: When using mounted volumes it is usual to only select the root drive for installation. One root drive per installation is permitted, and the same root drive cannot be used for multiple clustered instances. If you have used individual drive letters for these volumes, select any drives that you wish to include.
Diagram 10

On the cluster network configuration screen, specify the network settings to be used. It is usual to see only one or two networks here. All networks that are not configured for Public access in the Windows cluster will be excluded from this section of the installer. I'm going to be using the IP address 192.168.0.177, and that is entered below. Click "Next" to continue. See diagram 11.
Diagram 11

On the "Server Configuration" dialog, supply details of any service accounts and also set the collation. Notice that you do not get the option to set the SQL Server service and SQL Agent service startup types. They must be set to manual as the cluster service is directly responsible for the starting and stopping of the services. See diagram 12.
Diagram 12

On the database engine configuration screen, firstly set the account provisioning and choose between Windows or Mixed authentication. Also select a user or group to provision to the SYSADMIN group. This should be at least yourself or, if you have an AD group for DBAs, a specific AD group. See diagram 13
Diagram 13

On the Data Directories tab, set the locations for the shared instance database files.
Note: When using mounted volumes, ensure you install to a subfolder. This is because NTFS ACLs applied to a mounted volume root are not propagated down to subfolders\files. A subfolder must be used and NTFS ACLs applied directly to it. A example is shown below in diagram 14.
Diagram 14

Enable Filestream if it is required and click "Next" to continue. Also select the error usage and reporting options and click "Next" to continue. Review the detail for the cluster installation rules and click "Next" to continue. See diagram 15
Diagram 15

Once the installation completes click "Close". If the install failed, review the logs, and ascertain the reason for the failure.
This completes the install of the clustered SQL Server instance, all we need to do now is to join Cluster Node2 to the new instance.
Join A Node
To join Node 2 to the new instance, logon to node 2 and launch the SQL Server installer. From the Installation menu in the installation center, select the third option to add a node to a SQL Server failover cluster. The wizard has fewer steps as the instance configuration has already been completed. All that is left is to update the binaries onto the new node and update the cluster configuration. This is all performed by the installer and the cluster service.
You will be required to provide a licence key or specify a free edition to install, click "Next" Accept the licence terms and click "Next" to continue. On the product updates page, check or uncheck the option to check for SQL Server product updates and click "Next". Once the setup support files have been installed you should see the "Add Node" rules dialog. Check the results and click "Next" to continue, see diagram 16.
Note that my installer shows a warning here for the Distributed Transaction Coordinator. In this case it's valid as I do not have a clustered DTC setup within my cluster
Diagram 16

On the "Cluster Node Configuration" dialog, select the instance you wish to join. If you have multiple instances deployed, you may select here which instance to join. Click "Next" to continue. See diagram 17.
Diagram 17

On the cluster network configuration dialog, review the IP address details and click "Next". See diagram 18.
Diagram 18

On the Service Accounts tab, check the account details used during the previous instance installation and confirm the password(s). See diagram 19.
Diagram 19

On the ready to add node dialog, review and click "Install" to continue. See diagram 20.
Diagram 20

Once the installation completes, review the details and click "Close". That completes the add node wizard. At this point the Failover Cluster Instance has been installed to both Node1 and Node2.
Failover the instance to the new node and check that the clustered role starts successfully
Failover Tests
Now let's have a look at the failover of this clustered role to get an idea of what happens during various outage scenarios. We'll test the failover of the instance by:
- disconnecting the public NIC on the active node
- terminate the SQL Server exe process on the active node
- manually failover the clustered role via the Failover Cluster Manager
Disconnect Public NIC on Node2
You should have the instance online on node 2. Disconnecting the Public NIC will failover the instance back to Node1.
When an outage on the NIC that has been identified as the Public client connection interface, the system will automatically move the clustered role to an available partner node, in this case Node1. The network connection configuration may be viewed in the Failover Cluster Manager console and will differ depending upon the Hypervisor product you are using.
With the clustered role owned by Node2, I simply edit the Node2 virtual machine settings and clear the vNIC connected checkbox as shown below. Click "OK" to save the changes. See diagram 21
Diagram 21

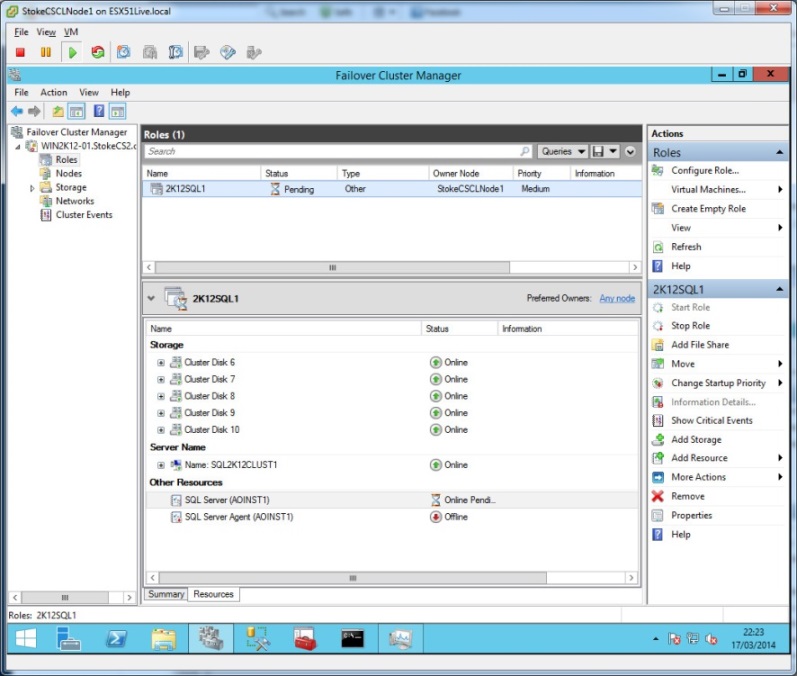
Switching to Node1, I get a quick response. Failover Cluster Manager already shows the group has moved to Node1 and has entered the pending state. Once all resources have moved and been brought online the role will enter the running state. This concludes the hardware failover test.
Diagram 22

Terminate SQLSERVR.EXE on Node1
If the previous failover test was carried out successfully, the role will restart on Node1.
Now we're going to test a software failover, do this on Node1 by opening Task Manager and killing the SQLSERVR.exe process. After this is done, nothing appears to have happened. Ah, here you were, expecting a failover? But why didn't a failover occur?
Let's check the properties for the SQL Server Service resource in Failover Cluster Manager to see why. As you can see by the resource defaults below, the policy response to a resource failure will attempt to restart on the current node first. This is the default for every resource. See diagram 23.
Diagram 23

An unexpected outage of the SQL Server service, for instance terminating the process, will initiate an automated restart attempt based on the resource policy above. See diagram 24. Process terminations typically happen as a result of a bug check crash, but can occur for any number of reasons.
Diagram 24
Manual Role Failover on Node1
A manual failover of the clustered role will initiate a controlled failover to a partner node. During manual failover you may select from "Best possible node" or "Select node". The best option will make a choice for you and will take into account any Preferred owners, the selected option will offer a list of nodes and allow you to choose.
So, the difference between the NIC disconnection and the EXE termination equates to the difference between a hardware failure and a software failure respectively. A hardware failure is usually an instant failover to a partner node. A software failover, assumes the failover was not catastrophic and attempts to restart on the same node. However, a series of software failures in quick succession, or at least within the constraints laid out in the resource failure policy, will result in a failover to a partner node. Careful though as too many successive failures will result in the clustered role going offline permanently.
This concludes the failover tests, have a good look at these and ensure that you fully understand what is happening before proceeding any further.
Once the instance has been installed and you are confident with all of the above, move to Level 6 of the stairway where we deploy an AlwaysOn group and look at failover scenarios and general AlwaysOn group properties.
As always, if you have any questions on the above, post in the topic discussion for this article and I'll help all I can.