How to Dynamically and Iteratively Pull data from a database to Excel
Introduction:
A need was identified to be able to send data from a database to multiple Excel workbooks dynamically depending on the number of different criteria identified by the client. In our case it was to be by a large grouping such as Group1, Group2 etc.
Within the Excel workbooks there were to be individual spreadsheets/tabs for each sub-grouping within the larger Group areas. Within each Group there would be a spreadsheet/tab for sub-group1, the sub-group2 and sub-group3. Each of these spreadsheets would then be populated with data specific to that sub-group from a database.
The requirement was to be able to do all of the above dynamically with as little (or no) manual intervention.
Purpose of the Document:
To document a procedure to create a new Excel output file, populate the file with discrete spreadsheets containing specific data from a database.
This document provides details on the Microsoft Visual Studio SSIS processes involved from variable creation through various packages.
Requirements:
1. Must be able to create the Excel file automatically including the name (dependent on the identified naming convention).
2. Must be able to create each spreadsheet or tab, name it and have top line column headers.
3. Must be able to populate each spreadsheet or tab with discrete data for that spreadsheet or tab. This would be based on a select statement.
4. Must be re-runnable.
Conceptual Approach:
The approach is:
1. Using a ‘Foreach Loop’ iterate through a set of commands to create the Workbook as desired.
2. Create a new Excel Workbook with new filename iteratively dependent on a query from a database table.
3. Within the new Excel Workbook create a spreadsheet or tab for each new dataset. The spreadsheets are determined through a sql select statement.
4. Populate each spreadsheet or tab with data appropriate to the spreadsheet or tab. The data is determined through a select statement from the database.
High Level Steps[a1] :
1. Add Execute SQL Task to the canvas and using the various properties populate the columns (will be variables) with the values to be iterated over
2. Add a ‘Foreach Loop’ container.
3. Define ‘Foreach Loop’ variables (see below)
4. Add an Execute SQL Task within the ‘Foreach Loop’ which will create the new Spreadsheet/tab for each identified value
5. Add a ‘Data Flow Task’ within the ‘Foreach Loop’ which will perform the data pull for a specific Spreadsheet/tab value and push to the Excel Workbook
Visual Studio Canvas:
Here is what the components of the Visual Studio canvas look like:

Visual Studio Canvas Components:
1. Create New file with tabs
Called ‘Create New file with tabs’ which is a user defined definition. This is an Execute SQL Task module where the variables to be used in the Foreach Loop are defined.
The purpose of this component is to define the columns of data to be included in the ‘Foreach Loop’.

The critical properties to set in this example are:
1. Set Result Set to ‘Full result set’
2. Under SQL Statement set Connection Type to ‘OLE DB’
3. Under SQL Statement set Connection to your database (here it is Server.db1) where the data resides
4. Under SQL Statement set SQLSourceType to ‘Direct Input’
5. Under SQL Statement write your first select which will determine the columns of data to be used in the Foreach Loop.

Note that the select statement here selects two columns of data. These two columns are then uploaded into one result set variable called obj_ListofGroups:

You must define the Result Set as it is the container that holds the columns of data to be iterated through in the Foreach loop.
2. Foreach Loop Container 1
Called ‘Foreach Loop Container 1’. This component can also be renamed as desired. This is the component that contains all the tasks to be done iteratively are defined. In our case we have an Execute SQL Task and a Data Flow Task.
The Foreach Loop allows the user to iterate through a set of components, sql etc for a selected set of data. This means the loop will not stop until it has run for all values identified. The values the loop to be run for can be a set of data selected from a table in the database and is identified in the Execute SQL Task that precedes the Foreach Loop.
Double click on the Foreach Loop box to bring up the Foreach Loop Editor.
To define the ADO object source_variable (under the Collection part of the Foreach Loop editor) set the following properties:

All values as noted above should be set similarly with the ADO object source variable being the same as was populated in the Execute SQL component that is outside the Foreach Loop container.
The variables to be used in the Foreach Loop are defined in the Foreach Loop editor:

Note that the two variables defined in the Variable Mappings screen of the Foreach Loop editor were populated in the initial select statement in the Execute SQL before the Foreach Loop.
The value of the ‘Index’ column above is dictated by the order that the variable/column appears in the initial Select statement in the initial Execute SQL component. In this case ‘Subgroups’ appeared before ‘Groups’ in the select statement.
Either column, Groups or Subgroups could be used to determine how many times to iterate through the Foreach Loop.
To create a new file each time with a dynamic naming convention set the Excel Connection Manager (note that you do not use a specific Excel Connection Manager, but rather the generic one) to use a new Property expression:
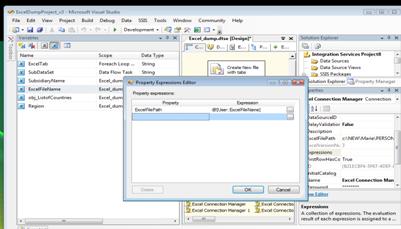
To access the Property Expressions Editor box click on Excel Connection Manager and then the Expressions property to bring up the Editor. Select the shown property from the drop down box and populate the Expression field with the variable which will create the new filename dynamically. (see below for the definition of the ExcelFileName variable)
3. Execute SQL Task Within Foreach Loop
Called ‘Execute SQL Task’. This component creates the required spreadsheets or tabs within the Workbook that was created in the pre-Foreach Loop Execute SQL Task.
The Execute SQL Task within theForeach Loop creates a tab for each value populated into the ‘Subgrouping’ column of the ‘ListofCountries’ container from the initial Execute SQL Task outside the Foreach Loop. Configure the ‘Execute SQL Task Editor’ as follows (bring up the Editor by double clicking on the Execute SQL Task box within the Foreach Loop):

Set the Connection property to: Excel Connection Manager to allow for iteration through a dynamic file creation (as noted earlier in this document). If you set the connection to a specific Excel Connection Manager (ie Excel Connection Manager 1 or 2 etc) then the Excel workbook file must be present and existing on the filesystem.
Set the SQLSourceType to: Variable to allow for the use of a variable to create the tabs iteratively. There appears to be no way to use a Select statement here with an embedded variable. Rather, use a variable that contains the select statement with an embedded variable for the tab or spreadsheet name. (see below for the definition of the ExcelTab variable)
4. Data Flow Task Canvas Components:
Called ‘Data Flow Task’. This component pulls the data from a database source and (in this instance) downloads the data into an Excel Spreadsheet within an Excel Workbook that was defined in the Execute SQL Task.
![]()

1. OLE DB Source Component:
This component defines the database to pull the data for the reports from as well as the exact sql Select statement to be used to pull the columns required by parameter. Double clicking on the OLE DB Source box brings up the OLE DB Source Editor:

Note the connection to the server and specific database (Server.db). In the Data access mode ‘SQL command from variable’ is used as, again, using a Select statement here and trying to embed a variable within the syntax did not prove successful. Rather, using a variable which is the Select statement and is itself an embedded variable allows iteration through the populated ‘SubGroup’ successfully.
2. Excel Destination:
Called ‘Excel Destination”. This component identifies the name for the new Excel spreadsheet/tab as well as the connection manager to be used.
This component defines the connection to the Excel Workbook. Keep in mind that previously in this exercise we have created the workbook dynamically. At this point create the spreadsheet/tab dynamically using a variable to name the spreadsheet/tab and to “dump” the data from the OLE DB Source Select into the appropriate spreadsheet/tab.
Double clicking on the Excel Destination box brings up the Excel Destination Editor.

In this Editor the connection manager is again specified to ensure the correct Excel file or workbook is populated. To ensure the correct spreadsheet/tab is populated the variable ‘Subgroups’ is used for the Data access mode property. If a specific table or view had been used here the workbook and the spreadsheet/tab would have had to previously exist which defeats the purpose of a dynamically created push to the Excel report.
Note: To be able to create the Excel Destination the first time when developing the solution an actual Excel workbook with at least one tab must exist. Once the Excel Destination Editor has been successfully set up the ‘template’ workbook must be deleted or renamed to ensure it does not interfere with the dynamic creation of files going forward.
Before leaving the Excel Destination Editor double check that the mappings have been successful. These indicate that the input columns from the database are not only mapped to output columns to the Excel workbook but that they are mapped correctly. They should look something like this:

Use of Variables:
It was found that variables containing the actual required sql statements were the best (perhaps only) methodology when working within Visual Studio’s ‘Foreach Loop’. Essentially a variable for the replaceable data was created and then that variable was made part of another variable containing the actual select statement.
EG: "Select Region, Subsidiary, StreetAddress1, City, AccountID
From dbo.Subgroupingarea
Where Subsidiary='" + @[User::Subgroup] + "'
Order by AccountID"
Note that in the above statement (which was assigned to a variable) a variable called ‘Subgrouping’ is embedded. This overall variable is used in the OLE DB Source to pull the data to be downloaded to the Spreadsheet within the Excel Workbook.
Variables:
The variables declared for this exercise were:
Definition of Variables:
ExcelTab – This variable defines the creation of the spreadsheets or tabs within a Workbook. It is defined as follows:
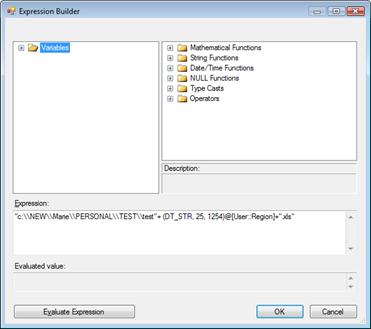
Note that the Expression box contains the filepath with a variable. The variable was populated from the initial Select statement.
Things to keep in mind: the syntax here is critical. If using a variable then must use double quotes around all sections that are not part of the variable string. As well, given that a slash (\) is a reserved character it must first be declared in this case as a literal. This is done with a slash in front of the slash (yep a little strange)
SubDataSet – This variable selects the data from the database for a specific spreadsheet value or tab definition. Note the use of the ‘SubsidiaryName’ variable that was populated in the initial Execute SQL Task.

ExcelFileName – This variable is used to define a new Workbook file name for each retrieved value. By introducing the ‘Grouping’ variable that contains values from the database the new file name will contain a value from the population of that variable.

obj_ListofGrouping – This is the “bucket” or container that holds the values to be used in the Foreach Loop. It can contain any number of actual columns. Each column can contain any number of values. The Foreach Loop will iterate through the values.
Grouping – This variable is used to create a new file or Workbook of a specific name as selected from the database. It is also used when identifying the sub-areas to be reported on within a specific Workbook. It is populated in the first Execute SQL Task. This is the bucket that contains the data selected into it in the initial Execute SQL Task and defines how many times the Foreach Loop will iterate through the loop creating a new Workbook of unique filename.
SubGrouping– This variable is used to create a new spreadsheet/tab in the Excel workbook or file, naming the tab and also is used to populate the spreadsheet/tab with the appropriate data.
Conclusion:
I have shown above how it is possible to dynamically create an Excel file on a filesystem and have the Excel file contain a number of named spreadsheets/tabs. From this, you can easily develop a custom set of Excel workbooks and tabs suited to the requirements of your organization.
There are a number of advantages to this type of approach. One advantage of this approach is that the Excel file becomes a vessel for the static output rather than containing any code. This keeps all code in one place for easy modifications as necessary. The second advantage is for inclusion in a one button solution. By having all components or steps for the solution, from database manipulation to Excel report creation in one place, the solution can be more easily automated. Seamless automation allows for the handing off of the repetitive running of the report either to a timed server job or to Tier 1 support in your organization.
This type of approach can be used for almost any situation where something must be done iteratively more than, say, three times. While the solution above involves pushing data to an Excel file, data can be pushed to a number of other formats including Access, MS Word or a straight text file.