

Introduction
In two previous articles, Using the WMI Event Watcher Task in SSIS to Process Data Files and Using the Konesans File Watcher Task in SSIS to Process Data Files, I demonstrated two techniques that allowed us to process a data file into a database table as soon as it arrived in a directory. Both techniques allow us to complete our task yet both have advantages and disadvantages. Neither will be right for every project, and in some cases neither will be useful.
In this article I will demonstrate a third technique in SSIS to complete the same task detailed in my previous two articles using only a SSIS Script Task that leverages the .NET Framework 4.0 Class System.IO.FileSystemWatcher. This technique aims to address some of the disadvantages of each of the other two techniques, but as with most things there are tradeoffs. We will walk through the development of a package that leverages this technique and at the end we’ll compare the three techniques. Hopefully this will prepare you to choose a technique that best suits your project.
To recap our problem case, we want our SSIS package to wait for an Excel file and then load that Excel file into a table as soon as it arrives. Similar to the techniques that use the WMI Event Watcher Task or the Konesans File Watcher Task this technique also produces far less system activity, in terms of starting and stopping the SSIS package, than techniques where a SSIS package is run every minute (or few) to check for a file and exit if one is not available. Using the Script Task to alert our package that it can begin processing significantly increases our chances of experiencing a very short amount of time between when a file becomes available and when processing that file begins.
Requirements
Here are some facts about the scenario we will be following in this article:
- A directory will be designated as the “drop directory”. This is the directory (i.e. Windows folder) where Excel files that need to be processed by our SSIS package will be delivered (i.e. dropped) by a business user, or by any automated process.
- Each Excel file will have a Worksheet (also known as a Tab) named “Products” containing a fixed set of columns. Each file may contain a different number of data rows but the format will remain consistent.
- The name of the Excel file will change from day to day however it will follow a pattern. For example, the name will follow the format BusinessData.YYYYMMDD.xlsx where YYYYMMDD will change depending on the day it is delivered (e.g. BusinessData.20120903.xlsx).
- A minimum of zero files and a maximum of one file will be delivered for processing per business day.
- The data file needs to be processed as soon as it arrives.
- The SSIS package should wait indefinitely for a file to arrive. *
Here is a list of the primary technologies used to produce this demo:
- Windows 7
- SQL Server 2012 Evaluation Edition (Database Engine, Management Tools Complete, Integration Services and SQL Server Data Tools (SSDT) selected during install)
- SQL Server 2012 Data Tools (SSDT) for SSIS development
- ACE OLE DB Driver 12.0 (install Microsoft Access Database Engine 2010 -or- Access or Excel 2007/2010)
Regarding CPU, the Script Task does not use much CPU (effectively zero) while waiting for a file to arrive. Regarding memory use, an SSIS package that runs continuously will stay loaded in memory while it is running and watching for files, just like any other running program would. However for discussion purposes it will occupy effectively the same amount of memory that a package built to run once per minute would occupy.
The purpose of running a package continuously is to alleviate the need to load and unload the package from memory each time we need to check if a file has arrived. The tradeoff here is between the constant memory use but overall low CPU use of a package that runs continuously vs. the CPU and memory allocation and de-allocation overhead of loading and unloading a package many times in the course of a day.
* A note about allowing an SSIS package to run continuously: there is nothing inherently wrong with setting up an SSIS package to behave in this way. The File Watcher Task offers us a very lightweight way (in terms of resources) to watch for new files being added to a directory.
Design
We stated our requirements above, decided to use SSIS 2012 to process our Excel files, and now need a high-level outline for how we will accomplish the task using the chosen technology. Generically this will be our processing logic:
- When a file arrives move it from the “drop directory” to a “processing directory” to reduce the chances of anything interfering with the file while it is being processed.
- Clear the database staging table where the Excel data will be loaded.
- Load the file from the “processing directory” into the staging table.
- Move the file from the “processing directory” to an “archive directory”.
In terms of SSIS the above outline translates into the following:
- Use a Script Task to watch for new files in the “drop directory”.
- Move the file from the “drop directory” to the “processing directory” using a File System Task.
- Clear the database staging table using an Execute SQL Task.
- Load the Excel file into the staging table from the “processing directory” using a Data Flow.
- Move the file from the “processing directory” to the “archive directory” using a File System Task.
- Exit.
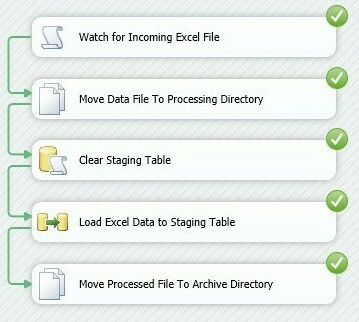
Here is a preview of the finished package:

Step-By-Step Development
In this section we will walk through the creation of the SSIS package, step-by-step.
Before we begin, ensure you have an Excel driver capable of connecting to Excel 2007/2010 (xlsx) documents. You can check the Drivers tab in the ODBC Data Source Administrator accessible via the Control Panel to see if you have the ACE ODBC Driver. If you have this driver, then you should also have the OLE DB Driver as well which is what SSIS will actually be using to connect to the Excel file.
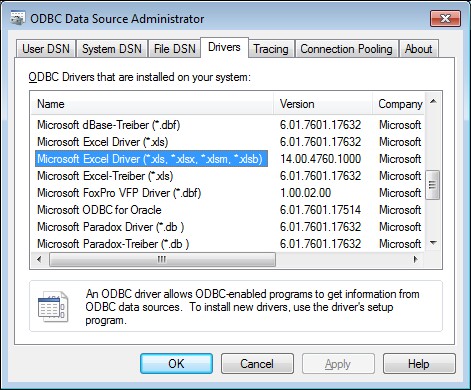
If you do not have Excel 2007 (or above) installed or have a driver installed that lists *.xlsx as a supported Excel file extension then you can attain the ACE Drivers by installing the Microsoft Access Database Engine 2010, a free download. See the References section for a link to the download.
Let's get started with our development.
1. Create a new directory named ExcelDrop. I used C:\@\ for this demo (e.g. C:\@\ExcelDrop\).
2. Under ExcelDrop create two directories, Processing and Archive. Your directory tree should look like this:

3. Stage file BusinessData.YYYYMMDD.xlsx (available in the download attached to this article) in the Processing directory. During the development phase the SSIS Excel Connector will need the file to be present in order to generate the metadata necessary to define the file import within the SSIS package. Once development is complete the file can be moved, and the package will have no trouble operating properly at runtime if the file is not present.
4. Create a new database and staging table in your SQL Server 2012 instance:
USE[master]GOCREATE DATABASE[Inventory]GOUSE[Inventory]GO SET ANSI_NULLS ON GO SET QUOTED_IDENTIFIER ON GO CREATE TABLEdbo.ProductStaging ( ProductStagingIdINT IDENTITY(1,1) NOT NULL, ProductNameNVARCHAR(255) NULL, PricePerUnitDECIMAL(12, 2) NULL,CONSTRAINTPK_ProductStagingPRIMARY KEY CLUSTERED(ProductStagingIdASC) )GO
5. Create a new SQL Server 2012 SSIS Package using SQL Server Data Tools (SSDT) and name it LoadExcelWorkbook. See the References section at the end of this article if you need assistance getting started with SSDT and SSIS 2012.
6. Add the following Variables to the SSIS package. Note that some expressions build on other variables so create all variables initially, then revisit the variables that require it to set their Expression values.
Variable Name | Type | Value | Expression |
ArchivePath | String | <derived from Expression> | @[User::WatcherInputDropPath] + "Archive\\" |
ProcessingFile | String | <derived from Expression> | @[User::ProcessingPath] + @[User::WatcherOutputFileName] |
ProcessingPath | String | <derived from Expression> | @[User::WatcherInputDropPath] + "Processing\\" |
WatcherInputDropPath | String | C:\@\ExcelDrop\ | n/a |
WatcherInputFileMask | String | BusinessData*.xlsx | n/a |
WatcherInputFindExistingFiles | Boolean | False | n/a |
WatcherInputIncludeSubdirectories | Boolean | False | n/a |
WatcherInputTimeoutAsWarning | Boolean | False | n/a |
WatcherInputTimeoutSeconds | Int32 | 0 | n/a |
WatcherOutputFileFullName | String | <empty string> | n/a |
WatcherOutputFileName | String | <empty string> | n/a |
For additional information about SSIS Expressions see the References links at the end of this article.
The variables prefixed with Watcher control the behavior of the Script Task that will watch for files. No other configuration or code changes are necessary outside of setting the values for these variables, i.e. you do not need to know or code any C# to begin using this solution.
Here is a description of each variable:
Variable Name | Description |
WatcherInputDropPath | Path to watch. This can be a path on a local drive letter, a mapped drive letter or a UNC path. The path must have a trailing backslash, e.g. C:\@\ExcelDrop |
WatcherInputFileMask | Pattern of file to watch. Windows file name wildcards are allowed, e.g. * |
WatcherInputFindExistingFiles | If True then existing files will be detected. If false only newly created files will be detected. |
WatcherInputIncludeSubdirectories | If True subdirectories of WatcherInputDropPath are watched. This variable can be used in conjunction with WatcherInputFindExistingFiles to achieve the desired behavior. |
WatcherInputTimeoutAsWarning | If True and the timeout period is reached before a file is detected then only a Warning is raised. Set to True and use in conjunction with an OnWarning Event Handler to react to timeouts without an exception being raised. Variable value is ignored if WatcherInputTimeoutSeconds = 0. |
WatcherInputTimeoutSeconds | Number of seconds to watch for a file. Set to 0 to wait indefinitely. |
WatcherOutputFileFullName | This variable is used by the Script Task to store the full file name (including path) of the detected file, e.g. C:\@\ExcelDrop\BusinessData.YYYYMMDD.xlsx |
WatcherOutputFileName | This variable is used by the Script Task to store the file name of the detected file, e.g. BusinessData.YYYYMMDD.xlsx |
7. Drag a new Script Task from the Common section in the Toolbox onto the Control Flow design surface.

8. Double-click the Script Task to open the Script Task Editor. First go to the General page and name the task Watch for Incoming Excel File:

Move back to the Script Page. This is where most of the work will be done. We'll use C# as the ScriptLanguage:

Set the ReadOnlyVariables value by clicking in the field and clicking the ellipsis:

Select all variables that begin with User::WatcherInput and click OK:

For the ReadWriteVariables select variables that begin with User::WatcherOutput and click OK:

The work in watching for the file will be done in the Script. On the Script page, click the Edit Script… button. Clicking the button will open a new copy of SSDT titled VstaProjects containing the scripting environment related to our Script Task. Below is the working script in its entirety meaning you can copy and paste all code shown here and use it to replace all code in ScriptMain.cs:
#region Help:  Introduction to the script task
/* The Script Task allows you to perform virtually any operation that can be accomplished in
 * a .Net application within the context of an Integration Services control flow.
 *
 * Expand the other regions which have "Help" prefixes for examples of specific ways to use
 * Integration Services features within this script task. */
#endregion

#region Namespaces
using System;
using System.Data;
using Microsoft.SqlServer.Dts.Runtime;
using System.Windows.Forms;
using System.IO;
using System.Threading;
#endregion
namespace SqlServerCentral
{
    /// <summary>
    /// ScriptMain is the entry point class of the script.  Do not change the name, attributes,
    /// or parent of this class.
    /// </summary>
    [Microsoft.SqlServer.Dts.Tasks.ScriptTask.SSISScriptTaskEntryPointAttribute]
    public partial class ScriptMain : Microsoft.SqlServer.Dts.Tasks.ScriptTask.VSTARTScriptObjectModelBase
    {
        #region Help:  Using Integration Services variables and parameters in a script
        /* To use a variable in this script, first ensure that the variable has been added to
         * either the list contained in the ReadOnlyVariables property or the list contained in
         * the ReadWriteVariables property of this script task, according to whether or not your
         * code needs to write to the variable.  To add the variable, save this script, close this instance of
         * Visual Studio, and update the ReadOnlyVariables and
         * ReadWriteVariables properties in the Script Transformation Editor window.
         * To use a parameter in this script, follow the same steps. Parameters are always read-only.
         *
         * Example of reading from a variable:
         *  DateTime startTime = (DateTime) Dts.Variables["System::StartTime"].Value;
         *
         * Example of writing to a variable:
         *  Dts.Variables["User::myStringVariable"].Value = "new value";
         *
         * Example of reading from a package parameter:
         *  int batchId = (int) Dts.Variables["$Package::batchId"].Value;
         *
         * Example of reading from a project parameter:
         *  int batchId = (int) Dts.Variables["$Project::batchId"].Value;
         *
         * Example of reading from a sensitive project parameter:
         *  int batchId = (int) Dts.Variables["$Project::batchId"].GetSensitiveValue();
         * */
        #endregion
        #region Help:  Firing Integration Services events from a script
        /* This script task can fire events for logging purposes.
         *
         * Example of firing an error event:
         *  Dts.Events.FireError(18, "Process Values", "Bad value", "", 0);
         *
         * Example of firing an information event:
         *  Dts.Events.FireInformation(3, "Process Values", "Processing has started", "", 0, ref fireAgain)
         *
         * Example of firing a warning event:
         *  Dts.Events.FireWarning(14, "Process Values", "No values received for input", "", 0);
         * */
        #endregion
        #region Help:  Using Integration Services connection managers in a script
        /* Some types of connection managers can be used in this script task.  See the topic
         * "Working with Connection Managers Programatically" for details.
         *
         * Example of using an ADO.Net connection manager:
         *  object rawConnection = Dts.Connections["Sales DB"].AcquireConnection(Dts.Transaction);
         *  SqlConnection myADONETConnection = (SqlConnection)rawConnection;
         *  //Use the connection in some code here, then release the connection
         *  Dts.Connections["Sales DB"].ReleaseConnection(rawConnection);
         *
         * Example of using a File connection manager
         *  object rawConnection = Dts.Connections["Prices.zip"].AcquireConnection(Dts.Transaction);
         *  string filePath = (string)rawConnection;
         *  //Use the connection in some code here, then release the connection
         *  Dts.Connections["Prices.zip"].ReleaseConnection(rawConnection);
         * */
        #endregion
        #region Instance variables
        // we need access to the found file info from the FileSystemWatcher OnFileCreate event in our class
        // scope. an instance variable may look odd but will do for our purposes
        private FileInfo foundFile = null;
        #endregion
        #region Method: void Main()
        /// <summary>
        /// This method is called when this script task executes in the control flow.
        /// Before returning from this method, set the value of Dts.TaskResult to indicate success or failure.
        /// To open Help, press F1.
        /// </summary>
        public void Main()
        {
            try
            {
                // initialize common variables from DTS variables collection
                string dropDirectory = Dts.Variables["User::WatcherInputDropPath"].Value.ToString();
                string fileMask = Dts.Variables["User::WatcherInputFileMask"].Value.ToString();
                bool includeSubdirectories = Convert.ToBoolean(Dts.Variables["User::WatcherInputIncludeSubdirectories"].Value);
                // look for existing files if configuration suggests we should
                bool findExistingFiles = Convert.ToBoolean(Dts.Variables["User::WatcherInputFindExistingFiles"].Value);
                if (findExistingFiles)
                {
                    FindExistingFile(dropDirectory, fileMask, includeSubdirectories);
                }
                // do we (still) need to look for a file?
                if (foundFile == null)
                {
                    // if we made it here there were no existing files to process (or we didn't check for them per the
                    // configuration variables) so setup a FileSystemWatcher object per the configuration variables
                    bool timeoutAsWarning = Convert.ToBoolean(Dts.Variables["User::WatcherInputTimeoutAsWarning"].Value);
                    int timeoutSeconds = Convert.ToInt32(Dts.Variables["User::WatcherInputTimeoutSeconds"].Value);
                    int timeoutMilliseconds = (timeoutSeconds == 0 ? -1 : timeoutSeconds * 1000);
                    WatchForFileCreation(dropDirectory, fileMask, includeSubdirectories, timeoutAsWarning, timeoutMilliseconds);
                }
                Dts.TaskResult = (int)ScriptResults.Success;
            }
            catch (Exception e)
            {
                Dts.Events.FireError(0, null, e.Message, string.Empty, 0);
                Dts.TaskResult = (int)ScriptResults.Failure;
            }
        }
        #endregion
        #region Event: void OnFileCreate(object source, FileSystemEventArgs e)
        /// <summary>
        /// Event attached to FileSystemWatcher when a file is created.
        /// </summary>
        /// <param name="source">Event source.</param>
        /// <param name="e">Event arguments.</param>
        private void OnFileCreate(object source, FileSystemEventArgs e)
        {
            PreProcessFoundFile(new FileInfo(e.FullPath));
        }
        #endregion
        #region Method: WatchForFileCreation
        /// <summary>
        /// Sets up a FileSystemWatcher to watch for new files being created.
        /// </summary>
        /// <param name="dropDirectory">Directory to watch</param>
        /// <param name="fileMask">File pattern mask of files being watched for.</param>
        /// <param name="includeSubdirectories">If true all subdirectories are also watched.</param>
        /// <param name="timeoutAsWarning">If true then if watcher times out only a warning is raised, i.e. the Task succeeds.</param>
        /// <param name="timeoutMilliseconds">Number of milliseconds to wait for a file to be initially created. This timeout period
        /// does not apply to the tiem spent waiting for exclusive access to be gained to the file.</param>
        private void WatchForFileCreation(string dropDirectory,
            string fileMask,
            bool includeSubdirectories,
            bool timeoutAsWarning,
            int timeoutMilliseconds)
        {
            // create a new FileSystemWatcher
            FileSystemWatcher fileSystemWatcher = new FileSystemWatcher();
            // set the path to watch to our 'drop directory'
            fileSystemWatcher.Path = dropDirectory;
            // set the option to watch subdirectories
            fileSystemWatcher.IncludeSubdirectories = includeSubdirectories;
            // set the filter of files to watch for to our 'file mask'
            fileSystemWatcher.Filter = fileMask;
            // add event handler to execute when new files are created
            fileSystemWatcher.Created += new FileSystemEventHandler(OnFileCreate);
            // begin watching
            fileSystemWatcher.WaitForChanged(WatcherChangeTypes.Created, timeoutMilliseconds);
            if (foundFile == null)
            {
                // the file watcher timed out waiting for a file  :-<
                string message = "Timeout waiting for file {Path='" + dropDirectory + "'; Filter='" + fileMask +
                     "'; IncludeSubdirectories=" + includeSubdirectories.ToString() + "}.";
                if (timeoutAsWarning)
                {
                    // only raise a warning
                    Dts.Events.FireWarning(0, null, message, string.Empty, 0);
                }
                else
                {
                    // raise an error
                    throw new TimeoutException(message);
                }
            }
        }
        #endregion
        #region Method: void PreProcessFoundFile(FileInfo dataFile)
        /// <summary>
        /// Takes actions subsequent to locating a file that allow later processing of the file. This method
        /// reports information to the parent container by firing info events. This method also ensures exclusive
        /// access to the file can be achieved before returning control to the parent container.
        /// </summary>
        /// <param name="dataFile">File to preprocess.</param>
        private void PreProcessFoundFile(FileInfo dataFile)
        {
            // set the instance variable value to the found file
            this.foundFile = dataFile;
            // local variable to pass to events that require parameters be passed by ref
            bool fireAgain = true;
            // raise an information event saying we found a file (not necessarily that it can be used)
            Dts.Events.FireInformation(0, null, "File found: " + dataFile.FullName, string.Empty, 0, ref fireAgain);
            // We know there is a new file that can be processed because
            // the FileSystemWatcher fired an event, however we do not know if the user or process
            // supplying the file has completed uploading it. We will loop over drop directory
            // looking for files that meet our criteria and once we find one we will make sure
            // the supplier has completed their upload process by checking to see if we can gain
            // exclusive access to the file. Once we can gain exclusive access to the file we will know
            // the upload is complete and we can allow the rest of the SSIS package to continue.
            WaitForExclusiveAccess(dataFile);
            // store the full file name (includes path) in output variable
            Dts.Variables["User::WatcherOutputFileFullName"].Value = dataFile.FullName;
            // store the file name in output variable
            Dts.Variables["User::WatcherOutputFileName"].Value = dataFile.Name;
            // raise an information event saying we found a file -and- it can be used
            Dts.Events.FireInformation(0, null, "File ready for use: " + dataFile.FullName, string.Empty, 0, ref fireAgain);
        }
        #endregion
        #region Method: void WaitForExclusiveAccess(FileInfo dataFile)
        /// <summary>
        /// Waits until exclusive access to a file can be achieved.
        /// </summary>
        /// <param name="dataFile">File to access.</param>
        private void WaitForExclusiveAccess(FileInfo dataFile)
        {
            // local variable to say how many seconds to wait in between checking if we can gain
            // exclusive access to the found file
            int secondsToWaitBetweenAttempts = 5;
            // local variable to pass to events that require parameters be passed by ref
            bool fireAgain = true;
            // Loop indefinitely checking if we can access the data file.
            while (1 == 1)
            {
                try
                {
                    // Attempt to gain access to the file.
                    using (Stream stream = new FileStream(dataFile.FullName, FileMode.Open))
                    {
                        // If we made it here no exception was thrown meaning we
                        // could access the file. We will break out of the loop and allow
                        // the rest of the package to continue processing.
                        break;
                    }
                }
                catch (IOException)
                {
                    // We are not interested in ending the program when an IOException
                    // occurs in this area. This type of exception means we could not
                    // gain access to the file.
                    // In general, programming algorithms that leverage exceptions for
                    // control flow are frowned upon. However in the case of file access
                    // it is an acceptable pattern.
                }
                // raise an information event saying we could not gain exclusive access to the found file and will wait
                Dts.Events.FireInformation(0, null, "Could not gain exclusive access to file " + foundFile.FullName +
                                                           ". Waiting " + secondsToWaitBetweenAttempts.ToString() +
                                                           " seconds before trying again...", string.Empty, 0, ref fireAgain);
                // wait some time before checking whether the file can be used
                Thread.Sleep(secondsToWaitBetweenAttempts * 1000);
            }
        }
        #endregion
        #region Method: void FindExistingFile(string directoryName, string fileMask, bool includeSubdirectories)
        /// <summary>
        /// Check a directory for files that match a file mask.
        /// </summary>
        /// <param name="directoryName">Directory to look for files.</param>
        /// <param name="fileMask">File pattern mask matching files to look for.</param>
        /// <param name="includeSubdirectories">True if subdirectories should also be checked.</param>
        private void FindExistingFile(string directoryName, string fileMask, bool includeSubdirectories)
        {
            // local variable to pass to events that require parameters be passed by ref
            bool fireAgain = true;
            // get the list of files that qualify
            DirectoryInfo directoryInfo = new DirectoryInfo(directoryName);
            FileInfo[] fileInfos;
            if (includeSubdirectories)
            { fileInfos = directoryInfo.GetFiles(fileMask, SearchOption.AllDirectories); }
            else
            { fileInfos = directoryInfo.GetFiles(fileMask, SearchOption.TopDirectoryOnly); }
            // check to see if any files were found
            if (fileInfos.Length > 0)
            {
                // found a file!
                PreProcessFoundFile(fileInfos[0]);
                // raise an info message
                Dts.Events.FireInformation(0, null, "Existing files found: " + fileInfos.Length.ToString(), string.Empty, 0, ref fireAgain);
            }
            else
            {
                // no files found, raise a warning
                Dts.Events.FireWarning(0, null, "No existing files found.", string.Empty, 0);
            }
        }
        #endregion
        #region ScriptResults declaration
        /// <summary>
        /// This enum provides a convenient shorthand within the scope of this class for setting the
        /// result of the script.
        ///
        /// This code was generated automatically.
        /// </summary>
        enum ScriptResults
        {
            Success = Microsoft.SqlServer.Dts.Runtime.DTSExecResult.Success,
            Failure = Microsoft.SqlServer.Dts.Runtime.DTSExecResult.Failure
        };
        #endregion
    }
}
Save the Script and close the Script Editor. Click OK to save the changes to the Script Task.
We have successfully configured a Script Task to find a file in the ExcelDrop directory based on a file mask (BusinessData*.xlsx). We are ready to code the rest of the logic necessary to process the file. Referring to our processing logic in the Design section we have achieved Step 1. Watch for incoming file. Here are the steps we have yet to implement:
Step 2. Move the file from the "drop directory" into the "processing directory".
Step 3. Clear the database staging table.
Step 4. Load the Excel file into the staging table from the "processing directory".
Step 5. Move the file from the "processing directory" to the "archive directory".
9. To achieve design Step 2 we will use the built-in File System Task. Drag a new File System Task from the Common section in the Toolbox onto the Control Flow design surface.

SSDT will immediately flag a validation error on the File System Task. Do not worry. We will resolve the validation error when we configure the Task in the next step.

10. Double-click the File System Task to open the Task Editor. The sections within each page are listed in alphabetical order which is not always the order in which we want to configure the task so it may appear as if we're jumping around a bit.
On the General page, in the General section, rename the task to Move Data File To Processing Directory.

In the Operation section we will set the Task to Move the file:

In the Source Connection section we will use a variable to define which file we want moved. Change the properties as follows:
* Make sure you choose variable User::WatcherOutputFileFullName

In the Destination Connection section we will use a variable to define where we want our file to be moved. Change the properties as follows:

Click OK to save the configuration.
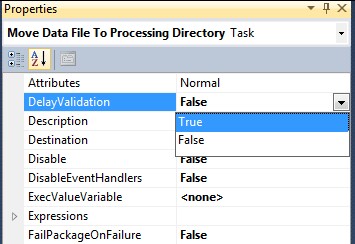
One more item: we want to set the DelayValidation property on the File System Task to True to avoid validation problems because our Watcher-output variables are empty. Do this by highlighting the Task, right-clicking and selecting Properties, then changing the property to True:
11. Connect the Script Task and the File System Task:

We have successfully configured a File System Task to move our data file from the drop directory to a processing directory. Referring to our processing logic in the Design section we have achieved Step 2. When the file arrives, move it from the “drop directory” to a “processing directory” to reduce the chances of anything interfering with the file while it is being processed. Here are the steps we have yet to implement:
Step 3. Clear the database staging table.
Step 4. Load the Excel file into the staging table from the "processing directory".
Step 5. Move the file from the "processing directory" to the "archive directory".
12. To clear the staging table, our design Step 3, before we load data from the file we will execute a TRUNCATE TABLE command against the database using the built-in Execute SQL Task. Drag a new Execute SQL Task from the Favorites section in the Toolbox onto the Control Flow design surface.

SSDT will immediately flag a validation error on the Execute SQL Task. Do not worry. We will resolve the validation error when we configure the Task in the next step.

13. Double-click the Execute SQL Task to open the Task Editor. On the General page, in section General, rename the task Clear Staging Table.

In the SQL Statement section, from the Connection drop-down, select <New Connection...>.

This will open a configuration dialog that will allow you to create a new database connection for use in this SSIS package.

Select New... to create a new Connection Manager. For this demo I am using the Inventory database created earlier on a local SQL Server 2012 instance named SQL2012, so my connection details are as follows:

After clicking OK you should see your new connection as an option:

Select it and click OK to add a Connection Manager to your SSIS package. Set the SQLStatement property value to:
TRUNCATE TABLE dbo.ProductStaging;The properties of the Execute SQL Task should now appear as follows:

Click OK to save the settings.
Connect the File System Task to the Execute SQL Task. As a side note, notice that in the process of setting up the Execute SQL Task a new OLE DB Database connection was created. This was a result of selecting <New Connection...> and configuring the task to connect to our test Inventory database.

14. The next step from our processing logic is Step 4. Load the Excel file into the staging table from the “processing directory”. This will require a Data Flow Task.
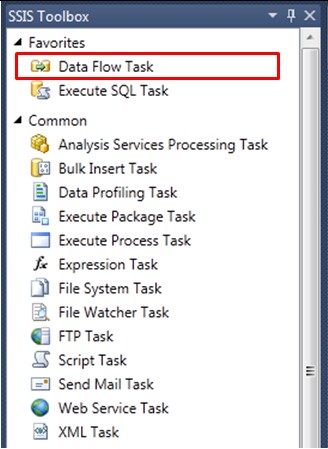
Drag one from the Favorites section of the Toolbox onto the design surface and name it Load Excel Data to Staging Table. Connect to it from the output of the Clear Staging Table task. In the Data Flow Task we need to copy data from the Products Worksheet (i.e. Tab) in the Workbook (i.e. Excel file) into the table we created in the Inventory database earlier (dbo.ProductStaging).

Double-click the Data Flow Task to open the Data Flow designer. We will need two objects in our Data Flow, an Excel Source and an OLE DB Database Destination. The SSIS Development Team added two handy Assistants to the Data Flow Designer in SQL Server 2012: the Source Assistant and the Destination Assistant. We will use them here.
Source 1. Drag a Source Assistant onto your Data Flow designer:

Source 2. The Add New Source dialog will appear. Select Excel, and New… and click OK:

Source 3. Select the sample file in the Processing directory and Click OK:

The SSIS designer will create a new Excel Connection Manager and Excel Source Component for you, per what we did with the Source Assistant.

The validation error icon placed on the Source Component immediately after creation is normal. SSIS will show there is an error until we define the data source, i.e. provide the Worksheet name or Query that defines the data set it will process.
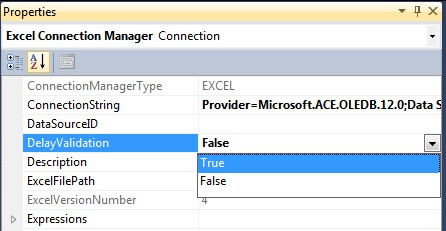
Set the DelayValidation property of the new Excel connection to True. Highlight the connection Excel Connection Manager in the Connection Managers pane, right-click, select Properties and change the DelayValidation property to True:
Source 4. Double-click the Excel Source to open the properties and set it to source data from the Products table (i.e. Worksheet) in the Excel Workbook.

When finished setting the Source table, click OK and notice the validation error disappear from the component.
Source 5. Right-click the Excel Source Component and select Properties (or highlight and press F4). Set the ValidateExternalMetadata property to False:

This is important because in a production setting the Excel file will not exist in the processing directory when the SSIS package begins to execute. Setting this property to False will let SSIS know it should bypass validating the metadata defined for the source component at runtime.
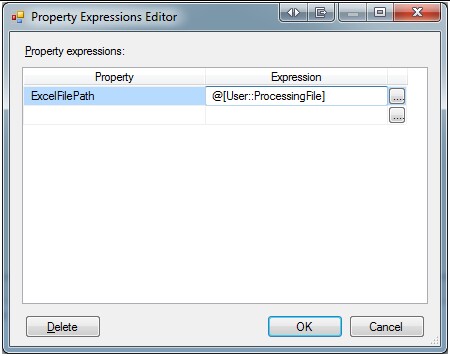
Source 6. Our Source object is now configured. Now we must configure our Excel Connection to be dynamic in terms of which file it will load, since the name of the file will change each day. Right-click Excel Connection Manager in the Connection Managers pane and select Properties (or highlight and Press F4).

In the Properties window click the ellipsis to open the Expressions Editor:

Set the ExcelFilePath to take its value from the ProcessingFile variable:
Our Source Component and Excel Connection are now configured. We will now configure the Destination Component.
Destination 1. Drag a Destination Assistant onto your Data Flow designer:

Destination 2. The Add New Destination dialog will appear:

Select SQL Server, the Connection to the test Inventory database we setup earlier when configuring the Execute SQL Task, and click OK:

Do not be concerned with the validation error shown on the OLE DB Destination component. The error will disappear when we finish configuring the data flow.
Destination 4. Connect the two Components:

Destination 5. Double-click the OLE DB Destination to open the Properties. Set the Name of table or the view to dbo.ProductStaging to let SSIS know that is where you would like to store the incoming data:

After selecting dbo.ProductStaging from the drop-down, because the columns in our Excel Worksheet match the columns in our staging table, SSIS will automatically map them to each other. This is nice for the purposes of this demo and a behavior that can be quite handy if you happen to control one or both of the source file format or destination database table definition when developing an ETL process:

Destination 6. Click OK. Our Data Flow Task is now complete:

Move back to the Control Flow tab and set the DelayValidation property of the Data Flow Task to True. Do this by highlighting the Load Excel Data to Staging Table Task, right-click, select Properties and change the DelayValidation property to True:

Our Data Flow Task is complete!
15. Referring to the processing logic we completed in the implementation for Step 4. The last step is Step 5. Move the file from the "processing directory" to the "archive directory". For this step we will once again use a File System Task. Drag a File System Task from the Toolbox onto the Control Flow design surface, connect the Data Flow Task to it and configure it as follows:

After some renaming and rearranging of the objects your SSIS package’s Control Flow should look similar to this, the finished product I previewed at the beginning of this article:
Note: do not be concerned if the Data Flow Task shows a validation error prior to the initial execution. This will not prevent the package from completing successful at runtime.
Testing
We have completed the process of creating and configuring our SSIS package to satisfy our requirements. It is now time to test it.
1. Start the SSIS package (press F5).
2. Your package should immediately move into a state where the Script Task is watching for files entering the drop directory C:\@\ExcelDrop, as noted by the Gold Wheel spinning in the top right corner of the task:

4. In order for the package to proceed we must add a data file to C:\@\ExcelDrop\ that satisfies the file mask BusinessData*.xlsx. Cut the sample file BusinessData.YYYYMMDD.xlsx in the Processing directory C:\@\ExcelDrop\Processing\ and Paste it into C:\@\ExcelDrop\.
5. Within a few seconds of moving the file (i.e. creating a new file) BusinessData.YYYYMMDD.xlsx in C:\@\ExcelDrop\ the File Watcher Task will notice there is a qualifying file present. When the Task can gain exclusive access to the file the rest of the package will be allowed to execute and our variables, User::WatcherOutputFileFullName and User::WatcherOutputFileName, will be set by the Script to the name of the file that was found. Here is what you ought to see when the package completes:
6. We can check dbo.ProductStaging in our test Inventory database and see that data from our Excel file was in fact loaded into our database table.

Success!
Conclusion
Relative to some other methods a Script Task can be leveraged to:
- Reduce the amount of time between when a file is delivered to a directory and when an SSIS package can begin processing that file.
- Reduce the number of times an SSIS package must be executed in order to process a single file.
In two previous articles, Using the WMI Event Watcher Task in SSIS to Process Data Files and Using the Konesans File Watcher Task in SSIS to Process Data Files, I demonstrated two other techniques to accomplish the same result. The Script Task brings with it some flexibility and ease of use that offer us some advantages over the other two techniques, yet has some potential drawbacks of its own. Below is a table comparing features of each of the three techniques. I'll leave it to you to decide which will best satisfy your project's requirements.
WMI Event Watcher Task | Konesans File Watcher Task | Script Task as implemented in Article using the .NET FileSystemWatcher Class | |
Included in SSIS | Yes | No | Yes |
Must Run Third-party Installer on Each Server and Developer Workstation | No | Yes | No |
Supported Provided By | Microsoft | Konesans | Microsoft |
Code and Configuration Provided by Microsoft or is Viewable | WMI Event Watcher Task provided by Microsoft. | Konesans File Watcher Task not provided by Microsoft and is closed source. | Script Task provided by Microsoft. Script content is custom written and is open source. |
User Base | Worldwide | Relatively Limited | Worldwide |
Support for Watching Network Location | Yes | Yes | Yes |
Permissions Required for Watching Network Location | Elevated permission on remote OS | Permission to Network Location | Permission to Network Location |
Can Recognize Existing Files | No | Yes | Yes |
Can Recognize Files in Subdirectories | Yes via carefully crafted and slow-running WQL | Yes | Yes |
Waits Until Exclusive Access to File is Achieved Before Returning Control | No | Yes | Yes |
Skills Additional to SSIS Required to Effectively Support or Extend | WQL | None | C# Scripting |
References
- SSIS Script Task
- Using Variables in the Script Task
- Konesans File Watcher Task
- SSIS WMI Event Watcher Task
- SSIS Expressions
- Installing a New Instance of SQL Server 2012 Database Engine and SQL Server Data Tools (SSDT)
- Create a New SSIS Project in SSDT
- Download Microsoft Access Database Engine 2010 Redistributable - includes ACE OLE DB Driver 12.0
- Download Microsoft SQL Server 2012 Evaluation
- SSIS Package Configurations
