Introduction
In my previous article, Using the WMI Event Watcher Task in SSIS to Process Data Files, I demonstrated how to use the WMI Event Watcher Task built into SSIS to process a data file as soon as it arrives in a directory. The technique requires us to mix the use of the built-in task, the WMI Event Watcher Task, and an Event Handler containing C# scripting written inside a Script Task. While the technique accomplishes the goal, it is not necessarily intuitive and not as elegant as some other solutions, including the one I will demonstrate in this article. To recap our goal, we want to develop an SSIS package to wait for an Excel file to arrive in a directory, and as soon as that file arrives load that Excel file into a SQL Server table.
In this article I will show you how to use the third-party Konesans File Watcher Task for SSIS. Similar to the technique using the WMI Event Watcher Task, this technique produces far less system activity in terms of starting and stopping the SSIS package than one where a SSIS package is run every minute (or few) to check for a file, and exits if a file is not available. A primary benefit of using the Konesans File Watcher Task to signal our package to begin processing after a file arrives is that it guarantees a short amount of time between when a file becomes available and when processing of that file begins.
The Konesans File Watcher Task and the WMI Event Watcher both provide similar functionality as it relates to watching a directory for files to arrive. However, internally the two Tasks accomplish the goal in different ways. The WMI Event Watcher leverages the WMI subsystem built into Windows while the Konesans File Watcher Task leverages the class System.IO.FileSystemWatcher built into the .NET Base Class Library. In addition to watching for files the Konesans File Watcher Task has the following beneficial features which I believe make it a better option than the WMI Event Watcher Task in many cases:
- Waits until exclusive access to a found file can be gained prior to allowing control to pass to the rest of the package.
- Captures the name of the found file into a variable for later use.
- Can optionally recognize existing files in the directory being watched.
- Simple to configure to watch for files in a directory referenced as a network UNC path.
If you remember in my previous article we implemented the first and second items ourselves using custom C# scripting in a Script Task. We did not implement the third item as it was not a requirement of our project, however if it were part of our requirements I would have resorted to using another Script Task placed before the WMI Event Watcher Task. While the fourth feature is available in the WMI Event Watcher Task, it is not intuitive and requires special permissions to the remote file server.
Here are some known drawbacks to using the Konesans File Watcher Task:
- Requires installation on all workstations and servers where a package that uses the task will be developed or executed.
- Closed source. Issues related to a tool being closed source are not specific to the Konesans File Watcher Task. Suffice it to say that no matter how great a tool may be or what functionality it offers, it being closed source can be a real barrier to adoption. Briefly, two main reasons are that we cannot inspect the source code to validate how well it is written and that there is nothing malicious contained within. And two, if a bug is found we must rely on the tool's creators to resolve the issue which may be an unacceptable risk depending on the project or use. Many online debates have, and will continue to take place related to the merits and demerits of using closed source software therefore I will not delve more deeply into the debate here.
Requirements
Here are some facts about the scenario we will be following in this article:
- A directory will be designated as the “drop directory”. This is the directory (i.e. Windows folder) where Excel files that need to be processed by our SSIS package will be delivered (i.e. dropped) by business users, or by any automated process.
- Each Excel file (also known as a Workbook) will have a Tab (also known as a Worksheet) named “Products” containing a fixed set of columns. Subsequent files may contain a different number of data rows, but the format will remain consistent.
- The name of the Excel file will change from day to day, however it will follow a pattern. For example, the name will follow the format BusinessData.YYYYMMDD.xlsx where YYYYMMDD will change depending on the day it is delivered (e.g. BusinessData.20120705.xlsx).
- A minimum of zero files and a maximum of one file will be delivered for processing per business day.
- The data file needs to be processed as soon as it arrives.
- The SSIS package should wait indefinitely for a file to arrive. *
Here is a list of the primary technologies used to produce this demo. See the References section for links to the downloads:
- Windows 7
- SQL Server 2012 Evaluation Edition
- SQL Server 2012 Data Tools (SSDT) for SSIS development
- ACE OLE DB Driver 12.0 (install Microsoft Access Database Engine 2010 -or- Access 2007/2010 -or- Excel 2007/2010)
- Konesans File Watcher Task for SQL Server 2012 - version 3.0.0.20
Regarding CPU, the Konesans File Watcher Task does not use much CPU (effectively zero) while waiting for a file to arrive. Regarding memory use, an SSIS package that runs continuously will stay loaded in memory while it is running and watching for files, just like any other running program would. However for discussion purposes it will occupy effectively the same amount of memory that a package built to run once per minute would occupy.
The purpose of running a package continuously is to alleviate the need to load and unload the package from memory each time we need to check if a file has arrived. The tradeoff is between:
- A package that runs once per day and runs continuously waiting for a file to arrive will use the memory required to have the package loaded but little to no CPU while it is waiting for the file to arrive.
- A package that runs many times per day and exits if a file is not available will not use memory continuously but will require CPU cycles as well as need memory to be allocated and deallocated each time it is loaded and unloaded per its schedule. Job schedulers like SQL Server Agent that track job history are also part of the overhead associated with starting and stopping a package on a regular basis.
* A note about allowing an SSIS package to run continuously: there is nothing inherently wrong with setting up an SSIS package to behave in this way. The Konesans File Watcher Task offers us a very lightweight way (in terms of resources) to wait for new files to be added to a directory.
Design
We stated our requirements above, decided to use SSIS 2012 to process our Excel files, and now need a high-level outline for how we will accomplish the task using the chosen technology. Generically this will be our processing logic:
- When a file arrives move it from the “drop directory” to a “processing directory” to reduce the chances of anything interfering with the file while it is being processed.
- Clear the database staging table where the Excel data will be loaded.
- Load the file from the “processing directory” into the staging table.
- Move the file from the “processing directory” to an “archive directory”.
In terms of SSIS the above outline translates into the following:
- Use the File Watcher Task to watch for new files in the “drop directory”.
- Move the file from the “drop directory” into the “processing directory” using a File System Task.
- Clear the database staging table using an Execute SQL Task.
- Load the Excel file into the staging table from the “processing directory” using a Data Flow Task.
- Move the file from the “processing directory” to the “archive directory” using a File System Task.
- Exit.
Here is a preview of the finished package:

Step-By-Step Development
In this section we will walk through the creation of the SSIS package, step-by-step.
1. Verify the Konesans File Watcher Task for SQL Server 2012 is available within SQL Server Data Tools (SSDT). When you open a SSIS package in SSDT you should see the File Watcher Task in your Toolbox. See the References section for a link to the download.
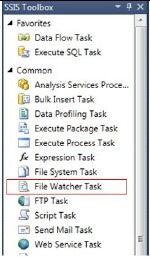
2. Ensure you have an Excel driver capable of connecting to Excel 2007/2010 (xlsx) documents. If you do not have Excel 2007 or above installed you can attain the ACE OLE DB Driver 12.0 by installing the Microsoft Access Database Engine 2010, a free download. See the References section for a link to the download.
Let's get started with our development.
3. Create a new directory named ExcelDrop. I used C:\@\ for this demo (e.g. C:\@\ExcelDrop\).
4. Under ExcelDrop create two directories, Archive and Processing. Your directory tree should look like this:

5. Stage file BusinessData.YYYYMMDD.xlsx (available in the download attached to this article) in the Processing directory. During the development phase the SSIS Excel Connector will need the file to be present in order to generate the metadata necessary to define the file import within the SSIS package. Once development is complete the file can be moved, and the package will have no trouble operating properly at runtime if the file is not present.
6. Create a new database and staging table in your SQL Server 2012 instance:
USE[master]GOCREATE DATABASE[Inventory]GOUSE[Inventory]GO SET ANSI_NULLS ON GO SET QUOTED_IDENTIFIER ON GO CREATE TABLEdbo.ProductStaging ( ProductStagingIdINT IDENTITY(1,1) NOT NULL, ProductNameNVARCHAR(255) NULL, PricePerUnitDECIMAL(12, 2) NULL,CONSTRAINTPK_ProductStagingPRIMARY KEY CLUSTERED(ProductStagingIdASC) )GO
7. Create a new SQL Server 2012 SSIS Package using SQL Server Data Tools (SSDT) and name it LoadExcelWorkbook. See the References section at the end of this article if you need assistance getting started with SSDT and SSIS 2012.
8. Add the following Variables to the SSIS package. Some of the expressions build on other variables so create all variables initially, then revisit the variables that require it to set their Expression values.
Name | Type | Value | Expression |
ArchivePath | String | <derived from Expression> | @[User::DropPath] + "Archive\\" |
DropFile | String | C:\@\ExcelDrop\BusinessData.YYYYMMDD.xlsx | n/a |
DropPath | String | C:\@\ExcelDrop\ | n/a |
FileExtension | String | xlsx | n/a |
FileMask | String | <derived from Expression> | @[User::FileNamePrefix] + "*." + @[User::FileExtension] |
FileName | String | <derived from Expression> | REVERSE(SUBSTRING(REVERSE(@[User::DropFile]), 1, FINDSTRING(REVERSE(@[User::DropFile]),"\\", 1)-1)) |
FileNamePrefix | String | BusinessData | n/a |
ProcessingFile | String | <derived from Expression> | @[User::ProcessingPath] + @[User::FileName] |
ProcessingPath | String | <derived from Expression> | @[User::DropPath] + "Processing\\" |
For additional information about SSIS Expressions see the References links at the end of this article.
9. Drag a new File Watcher Task from the Common section in the Toolbox onto the Control Flow design surface.

SSDT will immediately flag a validation error on the File Watcher Task. Do not worry. We will resolve the validation error when we configure the Task in the next step.

10. Double-click the File Watcher Task to open the Task Editor. On the General page, in the General section, rename the task to Watch for Incoming Excel File. In the Options section set the Output Variable Name to User::DropFile, a variable we configured in an earlier step.

We will now set some of the expression properties of the Task, making the Task dynamic. This means that some Task properties will derive their values at runtime, and will depend on the value of certain package variables. Set the Filter expression to use the runtime value of the @[User::FileMask] variable, and set the Path expression to use the runtime value of the @[User::DropPath] variable:

Technically this step was not necessary. We could have just as easily hardcoded the values into the Task properties, however keeping important values in variables and mapping those variables to Task properties using the Task's expressions makes it easier to configure and reconfigure the package as needed. A note about hardcoding: this is a demonstration and while I am showing the use of expressions to map variables to Task properties to make it simpler to configure, if I were developing this package for use in an enterprise environment I would take it one step further and map the variable values to either an XML configuration file or a SQL Server table using a Package Configuration (see References).
After we set the expression values we can see the mappings reflected in the General page, signifying the Task is configured to take values for those properties from the result of an Expression, in this case a simple variable mapping:

Click OK to save the changes to the Task.

We have successfully configured a File Watcher Task to find a file in the ExcelDrop directory based on a file mask (BusinessData*.xlsx). We are ready to code the logic to process the file. Referring to our processing logic in the Design section we have achieved Step 1. Watch for incoming file. Here are the steps we have yet to implement:
Step 2. Move the file from the "drop directory" into the "processing directory".
Step 3. Clear the database staging table.
Step 4. Load the Excel file into the staging table from the "processing directory".
Step 5. Move the file from the "processing directory" to the "archive directory".
11. To achieve design Step 2 we will use the built-in File System Task. Drag a new File System Task from the Common section in the Toolbox onto the Control Flow design surface.

SSDT will immediately flag a validation error on the File System Task. Do not worry. We will resolve the validation error when we configure the Task in the next step.

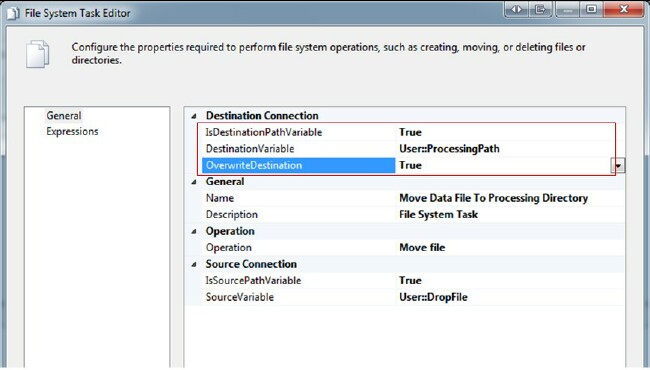
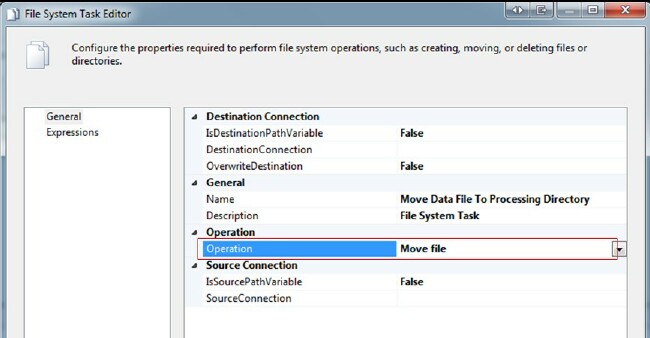
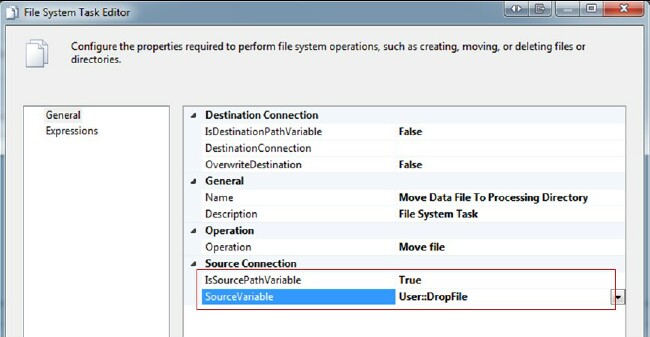
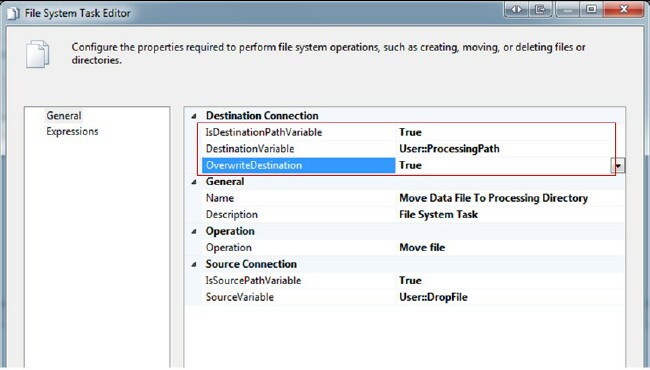
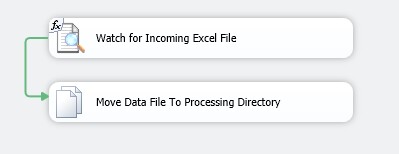
Step 3. Clear the database staging table.
Step 4. Load the Excel file into the staging table from the "processing directory".
Step 5. Move the file from the "processing directory" to the "archive directory".
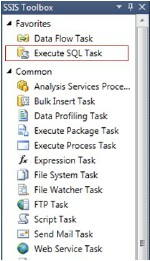
SSDT will immediately flag a validation error on the Execute SQL Task. Do not worry. We will resolve the validation error when we configure the Task in the next step.

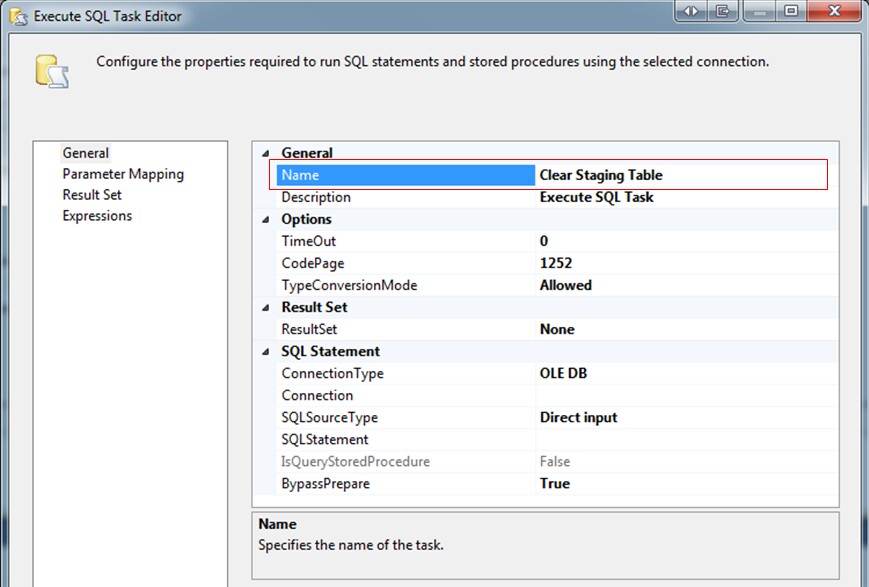
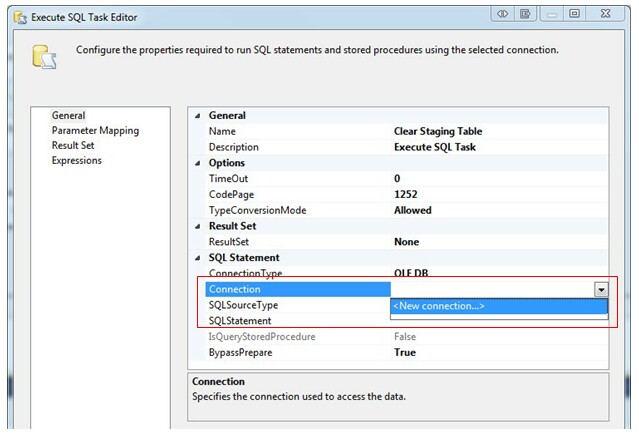
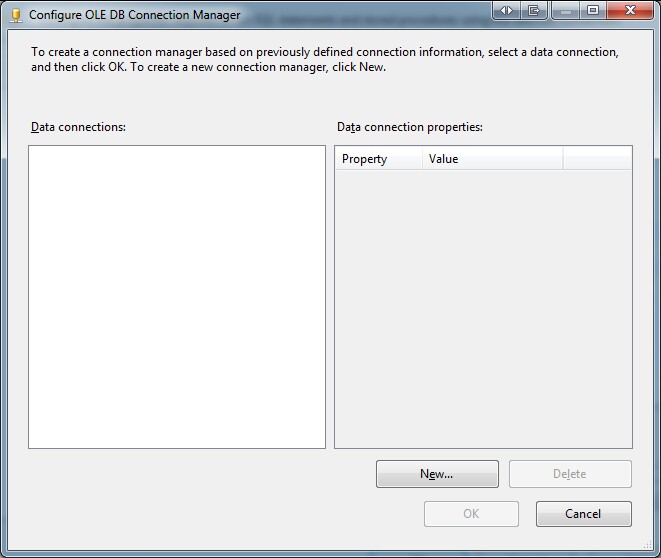
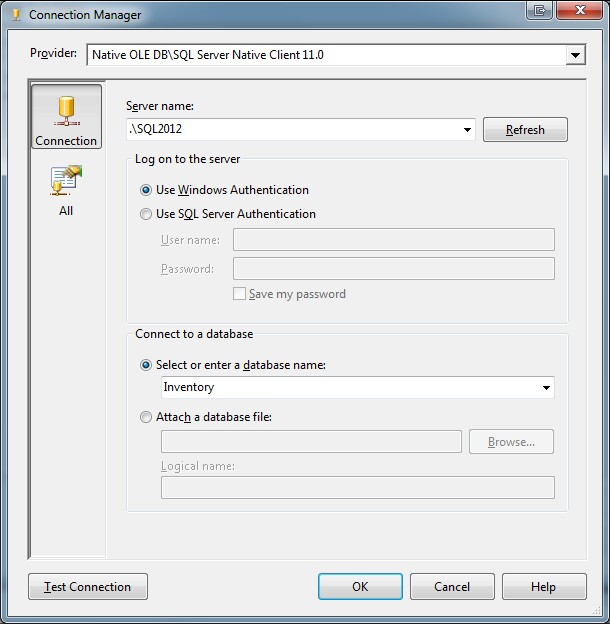
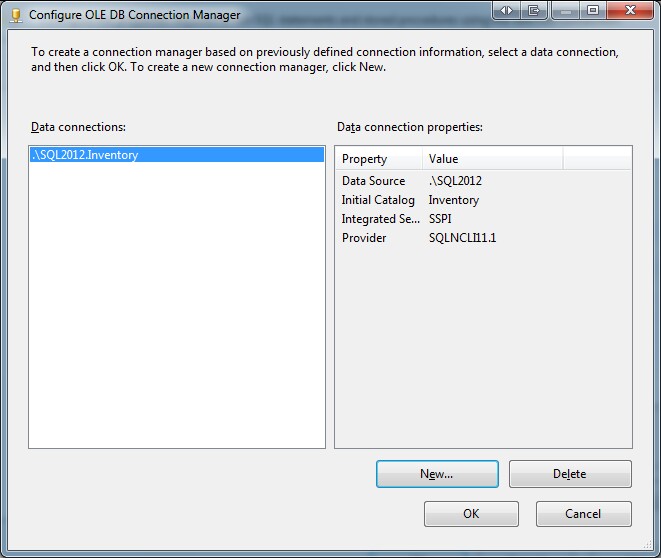

Here is the SQL code to place in the SQLStatement property of the Execute SQL Task:
TRUNCATE TABLE dbo.ProductStagingNotice that SSIS created a new OLE DB Database connection to support the Execute SQL Task:

16. The next step from our processing logic is Step 4. Load the Excel file into the staging table from the “processing directory”. This will require a Data Flow Task. Drag one from the Favorites section of the Toolbox onto the design surface and name it Load Excel Data to Staging Table. Connect to it from the output of the Clear Staging Table task. In the Data Flow Task we only need to copy the data from the Products Worksheet (i.e. Tab) in the Workbook (i.e. Excel file) into the table we created in the Inventory database earlier (dbo.ProductStaging).

Double-click the Data Flow Task to open the Data Flow designer. We will need two objects in our Data Flow, an Excel Source and an OLE DB Database Destination. The SSIS Development Team added two handy Assistants to the Data Flow Designer in SQL Server 2012: the Source Assistant and the Destination Assistant. We will use them here.
Source 1. Drag a Source Assistant onto your Data Flow designer:

Source 2. The Add New Source dialog will appear. Select Excel, and New… and click OK:

Source 3. Select the sample file in the Processing directory and Click OK:

The SSIS designer will create a new Excel Connection Manager and Excel Source Component for you, per what we did with the Source Assistant.

The validation error icon placed on the Source Component immediately after creation is normal. SSIS will show there is an error until we define the data source, i.e. provide the Worksheet name or Query that defines the data set it will process.
Source 4. Double-click the Excel Source to open the properties and set it to source data from the Products table (i.e. Worksheet) in the Excel Workbook.

When finished setting the Source table, click OK and notice the validation error disappear from the component.
Source 5. Right-click the Excel Source Component and select Properties (or highlight and press F4). Set the ValidateExternalMetadata property to False:

This is important because in a production setting the Excel file will not exist in the processing directory when the SSIS package begins to execute. Setting this property to False will let SSIS know it should bypass validating the metadata defined for the source component at runtime.
Source 6. Our Source object is now configured. Now we must configure our Excel Connection to be dynamic in terms of which file it will load, since the name of the file will change each day. Right-click Excel Connection Manager in the Connection Managers pane and select Properties (or highlight and Press F4).

In the Properties window click the ellipsis to open the Expressions Editor:

Set the ExcelFilePath to take its value from the ProcessingFile variable:

Our Source Component and Excel Connection is now configured. We will now configure the Destination Component.
Destination 1. Drag a Destination Assistant onto your Data Flow designer:

Destination 2. The Add New Destination dialog will appear:

Select SQL Server, the Connection to the test Inventory database we setup earlier when configuring the Execute SQL Task, and click OK:

Do not be concerned with the validation error shown on the OLE DB Destination component. The error will disappear when we finish configuring the data flow.
Destination 4. Connect the two Components:

Destination 5. Double-click the OLE DB Destination to open the Properties. Set the Name of table or the view to dbo.ProductStaging to let SSIS know that is where you would like to store the incoming data:

After selecting dbo.ProductStaging from the drop-down, because the columns in our Excel Worksheet match the columns in our staging table, SSIS will automatically map them to each other. This is nice for the purposes of this demo and a behavior that can be quite handy if you happen to control one or both of the source file format or destination database table definition when developing an ETL process:

Destination 6. Click OK. Our Data Flow Task is now complete:

Our Data Flow Task is complete!
17. Referring to our processing logic, we completed the implementation for Step 4. The last step is Step 5. Move the file from the "processing directory" to the "archive directory". For this step we can again use a File System Task. Drag a File System Task from the Toolbox onto the Control Flow design surface, connect the Data Flow Task to it and configure it as follows:

After some renaming and rearranging of the objects your SSIS package should look similar to this, the finished product I previewed at the beginning of this article:

Testing
We have completed the process of creating and configuring our SSIS package to satisfy our requirements. It is now time to test it.
1. Start the SSIS package (press F5).
2. Your package should immediately move into a state where the File System Watcher is watching for files entering the drop directory C:\@\ExcelDrop, as noted by the Gold Wheel spinning in the top right corner of the task:

4. In order for the package to proceed we must add a data file to C:\@\ExcelDrop\ that satisfies the file mask BusinessData*.xlsx. Cut the sample file BusinessData.YYYYMMDD.xlsx in the Processing directory C:\@\ExcelDrop\Processing\ and Paste it into C:\@\ExcelDrop\.
5. Within a few seconds of moving the file (i.e. creating a new file) BusinessData.YYYYMMDD.xlsx in C:\@\ExcelDrop\ the File Watcher Task will notice there is a qualifying file present. When the Task can gain exclusive access to the file the rest of the package will be allowed to execute and our variable, User::DropFile, will be set by the Task to the name of the file that was found. Here is what you ought to see when the package completes:

6. We can now check dbo.ProductStaging in our test Inventory database and see that data was loaded.

Success!
Conclusion
Relative to some other methods the Konesans File Watcher Task can be leveraged to:
- Reduce the amount of time between when a file is delivered to a directory and when an SSIS package can begin processing that file.
- Reduce the number of times an SSIS package must be executed in order to process a single file.
In a previous article I demonstrated how to use the built-in WMI Event Watcher Task to accomplish the same result. The Konesans File Watcher Task offers functionality and ease of use that I like very much, namely that it can be used to watch for files in a network location per a UNC path without much reconfiguration, and you can configure it to recognize an existing file when the task begins. We can accomplish both of these using functionality built into the WMI Event Watcher Task, and SSIS in general, however not without some non-trivial reconfiguration and some custom coding. The Konesans File Watcher Task makes this functionality very accessible and simple to implement.
I would be remiss if I only sang the praises of the File Watcher Task. There are a couple downsides that I must mention. The Task is closed source meaning we cannot review the source code. Also, we must install the component on each server and developer workstation where packages that make use of the Task will be executed or developed. These two properties of the Task may not bother you, however it can amount to a real barrier towards adoption for many individuals, and especially for corporate environments where SSIS tools from third-party vendors (i.e. not Microsoft) are strictly regulated and sometimes banned outright.
In a future article I will demonstrate a third technique to satisfy our project requirements using only a SSIS Script Task. In addition I will provide a comparison of all three techniques to help you choose the right tool for the job.
References
- Konesans File Watcher Task
- SSIS Expressions
- Installing a New Instance of SQL Server 2012 Database Engine and SQL Server Data Tools (SSDT)
- Create a New SSIS Project in SSDT
- Download Microsoft Access Database Engine 2010 Redistributable (includes ACE OLE DB Driver 12.0)
- Download Microsoft SQL Server 2012 Evaluation
- SSIS Package Configurations
- System.IO.FileSystemWatcher


