

Microsoft's introduction of the Team Edition for Database Professionals (VSDB) turned around our development and deployment processes. For a long time we had been working on methods of deploying from source control in the same way that the development teams work with their code. We tried several tools from various vendors and had finally decided to build our own. We had been using the home grown tool for a little while when VSDB came out. It solved a number of problems that we had run into with our in-house tool and offered a bunch of functionality that we had previously not had. So we went with VSDB. Now, almost all of our major development projects are using VSDB for development and deployment. The road to implementation contained more than a few bumps. The biggest of these was figuring out how exactly to set up our projects so that we could automate deployment between multiple environments; Development, QA, Staging, Training, Performance Testing and, finally, Production.
There are any number of possible differences between environments. The two that created difficulties for us were the different disks defined on different servers, and the different security requirements between servers. We also needed the builds to be automated so that we can schedule when they're run as well as run them manually. Finally we needed to be able to share projects between different DBA's so that more than one of use could run the same deployment on more than one environment.
In the following, I'm assuming you already create your VSDB projects and understand the basics of working within the Visual Studio environment as well as the basics of working with VSDB. We're also going to concentrate on scenarios where we're recreating the database every deployment. Incremental deployments have a whole host of issues that may require another article. This is targeted at the Visual Studio 2005 version. A new version has come out with Visual Studio 2008, but according to Gert Drapers blog, there are probably few differences between what's outlined here and the new version.
Server Configuration
In order to support deploying to multiple environments, you need to set up multiple connections so that each of the various servers will be used appropriately. A method of doing this is supplied with VSDB. On the Standard tool bar a drop down lists the available configurations and provides a link to the Configuration Manager. You'll need to define a Configuration for each environment that you will be connecting to. The more so because the Build settings in the Project Properties are different for each environment.
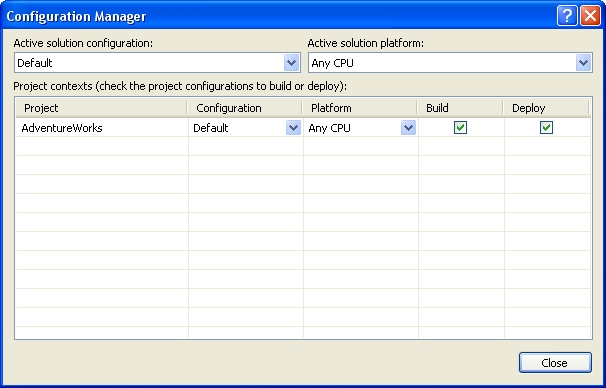
Clicking the Configuration Manager opens a new window. This window lists the Projects available for the solution you have open within the Visual Studio environment. Each project has a list of configurations that can be created & removed from this window. It's important to note that configurations are created both for the Solution and for the Project. They can be named the same thing. If you delete or change the name of the Solution configuration, you haven't done so for the Project configuration and vice versa.
Once you've set up a configuration for each server that you are interested in connecting to, you need to modify the Build for each configuration in order to change the server connection, file locations, etc.
Right click on the project in the explorer window and select properties. The property sheet will appear. Click on the Build tab to begin to manipulate the various properties listed.
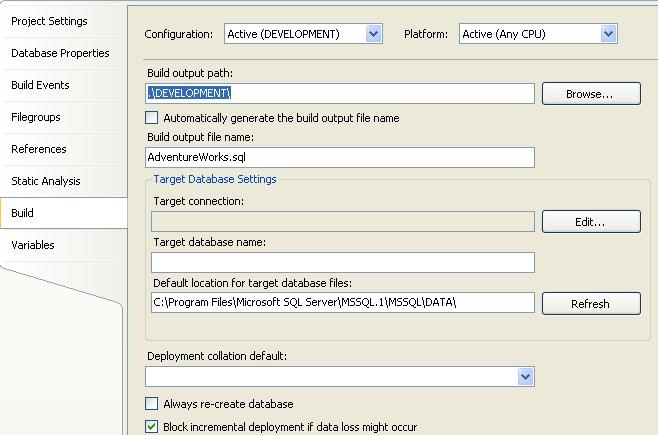
As you can see in the image above, the DEVELOPMENT configuration is selected. I could have a configuration for QA, PRODUCTION, TRAINING, PERFTEST, whatever. The Target Database Settings are our primary concern in this case. First off, you need to click on the Edit... button to set up the connection to your server. Then you have to specify a database name. Finally, click on the Refresh button to get the default location for the database files. This is pulled from the defaults on the server. If you haven't updated those individually for each of your database servers, now is the time. Set the Always re-create database to on in order to completely redeploy the database with each deployment.
All the configuration information is stored in the .user file within the project. This is normally an invisible file since it maintains individual settings for the environment. But, since we need these server settings from the configurations to be shared, you have to browse to the .user file and add it to your project and check it into source control. Every time you perform edits to the project, you should check this file out of source control first.
We're now going to move to the FileGroups tab. If your system is like ours, you probably have various drives associated with database storage, one for the data/clustered indexs, another for the indexes, another for text, yet another for logs and maybe more.
 As you can see, it's using the variable $(DefaultDataPath) and the variable $(TargetDatabase) to create the location for the log files. Since we have a different location that we want to use, in our system, we replace the string above with this: $(Log_Drive)$(Log_Dir)$(TargetDatabase)_log.ldf This allows us to configure the specific drive and directory that we want to use. Now, to get this parameter into the system, we have to look at how MSBUILD.EXE worksMSBUILDBecause we're working through Visual Studio, a lot of the tools that come with it are available to us. One of these is MSBUILD.EXE. This is the command line build utility. We set up command files for each of our environments that call msbuild and set it to the appropriate configuration, passing in the appropriate parameters. To store the command files, we create a folder within the project called CommandFiles. This keeps them together with the code and all of it gets checked into source control (TFS in our case). Setting up the command is pretty simple: msbuild ..\Adventureworks.VSDBj /t:sqlbuild /p:Configuration="DEVELOPMENT";Log_Drive="Q:\";Log_Dir="\MyPath"
msbuild ..\Adventureworks.VSDBj /t:sqlbuild /p:Configuration="DEVELOPMENT";Log_Drive="Q:\";Log_Dir="\MyPath"
msbuild ..\Adventureworks.VSDBj /t:sqldeploy /p:Configuration="DEVELOPMENT";Log_Drive="Q:\";Log_Dir="\MyPath"
Just like working with the gui, you have to do a build and then a deploy to put together all the scripts and get them out to your server.
Security
The last hard part about deploying to multiple servers is the fact that different servers in different environments not only have a variety of users associated with them, but they may even have different roles with different permissions. For example, we expose quite a few permissions to the developers within the development environment, but reduce those permissions pretty radically when the database is deployed to QA and obviously take them away completely in Production.
To support this, we put the post deployment scripts to work. The main script, script.postdeployment.sql is called by the tool as part of building and deploying your database. Simply add a line of code to call a security script:
:r .\SecurityDev.sql
It uses the SQLCMD syntax because that's the tool that MSBUILD uses to run the scripts against your server.
Within the script, we simply identify a list of servers that meet the development criteria and then set the appropriate permissions within:
IF @@SERVERNAME IN ('Dev01', 'DEV02','SANDBOX')
BEGIN
 CREATE ROLE [Dev];
 CREATE USER...
 GRANT CONNECT...
END
You'll need to create a file for each environment that you might deploy to and include them in the post deployment script. This means that they'll get checked as part of each deployment.
Conclusion
So, when you want to deploy the project, you run the command files associated with a particular server. It recieves, through parameters, the appropriate configuration and file locations. The configuration points it to the correct server. The file locations are set as part of the deployment. After the deployment is successful, the post-deployment scripts create the appropriate security settings per your server. It's all automatic and configures itself for a given environment. It's allowed us to reduce the time it takes to deploy our databases. We've also reduced our deployment error rate. We're more tightly integrated with the developers than we used to be. Overall, it's been very successful.
