

Have you ever wanted to know how fast one of your core SQL Servers are running, or ever wanted to compare the raw performance of one server to another? Now you can – and for free!
Some folks at Dell developed a synthetic benchmark tool a while back that can run benchmark tests against SQL Server, Oracle, MySQL, and PostgreSQL installations. It is freely available at http://linux.dell.com/dvdstore/. It generates a benchmark value in the form of ‘orders placed’ per test cycle, and tests the performance of the instance configuration and the infrastructure underneath it. You create a synthetic workload dataset with an included tool, load it into the instance via a new test database (DS2), and then run an included load testing tool to simulate orders of DVDs off of a web store.
I use this tool quite frequently when I want to test the raw performance of a SQL Server when doing virtualization proof-of-concepts. I will benchmark a physical SQL Server with this utility in a manner that approximates the same load I measure by profiling their production servers. I then replay the same configuration against a virtualized copy of the same setup, and compare the results. If the infrastructure is performing as expected, the performance should be equivalent. If something is not configured right, the equivalent workload will perform slower than the physical server, and then I know I need to go investigate.
Let’s get started!
If you are interested, Dave Jaffe from Dell has created an introductory test video on Youtube located here.
Pre-Requisites
First, download the two pre-requisite test bundles. A base bundle is shipped for all database engines, and the current release is located at http://linux.dell.com/dvdstore/ds21.tar.gz. The extra bundle for SQL Server testing is located at http://linux.dell.com/dvdstore/ds21_sqlserver.tar.gz. Download them both.
I normally create a folder called C:\ds2 for these. Make sure you have enough space on whatever drive you place them on to create the workload files. Extract both of these files to the same base directory, and it will create a file structure that is similar to the following.

Next, you need to install a Perl utility so the workload files can be successfully generated. I like to use ActiveState’s ActivePerl community edition. Download the version that matches your Windows platform and install it.
Setup
Next, we will create the workload files. You should be doing this on the database server itself so you do not have to copy the workload files across the network after you create them. How large should you make the workload dataset? I strive for targeting the average size of the database that I am looking to migrate between platforms, or just a good size that represents average data volumes in your environment. Remember that you need this amount of space on the drive where you are building the workload files.
For demonstration’s sake, I’ll generate a 2GB workload dataset here. Open a command prompt and cd into the new DS2 directory that you created. Run Install_DVDStore.pl to begin the process.
Enter the database size (integer value), then enter the measurement of space. Enter the database platform (MSSQL) and the platform (WIN).
![]()
Next, you need to enter the location where the new database objects will be placed on the SQL Server’s file system itself. It does this as part of the create database script. Don’t worry, these can be changed later if necessary. Please remember to place a trailing backslash at the end of the path because the build script does not do this for you.
I am testing this on my laptop so I will use the C:\DS2\DatabaseFiles\ directory.

Once you hit enter, it will begin to generate the CSV workload dataset files.

Give it a bit of time to finish, and now you are ready for the next step. If you navigate to the sqlserverds2 directory, you will now see a script called sqlserverds2_create_all_2GB.sql.

Do not run this file yet. DVDStore for SQL Server has a small bug in it. Edit the highlighted file with your favorite editor (Notepad or SSMS both work great).
Scroll to line 91. You will see it is a create table command with line 91 being GENDER VARCHAR(1). Change this to a VARCHAR(2). Something in the way that the workload script is generated on Windows causes this piece to fail if not corrected. Save the file.

At this time, check to ensure that full text search is enabled on your SQL Server instance. Most of the time this is a no-brainer, but occasionally I find that it has been disabled.
Data Load
Now, run the script! It will create the new ‘DS2′ database and a new login called ‘ds2user’. This login does not have the ability to set or change the password because of the way the workload files were coded, so for security purposes disable this login when your tests are complete.
It then loads the CSV workload files with bulk insert commands. It could take a bit, so be patient. You can monitor the progress in the query’s Messages window.

When completed, run whatever index maintenance job that you have available on this new database. I recommend the Ola Hallengren database maintenance solution.
Finally, take a backup of this database so that you can restore it on this or other instances to replay this test to get relative performance differences.
Test Execution
Now, it’s time for the fun part. Create a new batch file in the c:\DS2\sqlserverds2 directory. I called mine ‘runstresstest.bat’. In the batch file, add the line:
- c:\ds2\sqlserverds2\ds2sqlserverdriver.exe --target=localhost --run_time=60 --db_size=2GB --n_threads=4 --ramp_rate=10 --pct_newcustomers=0 --warmup_time=0 --think_time=0.085 > testresults.txt 2>&1
In this string, please change your target if you intend to run this across a network or if you have a named SQL Server instance. Set your database size according to how you built the workload files. Adjust your number of threads to set the expected load. This program cannot scale well above 64 threads, and cannot be executed above 100 threads. If you need more threads than 64, I suggest running a second copy of the batch file to get more threads, and would set the test configuration at 50 threads.
The think_time setting is the amount of time that a simulated user would ‘think’ before clicking again. I have the time set very low so I can stress test the instance. I store the output to a ‘results.txt’ file so I can record the results later.

Now, pick a time that works best for your test and execute it. If this is a production instance with background production tasks, this test will throttle the CPUs and memory, so be careful not to disrupt production tasks. You’ve been warned! Make sure to have whatever monitoring tool or Perfmon running so you can capture the performance metrics – i.e. CPU usage, memory PLE, I/O activity, etc. – so you know how hard this machine is being throttled.
It looks like the test is not doing much at all in the command window.
![]()
However, tail the testresults.txt output file.

You can see activity as all of the threads are spawned and connect, and then the test actually begins.
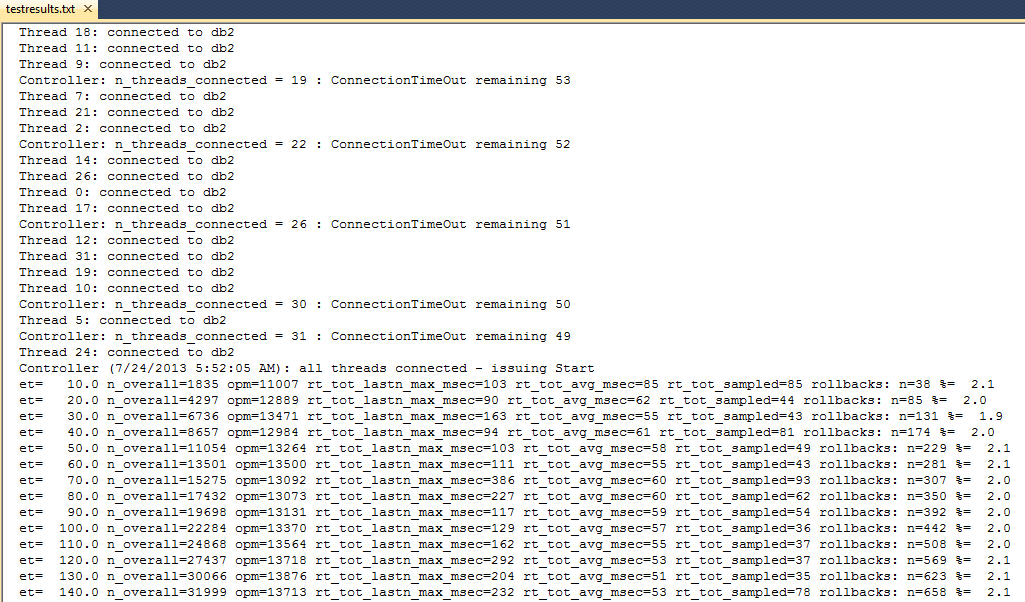
You get an entry in the output file every ten seconds,with an orders per minute (opm) value recorded.
Finally, the test will end, and you should have a final ordered placed value for the test.

This number is the relative score for the instance’s performance on this particular test.
Now, you are free to re-run this test in any permutation you see fit for your purposes. Restore your backup so you are working from the exact same dataset before each test. Document what you change if you are testing infrastructure or instance changes, and try to only make one change at a time!
You can now test infrastructure, instance, or database configuration changes and see the raw performance differences in one simple to read number! Enjoy, and contact me if you have any questions or comments!
