One of the main purposes of placing a database under source control, alongside the application code, is to allow team collaboration during development projects. The Version Control System (VCS) stores and manages all of the project files, maintaining an audit trail of what changed, and who made the change. Each team member can work on a file, or set of files, and submit their changes to the VCS to make them available to other team members. They can also inspect the VCS to discover recent changes made by other team members. By following some sensible best practices the team can coordinate their efforts, via the VCS, in a way that minimizes the potential for conflicting changes, and therefore the need to spend time on conflict resolution, during merging.
Getting Started
By necessity, the examples in this level build on the previous level, so I'll assume you've worked through the previous two levels, and set up an SVN server and client, created a repository, and committed our database and its objects to the source control system. Alternatively, the code download for each level, from here in, includes a backup (dump) of both the AdventureWorks and the MyAW2012 SVN repositories, as they existed at the end of the previous level.
If you have not worked through previous levels, have not created any repositories, and wish to jump straight in at this level, then follow these steps:
- Create a new empty repository (i.e. not with the trunk/branch/tag structure) e.g. called MyAW2012Copy.
- Create and add Dev1 as a repository user (see Level 1)
- Save the attached dump file to a suitable location, e.g. D:\SVNBackups
- Open a command prompt (if you are using VisualSVN Server Manager, you can open a command prompt from within the tool. At the SVN Server level, select Action | All Tasks | Start Command Prompt).
- Restore the dump file to whichever location you configured SVN to store the repository data and metadata (C:\Repositories\, by default), as follows:
svnadminloadC:\Repositories\MyAW2012Copy< D:\SVNBackups\MyAW2012_AfterLevel2.bak - Check out the cloned repository to a new working folder (e.g. C:\SVN_Dev1\MyAW2012) as described in Level 2.
Add a new user to SVN
In this level, we're going to have two developers working together on the same database project, so we need to authorize a new user on our source control system. Connect to the SVN server we set up in Level 2 (in my case, for example, the URL is http://localhost:3343/csvn/), and authenticate using administrative credentials. Navigate Users | Create to create a new user and give the user name, such as Developer2.
Using Domain accounts from Active Directory
Most source control systems, including CollabNet SVN, can be tied into an Active Directory server to use domain accounts, assuming your team are all on a suitable network.
By default, some SVN server software, such as Subversion Edge, has a default rules for repository access that allow all authenticated users to connect to all repositories on the SVN Server instance. In other case, such as if using Visual SVN, you'll need to add each user to each repository, explicitly. Check your server's documentation and make sure you grant the new user to access the repository, if this is not the default option.
Using a native client (TortoiseSVN)
In the absence of IDE-integrated client, interaction with the VCS is via a dedicated client, such as TortoiseSVN, when using SVN. Developers establish a working folder for the project, just a normal Windows directory, which they then link to the VCS using the native source control client. They save their database scripts within the working folder and then manually commit them to the VCS through the native client. They also perform regular updates of the working folder to capture changes committed to the VCS by other developers, and then apply those change scripts, manually, to their copy of the development database.
In Level 2, we created a copy of the AdventureWorks database called MyAW2012, and demonstrated a manual technique for putting it into the VCS. Let's now assume that our second developer, Dev2 for short, wants to start development work on MyAW2012.
Commits and Updates
Let's see how our new user can collaborate with our existing users, committing changes and capturing the changes of others into his working set, working through a native source control client, such as TortoiseSVN (later, we'll cover the same process using an IDE-integrated client, Redgate SQL Source Control).
For the examples, I assume use of the dedicated development model (see Level 2), where each developer has his or her own dedicated copy of the database under development, and so each develops separately, in a dedicated 'sandbox'. It is important to use the same development model for all database users, to avoid conflict between the different models.
Initial Checkout
To see this in action, create a new Windows folder for Dev2, and perform an SVN Checkout of the MyAW2012 repository created previously (https://<server>/svn/MyAw2012) to C:\SVN_Dev2\MyAW2012, which will create the MyAW2012 subfolder as Dev2's working folder.
Multiple users on the same client: clearing authentication data
Of course, generally, each user will be on a separate client. However, if you're working on a single machine for these examples, you'll need to remember to clear TortoiseSVN's authentication data each time you want to switch between users. To do this, right-click the working folder, or one of its subfolders, navigate TortoiseSVN | Settings. Go to the Saved Data node, and click Clear All for the Authentication data listing.
With the checkout complete, Dev2's working directory should look something like as shown in Figure 1, depending on how Dev1 organized the folders and files for the initial commit (I have simply renamed the original SVN folder to SVN_Dev1)
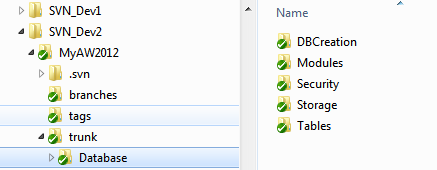
Figure 1: Dev2 performs a checkout of the root repository folder in the VCS
Creating and Committing new database objects
Let's now imagine that Dev2 needs to create a new table and a stored procedure that writes to it. Listing 1 shows the script to create the new table, called MyTable.
/* Tables: dbo.MyTable.sql */USE MyAW2012
GO
CREATE TABLE dbo.MyTable (
MyId INT IDENTITY(1,1)
,MyText VARCHAR(100)
);
GO
Listing 1: The CREATE script for the Mytable table
For code modules, such as stored procedures or views and so on, a common approach is to add a clause to the CREATE script to check if the object exists first, and dropping it if it does, before running the CREATE command. Alternatively, we can adopt the pattern used by Alexander Karmanov (see http://bit.ly/1Eicfeg), whereby the CREATE PROCEDURE command is essentially just a stub, which SQL Server only runs if the object does not exist in the target database, and with the procedure logic defined within a subsequent ALTER STATEMENT command, which will always run.
Listing 2 depicts this latter approach. It may seem like a complication now, but it makes it much easier to modify the objects subsequently, by just adjusting the logic in the ALTER command. When the change is deployed, there is no need to drop the objects first and so this approach minimizes user interruption when and leaves any permissions unchanged.
/* Modules: dbo.uspWriteToMyTable.sql */USE MyAW2012
GO
IF OBJECT_ID('dbo.uspWriteToMyTable') IS NOT NULL
    SET NOEXEC ON
 -- if the object exists, SQL Server will compile, but not run, the
 -- subsequent CREATE PROCEDURE batch
GO
PRINT 'dbo.uspWriteToMyTable: creating initial stub';
GO
CREATE PROCEDURE dbo.uspWriteToMyTable
AS
    PRINT 'dbo.uspWriteToMyTable: Not implemented yet.'
GO
SET NOEXEC OFF
 -- the ALTER PROCEDURE batch will always run
GO
PRINT 'dbo.uspWriteToMyTable: procedure code is updated';
GO
ALTER PROCEDURE dbo.uspWriteToMyTable ( @Mytext VARCHAR(100) )
AS
    BEGIN
        INSERT  dbo.MyTable
                ( MyText )
        VALUES  ( @Mytext )
        PRINT 'dbo.uspWriteToMyTable ... running ...'
    END;
GO
PRINT 'dbo.uspWriteToMyTable: procedure creation script finished';
Listing 2: Creating the uspWriteToMyTable stored procedure
Our developer, Dev2, generates individual scripts for each object, and saves each to the appropriate sub-folder of his working directory, as indicated at the head of each script.
Having saved the two files, they will not be marked with the green tick in the working directory, as they would if they were up to date in source control, indicating that Dev2 still needs to "add" the files to the working folder. Depending on your system setup, the files and directory may be marked with a '?' icon. Having added the files to the working folder (right click the file, select TortoiseSVN |Add), the overlay should change to a '+' icon.
Dev2 now needs to commit the file to the VCS, in order that the VCS will begin tracking the file, and so that it will be available to other developers. The best and safest way to do this is to better to commit at the highest possible level, such as at the trunk or even repository level. This will capture all related changes in one commit. While it is possible to comment at lower levels, it is quite a dangerous approach. For example, to commit the stored procedure only, Dev2 can right-click the Modules subfolder, containing the new stored procedure, and select SVN Commit. However, what happens if he then forgets to commit the associated table?
The importance of meaningful commit messages
Upon each commit to the repository, it is a best practice to provide a meaningful description of the change, as a commit message. It will make subsequent auditing of changes much easier. If you use a specific reference for each requirement you are implementing, why not include this in the commit message, to help you identify the requirement to which the change was related?
Having performed the commit, you will be able to see the new objects in source control if you browse the SVN repository, using either the Subversion Edge browser, as described previously, or if you don't have Subversion Edge then you can use TortoiseSVN's built-in Repo-browser (in Windows Explorer, right-click on the appropriate directory within your working folder and navigate TortoiseSVN | Repo-browser). Figure 2 shows the revision log in Subversion Edge.

Figure 2: Log message displayed in SubversionEdge for Dev2's commit of two files
In my example, committing the table and associated stored procedure created revision 4 to the repository, although the specific revision number may be different for you. However, as long as you added a clear and specific log message, it will be obvious which revision relates to which change.
If we look inside the trunk folder we can see the history of revisions to the repository as a whole.
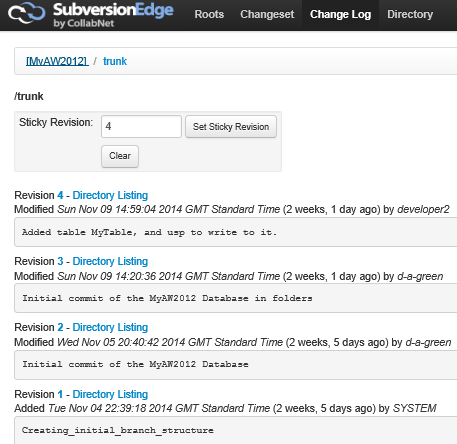
Figure 3: Clear commit messages help others to understand the purpose of each commit.
In a centralized source control system, users work with a single central repository, which maintains the version history for every change committed to that repository. To each commit, the central server assigns a global sequential revision number, which means that each file or set of files associated with a particular commit receives the same revision number. Since the revision numbers increment sequentially, it is easy to identify file versions at a specific point in time Notice, also, how helpful a clear message can be when trying to identify the change from a list of updates to the repository.
Performing Diffs
We can also use SVN's "diff" mechanism to see exactly what changed between two revisions. We'll cover this in more detail in a later level.
Now, the next time one of the other developers updates their own MyAW2012 working directory, by right-clicking and selecting SVN Update, which they should do frequently, they will retrieve the two new files that Dev2 added.
Modifying existing objects
Most of the time as developers, we are not adding or removing objects, but modifying existing ones, changing them subtly to add functionality, or resolve bugs. The implications of such modifications vary depending on the type of object being modified. For example, let's say Developer1 discovers a need to enter longer data (150 characters) into the MyText column, via the uspWriteToMyTable stored procedure.
From a clean MyAW2012 working directory, with no outstanding commits and having performed an SVN Update to pick up the changes made by Dev2, Dev1 can begin work on the required upgrade.
For the stored procedure, Dev1 simply modifies the ALTER PRCOEDURE portion of Listing 2, so that the @MyText input parameter takes150 rather than 100 characters.
…
ALTER PROCEDURE dbo.uspWriteToMyTable ( @Mytext VARCHAR(150) )
AS
    BEGIN
        INSERT  dbo.MyTable
                ( MyText )
        VALUES  ( @Mytext )
        PRINT 'dbo.uspWriteToMyTable ... running ...'
    END;
GO
…
Listing 3: Updating the definition of uspWriteToMyTable
However, of course, this change alone would cause a failure in the subsequent test run, without a corresponding update to the underlying table, to increase the length of the data type for the MyText column.
However, modifying the table is trickier. We have two basic options:
- Save the modified
CREATEscript – We store one file per object and edit each file as appropriate to reflect each schema modification. - Save a new
ALTERscript – For each schema object, we store the string of upgrade (ALTER) scripts, usually one change per script, required to advance the object from one defined state to the next.
Our first option is to construct a new CREATE script for the table, and commit it to the VCS. In many ways, this is the simplest, cleanest option from a developer's perspective. It means a unified approach to version control for all database objects, and this model is also a natural fit for the built-in versioning mechanisms of the VCS, which will track the complete history of changes to a given objects, and allow us to explore the changes introduced between versions.
The problem is: how will the other developers apply the new script to their dedicated database? They could drop the existing table and recreate it, but what if it's loaded with test data that they do not wish to lose? Also, of course, once our database is in a production environment and loaded with real data, any upgrade will need to ensure to preserve that data, so simply dropping and recreating a table will be out of the question.
Rather than generating a new CREATE script, the alternative is option 2, generating a series of ALTER scripts that must be run, in sequence, after the CREATE script. The downside of this approach is that since every change is a new script, it removes the basic ability of the VCS to show a "diff" of changes to an object, between revisions. On the plus side, it makes changes relatively easy to deploy, as long as we have a mechanism that ensure we run all the scripts, once, and in order. However, it can get complex and error prone in cases where there are a long series of modifications from multiple developers, and requires maintaining a "change log".
Some teams try to maintain both the latest CREATE scripts, and the series of upgrade scripts, but that leads to twice as much coding to do for each database change, and runs the risk of drift between the two (e.g. in the case of a typo in one script, where the length is created as 510 rather than 150 characters).
Regardless of the way in which we choose to resolve this issue, we can see that there is a degree of tension between the desire of developer to minimize the work entailed to version control a database, and the work necessary to actually deploy the database, either as a brand new instance, or an upgraded one. This is particularly acute where data needs to be retained as part of an upgrade – not usually such a challenge for application code. In my opinion, this is the single biggest reason why manual source control software for databases has lagged behind that of application code, and the reason that source control of databases is not as widely adopted.
Using a Schema Comparison Tool
With a tool such as SQL Compare, which SQL Source Control uses under the cover, we can adopt CREATE script versioning and allow the tool to generate the upgrade script required to move from one revision to the next, without data loss, by comparing the live database, or the new CREATE script, with the one that exists in the VCS. We'll cover this approach in our subsequent examples.
In this example, I've assumed that the team opted for CREATE script versioning, and so Dev1 simply commits a new version of the MyTable CREATE script, as shown in Listing x.
USE MyAW2012
GO
CREATE TABLE dbo.MyTable (
MyId INT IDENTITY(1,1)
,MyText VARCHAR(150)
);
GO
Listing 4: A new CREATE script to update the definition of MyTable
Right-click the SVN_Dev1\MyAW2012 folder and commit both these changes as a single commit.
Handling conflicts in a native client (Merging)
Sometimes, when a team works concurrently in upgrading the same database, there is the possibility of developers making changes to the same object, in the same branch (or in trunk), at the same time, which can lead to conflicts. Let's take a look at how we might handle such conflicts, when using native source control clients.
The team have decided that they want to add a new column to the ErrorLog table in the MyAW2012 database, in order to track which database login encountered the error. We will assume the developers are using CREATE script versioning i.e. when they alter an object, they save to the VCS the latest version of the CREATE script, rather than a separate ALTER script.
Dev2 updates his working folder to get the latest revision from the source control system (revision 5 in my example; your revision number may vary), and then gets to work creating a new ErrorEncounteredByLogin error-tracking column, with the agreed definition. Listing 5 shows the relevant portion of Dev2's new CREATE script for the ErrorLog table. In Dev 2's SSMS instance, open up the CREATE script for the ErrorLog table and add the ErrorEncounteredByLogin column, as defined in Listing 2 and save the new version of the script. Do not yet commit the change to source control.
CREATE TABLE [dbo].[ErrorLog](
  [ErrorLogID] [int] IDENTITY(1,1) NOT NULL,
  [ErrorTime] [datetime] NOT NULL,
  [UserName] [sysname] NOT NULL,
  [ErrorNumber] [int] NOT NULL,
  [ErrorSeverity] [int] NULL,
  [ErrorState] [int] NULL,
  [ErrorProcedure] [nvarchar](126) NULL,
  [ErrorLine] [int] NULL,
  [ErrorMessage] [nvarchar](4000) NOT NULL,
  [ErrorEncounteredByLogin] [NVARCHAR(255)] NOT NULL DEFAULT SUSER_SNAME(),
...etc...
Listing 5: CREATE script for the ErrorLog table
Unfortunately, there has been a miscommunication between Dev1 and Dev2, and Dev1 understood that it was his job to add the new error-tracking column. In Dev 1's SSMS instance, add a column that is identical in definition but called ErrorEncounteredBy, rather than ErrorEncounteredByLogin.
Now let's assume that Dev1 commits the change before Dev2, so go ahead and commit Dev1's change. Next, switch back to Dev2's SSMS instance and issue a commit. You should see a Commit Failed! Error. This is the sort of conflict that can occur when two developers both require similar functionality but are not communicating properly! The problem is that Dev2 is now, unwittingly, working on an out of date working copy (revision 4 instead of revision 5), as described in Figure 4.
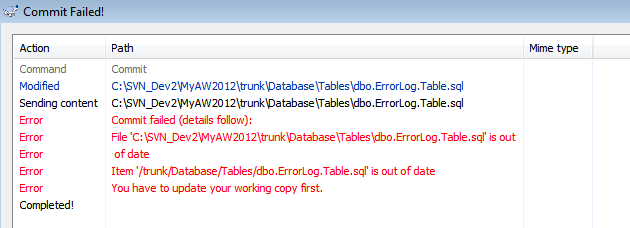
Figure 4: A conflict warning when attempting to commit a change to an object that has changed since the developer last performed an update of their working directory.
On clicking OK, SVN automatically suggest that Dev2 updates her working copy. In other words, SVN will bring Dev2's working folder up to latest revision (r5 in this example; your revision number may vary depending on exactly how you proceeded through the examples) and attempt to automatically merge the latest version of the file in the repository with Dev2's working copy of the file.
On proceeding with the update, the Update Finished dialog contains a "conflict" warning, as shown in Figure 5.

Figure 5: Update of working folder resulting in a conflict
Click OK, and SVN opens a commit dialog containing the conflicted file. Double clicking on the file opens the TortoiseMerge tool, clearly displaying the cause of the conflict.

Figure 6: Resolving the conflict in TortoiseMerge
TortoiseMerge shows the latest version from the VCS ("theirs") side by side with Dev2's working copy ("mine") and also the merged copy of the dbo.ErrorLog table, containing the conflict.
Dev2 can right-click the exclamation point in the left margin to see the options for fixing the conflict, accepting their change, his change, or even both. In this case, he selects Use text block from 'mine', in order to keep his own change only, and then clicks the Mark as resolved button (the green tick), closes the TortoiseMerge window, and commits the new merged version of the object, with a suitable commit message. This creates a new revision in the VCS (r6, in this example).
Dev2 can then inform Dev1, verbally or by email, of what happened, and the next time Dev1 updates his working folder, he will automatically get the new revision, with the ErrorEncounteredByLogin column.
While this example may seem a little contrived, it does demonstrate how conflicts can occur during team database development, especially in the absence of god communication. We'd see exactly the same situation if, for example, two developers were working on different columns in the same table, and on ended up with an out-of-date working copy. In this situation the affected developer would need to perform a merge that retained both changes.
Using an IDE-integrated client (SQL Source Control)
As discussed in Level 1, most application developers will much prefer to interact directly with the VCS through their IDE. For example, VisualSVN, a plug-in for the Visual Studio IDE, allows developers to retrieve files from the VCS, edit them as required in their IDE and then commit the changed file back to the VCS. More recently, a number of tools have emerged, such as SQL Server Data Tools (SSDT), or Redgate's SQL Source Control plug-in for SSMS, which integrate database source control directly into the developer workflow.
Source Controls using SSDT
It's worth noting that SSDT, introduced with SQL 2012, but backwards compatible to 2005, uses a different model for database source control, based around database projects. Later levels in this stairway will look in detail at the SSDT model.
Handling commits and updates in SQL Source Control
We're now going to discuss the process of committing changes and capturing the changes of others when working through an IDE-integrated client, in this case Redgate SQL Source Control.
In Level 2, we put the AdventureWorks database under source control using SQL Source Control. Let's now assume our new developer, Dev2, wants to start work on this database.
If you did not work through levels 1 or 2, then you'll need to follow these steps to get started:
- Create a new blank SVN repository, called for example AdventureWorks2012
- Retrieve the
AventureWorks_AfterLevel2.bakfile from the code download and restore it to the new repository, as described above in Getting Started. - In TortoiseSVN, check out the cloned repository to a new working folder (e.g. C:\SVN_Dev1\AdventureWorks2012).
- Within Dev1's SSMS instance, you will need to create an empty copy of the
AdventureWorksdatabase, called, for example,AdventureWorks2012_Dev1 - Use SQL Source Control to link it to the AdventureWorks2012 repository, using the URL
https:///svn/AdventureWorks2012/trunk/database.
- Perform a Get latest – if SQL Source Control reports
FREETEXTerrors at this point, see the section below, Connect to an existing source controlled database
Having followed these steps, you should be able to proceed as described in the following sections.
Create an empty copy of the development database
Our new developer needs to have a working copy of the database to use, so on Dev2's client open up SSMS and run Listing 6, modified as required for your environment (for example, to specify custom file locations).
CREATE DATABASE AdventureWorks2012_Dev2
Listing 6: Creating an empty copy of the AdventureWorks2012 database for Dev2
Generally, of course, each developer will have their own machine, but for the sake of these examples, I'm simulating two developers running on one computer. I have used a second windows account, running management studio, for Dev2. This necessitates giving suitable security permissions on the database instance to Dev2.
Connect to an existing source controlled database
Next, we need to link Dev2's copy of the database to the existing repository URL from Level 2 (https://<server>/svn/AdventureWorks/trunk/database/).
To do this, simply refresh the Object Explorer, right click the new AdventureWorks2012_Dev2 database, select Link database to source control, and enter the URL.
This will link the database to the existing repository. You may be asked to enter your credentials at this point (thus confirming that we are using a second developer account), but if you are using the same Management Studio interface these credentials may be remembered.
While the database is now linked to a VCS, the tool will not yet have either committed any objects to it or retrieved any changes from it. If you were to go to the Commit changes tab, you would see that, because Dev2's database is currently empty, there are no changes to commit.
However, on the Get latest tab in the Source Control window (Figure 7), you will see there are a number of changes to retrieve, essentially the whole database (you may have a different number of objects, depending on the variant of the AdventureWorks database that you are using).

Figure 7: List of changes in the VCS that are not yet applied to the local database
In this case, with the exception of the database owner, all items are New. Clicking on any one of the objects will reveal the CREATE script for the object as it exists in the latest revision in the VCS, versus its definition in the development database.
When you click the Get latest button in the top left (with the red arrow), SQL Source Control will update the development database will all the latest changes from the VCS. Click Get latest, SQL Source Control will begin the update. For larger databases, this can take a minute or two. Once done, we'll have the latest version of every database object, as it currently exists in the VCS.
Possible FREETEXT errors
Occasionally, the SQL Compare engine, which underpins SQL Source Control, doesn't handle precedence properly. In this case, it's possible you'll see FREETEXT errors because SQL Source Control is trying to create a stored procedure, uspSearchCandidateResumes, which uses the FREETEXT predicate on a table that isn't full-text indexed, because it isn't yet created. SQL Source Control provides the option to edit the synchronization script manually. Comment out the stored procedure, run the script manually to create the rest of the objects, and then create the stored procedure afterwards.
Note that at this stage we have not source controlled any data, so you will end up with an empty database. This is great where you don't need reference data, and allows unit tests to be run, but may impede functional testing and development, where you need to, for example, populate application objects. For this reason, I tend to also source control a script to insert a known set of "startup" data, as such data will be normally retained on future schema updates (with the exception of destructive events such as dropping a table or column).
Storing reference/lookup data in the VCS
You should think carefully about how much data you source control. As well as the physical storage requirement that a large data table introduces, you will find that there is a performance impact for the system to check each row of data upon every commit / get latest operation.
Committing new objects from SQL Source Control
At this stage, both Dev1 and Dev2 have working copies of the same AdventureWorks2012 database (Dev1's local copy is called AdventureWorks2012_Dev1 and Dev2's local copy is called AdventureWorks2012_Dev2), and can work side-by-side in their database development efforts.
Switch back to Dev1's SSMS instance and run Listings 1 and 2 (don't forget to update the USE statement to the correct database) to add to AdventureWorks2012_Dev1 the table, MyTable, and the uspWriteToMyTable stored procedure.
Go to the Commit changes tab in SQL Source Control, and you will see that it has detected the two new objects that need to be committed the VCS repository. However, try committing just the stored procedure, as shown in Figure 8.

Figure 8: Attempting to commit the uspWriteToMyTable stored procedure in SQL Source Control
The tool produces the error shown in Figure 9, and you will note that the default selection is to add dependent objects. This helps us to avoid the situation we discussed earlier, whereby the database, as it exists in the VCS, is in a non-working state.

Figure 9: An SQL Source Control warning to help prevent updating an object without also updating dependent objects.
We can now click Continue and SQL Source Control will add both, keeping our source control repository in a consistent state.
Modifying existing objects from SQL Source Control
For the initial commit of new database objects, SQL Source Control simply scripts out the CREATE command for each database object and commits it to the VCS. However, what happens when we need to update an existing object, while preserving any data stored in that object?
When working with a native VCS client, as discussed earlier, we need to choose at this point between generating and committing a new CREATE script, or committing a separate upgrade script. However, an IDE-integrated client removes this pain point, to a large degree at least. When a developer performs a commit operation from SQL Source Control, it compares the CREATE script for each object, as it exists in the local database, with the CREATE script for the latest version of the object in the VCS. If an object has been modified, it generates a new CREATE script that incorporates the changes, and which the developer can commit to the VCS.
Conversely, when a developer needs to update their local database with the changes of other developers, SQL Source Control performs a comparison of the CREATE script for the latest version of the object in the VCS with that for the existing object in the local database and generates the ALTER script required to synchronize the two.
Let's see that in action. Switch to Dev2's SSMS instance and perform a "get latest" to retrieve the new table and stored procedure that Dev1 just committed. SQL Source Control will simply create these new objects in Dev2's local database, since they don't currently exist.
Dev2 now modifies the table and stored procedure to accommodate 150 characters, and commits the changes to the VCS, with an appropriate commit message. Run the code in Listing 7 against Dev2's local development database.
USE AdventureWorks2012_Dev2
GO
ALTER TABLE dbo.MyTable ALTER COLUMN MyText VARCHAR(150);
GO
IF OBJECT_ID('dbo.uspWriteToMyTable') IS NOT NULL
    SET NOEXEC ON
 -- if the object exists, SQL Server will compile, but not run, the
 -- subsequent CREATE PROCEDURE batch
GO
PRINT 'dbo.uspWriteToMyTable: creating initial stub';
GO
CREATE PROCEDURE dbo.uspWriteToMyTable
AS
    PRINT 'dbo.uspWriteToMyTable: Not implemented yet.'
GO
SET NOEXEC OFF
 -- the ALTER PROCEDURE batch will always run
GO
PRINT 'dbo.uspWriteToMyTable: procedure code is updated';
GO
ALTER PROCEDURE dbo.uspWriteToMyTable ( @Mytext VARCHAR(150) )
AS
    BEGIN
        INSERT  dbo.MyTable
                ( MyText )
        VALUES  ( @Mytext )
        PRINT 'dbo.uspWriteToMyTable ... running ...'
    END;
GO
PRINT 'dbo.uspWriteToMyTable: procedure creation script finished';
Listing 7: Dev2 updates MyTable and uspWriteToMyTable to accommodate 150 characters in MyText field.
Commit the changes with an appropriate commit message.
Now, back in Dev1's SSMS instance, click "get latest". SQL Source Control will detect that the objects as they exist in AdventureWorks2012_Dev1 are different from their latest versions in the VCS, and will highlight how the VCS versions are different. Figure 10 shows the difference highlighted for the MyTable table.

Figure 10: The differences have been detected by SQL Source Control and highlighted
To see what's going on under the cover when we apply this modification, I set up and started a Profiler trace (feel free to use Extended Events, if preferred!) on the AdventureWorks2012_Dev1 database, and then hit "Get latest" in SQL Source Control to apply these changes to Dev1's database.
Figure 11 shows that, under the covers, SQL Source Control has determined that it can ALTER the existing table, rather than dropping it and creating it afresh with the new CREATE statement.
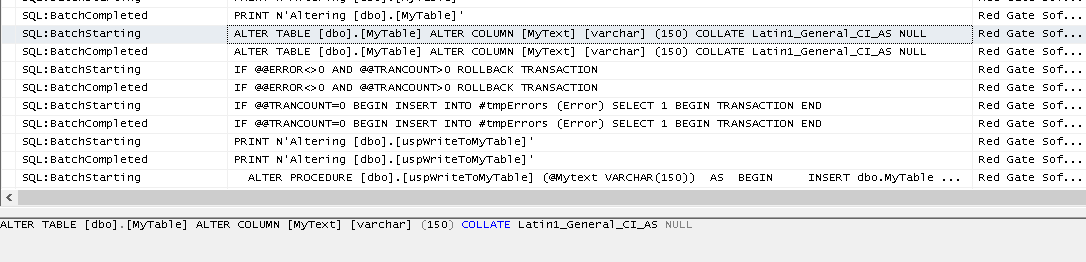
Figure 11: Under the covers, SQL Source Control runs an ALTER command to apply changes to an existing object in the local database
When SQL Source Control applies any change to the local database, it will do so in a way that retains the data in the table. If this is not possible, it will return a warning message that the change may result in data loss.
Avoiding Data loss during table modifications: Migration scripts
If SQL Source Control detects potential data loss, one way around this potential data loss is to use Migration scripts – a feature of SQL Source Control that allows us to manually code the path between two states of the database, where SQL Source Control can't work out automatically what needs to be done. We will look at Migration scripts in more detail later in this series.
In some cases, when two developers work simultaneously on the same branch, it's possible that both the local database and source control contain conflicting changes to the same object. In that case, a conflicted state occurs and SQL Source Control needs some help to work out what to do. Let's look in more detail at how to handle conflicting database object modifications, in an IDE-integrated client.
Handling Conflicts in the IDE Client
To demonstrate conflict handling in SQL Source Control, we'll run briefly through a similar example to the one we used previously when demonstrating merging in the native client, but this time with both our developers working on their own local copies of the AdventureWorks database, and coordinating through the VCS using the SQL Source Control plugin.
In Dev1's SSMS instance, run the code in Listing 8, but don't commit the change to the VCS just yet.
USE AdventureWorks2012_Dev1
GO
ALTER TABLE dbo.ErrorLog
  ADD ErrorEncounteredByLogin NVARCHAR(255) NOT NULL DEFAULT SUSER_SNAME();
GO
Listing 8: Dev1 adds ErrorEncounteredByLogin column
Next, in Dev2's SSMS instance, add a similar column, but with a different name.
USE AdventureWorks2012_Dev2
GO
ALTER TABLE dbo.ErrorLog
 ADD ErrorEncounteredBy NVARCHAR(255) NOT NULL DEFAULT SUSER_SNAME();
GO
Listing 9: Dev2 adds ErrorEncounteredBy column
Commit to the VCS Developer 2's modification, using the source control Commit Changes tab, with the commit comment of Added ErrorEncounteredBy column to ErrorLog table to track login of user encountering error.
Now, return to Developer 1's SSMS client and try to commit the change, SQL Source Control presents a window showing the conflict.

Figure 12: SQL Source Control detects a conflict
Currently, SQL Source Control does not offer built-in merging support. SQL Source Control allows only the entire object to be retained or replaced; we do not have the line-by-line merging capability that we had in the native client.
Therefore, we have the choice either to "keep mine", overwriting the current version of the file in the VCS when we commit, or "take theirs", in which case our local copy will be overwritten when we click Get latest. If we decide to take the version from source control, we will receive a warning stating that we are about to drop a column. In this instance, that's not a problem, but you should be aware of the potential for data loss, as discussed earlier.
If we need a merge option other than "keep mine" or "take theirs", such as including both columns, or creating a new merged version of the object that somehow reflects both changes, then assuming we have an external merge tool, such as BeyondCompare or KDiff, we can click the Merge… button shown in Figure 12 to launch that tool, saved the new merged file and re-commit the change to source control. This is a very similar process to that covered earlier, using TortoiseMerge.
Once you've completed all the changes, you can also update the developer's working folders in TortoiseSVN.
We can review all these changes in the VCS, which has the ability to show the commits done by each developer, and thus act as an audit trail, as well as show details of each revision (Figure 14). If you haven't got SubversionEdge, simply right click the working folder in TortoiseSVN, and select TortoiseSVN | ShowLog.
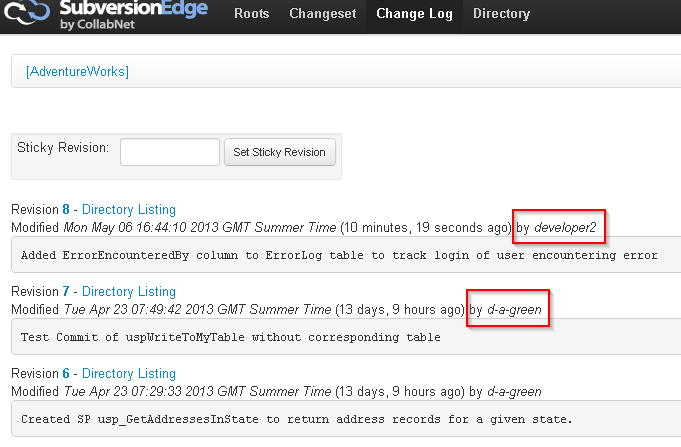
Figure 14: Reviewing changes in the VCS
We have now seen how two developers can work together with a source controlled database, and the effect of changes which come into conflict, and how to handle them.
Best Practices for Minimizing Conflicts and Avoiding Loss of Work
The art of minimizing conflict in personal relationships comes down to communicating, often, and so it is with version control. Version control is simply a record of the changes done, so to minimize conflicts we need to increase the frequency with which we communicate our changes with others.
- Always start from a known base – in other words, ensure that your working copy is up to date, or if using SQL Source Control, that you have run a "Get Latest" before starting work. This ensures you are working against the latest checked in code.
- Don't wait for a suite of changes to accumulate before committing– commit each atomic change as it is completed.
- Always test before committing – don't commit code that doesn't work to a trunk from which others will pull code. At the very least you will cause others extra work. Before committing, verify that the code compiles and passes the team's suite of unit tests.
- If working from a native VCS client, commit from a high level, rather than within a specific folder - to ensure that you don't miss files.
- Commit unfinished changes to a separate branch – if you have code which is failing tests, you should still commit the changes to the VCS at the end of each day, but not to the location form which other developers pull changes. Use a separate branch, and include a commit message that makes it clear that the code is a work-in-progress. Remember, checking into version control provides a backup should you or your machine not make it into work the following day