

Purpose
A data warehouse administrator is often tasked with loading data to the production environment. This can either be in the form of database to database data movement or file to database. The focus of this article is to examine how to back out data when the data is received in the form of a file and loaded to a database. This is a common practice when working with vendors or when you are working with a mainframe. Our method for backing out data is to capture the file name during the load process. There are different schools of thought on backing out data; the methodology used below is the one that my business has chosen as a best practice.
The process for this is fairly straightforward.
- Find the file to load
- Grab the file name
- Load the data – add a derived column
- Repeat as necessary
This process will also provide some exposure to the following tasks
- Foreach loop container
- Script task
- Data flow task
- File system task
Let’s setup our table and folder structure first. First, let’s create a folder on the root folder of the C drive and call it FILENAMEEXAMPLE. Within that folder, create another folder called ARCHIVE. Now, by login into your SQL Server database, create the table using the script at the bottom of the article. By the end of the tutorial, you will know how to loop through files, dynamically determine the file name, create a derived column, and load the data to your database environment. At the bottom of the article I’ve included two files to use in this example. Let’s begin!
Creating the FOREACH LOOP CONTAINER
The first step is drag a FOREACH LOOP CONTAINER to the onto the control flow window. By double clicking the task object it will bring up the FOREACH LOOP EDITOR. We’ll begin by first naming the task so that any others that come after us can know what the task is doing. For this example, highlight the GENERAL tab and name the task LOOP THROUGH FILES.
The collection tab is where most of the fun happens. Because we’re working with files, select the enumerator as FOREACH FILE ENUMERATOR (should be the default). The collection tab will look something like this:

So far so good. We’ve told SSIS to look at a folder and file text files. Now we need to do something with them. For this we will need to load the file name and map it to a variable. If you’ve selected FULLY QUALIFIED like I’ve done below it will grab the location and file name. By selecting VARIABLE MAPPINGS we can create a variable where the FOREACH LOOP CONTAINER will store the file name. This example assumes that all files are in a given folder.

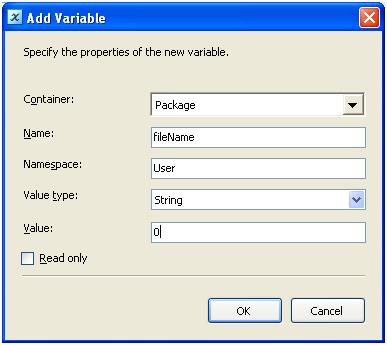
We’ll next create a new variable to contain the file name the FOR EACH LOOP captures. In my case, I’ve named it FILENAME. We’ll keep it in the USER namespace. Because it contains text we’ll keep the value type of STRING. For a value, I put in a 0. No other reason than to have a value.
Hit OK to save your variable. Hit OK once more to exit the FOREACH LOOP EDITOR.
Obtaining the file name on a fully qualified file name
To obtain the file name from a fully qualified location is to use the script task. The script task allows you to take advantage of .NET functions. In order to accomplish this, let’s drag a script task inside of the FOREACH LOOP CONTAINER. Should look something like this:
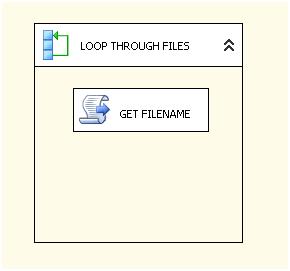
As we did with the FOREACH LOOP CONTAINER, let’s rename the script task to something more developer friendly. Let’s call it GET FILENAME. Select SCRIPT in the SCRIPT TASK EDITOR. We’ll keep the default, but we need to pass our variable FILENAME as a ReadWriteVariable.

Let’s write some code! Select the DESIGN SCRIPT button at the lower right of the SCRIPT TASK EDITOR
We’ll write a few lines of code to accomplish this.
       PublicSub Main()
         Dts.Variables("fileName").Value = System.IO.Path.GetFileName(Dts.Variables("fileName").Value.ToString())
         Dts.TaskResult = Dts.Results.Success
    End Sub
Load to the database
Now we need to load the data in the file into the database. That is the reason we’re doing this, right?;) Like we did with the SCRIPT TASK, we need to add a DATA FLOW TASK inside the FOREACH LOOP CONTAINER. It should now look something like this.

As we did earlier, rename the DATA FLOW TASK to Load data to the database (or something descriptive). Now the fun part. Double click on the DATA FLOW TASK.
Now that you’re in the DATA FLOW tab, let’s drag a FLAT FILE SOURCE task over.

By double clicking on the FLAT FILE SOURCE task, you’ll get to the FLAT FILE SOURCE EDITOR. Even though we’re going to ultimately have dynamic connection strings, for the purposes of testing, we need to have a connection string available at design time. By selecting NEW in the FLAT FILE CONNECTION MANAGER section we can point SSIS to the test file.

Select OK to confirm the changes. Select OK in the FLAT FILE SOURCE EDITOR to confirm all changes.
The next step is to add a derived column add our file name to the load process. Under the DATA FLOW TRANSFORMATIONS drag over a DERIVED COLUMN task. By double clicking on the DERIVED COLUMN task we’ll get the DERIVED COLUMN TRANSFORMATION EDITOR. This is where we’ll bind the value in the variable to the column that will be loaded. You’ll want the screen to look something like this:
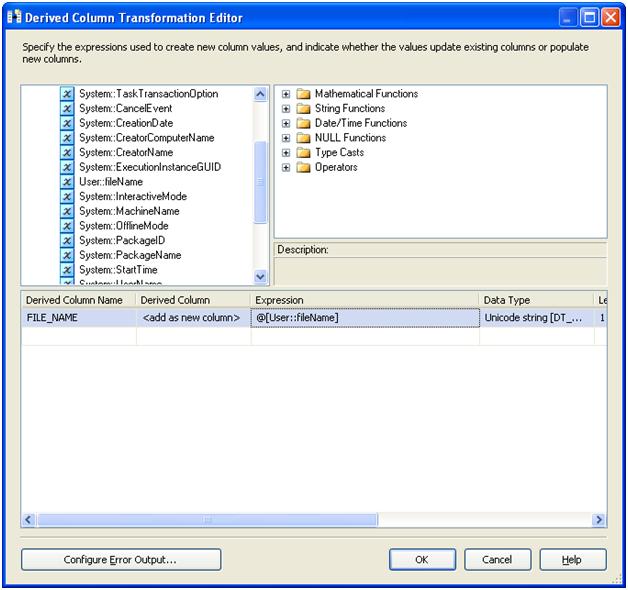
Be sure to change the DATA TYPE from UNICODE to STRING. Select OK to confirm changes.
The last step in the DATA FLOW task is to take our data and move it to a database. We accomplish this by selecting an OLE DB DESTINATION from the DATA FLOW DESTINATIONS in the toolbox.

By double clicking on the OLE DB DESTINATION we open up the OLE DB DESTINATION EDITOR to create a connection to the database. Select NEW to create a connection. The configuration manager tab should now look like this:

Now we need to map the file to the database columns. Select MAPPINGS to map the source to the destination.

In this case, my COLUMN 0 is mapped to FRUIT_NAME and FILE_NAME is mapped to FILE_NAME in the database. The LOAD_DATE in the database will have a default value when data is inserted. If you had multiple columns, you would simply map the rest of the columns to the corresponding destination columns.

Move the file to archive
The very last step in our simple ETL process is to move the files we’ve processed to an archive folder. This step is accomplished by the use of a FILE SYSTEM TASK. As we did with the previous steps, let’s drag a FILE SYSTEM TASK inside of the FOREACH LOOP CONTAINER. Double click the FILE SYSTEM TASK to configure the properties.

We first need to create a DESTINATIONCONNECTION. In my example, my archive is located here: C:\FILENAMEEXAMPLE\Archive. The operation we want to perform is a move operation. The source connection has already been determined for us by the FOREACH LOOP CONTAINER so we’ll just set the value to that. The FILE SYSTEM TASK EDITOR should look like this when completed.

Wrapping up

Earlier I mentioned that we need to hard code a connection string to a static file. Now that we’ve configured everything, we need to change that connection string to a dynamic connection string. Let’s right click our SNACKS connection to get to the properties. Expand the EXPRESSIONS and open up the PROPERTY EXPRESSIONS EDITOR. The property we are modifying is CONNECTIONSTRING. We’ll set it to the @fileName variable we first created.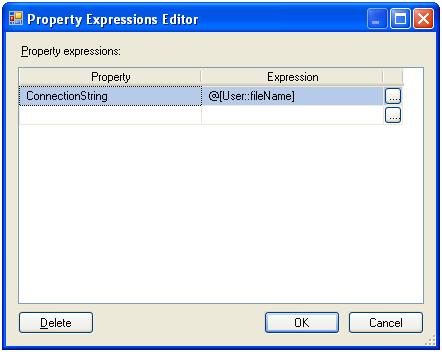 If you run the job, you’ll find that your table is now populated with the data in the file as well as the file name.

Backing out data made easier
Let me set a scenario that we get quite often (too often but that’s another story). A call or trouble ticket comes in from a vendor saying that they have sent the wrong file. Because of some of the data we’re dealing, with we just go into the environment and load the file. The problem is how do we remove the data we received from a given file? Because we’ve populated the table with metadata about the file, a simple delete statement can remove on the affected records.
 delete
 from snacks
where [file_name] = 'FRUITS.txt'
Conclusion
As you can see, adding a file name is a very simple process accomplished by using some SSIS tasks that I’m sure you will continue to use on a regular basis. The concepts applied in this example can be expanded to include many other meta data attributes. Some of my favorites are file name, file location, date modified and modified by. Just about anything you can see when you browse a file using windows explorer you can map it to a column. I hope this example motivates you to find new and creative ways to use SSIS to make your life as a DBA or database developer easier.