

In my last
article, I spoke extensively about the theory behind clustering a Windows 2000
and SQL Server machine. This week, I’ll detail how to actually accomplish this
task in a step-by-step guide. In this guide, I’ll use Windows 2000 Advanced
Server with SQL Server 2000 Enterprise to create an Active/Active cluster. These
two software components are the minimum requirement in a 2000 environment to
cluster SQL Server 2000. If you have not read my article on Clustering
SQL Server 2000 from 500 Feet, I would recommend that you do so before moving
forward since this guide will use terms that I assume you know from the last
article.
Common question: One of the number one questions I received after writing this article was how do you do an Active/Passive cluster. Essentially, you can follow this guide to cluster your SQL Server but stop before you add the second SQL Server. That's all it takes!
Note: As with any type of configuration and installation,
there are multiple ways of doing this. I will show you towards the end of this
article how I configure clustering for optimal performance. This may not be the
best method of optimizing things in your environment.
Tip: Before attempting clustering, I would recommend
that you install service pack 2 for Windows 2000. There are a number of bug
fixes between the two service packs related to clustering.
Goal #1 – Cluster Windows 2000 Advanced Server
Before we
even install SQL Server, you will want to ensure that your Windows environment
is successfully installed and clustered. Although it is possible to cluster SQL
Server after it is installed, it makes it much easier if you have already have
this piece complete. If you already have this part done, SQL Server will
automatically detect that it is in a clustered environment when you try to
install it. Before you begin, make sure all of your drives you plan to share are
formatted. You will also want to ensure that your network is fully configured.
- Create
an account for Microsoft Cluster Service (MSCS) to use
. This account will need to be a domain account and bean administrator. Make sure you make the password non-expiring.
- Stop
the second node that will be in
the cluster
.This is only a precaution and is generally not required.
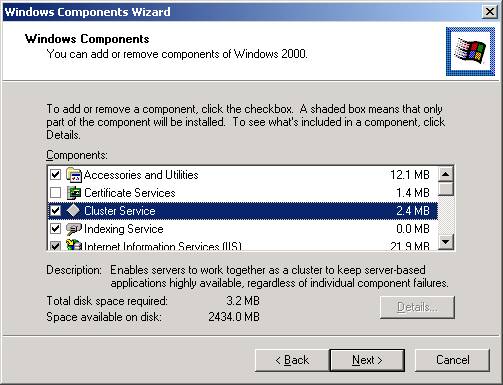
- Add
the Cluster Service component
.You can do this by going to Control Panel, clicking on Add/Remove Programs,
and then clicking on Windows Components. Click on Cluster Service as shown
below. Notice that some components of Internet Information Services (IIS)
are also added when you click Cluster Services. This small component of IIS
is required for Cluster Services to work properly.
Note: When
you install Windows 2000, you can also check this box when choosing your
components to install. After Windows boots up for the first time, you’ll be
able to launch the wizard by going to Control Panel and click on Add/Remove
Programs. The Configure Clustering option will be highlighted.
- When
you click Next, this will start the Cluster Service Configuration Wizard.
Click Next to continue in the wizard. This will take you to the Hardware
Configuration screen. You will need to make sure that all the equipment in
your cluster is on the Hardware Compatibility List (HCL). After looking at http://www.microsoft.com/hwtest/hcl
to confirm this, click I Understand and then Next.
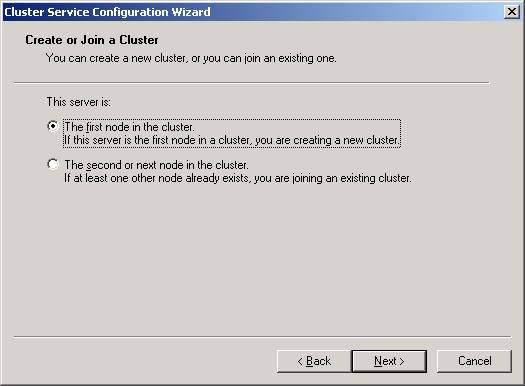
- You
will then need to select that this is the first node in the cluster.
By doing this, you’re creating a new cluster. The next node is much easier
to configure because you’ll only have to select the last option and much
of the configuration is read from the first node.
- You
will now need to provide a name for your cluster
. This name will be used by many Windows tools like PerformanceMonitor to designate the “floating” name for the cluster. If one machine
fails in your cluster, this name will move to the surviving node. I’ve
chosen the name CLUSTEREXAMPLE for this article.
- Next,
specify the account we created in Step 1
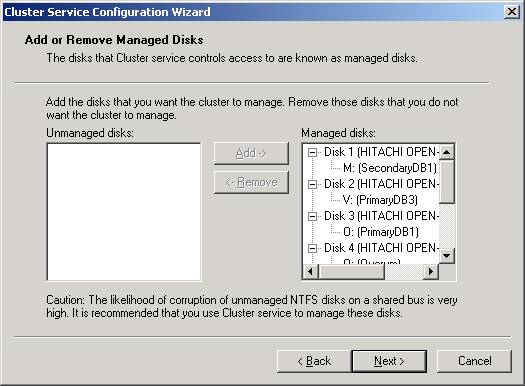
. This account will be used to start the Cluster services. - After
clicking Next, specify each of the shared drives that you’d like to
cluster
. Eachdrive you specify is then managed by MSCS. I would recommend that you allow
all the shared drives to be managed my MSCS. Otherwise you risk corruption
of the drives. By default, all the drives will be selected but if you wish
to add more or remove some drives you can highlight the drives and click Add
or Remove. After you’ve added all the drives you need, click Next.
- Specify
your quorum drive
.The Quorum drive holds log files and health information about your cluster.
If one node fails, the surviving node depends on the quorum drive to start
the services. For simplicity, I always call my quorum drive the Q drive. It
should be about 815 MB in size typically, although much of that space will
go unused. After selecting the drive, click Next.
- You
now must configure the cluster’s network
. Read the message about the types of networks that can beconfigured and click Next. Essentially, you can configure the cluster to
communicate over a private network and/or a public network. I prefer to have
the heartbeat connection over a private network for security and everything
else go over the public network.
- Configure
each network card
.You will be presented a screen to configure each network connection. To use
the each network connection, click the Enable This Network For Cluster Use
and then select the type of use it will have. For example, if you want all
traffic to go out on a single network card, select All Communication (mixed
network). If you only configure you cluster for one connection, you will
receive a warning stating that you now have a single-point of failure.
Acknowledge the warning to proceed.
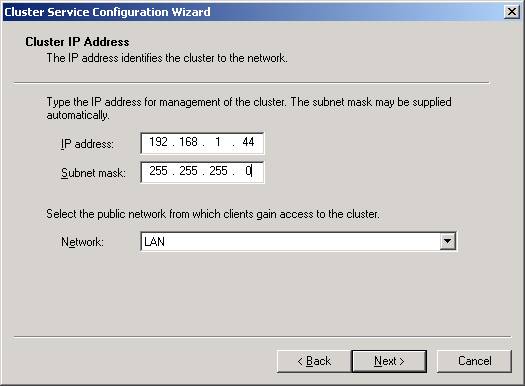
- The
last step in this node is to specify a virtual IP address for the cluster.
You will also need to specify the subnet for the IP address and which
connection will be used by clients to connect to the cluster.
- You’re
now done with the first node! Not too bad, is it? Now click Finish to
complete the wizard and acknowledge that the service was successfully
started. No reboot is required after installing a cluster.
- Boot
up any servers that need to be in the cluster
. - Repeat
the same steps on the second node to launch the wizard again
. This time select the Second Node option as shown inStep 5. By selecting that option and specifying a security account for
Windows to use, the wizard will read the configuration from the first node
and almost automatically configure itself.
Goal #2 – Configure the Cluster
By
installing the cluster on both nodes, you have also created a new tool called
the Cluster Administrator. With this tool, you can configure your cluster for
optimal use. You can run the tool like you do most other tools in Windows 2000,
by going to Control Panel and selecting Administrative Tools. When you first run
Cluster Administrator, you’ll notice that the cluster is configured awkwardly.
By default, each shared disk you assigned earlier resides in its own group under
Groups.
I
prefer to keep similar resources together. Drives that I see that will be
primarily used by a SQL Server on Server1 will be grouped together and likewise
for Server2’s drives. With that in mind, I create two new groups: Server1 and
Server2. I then place the drives from each independent group into one of the two
groups. You’ll also notice that there is a Cluster Group where the quorum
drive resides. Leave this group alone.
In
Cluster Administrator, if you get lost, right-click. For example to move the
drive to one of the two groups right click on the resource and click Move to New
Group. Then, specify which group you’d like to move to. Once you have all the
drives except the quorum drive moved to one of the two new groups, delete the
empty groups. You can then test a failover by right clicking on the group and
selecting Move Group. You will then see the resources fail, go to Online
Pending, then to Online on the new server.
You
may also want to configure the primary owner of each drive. You can do this by
right-clicking on the resource and clicking Properties. Which group you place
your resources in is very important. A resource can only act as a dependent on
another resource that is in the same cluster group.
Goal #3 – Install SQL Server
So far,
we’ve only clustered the drives but nothing more. Let’s make this a little
interesting by adding some added resources like MS DTC and SQL Server. In
installing SQL Server there are only a few additional steps that you may not be
used to. Before we begin, make sure each of your nodes is online.
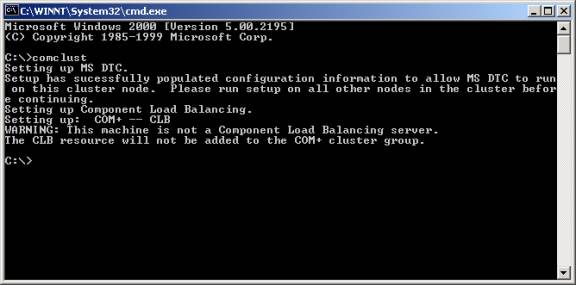
- Install
MS DTC separately
.To install the clustered version of MS DTC, go to a command line and type
comclust (it will be in your path). You will see the MS DTC resource created
as shown below. This resource is located in the Cluster Group in Cluster
Administrator. Perform the same action on the any other nodes in the cluster
as well.
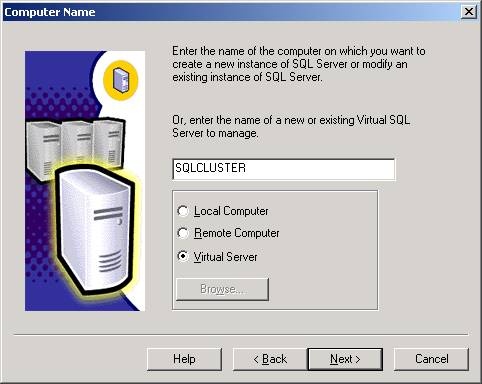
- Start
installing SQL Server 2000 as you would normally
. The first unusual screen you will see is where younormally specify if you’re going to install locally or remotely. You now
have an added option of a Virtual Server.
- After
you step through the license agreement, you will be asked to specify an
IP address and subnet for your virtual SQL Server name. Type the virtual
IP address and the subnet will automatically fill itself in for you. Next,
select the network connection to use then click Add. That will transfer the
data to the bottom box.
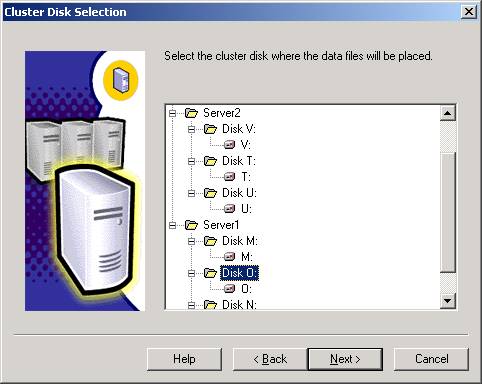
- You
will then need to specify the drives where the data files will be
placed as shown below. You will only see drives that the node owns. If
there is a drive that you don’t see in this list, go back to Cluster
Administrator and move the group over to the server where you’re
installing SQL Server. When click Back to go back a screen in the
installation wizard then Next to refresh the list of drives. There is a bug
in the installation wizard that you will need to watch carefully here. If
you specify a drive here, the wizard pretty much ignores the drive selection
and you will need to manually re-select the drive in a moment.
- In
the Cluster Definition screen, you will need to specify which nodes SQL
Server will be installed on.
- You
then need to specify an administrative account for the cluster
. Again, I would use the clustacct that weestablished in Step 1 of Goal 1.
- Specify
an instance name
.If this is the first SQL Server in the cluster, then you can make it the
default instance. If this is the second instance in your cluster, you must
use an instance name and a different virtual server name a few steps ago.
There are special notes about this in my previous article.
- Confirm
the directories and type of installation
. Again, there is a bug in the wizard that will require you topossibly change the Data Files option again. The wizard will default to the
first drive in the group so if you wish to specify a new drive, change it
here.
- Continue
the installation as you would normally in SQL Server
. The rest of the installation is exactly like thenormal installation path. The only difference is when SQL Server goes to
copy the files, you cannot see the progress because it’s copying the files
and configuring both nodes. This process may take up to 15 minutes so be
patient. Don’t assume that nothing is happening on the server.
- Reboot
both servers
.Reboot the server where you installed SQL Server from first, followed by the
second node.
After
rebooting the servers you can install SQL Server on the second node. Install it
exactly the same way but you’ll need to assign another virtual SQL Server name
and IP address. You’ll also need to use and instance name for the second node.
There are special notes in my previous article about using an instance name. I
would recommend rebooting one more time after you’ve installed the second
instance, although it is not required.
After that, you're ready to install Service Pack 1 for SQL Server 2000.
Goal #4 – Configuring the Cluster for SQL Server
SQL Server
is now running on both instances. If you’ve installed two instances of SQL
Server (one on each node), then you’re running in Active/Active mode. You’re
now ready to go to Cluster Administrator and perform the final configuration
steps for SQL Server. By default, if you’re using multiple shared drives, SQL
Server in a cluster will not be optimally configured.
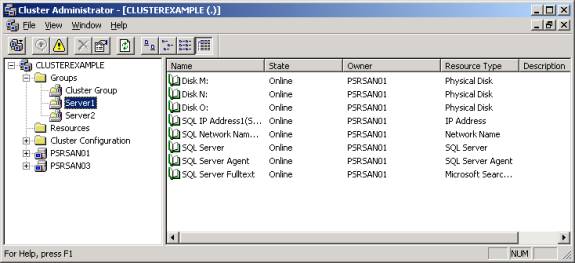
To
configure the resources properly, open Cluster Administrator and go to your
first server’s group that you installed SQL Server on. If you’re running
multiple data drives for a SQL Server, they will not be accessible until you
make the SQL Server service a dependency on these drives. In other words, you
can’t place backups or any data files on the M drive until the SQL Server
service is set as dependency to the M drive. You wouldn’t want the SQL Server
service starting until all your drives are ready. To make the SQL Server service
dependent on the drives, you must first fail the service by right-clicking on
the SQL Server service in Cluster Manager (shown below) and select Failover. You
can then right-click on the SQL Server service here and select properties.
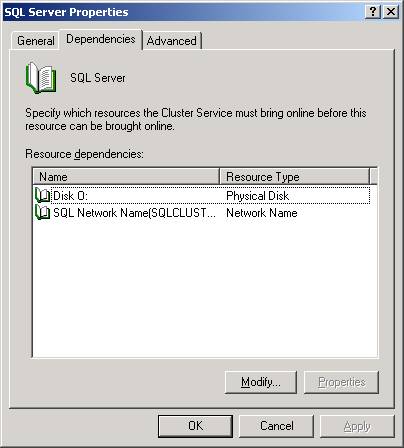
You will
notice by going to the Dependencies tab that the service is only dependent on
the primary data drive and the virtual SQL Server name. To add additional
resources click Modify.
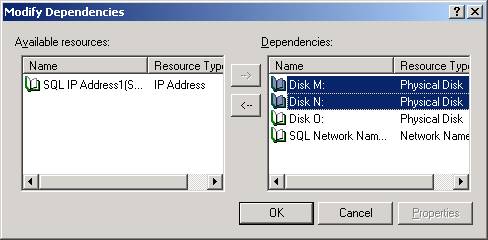
As you can
see below, I’ve made the SQL Server service additionally dependent on the M
and N drive by selecting the drives then clicking the à
button. After you’ve added your resources click OK.
You will
then need to restart the SQL Server service by right-clicking on the service and
selecting Start. Now, all the drives you specified will be available to
Enterprise Manager and T-SQL. To complete the configuration, you can perform the
same action on the second node if necessary.
You’ve
now completed the basic clustering of SQL Server and Windows 2000! For
additional help on this topic, you can post questions in the In
The Enterprise forum. In future articles, I will discuss how to cluster
Analysis Services, which is not nearly as simple as clustering SQL Server.
