
Using PowerShell to Generate Table-Creation Scripts
Now that Window PowerShell is better integrated with SQL Server (as of the 2008 release), many DBAs are keen to learn how to use PowerShell to perform repetitive administrative tasks in SQL Server. However, creating PowerShell scripts might present a bit of a challenge to some because PowerShell is both a command shell utility and a .NET environment-and it uses a scripting language different from the typical Windows/DOS Command Prompt commands and from .NET languages such as C# and Visual Basic.NET.
To help DBAs become more confident with creating PowerShell scripts-which can be important tools when performing repetitive tasks-this article describes a sample PowerShell script line-by-line. It demonstrates many of the components necessary to create code that interfaces with SQL Server 2008. In addition, the article provides details about how to implement the same solution without using the new PowerShell features. That way, if you have not implemented SQL Server 2008, you can still use PowerShell to manage your SQL Server 2005 instances.
Specifically, the script demonstrates how to generate Transact-SQL CREATE TABLE statements based on tables in an existing SQL Server database. Note, however, that this article assumes you already have a basic understanding of PowerShell concepts. If you’re new to PowerShell, I recommend that you first have a look at these Simple-Talk articles by PowerShell expert Dan Sullivan.
- Managing SQL Server using PowerSMO
Dan Sullivan – 31 January 2007 - PowerSMO At Work Part I: DBA Scripts and Functions
Dan Sullivan – 19 February 2007 - PowerSMO at Work Part 2
Dan Sullivan – 12 March 2007
Also note that the solution in this article is based on PowerShell version 1.0. As of this writing, the version 2.0 community technology preview (CTP) has been recently released. However, the principles discussed in this article should be consistent from one version to the next.
Running PowerShell Script Files
Before we get started on the sample script itself, let’s take a quick look at how to run script files in PowerShell and how to interface with SQL Server. A PowerShell script is essentially a text file that contains PowerShell statements and that is saved with a .ps1 extension.
By default, PowerShell does not let you run a script from the console. You must first configure the execution policy to permit script execution. The easiest way to set the policy that enables you to start using script files is by running the following command at the PowerShell command prompt:
|
1 |
set-executionpolicy remotesigned |
The command uses the Set-ExecutionPolicy cmdlet to set the execution policy to RemoteSigned. This means that you can run script files on your local machine, but files that you download from the Internet must be digitally signed.
To verify the current execution policy setting, run the following command at the command prompt:
|
1 |
get-executionpolicy |
When you set the execution policy, it persists from one session to the next, until you explicitly change the policy. However, you must have local administrative privileges to change the policy. To learn more about setting the execution policy, use the following command to retrieve the PowerShell help file:
|
1 |
help set-executionpolicy -detailed |
The command returns details about how to use the Set-ExecutionPolicy cmdlet and provides information about the available policy options.
Using PowerShell with SQL Server 2008
When you install SQL Server 2008, Setup automatically installs PowerShell if it’s not already installed on your system. Setup also installs the two PowerShell snap-ins necessary to interface with SQL Server. The first snap-in is the provider that acts as the interface between PowerShell and SQL Server, and the second snap-in provides a set of PowerShell cmdlets specific to SQL Server. The snap-ins must then be loaded into PowerShell in order use the SQL Server features from the console (more on this below).
Note: This section applies specifically to the new SQL Server 2008 support for PowerShell. However, you can still use PowerShell to manage SQL Server 2005 or 2008 instances without using these PowerShell snap-ins. The approach is described later in the article.
After you install SQL Server 2008, you have three ways to access PowerShell:
- SQL Server Management Studio: In Management Studio, right-click a node (such as Databases or Adventureworks2008) in Object Explorer, and click Start PowerShell. When the PowerShell console opens, the SQL Server snap-ins are automatically loaded and the node from which you launched PowerShell is set as the current location within the console. For example, if you launched PowerShell from the Databases node (on the default instance of the Server01 computer), the location in PowerShell would be SQLSERVER:\SQL\SERVER01\DEFAULT\Databases\. (The SQL Server paths are described in more detail later in the article.)
- The sqlps utility: Open a Windows Command Prompt window and enter sqlps at the command prompt. The console prompt switches to PowerShell mode, with the SQL Server snap-ins automatically loaded and the current location set to SQLSERVER:.
- PowerShell console: Open PowerShell directly through the Start menu or a shortcut. Manually load the SQL Server snap-ins.
To manually load the SQL Server snap-ins into PowerShell, run the following commands in the PowerShell console (on the computer where SQL Server is installed):
|
1 2 |
add-pssnapin sqlserverprovidersnapin100 add-pssnapin sqlservercmdletsnapin100 |
The first command loads the SQL Server provider, and the second command loads the SQL Server cmdlets. You can now interface with an instance of SQL server, as long as you don’t end the current session.
If you want to preload the SQL Server snap-ins whenever you open PowerShell, you must add the two commands to one of the PowerShell configuration files. For more information about configuration files, see the “Windows PowerShell Getting Started Guide” file that is included in the PowerShell installation.
After you’ve set up PowerShell with the correct execution policy and, if necessary, loaded the SQL Server snap-ins, you’re ready to run the script files.
Defining Parameters in a PowerShell Script
To create a PowerShell script file, you can use a text editor such as Notepad. The file is made up of a series of PowerShell commands (such as those you would enter at the command prompt) that perform a specific task or set of tasks.
Let’s take a look at our example to demonstrate how this works. The following code shows the contents of the ScriptTables.ps1 file:
|
1 2 3 4 5 6 7 8 9 10 11 12 13 14 15 16 17 18 19 20 21 22 23 24 25 26 27 28 29 30 31 32 33 34 35 36 37 38 |
# define parameters param ( $server = $(read-host "Server ('localhost' okay)"), $instance = $(read-host "Instance ('default' okay)"), $database = $(read-host "Database"), $tables = $(read-host "Tables (wildcards okay)"), $file = $(read-host "Script path and file name") ) # trap errors $errors = "c:\data\errors.txt" trap { "______________________" | out-file $errors -append; "ERROR SCRIPTING TABLES" | out-file $errors -append; get-date | out-file $errors -append; "ERROR: " + $_ | out-file $errors -append; "`$server = $server" | out-file $errors -append; "`$instance = $instance" | out-file $errors -append; "`$database = $database" | out-file $errors -append; "`$tables = $tables" | out-file $errors -append; "`$file = $file" | out-file $errors -append; "`$path = $path" | out-file $errors -append; "`$scripts = $scripts" | out-file $errors -append; throw "ERROR: See $errors" } # retrieve set of table objects $path = "sqlserver:\sql\$server\$instance\databases\$database\tables" $tableset =get-childitem $path -ErrorAction stop | where-object {$_.displayname -like $tables} # script each table foreach ($table in $tableset) { $table.script() | out-file $file -append -ErrorAction stop } |
The first section of the script defines a set of input parameters that prompt the user for the information necessary to run the script, such as the name of the SQL Server instance or the name of the database. This section uses the param function (the param keyword followed by a set of parentheses) to define the parameters. The actual parameter definitions are enclosed within the parentheses.
For example, the following parameter definition (the first command within the parentheses) prompts the user for the name of the SQL Server computer:
|
1 |
$server = $(read-host "Server ('localhost' okay)"), |
The command begins by declaring the $server variable and setting its value. The value is based on an expression enclosed in parentheses and preceded by a dollar sign. The leading dollar sign is necessary to force the evaluation of that expression so that the data entered into the console is processed before any other steps.
The expression itself uses the read-host cmdlet to prompt the user for the name of the server and read the user’s input. The string (enclosed in quotes) that follows the cmdlet is the text that is displayed to the user. When the user enters a server name, the name is assigned to the $server variable, which is used later in the script.
The param function includes five parameter definitions, which are separated by commas. These definitions are specific to how the script is used to connect to a SQL Server 2008 database (based on the new PowerShell support). To connect to a SQL Server database without using the new PowerShell features, you might want to define your specific parameters a bit differently to what is shown here, but the basic approach is still the same. More details about this are provided in the article.
After a user enters a value for the first parameter, the user is then prompted for a value for the second parameter, and so on, until a value has been provided for each variable. Figure 1 shows what the PowerShell looks like after each value is supplied to the parameter. After the last value has been provided, the script will run.
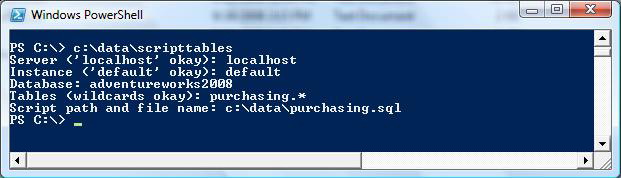
Figure 1: Running the ScriptTable.ps1 Script File in Windows PowerShell
Trapping Errors in a PowerShell Script
The next section in the ScriptTables.ps1 file traps any errors generated when the script runs. The section begins by declaring the $errors variable and setting its value to “c:\data\errors.txt,” the file used (for this example) to record errors.
The $errors variable definition is followed by the trap keyword and its related script block, enclosed in braces. The code within the braces is executed if any errors are generated later in the script. Let’s take a closer look at this script block to better understand how the code works.
The first statement simply adds a line (underscore) to the error file to clearly mark the start of the error message:
|
1 |
"______________________" | out-file $errors -append; |
The line is passed as a string down the pipeline to the out-file cmdlet. The cmdlet saves the string to the errors.txt file. Because the -append switch is specified, the line is added to the file, rather than overwriting any data.
The second statement in the trap script block is the same as the first statement except that it adds the text “ERROR SCRIPTING TABLES” to the file, rather than a line:
|
1 |
"ERROR SCRIPTING TABLES" | out-file $errors -append; |
Once again, a line is added to the file, rather than over-writing any data.
The next statement in the trap script block uses the get-date cmdlet to add the current date and time to the error.txt file:
|
1 |
get-date | out-file $errors -append; |
As you can see, the first three statements of the trap script block are used only to provide general information and to mark the beginning of an error entry. However, the next statement provides specific information about the errors:
|
1 |
"ERROR: " + $_ | out-file $errors -append; |
In this case, the word “ERROR” is concatenated with the $_ symbol. This is a system variable that contains the current object in the pipeline. In a trap statement, the object is an array that contains the set of error messages that may have been generated by the script. By calling the variable in this way, we can pipe the error messages to the out-file cmdlet in order to include those messages in the errors.txt file.
The next seven statements in the trap script block write the current variable values to errors.txt. For example, the following statement writes the value of $server to the file:
|
1 |
"`$server = $server" | out-file $errors -append; |
Notice that a backtick (`) precedes the first instance of the variable name. A backtick is used in this way to escape the dollar sign so that the variable name ($server) is treated as a string and printed to the errors.txt file rather than the variable value being printed to the file. In other words, PowerShell treats “$server” as merely part of the string value, with no significance beyond that. However, because the dollar sign is not escaped in the second instance of the variable name, PowerShell retrieves the variable value rather than the variable name. For example, if the server is Server01, the error entry in errors.txt would read:
|
1 |
$server = Server01 |
The reason to include the variable values in the errors.txt file is because this information can sometimes help you troubleshoot errors. For example, if you enter a nonexistent database name as a parameter value, you can use the error output to easily identify the problem.
The final statement in the trap script block is a throw statement:
|
1 |
throw "ERROR: See $errors" |
The throw statement exits the ScriptTables.ps1 script and displays the specified message in the PowerShell console. You do not have to include a throw statement in the trap script block. You can instead specify that the script continues to run and or that it simply breaks, without taking any further action, but the throw statement provides an easy way to display a message in the PowerShell console to inform a user that there has been an error.
Retrieving the Database Objects
Now that we’ve defined our parameters and set up error-handling, we’re ready to move on to the main part of the script, where we perform the actual tasks. The next step, then, is to define the SQL Server table objects that we want to script. This involves identifying the path that points to the tables collection for the specified database and from that collection retrieving that specified tables.
To define a SQL Server path in PowerShell, we use the SQL Server Management Object (SMO) model to identify the object hierarchy, as shown in the following statement:
|
1 |
$path ="sqlserver:\sql\$server\$instance\databases\$database\tables" |
The path begins by specifying the drive (sqlserver:) used to connect to a SQL Server instance and is then followed by the folder name (sql). The sqlserver: drive supports three predefined folders:
- sql: Contains database objects such as tables.
- sqlpolicy: Contains policy-based management objects such as policies.
- sqlregistration: Contains registered objects such as registered servers.
Because we’re concerned with table objects for this solution, we access the sql drive, so the first two components of the SMO path are sqlserver:\sql. Notice that we use a backslash (\) to separate the path components.
After we specify the drive and the folder, we can work down through the SMO hierarchy to the tables collection:
- $server: The server where SQL Server is installed. You can use “localhost” to refer to the local system. The $server value is derived from user input when the script is first called.
- $instance: The SQL Server instance on the server specified in $server. If it is the default instance, “default” must be specified. The $instance value is derived from user input when the script is first called.
- databases: The collection of databases available on the instance specified in $instance.
- $database: The specific database that contains the target collection of objects, such as tables and views. The $database value is derived from user input when the script is first called.
- tables: The collection of tables available in the database specified in $database.
Once we’ve identified the SMO path-and assigned it to the $path variable-we can use the following statement to retrieve the specific table objects:
|
1 2 |
$tableset =get-childitem $path -ErrorAction stop | where-object {$_.displayname -like $tables} |
First, we declare the $TableSet variable and then use the get-childitem cmdlet to assign a value to the variable. The cmdlet retrieves all the table objects in the tables collection that is specified in the SMO path ($path). In other words, the cmdlet will return all the tables that exist on a specified server, instance, and database.
An important option in the get-childitem cmdlet is -ErrorAction. You should specify this option for any cmdlet in which we want to trap errors. That way, if an error is generated when the cmdlet runs, that error will be trapped rather than be returned to the PowerShell console, as is normally the case.
After we retrieve the tables from the tables collection, we use the where-object cmdlet to filter out all tables except those specified in $tables. Because $tables can include wildcards (such as “purchasing.*”), the where-object expression uses the -like operator. As a result, the display name for each table object must match the wildcard expression specified in $tables. (Note that the -displayname property includes both the schema and the table names, separated by a period.)
Each table returned by get-childitem statement is saved to the $tables variable as a Microsoft.SqlServer. Management.Smo.Table object. As a result, you can use the object’s methods and properties when working with the individual tables. An easy way to view the methods and properties available to the table object is to use the get-member cmdlet. For example, to view a list of the methods and properties available to the $tableset objects, run the following command at the PowerShell command prompt:
|
1 |
$tableset | get-member |
Figure 2 show a partial list of the results returned by the statement. As you can see, the Microsoft.SqlServer. Management.Smo.Table object supports a number of methods, as well as numerous properties. In the following section, we’ll use one of these methods to generate the table scripts.
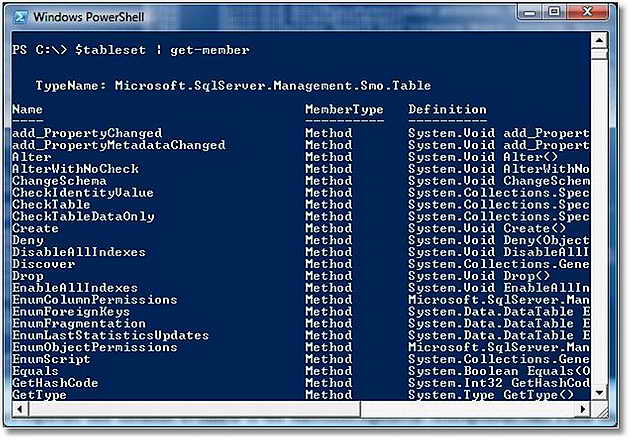
Figure 2: The Properties and Methods Available to the Microsoft.SqlServer.Management.Smo.Table object
This section of the code in which you define your SMO path and set of tables, is specific to how to create a script that uses the new PowerShell features in SQL Server 2008. If you want to create a PowerShell script that does not use these features-so you can manage SQL Server 2005 instances without installing SQL Server 2008-you should replace the $path and $tableset definitions with the following code:
|
1 2 3 4 5 6 7 8 9 |
# load .NET assembly [reflection.assembly]::LoadWithPartialName("Microsoft.SqlServer.Smo") | out-null # retrieve set of table objects $srv =new-objectMicrosoft.SqlServer.Management.Smo.Server($server) $db =$srv.databases[$database] $tableset =$db.tables | Where-object {$_.schema -eq$schema-and$_.name -like$tables} |
The first statement loads the Microsoft.SqlServer.Smo .NET assembly on your system so that PowerShell can use the SMO classes available to that assembly. The loading process is piped to the out-null cmdlet so that no messages are returned to the PowerShell console.
Next you must use the new-object cmdlet to create a Microsoft.SqlServer.Management.Smo.Server object, based on the server name supplied to the $server parameter. In this case, your $server parameter should reflect the name of the server and the name of the instance, if it is not the default instance. The easiest way to do this might be to provide a single parameter, rather than separating them out as is done for the original solution. It is up to you how you want to pass this information in to the new-object cmdlet. However, if the instance is not the default, be sure that the server and instance name are separated by a backslash, as in SERVER01\INSTANCE01. The new Server object is saved to the $srv variable. That way, you can then use the variable to access the object’s properties and methods in order to connect to the SQL Server instance.
The next statement uses the databases property ($db.databases) of the Server object to retrieve (from the databases collection) the database specified in the $database parameter. The database is saved to the $db parameter as a Database object. You can then use the $db parameter to access the tables collection for the database and create your table set.
Notice that the tables collection is piped to a where-object cmdlet. This allows you to filter out those tables that do not match the specified schema and tables. Also notice that the where-object expression includes the $schema and $tables variables. These are input parameters that contain values supplied by the user. The parameters are separated into two variables (rather than a single $tables variable) because this alternative method of accessing the table objects does not support the displayname property as is used in the original solution. As a result, you must prompt the user for a schema name and then the table names.
That’s all you need to do to make the code usable to use in a SQL Server 2005 environment. You must load the SMO assembly and use the SMO objects to create the table set. You must also ensure that you set up your input parameters correctly. Otherwise, the rest of the code is the same.
Generating the Transact-SQL Script
The final section in the ScriptTables.ps1 script is a foreach statement that iterates through the collection of table objects in $tableset and generates a script for each table:
|
1 2 3 4 5 |
# script each table foreach ($table in $tableset) { $table.script() | out-file $file -append -ErrorAction stop } |
Each time the foreach statement loops through the collection of table objects, it calls the script() method on the individual table object. The script() method automatically generates the Transact-SQL code necessary to create the table. To save the code to a file, you must send it down the pipeline to the out-file cmdlet, which adds the script to the file specified in $file (one of the parameters that the user enters upon running the script). As each table script is generated, it is added to the specified file. Notice that the out-file cmdlet also include the -ErrorAction option to ensure that any errors are trapped.
As you can see, once you’ve identified the individual table objects, scripting the tables is very straightforward. When you run the ScriptTable.ps1 script, you simply call the file, using the full path, and provide the necessary parameter values, as shown in Figure 1. If PowerShell encounters no errors, it adds the Transact-SQL code to the specified target file. If PowerShell encounters errors, it adds the error-related information to the errors.txt file.
Conclusion
That’s all there is to generating Transact-SQL code. I hope that, in addition to demonstrating how to automatically script SQL Server tables, the solution also shows you how easy it is to use PowerShell to automate SQL Server management tasks. The ScriptTables.ps1 script includes the basic elements necessary to create a wide variety SQL Server scripts-the parameter definitions, the trap statements, the SMO objects, and the use of object members such as the script() method. With these basics, you can create scripts that perform such tasks as exporting data, running Transact-SQL script files, or creating databases. Of course, the process of creating other types of scripts will no doubt include some trial and error on your part, but the example shown here should provide you with a good foundation for getting started. What you do with that foundation is up to you.


