While working on Azure Storage, you may want to quickly access the data and tweak it the way you need it. Azure Storage Explorer is a GUI-based tool that comes with a bunch of features to ease your development experience. In this article, I am going to go over core technical details of Azure Storage and then will introduce you to one of the very useful storage tools called Azure Storage Explorer. You are going to get answers to all your questions such as what Azure Storage is and what kinds of data can be stored into Azure Storage. You will also learn how to manage your Storage through Storage Explorer. For this, you will access, create and modify Table Storage through Azure Storage Explorer. Additionally, you will create a client application using the Azure Storage .NET SDK and further access the uploaded data through Azure Storage Explorer.
Windows Azure Storage
As per Microsoft’s documentation “Azure Storage is Microsoft’s cloud storage solution for modern data storage scenarios.” Azure Storage provides the most efficient, scalable and reliable solution for the data storage and accessibility in the modern data storage world. It’s really made of four different types:
- Table Storage: Table storage stores large amounts of structured data. This gives you the ability to store entities with name and value pairs. You can easily access the data using a clustered index. It has an extraordinary ability to scale as per needs.
- Blob Storage: This is for larger files and has the capability to store a massive amount of unstructured data. Anything that you come across on the computer or phones such as images, video files, audio files, pdfs and larger documents. Blob storage allows you to access them very efficiently in a variety of ways. You can access them like a hard drive; you can even store virtual hard drives in blob storage. Blob storage is a massively scalable object store for text and binary data. Blobs take advantage of Content Delivery Network to give you more scale internationally.
- Queue Storage: Queues are primarily created for messaging, where you can put a small piece of data into the queue and then read and process the information on a first come first serve fashion. After the message is processed, you can recycle that message, or you can keep it in the storage so that you can do additional work on it. Queues can be considered as shorter-term storage, the message on queues can live for a maximum of seven days. Storage queue APIs are lease based; you can renew or update the lease using appropriate API method calls. In addition to this, you can access the message from any corner of the world by HTTP or HTTPs method calls.
- File Storage: This storage type is mainly used to store files in the cloud, and they are typically accessible through the SMB (Server Message Block) protocol. These can be thought of as an efficient alternative to traditional on-premises file server storage.
Azure Storage Account
A storage account houses all these types of storage. You will need to set up your Azure Storage Account in your Azure Subscription. This can be done by adding a new Storage account using the Azure portal. Once you create your storage account, you will have all the Queues, Blobs, Tables and Files underneath that account. You can choose which of the options suits your requirements. The first step is to create the storage account in your Azure Subscription. Once you login to Azure Portal, you will see all the services that Azure provides on the left panel of the page. You will then notice that there is an option called Storage Account. If you don’t see it, click All services and then filter for storage. After you click Storage Account, you will see an option to add a new one.
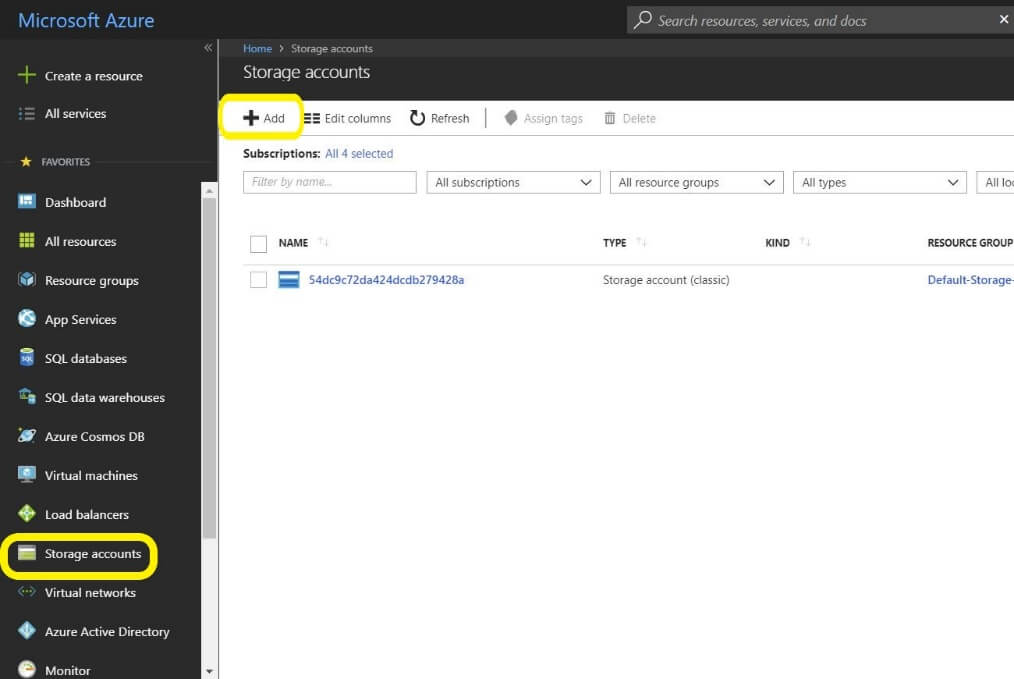
Once you click the Add button, you can fill in all the details for your account. As this article is more about the Azure Storage Explorer, I am not going into each and every detail of creating a storage account. One thing to keep in mind is that the storage account name must be unique across Azure. After you have all the details in the required fields filled in, you can click the Create button.

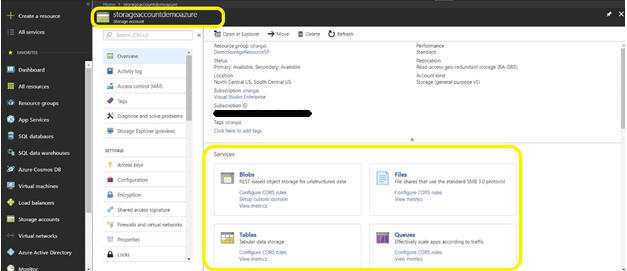
As I mentioned before, once the Azure Storage account is created and you click on it to see the properties, you will see that it supports services for Blobs, Files, Tables, and Queues.
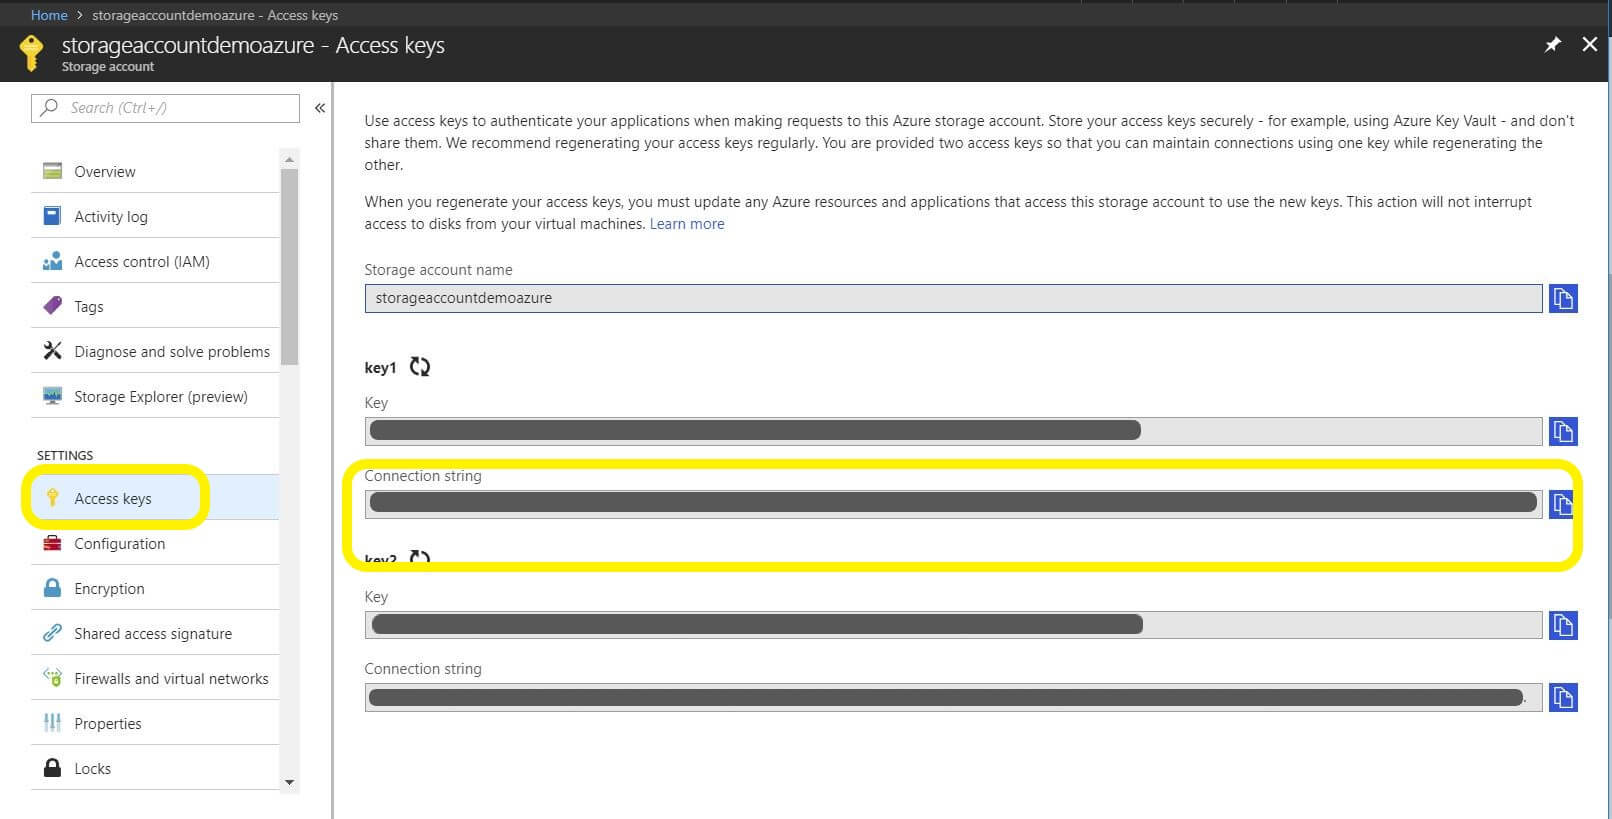
You can find connection strings for your client applications by clicking Access keys.
All the Azure storage services are accessible through the REST API which is the HTTP API that can be accessed from devices. You can just create HTTP requests from your devices to Storage Uris and then access tables, blobs, and queues. Any device that knows how to speak through HTTP can access the storage. Now to access this information, you definitely need to implement standard security to ensure there are no man in the middle attacks. To prevent this, the storage services use standard SSL security to protect the communication between the clients and servers. If somebody is manipulating the data in an account, they should have rights to do that, and that means they should have valid keys. When you make a request to the Storage service, you will have to provide the security information for the storage account in the header of the message. You will have to take the authorization information of the keys and provide those inside the message.
In addition to security on the HTTP requests, versioning is also needed if there is an update to the data already in place. Azure again uses HTTP protocols for this in the form of E-tags, so when you get an item from Azure services, they are marked with E-tags. Then you can check the details to deduce whether that data has changed as compared to previously uploaded versions. Azure Storage provides storage, security, and versioning all layered on the top of standard HTTP protocol requests and responses.
Azure Storage Explorer
Now as that your storage account has been created, let me introduce you to the tool, Azure Storage Explorer, that will improve your overall development experience with Azure Storage.
Azure Storage Explorer is an application which helps you to easily access the Azure storage account through any device on any platform, be it Windows, MacOS, or Linux. You can easily connect to your subscription and manipulate your tables, blobs, queues, and files. In addition to these, you can connect to and manipulate Azure Cosmos DB Storage and Azure Data Lake Storage as well.
Benefits of Using Azure Storage Explorer:
- Easily connect and manage one or multiple Storage accounts.
- User-friendly UI to view and update entities of not just storage accounts but also Azure Cosmos DB and Azure Data Lake.
- Increased productivity with quick access to your data and management of the objects in your storage with ease.
How to Set up the Explorer?
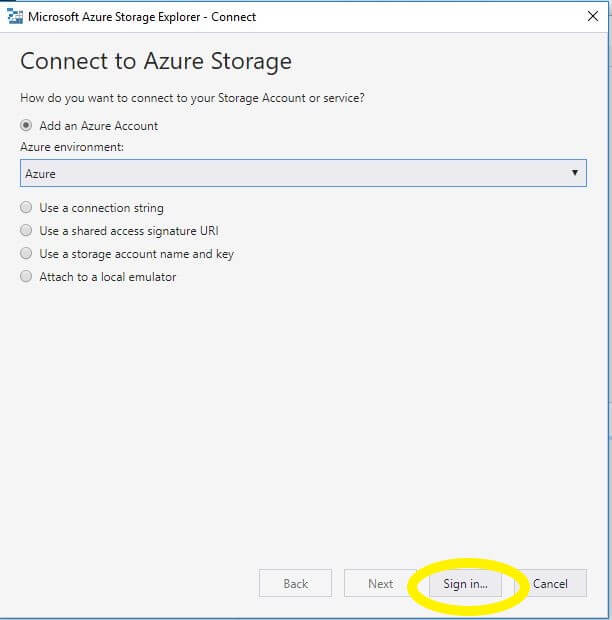
You can download it from here. After it has installed successfully, you can launch Azure Storage Explorer through the Start menu. You will see the screen below once it opens up for you and you click the Account Management icon.
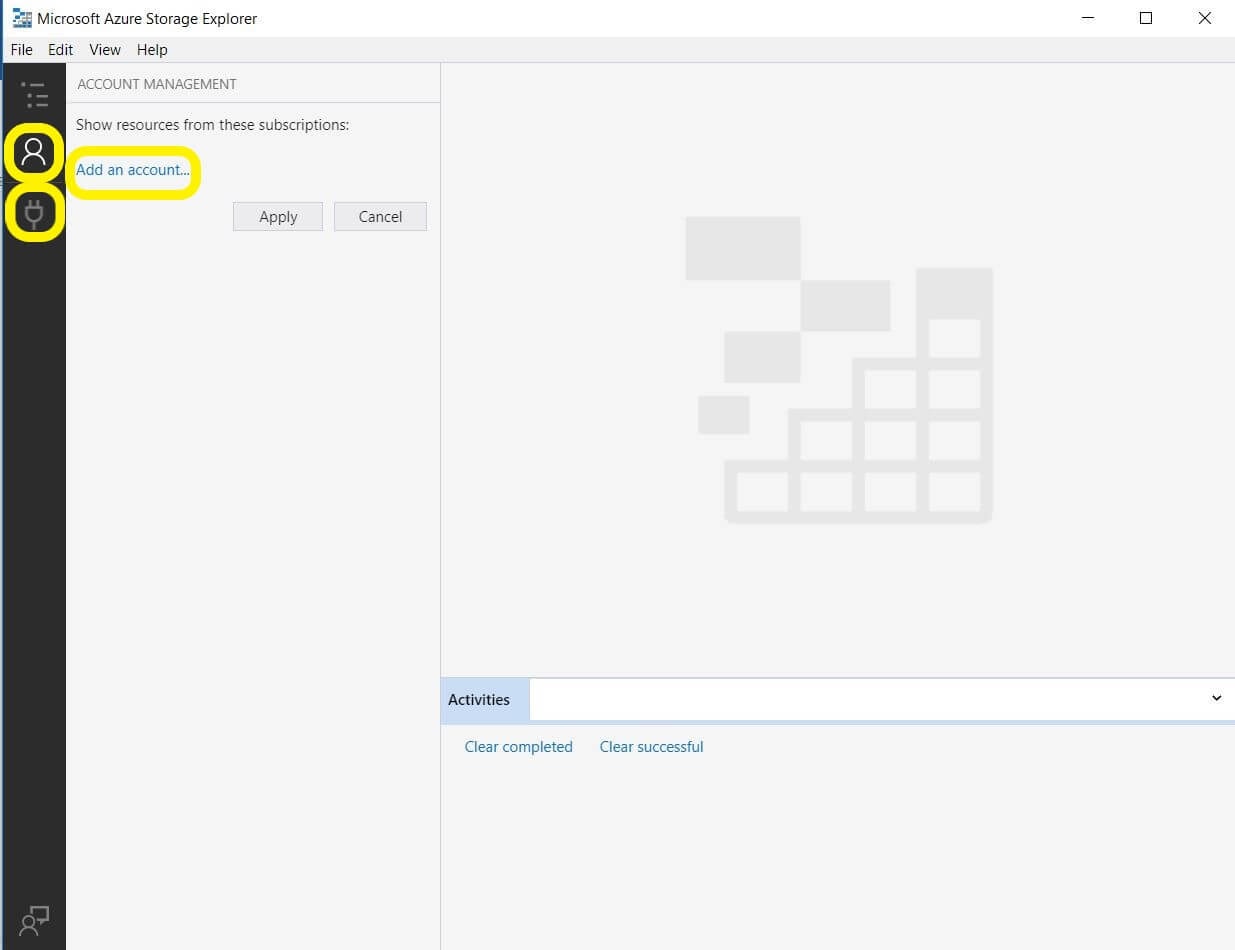
Once you click Add an account, you will notice that there are multiple options for connecting to your storage account. You can connect by signing in with your Azure account credentials, using a connection string, using storage account name and key, and many more. For now, just sign in with your Azure credentials.
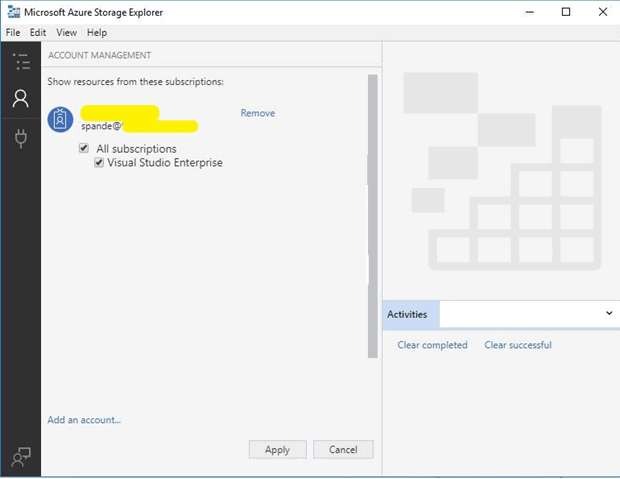
Once you Sign in you will get an option to select all the list of resources from your subscription that you can select so that they will get added to the Azure Storage Explorer. Tick the options appropriate to the accounts that you want to use. Select the account that holds the storage account added in the previous section.
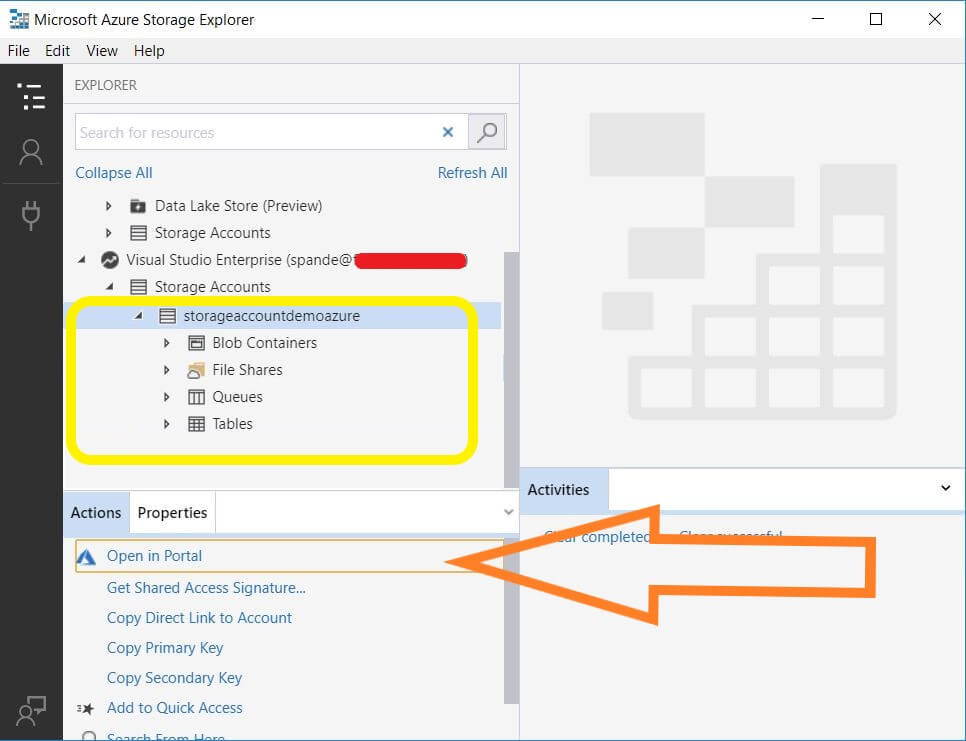
Once you locate the storage account, you will see that you can access all four storage options through Explorer. Also, you will see a link in the options to open these storage account components in Azure Portal. You can easily do that by clicking Open in Portal.
Why use Azure Storage Explorer?
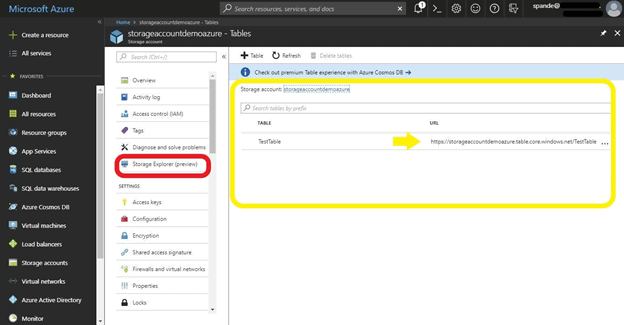
If you navigate down to the Table storage in your storage account in the Azure Portal (on the Storage accounts page, click on Tables Service to see the list of tables), it will bring you to the page shown in the screenshot below. You will be able to see the list of tables in your storage account and their respective URLs. Also, you will notice that Storage Explorer is available in preview mode. That tells us that the Storage Explorer will be added to Azure Portal very soon. But for now, just keep using the Azure standalone application for this article. To add new data to these tables, you will have to pass on the entities through your client application code by using the appropriate URLs. This approach will create the data for you, but Azure Storage Explorer plays an important role to make it easily accessible by User-friendly UI.
Additionally, developers often want the ability to tweak the data according to the project needs. Azure Storage Explorer provides the ability to modify the data in the most efficient manner. Storage Explorer enables you to perform relevant operations on the storage by providing different options based on the type of storage. Here is the list of operations for different storage options:
Table Storage:
-Query, Add, Edit and Delete Entities
-Import the entities and export the tables and results of the query filters.
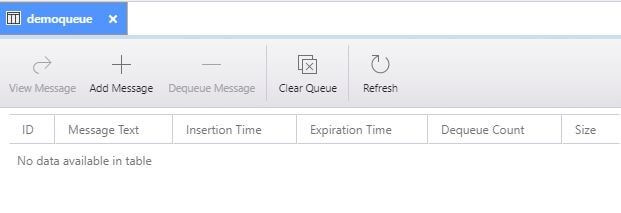
Queue Storage:
-Enqueue/Add and Dequeue Message and View the message
– Clear the queue
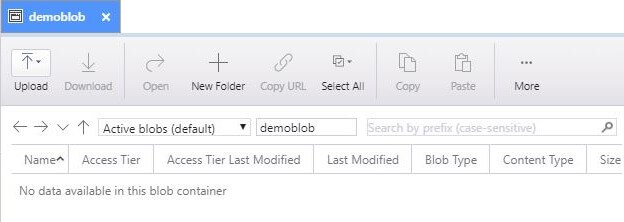
Blob Storage:
-Uploading and Downloading Blobs
-Copy Blobs and folders
-View Blobs
-List Blob Containers
-Delete Blobs
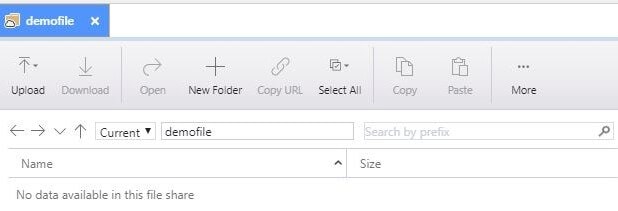
File Storage:
-Upload and Download files or directories
-Easily view or open the files
-Rename and modify the files
-Create and Delete Directory
By Now, you probably understand how Azure Storage Explorer makes storage access so easy and hassle-free. You just connect to your storage account, and you are all set to perform any operation on it.
Using Azure Storage Explorer
To help you understand how Azure Storage explorer works, I’ll demonstrate how to access, create and modify Table storage through Storage Explorer.
Before creating the Table Storage, let me first clarify the various components involved in this storage pattern. You might think that Table storage is the same as that of relational or traditional database, but this is instead a schema-free collection of entities. An entity is an object which consists of properties. By default, each entity has a partition key, a row key, and a timestamp. Properties are the key-value pairs.
What is a Partition Key?
The partition key is a unique identifier for the partition in a given table. This can be considered as the first part of the primary key, and another part is row key.
What is a Row Key?
Row key is the other part of the primary key. In combination with the partition key, the row key forms a unique combination to uniquely identify the entity within the table.
Each entity has a Partition Key and a Row Key which can be used to form a clustered index which enables very fast lookup through the storage.
Now to focus back on Azure Storage Explorer. To add a new table, select the Tables option and then click on Create Table.
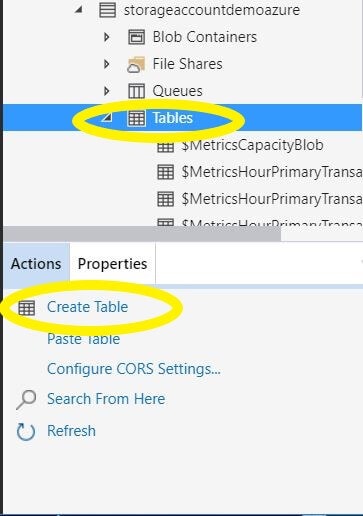
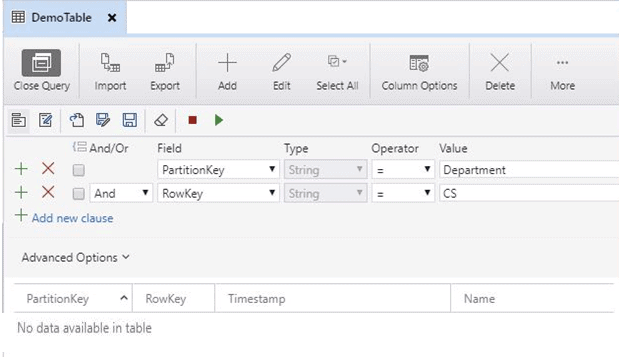
After clicking Create Table, provide the appropriate name of the table. Here, the name of the new table is DemoTable.
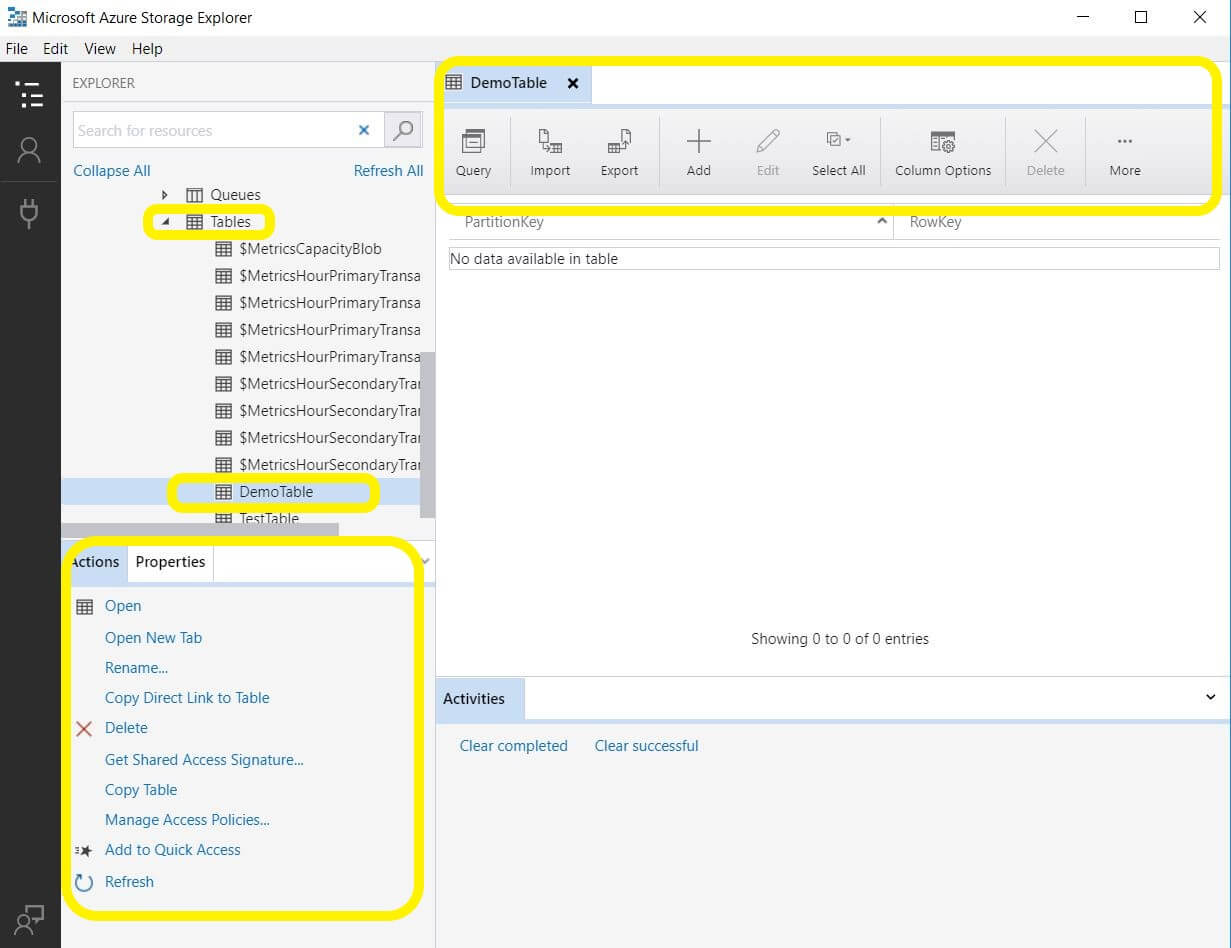
There are various options that Explorer provides such as a Query on the table, Import/Export data, adding a new entity and many more. You will notice that the newly created table has no data; the Partition key and Row Key do not hold any data currently.
Let’s add some data to this DemoTable.
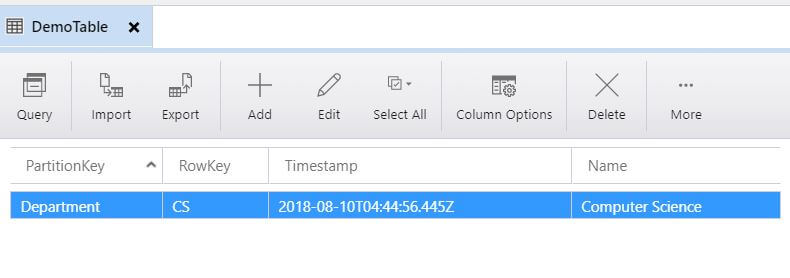
Click on the Add option found in the menu at the top. You will see the PartitionKey and RowKey properties which every entity will have. Type Department as the partition key and CS as the row key. Department and CS form a unique combination.
To add a new property, click on the Add Property button on the bottom of the page. As you can see, I have added a property called Name with a value Computer Science. You can select the type of property from the Type dropdown.
Properties support following types:
|
Byte[] |
Bool |
DateTime |
Double |
|
Guid |
Int32 or int |
Int64 or long |
String |
After you have added all the properties, click on the Insert button.

You will see that a new entity is added to DemoTable as below:
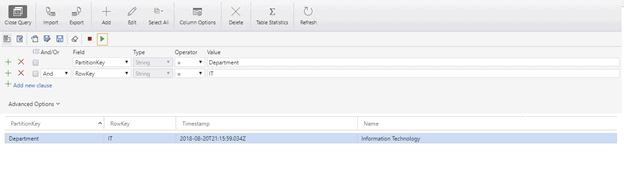
Add three more entities to the table and query the table. This is how my table looks like after adding the entities:
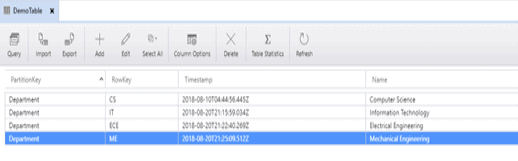
To filter the IT department data, you can add a new clause by clicking the Add new clause option.
Creating a .NET Application with the Azure Storage .NET SDK
You can use Azure Storage to store your client application data onto the Cloud. Microsoft’s Azure Storage SDK enables you to access the storage accounts using simple method calls. It hides all the complexities behind the scenes making the development experience smooth. You can imagine a simple accounting website built on the .NET platform which asks the user to upload an image of the bills then process it and further makes it available for download. This scenario can be achieved using Azure Storage. The .NET web application can store the image file as blobs to Azure Blob Storage then process it using some code, store the output to the Azure Storage and finally make it available to the users. With Azure Storage explorer you will be able easily to download the files for accounting purposes.
For the scope of this application, instead of developing a .NET web application we will develop a console application that will upload the files stored locally on the computer to the Azure Storage. You will see how convenient it is to upload the files through a client application using the storage client using .NET SDK.
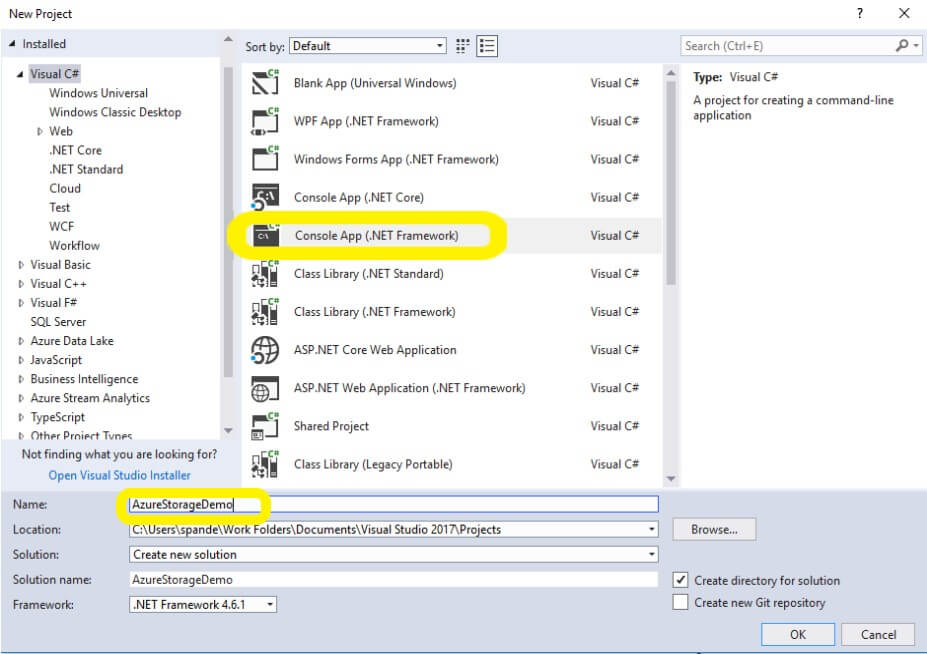
In Visual Studio, create a new Console application named AzureStorageDemo. Go to File => New => Project => Visual C# => Console App (.NET Framework).
Once the project is created, the first step is to add keys to the App.config file you will find under your project folder structure in Solution Explorer. You need to add these keys so that they can be easily accessed multiple times through the code. Also, it will be very convenient to change these keys if you need to replace them with another storage account keys in the future.
|
1 2 3 4 5 6 7 8 9 10 |
<?xml version="1.0" encoding="utf-8" ?> <configuration> <appSettings> <add key="StorageAccountName" value="your storage account name"/> <add key="StorageAccountKey" value="your storage account key"/> </appSettings> <startup> <supportedRuntime version="v4.0" sku=".NETFramework,Version=v4.6.1" /> </startup> </configuration> |
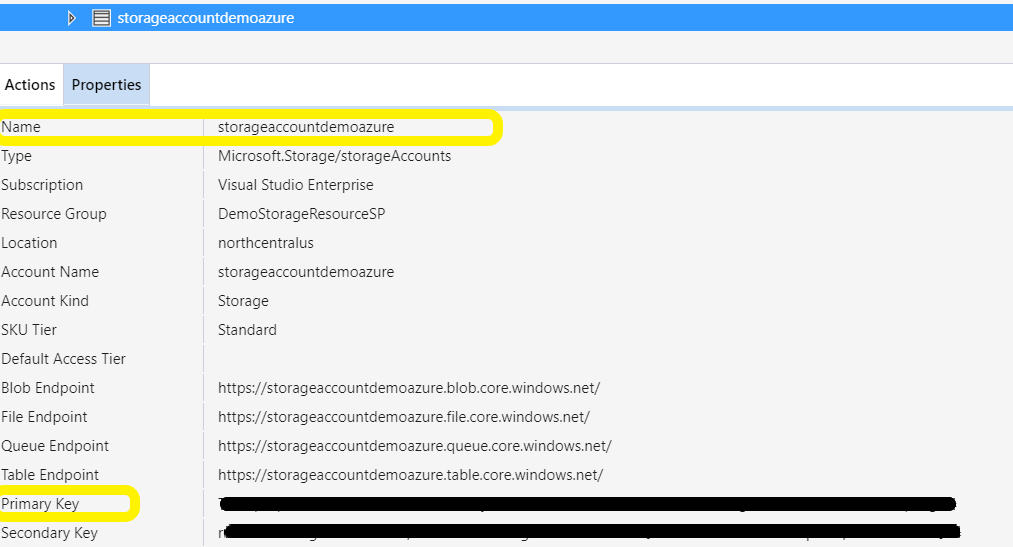
The keys include the Storage Account name, and Storage Account Key details that you must grab from the Azure Portal or Azure Storage Explorer. For this demo, I am going to access the keys from Azure Storage Explorer. Just click on the storage account, and you will see that all the information related to your storage account will be easily accessible to you in the Properties section. Now, you can copy the Storage Account Name and Storage Account Key and paste them in your App.config file.
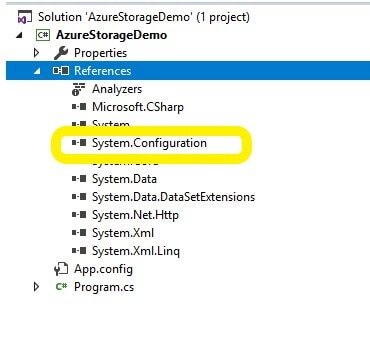
The next step is to add a reference in System.Configuration to the project in order to access the keys that you added to App.config. To add a reference, go to the Solution Explorer Window, right-click on References=>Add reference=> Select Framework. Then select System.Configuration from the list. You should then see the new reference added to the project.
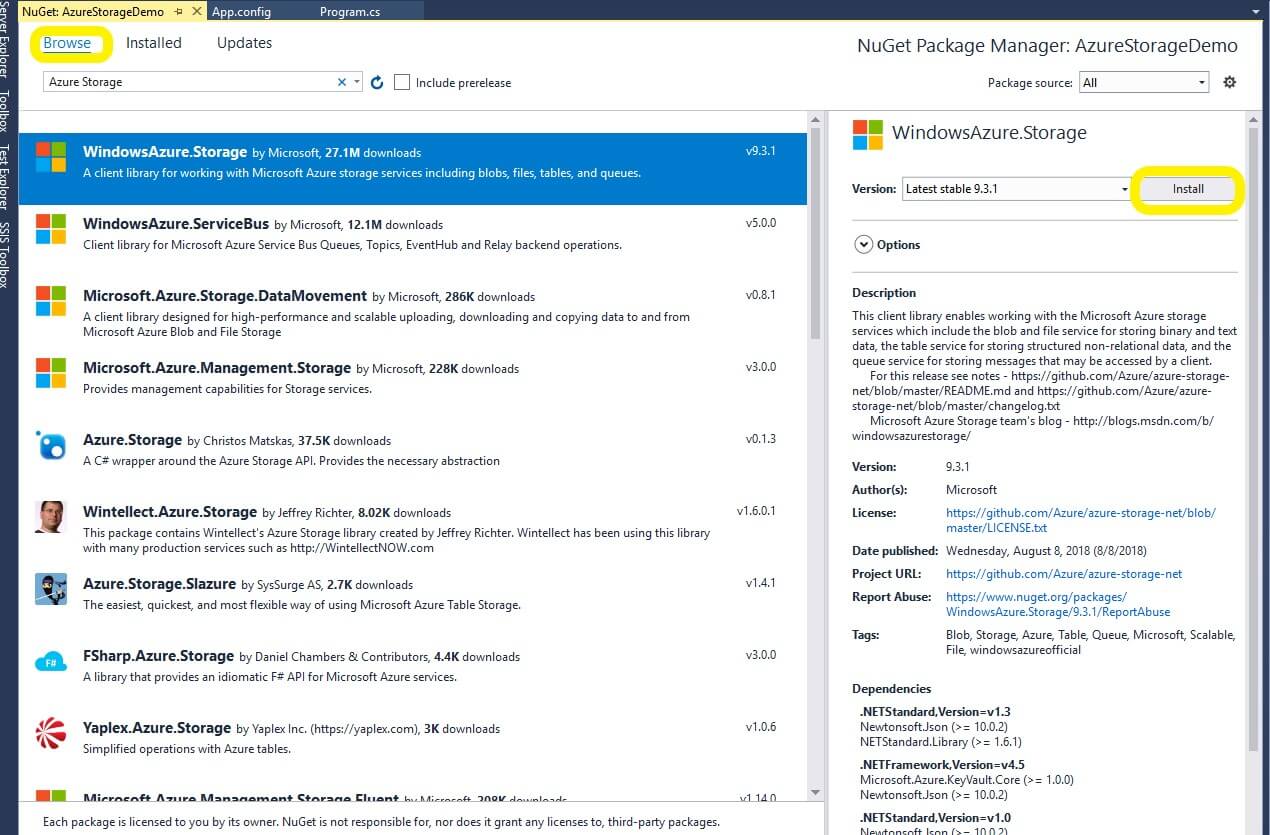
To talk to Azure Storage, a NuGet package must be installed. Right-click the project in the Solution Explorer and select Manage NuGet Packages. Find WindowsAzure.Storage in the list and click Install.
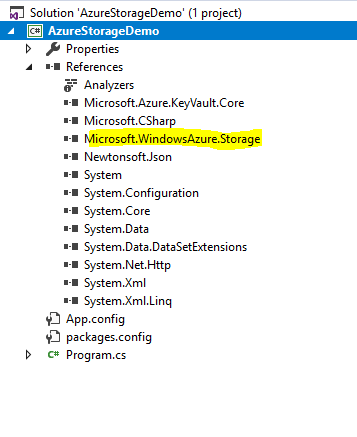
After you click the Install button, you will notice that the reference is added to the project.
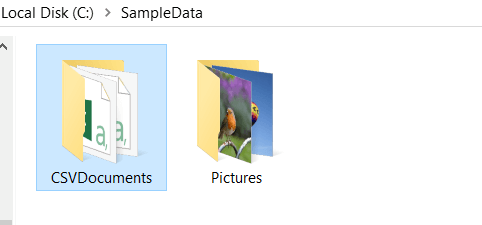
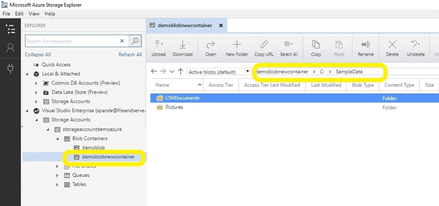
Now that the references have been added to the project, it’s time to write some code to upload blob files from a directory over to the Azure Blob Storage. As you can see in the image below, I have created a SampleData directory which has 2 folders, CSVDocuments and Pictures. What we are going to do next is upload all the files from SampleData using C# code and then download these files from Azure Storage Explorer.
Brief Overview of the Code:
To upload data through .NET, you must implement the following in your code:
- Create an instance to the storage account by using storage credentials such as storage account name and key.
- To perform various tasks on the blob, create a blob client for the storage account using CreateCloudBlobClient
- To get a reference to the container in the blob storage, pass the name of the container to the GetContainerReference method. The code will make sure that the container exists. You can always look in the Azure Storage Blob containers to see if it already exists, but for code safety use a CreateIfNotExists call on the container object.
- To upload the files from a directory, create a blob object using GetBlockBlobReference and further upload the files from the specified file path to Azure Storage using the UploadFromFile method.
Code for Uploading Blobs to Azure Storage
Replace the original code found in the Program.cs file with this code:
|
1 2 3 4 5 6 7 8 9 10 11 12 13 14 15 16 17 18 19 20 21 22 23 24 25 26 27 28 29 30 31 32 33 34 35 36 37 38 39 40 41 42 43 44 |
using System; using System.Collections.Generic; using System.Configuration; using System.Diagnostics; using System.IO; using System.Linq; using System.Text; using System.Threading.Tasks; using Microsoft.WindowsAzure.Storage; using Microsoft.WindowsAzure.Storage.Auth; using Microsoft.WindowsAzure.Storage.Blob; namespace AzureStorageDemo { class Program { //get the storage keys from app.config private static readonly string StorageName = ConfigurationManager.AppSettings["StorageAccountName"]; private static readonly string StorageKey = ConfigurationManager.AppSettings["StorageAccountKey"]; //File path to upload all the files private static readonly string path = @"C:\SampleData"; static void Main(string[] args) { Debugger.Break(); //initalize new instance of storage account based on the name and key combination var stoageAccount = new CloudStorageAccount(new StorageCredentials(StorageName, StorageKey), true); //create a blob storage client var blobStorageClient = stoageAccount.CreateCloudBlobClient(); //get container reference ,create new if it does not exists var container = blobStorageClient.GetContainerReference("demoblobnewcontainer"); container.CreateIfNotExists(); //get all the directories from filepath and upload one by one foreach (var fp in Directory.GetFiles(path,"*.*",SearchOption.AllDirectories)) { var blobRef = container.GetBlockBlobReference(fp); blobRef.UploadFromFile(fp); Console.WriteLine("Uploaded File {0} ",fp); } Console.WriteLine(); Console.Write("Press any key to exit..."); Console.ReadKey(true); } } } |
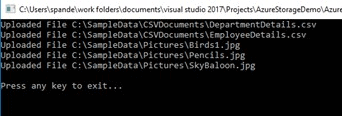
Run the project, and you will see that csv files have been uploaded one by one to their respective folders on the Azure Storage account:
After all the code has been executed successfully, refresh your Azure Storage Explorer and navigate to your Blob containers section. You will see that new blob container, demoblobnewcontainer has been created. Browse to the Sample data directory, and you will notice that the two folders are uploaded to Azure Blob Storage successfully.
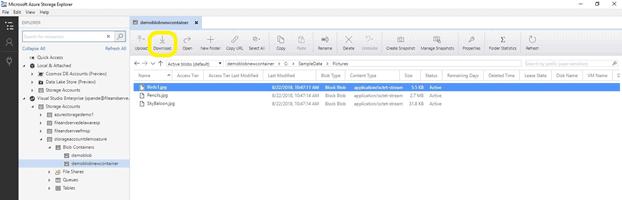
You can download the files from Azure Storage Explorer with just a single click, i.e., using the Download button and saving to your local machine.
You may sometime come across a scenario where your application is uploading the documents to Azure Storage, and you want to download, edit, or access those files. There might also be a scenario where you want to update your test data and easily update your blobs through GUI. Azure Storage Explorer has the answer to all these situations. Through the user-friendly and feature-rich UI, Azure Storage Explorer makes data modifications so easy.
Summary
Azure Storage is a scalable and reliable solution to store varied forms of data. Be it Structured or unstructured, Azure Storage has the capacity and ability to store all of it. To add more flavor to it, Azure Storage Explorer enables the user to efficiently manage the data by providing various features depending on the type of storage. Azure Storage Explorer is a feature-rich application that you can just download on your machine, connect to your subscription and access your storage account without actually using the Azure portal. It also enables you to connect to other data storage features provided by Azure such as Azure Data Lake and Azure Cosmos DB.
References
https://azure.microsoft.com/en-us/features/storage-explorer/
https://docs.microsoft.com/en-us/dotnet/api/microsoft.azure.storage.blob.cloudblobcontainer.getblockblobreference?view=azure-dotnet-legacy
Load comments