SQL Server Agent is a job scheduling agent that ships with SQL Server. Its infrastructure consists of a Windows service that is used to execute tasks (called jobs in SQL Server parlance), and a set of SQL Server tables that house the metadata about these jobs. The agent can execute numerous types of jobs, either on a schedule, or on-demand. In this article, we will look at some of the best practices for security that should be followed when installing and setting up SQL Server Agent. I’m assuming you already have a working knowledge of configuring and using SQL Server Agent.
Who sees what
A common request that DBAs get is to grant the development team access to SQL Server Agent. As with all database access, you should grant only as much access as required, because of the inherent security risks of a task scheduler.
SQL Server contains 3 fixed database roles on the MSDB database, which gives administrators fine control over access to SQL Server Agent. The SQL Server Agent node in SSMS is visible only to users in one of these 3 roles (except sysadmins, who can see everything irrespective of role membership). Here is an explanation of the roles, in order from the most restrictive to least restrictive:
- SQLAgentUserRole – Users in this role are granted view/edit/delete/execute access to only jobs owned by them. Users in this role cannot view any jobs owned by system administrators, or by users in the other two roles. Grant this role when you want users to only see jobs owned by them.
- SQLAgentReaderRole – Users in this role get all the privileges of theSQLAgentUserRole, i.e. they get access to owned jobs. In addition to that, they can also view (but not modify or execute) all jobs on SQL Server Agent, irrespective of ownership. Grant this role when you want users to be able to view, but not execute, all jobs in the system, but modify/execute only jobs owned by them.
- SQLAgentOperatorRole – Users in this role get all the privileges of the SQLAgentReaderRole. In addition to that, they can also execute, or enable/disable any job in the system. However, users in this role can modify only owned jobs. Grant this role for super users who can view/execute all jobs on the system.
Always start by granting users the most restrictive role – SQLAgentUserRole, and upgrade membership to higher roles if required. Use the below table to determine the type of access you should grant:
| Action | SQLAgentUserRole | SQLAgentReaderRole | SQLAgentOperatorRole |
| Create/modify/delete | Only owned jobs | Only owned jobs | Only owned jobs |
| View List | Only owned jobs | All jobs | All jobs |
| Enable/Disable | Only owned jobs | Only owned jobs | All jobs |
| View Properties | Only owned jobs | All jobs | All jobs |
| Edit Properties | Only owned jobs | Only owned jobs | Only owned jobs |
| Start / Stop | Only owned jobs | Only owned jobs | All jobs |
| View job history | Only owned jobs | All jobs | All jobs |
| Delete job history | No | No | Only owned jobs |
| Change Ownership | No | No | No |
What service account to use
The core of the SQL Server Agent infrastructure is the SQL Agent Service. This is a windows service that is responsible for executing the different types of job steps supported by SQL Server Agent. The service account defines the Microsoft Windows account used to execute the SQL Agent service.
You select an account for the SQL Server Agent service by using SQL Server Configuration Manager, where you can choose from the following options:
- Local System– This is the NT AUTHORITY\System account on the local machine. It is a member of the Windows Administrators group on the local machine, and therefore, is a member of the SQL Server sysadmin fixed server role. Since the account is a Windows administrator, it has permissions beyond what is required for running SQL Server Agent, and it is therefore not recommended to be used as a service account.
- Local Service– not recommended. Has minimum privileges on local machine.
- Network Service – not recommended. Has minimum privileges on local machine.
- Windows Domain Account – You can also choose a windows domain account as the service account for SQL Server Agent. Using a windows domain account and granting it the necessary permissions is the best practice when choosing a service account. It is also recommended that this account not be a member of the Windows Administrators group.
Further, the service account is required to be a member of the SQL Server sysadmin fixed server role on the SQL Server instance.
SQL Server Agent also supports proxies, which allows it to execute processes in the context of other windows users. Proxies are addressed in detail later in this article, but from a security perspective, the service account should have the following windows permissions to be able to support proxies:
- Permission to log on as a service (SeServiceLogonRight)
- Permission to replace a process-level token (SeAssignPrimaryTokenPrivilege) – this permission allows a windows account to launch a new process under a different user account. This permission enables the SQL Server Agent service account to launch processes that “run as” the user accounts defined in the proxy.
- Permission to bypass traverse checking (SeChangeNotifyPrivilege) – this permission allows a windows account to traverse a directory structure, even though the account may not have access on the individual levels of the directory tree. To understand why this is required, consider this example – SQL Server Agent is trying to execute an SSIS package residing on a shared folder \\TOP_SECRET\For_SQL_Agent.dtsx. In this scenario, the service account is granted access only to the “For_SQL_Agent.dtsx” file, and does not have any access whatsoever to the “TOP_SECRET” folder. Since the agent service account has the bypass traverse checking permission, it can still traverse the directory structure to get to the .dtsx file, and execute the package.
- Permission to adjust memory quotas for a process (SeIncreaseQuotaPrivilege) – required so that SQL Server agent can adjust memory quotas for memory-intensive jobs.
- Permission to log on using the batch logon type (SeBatchLogonRight) – when executing scheduled tasks in the context of a different user, SQL Server Agent will first create a new “batch logon session” that runs in the security context of this user. A batch logon session is a session created without any interaction from the user, as opposed to an “interactive” logon session, which is created when a user physically logs on to the machine. This permission enables SQL Server Agent to create a batch logon session.
Note that there are special considerations when setting up the service account for multiserver job processing. You can refer to the documentation here for a complete list of the permissions required..
Who should own what job
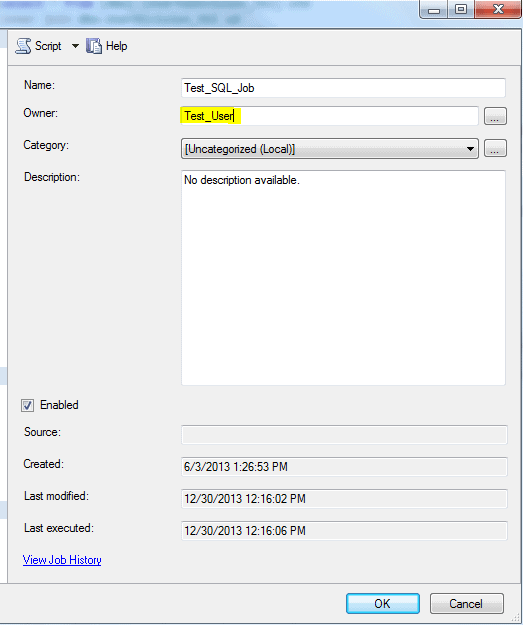 Job ownership is an important concept in SQL Server Agent. SQL Server Agent sets the security context for job execution based on the role of the user owning the job. By default, SQL Server Agent executes job steps under the SQL Server Agent service account irrespective of job ownership, or under the context of a proxy account, as we will see later in this article.
The exception to this rule is T-SQL job steps, which execute under the security context of the job owner. If the job owner is a member of the sysadmin role, then the job step executes in the context of the SQL Server Agent service account. A common mistake when setting up jobs is to make “sa” the job owner – this will cause all T-SQL job steps to execute as the SQL Agent service account, which is a system administrator account. A better option is to set a non-sysadmin account as the job owner, and explicitly grant only the required database permissions to this account.
If you have a single instance of SQL Server Agent hosting jobs for multiple applications, you should consider using job ownership for access control of T-SQL steps. Each group of jobs for an application should be owned by an account specific to that application, which is granted access only to database objects relevant to that application. This approach will prevent jobs for one application inadvertently modifying database objects from another application. Access control for other types of job steps (SSIS, replication etc.) can be enforced by using proxies, as we will see later in this article.
Logging to file
 SQL Server Agent maintains job history for each job execution, which includes job start and end times, a log of the job activity etc. There are a couple of ways you can view job history:
- Right-click on the job in SSMS, and choose View job history, or,
- By querying the msdb.dbo.sysjobhistory table. The View job history option in SSMS internally queries this table to get the job history.
One of the problems with the sysjobhistory table is that it can store only up to a maximum of 4000 characters per log entry, because the message column in the table is defined as nvarchar(4000). If this is exceeded, it may cause problems with subsequent job steps because errors will be lost. This simple test will illustrate the point:
|
1 2 |
DBCC CHECKALLOC select 1/0 -expression that will trigger an error. |
In the above t-SQL, we execute the DBCC CHECKALLOC command to check disk space allocation consistency for the msdb database. The command also prints an allocation summary for each index and partition in each file, which will go past the 4000 character limit on most databases. At the end of the DBCC command, the job step in our test intentionally fails with a divide by zero error. Upon execution, the job will obviously fail, but you will never see the divide by zero error in the job history, because the error message gets truncated at 4000 characters.
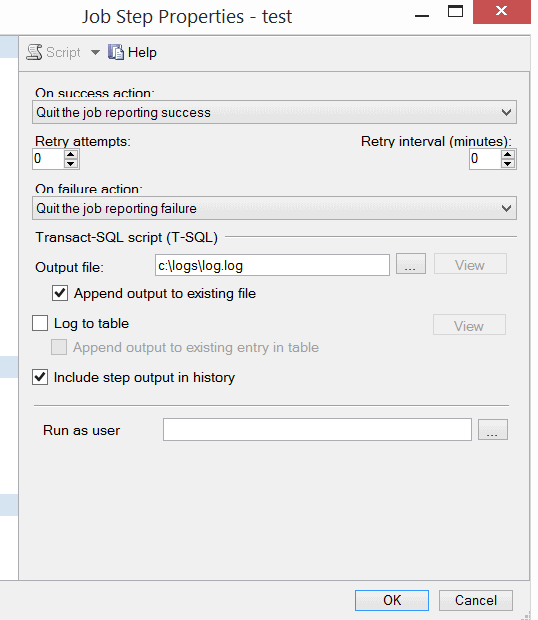
To prevent this from happening, it is always a good practice to log your job output to a file. You can set this option from the Advanced tab on the job step, as shown in the figure. Setting this option will write all your job output to a text file, and enable you to look at the complete log with no limit on the number of characters.
When choosing this option, ensure that the SQL Agent service account has write access to the log file. There is also an option to log to a table instead, which basically writes the same log entry to the msdb.dbo.sysjobstepslogs table instead of a file.
If you choose to write the log output to a file or a table, it is a good idea to setup an archiving mechanism to archive the log file or table – failure to do so may lead to situations where the log file or table uses up all your disk space and brings down your entire SQL Server instance.
Using Alerts
SQL Server Agent provides an alert system that allows database administrators to configure outgoing alerts for various system events. The alert can be used to notify database administrators about certain error conditions. It can also execute other SQL Server Agent jobs to fix the problem, or take other remedial action.
Setting up alerts for errors
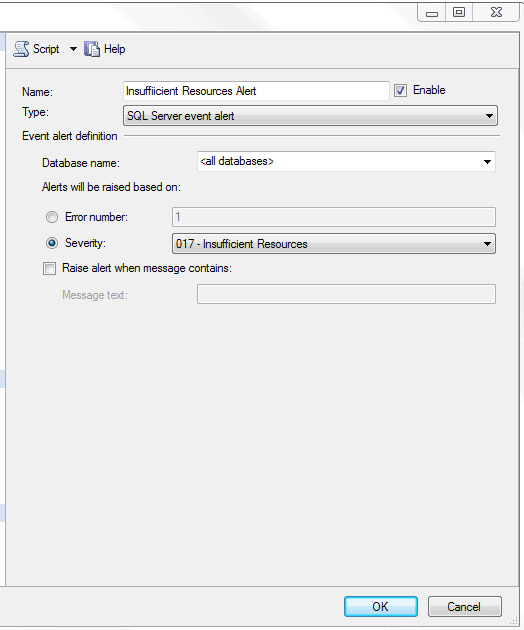
You can setup alerts to send out notifications when certain errors occur in the system. Alerts can be triggered when:
- An error with a predefined error number occurs
- An error with a predefined severity occurs
- An error containing a predefined text occurs
SQL Server Agent reads the Windows application log periodically and checks if an error satisfying one of the above criteria has occurred. If it finds an entry, it initiates the action listed on the Response tab of the alert.
The Response allows you to notify a database administrator of the situation via email. Or, if the problem can be fixed, the alert can be configured to execute another SQL Server Agent job to fix the problem.
Note – It is important to remember that SQL Server Agent alerts are triggered only for errors that are logged to the windows application log. If you setup alerts for errors that are not logged to the windows log (such as the divide by zero error), your alert will never fire. If you explicitly want an error to be logged to the windows application log, you can call RAISERROR with the LOG option, which will log the error and fire any alerts configured to listen for the specific error.
The best practice is to configure alerts for errors with severity 19 to 25. Errors with severity greater than 19 are always logged to the event log, and the alert should be configured to notify the database administrator(s).
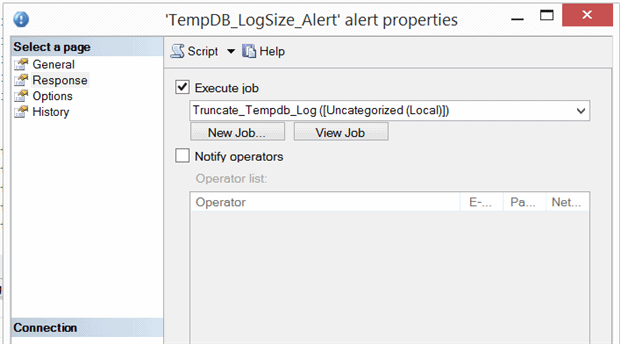
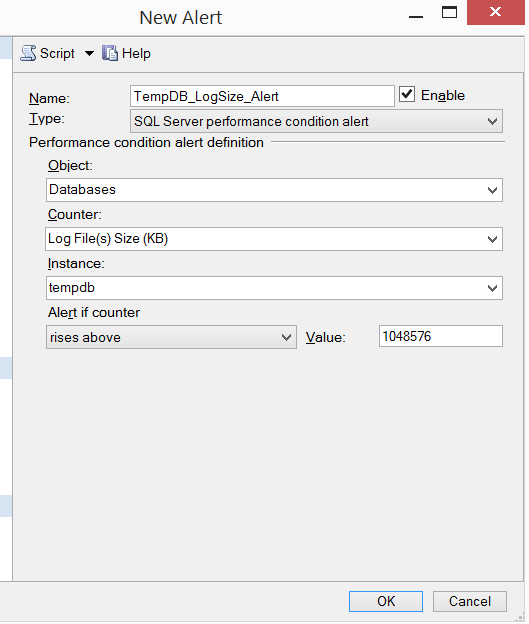
Setting up performance alerts
Another useful feature of SQL Server Agent is the ability to send out alerts when certain performance counters are affected. Alerts can be configured to fire when certain performance counters values exceed/equal/go below a limit. For e.g., the accompanying screenshot shows an alert configured to fire when the tempdb log file size exceeds 1 GB. On the response screen, you can execute a SQL Server Agent job to truncate the log and fix the problem.
USING PROXIES
SQL Server Agent uses Proxies to define the security context for job steps. Basically, a proxy is an object that provides SQL Server Agent access to stored credentials for a Windows user. When running a job step that is configured to use a proxy, SQL Server Agent impersonates the credentials defined in the proxy, and then runs the job step using that security context.
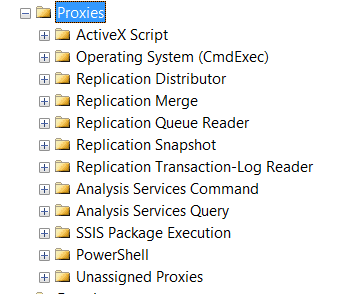
SQL Server Agent uses Subsystems to define the security context for proxies. By default, SQL Server agent provides 11 subsystems, as shown in the figure. Each subsystem represents a type of external process that can be executed in a job step.
By default, all T-SQL job steps in SQL Server Agent execute using the account that owns the job. For job steps that execute processes in one of the other subsystems (e.g. SSIS, PowerShell etc.), the default execution account is the SQL Server Agent execution account. For job steps in non T-SQL subsystems, the SQL Server Agent service account would have to be granted access to these other subsystems as well. This is almost always a bad practice – it significantly increases the security risk if the service account is compromised.
A better option is to configure a proxy for each subsystem, and grant the appropriate privileges to the proxy account. When a proxy is granted access to a subsystem, it becomes available to all job steps using that subsystem.
Creating a proxy for SSIS Package Execution
You can follow these steps to create a proxy for the SSIS subsystem, and use it in job steps.
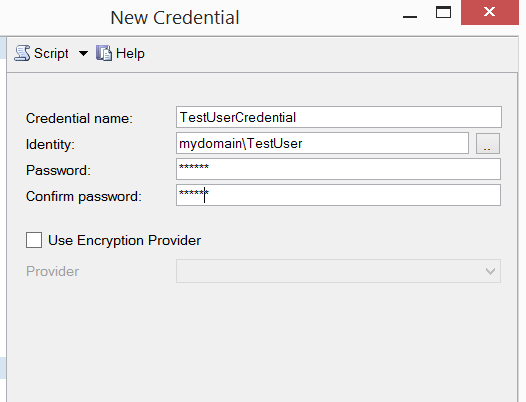
- Create a credential – In SSMS, expand the Security node, and right-click on Credentials. Choose New Credential to launch the new credential dialog, and enter the credential name. In the Identity box, enter the name of the windows account that you will be using for the proxy – this is the account that SQL Server Agent will use when connecting to the external subsystem. Enter, and re-enter the account password to create the credential.
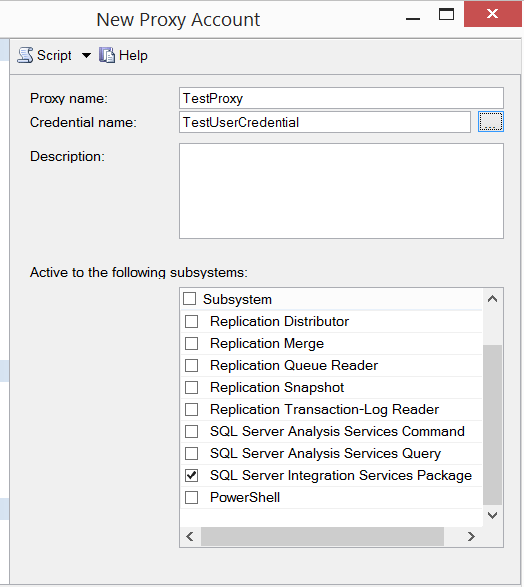
- Create the proxy – In SSMS, expand the Proxies node under SQL Server Agent. Right-click on the SSIS Package Execution node, and choose New Proxy to launch the new proxy dialog. Type in a proxy name. In the Credential name box, type in the name of the credential created earlier. In the Active to the following subsystems list, check the subsystems where the proxy can be used – you must first make sure that the credential used by the proxy has access to the selected subsystems. In the above screenshot, I added the proxy to the SQL Server Integration Services Package subsystem.
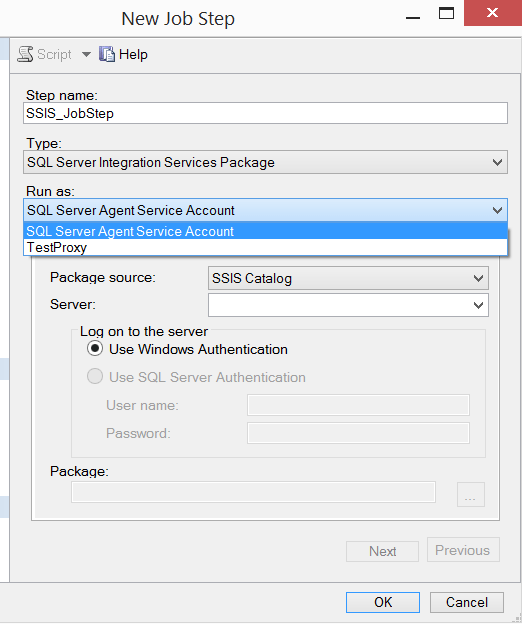
- Create the job – Right-click on the Jobs node under SQL Server Agent in SSMS to launch the New Job dialog. Enter a name for the job and navigate to Steps tab. On the Steps tab, add a new job step by clicking New, and enter a job step name. Under the Type dropdown, select SQL Server Integration Services Package, since we added the proxy to the SSIS subsystem. Under the Run As drop down, you should automatically see two accounts – the SQL Server Agent Service account, and the proxy we just created. You can then select a package of your choice from either the SSIS Catalog or the file system. Once you have selected the SSIS package, hit Ok on the New Job Step and New Job dialogs to create the job.
When you execute the job we created, SQL Server Agent actually impersonates the account used by the proxy, and executes the SSIS package under the security context of the impersonated account.
Conclusion
In this article we discussed the security implications when choosing a service account for SQL Server Agent, and looked at the security permissions that should be granted to the service account. We also delved into setting up job visibility for different users by adding them to one of the 3 fixed database roles in MSDB, and we also touched upon the importance of the job owner. We also looked at the options available for logging in SQL Server Agent, and how this enables you to get over the 4000-character limit in log messages. We went over the different types of alerts that you can configure in SQL Server Agent. Lastly, we looked at the steps to setup proxies and configure your jobs to use proxies.
I hope that these tips will enable you to create a secure and efficient SQL Server Agent environment.

Load comments