The series so far:
- Introduction to Testing Your PowerShell Code with Pester
- Advanced Testing of Your PowerShell Code with Pester
- Testing PowerShell Modules with Pester
Automation has become the backbone of infrastructure management within most corporations. The DevOps movement has added to the importance of having a good automation strategy. With its usefulness on the Windows platform long established, and now the ability to run on the Linux and Apple Mac OSX platforms, PowerShell has firmly established itself as a powerful player in the world of automation.
Given the importance of PowerShell, imagine that your boss, project manager, or similar authority figure comes to you with some basic questions.
“How can I be confident your code meets requirements?”
“How do we know your changes don’t break other modules?”
“Can you prove to me your scripts do everything they are supposed to?”
These and other questions can be answered through the use of testing.
Pester
“Sure” you say. “I test my code.” But in a shockingly high number of environments testing is still a manual process. A developer makes changes, runs a test on their computer, and deploys. Unfortunately, this type of testing just doesn’t scale. A developer may be able to test the small script they created, or the function they updated. But what about bigger code bases? Modules composed of multiple PS1 files, or scripts that rely on many different modules?
Just as automation is the answer to infrastructure management, so too is it the answer to testing. From the title of this article, you’ve guessed by now the tool of choice for testing PowerShell code is Pester.
Pester is a community-based project designed from the ground up as a testing framework for PowerShell, written in PowerShell. It’s open source, you can look through the source code, even make contributions back to it. You’ll find the full project on GitHub.
A lot of effort went into making Pester as compatible as possible across multiple versions and platforms. It is compatible with PowerShell 2.x up through 5.x on Windows 10, 8, 7, Vista, and all versions of Windows Server from 2003 through today. It is even compatible with the new PowerShell 6.0 Core, running on Linux/Mac OSX platforms, with a few minor limitations. (See the article Pester on PSCore limitations for more information).
In this series of articles, I’ll introduce Pester and show examples of the different types of tests you can perform.
Types of Testing
Before getting into writing tests, I will cover the types of testing. These break into three basic categories. While there are entire books written around testing concepts, this will be as brief as possible to provide context to basic testing operations.
Unit Testing
Unit tests are performed by the developer and are typically focused on the code they’ve just created or modified. They provide feedback that the code works as they wanted it to. Unit tests are done in isolation. By isolating the test to run on just the code they’ve written, and not that of external modules, they can be assured any problems they find are with their code and not with external modules or functions.
To achieve isolation, testing uses the concept of mocks. Within a test a mock is used instead calling the actual external function desired. For example, let’s say your script calls Test-Path to validate the existence of a file. Actually, calling the real Test-Path function could cause several issues in testing.
First, the Test-Path cmdlet itself could have a bug in it, previously undiscovered or maybe just not known to the developer. Second, the developer could be assuming the path containing the file they are seeking will always exist as part of the test. Issues would certainly arise if the directory was to unexpectedly vanish. Finally, the drive containing the file may not be present or issues such as network connectivity or hardware failure could be causing problems.
Should any of these issues occur, the developer is left not only trying to debug his own code, but also struggling with the many ways the Test-Path cmdlet could have failed.
Mocks provide a way to remove external code, such as Test-Path, from the equation. As you will see later in this series, you can create a ‘fake’ or ‘mock’ version of Test-Path that would always return a true (or false). This removes the external call (in this case to Test-Path) as a possible vector for errors a developer might have to track down. The next article in the series will dive deeper into mocks.
Integration Testing
Integration testing is the next step in your testing workflow. Once a developer successfully completes their unit tests, they are ready for integration testing. Integration tests go beyond just testing the code the developer has finished working on, to testing it along with all the related code for a project.
For example, let’s say you updated two functions in module A. This module is part of a bigger project that encompasses two other modules, B and C, in addition to A. When executing integration tests, it would call all of the tests for all three modules. This is to ensure changes to module A don’t adversely affect modules B and C.
Typically, integration tests do not employ mocks. To fully test integration, in addition to your own code, you should execute that code against other modules. These modules might include some you’ve purchased, or those provided by Microsoft such as AzureRM or SqlServer. Integration testing is often considered ‘white box’ testing. In white box testing, also referred to as clear box or glass box, the tester has access to the underlying source code.
Many source code control systems have the ability to automatically perform integration testing. Once code is checked in, the system will automatically execute the integration tests you’ve configured.
Acceptance Testing
Acceptance tests should be done by someone other than the developer. Some companies have internal organizations set up just to perform testing. In other organizations business users are often employed as testers, although this isn’t as common when testing non-application projects such as PowerShell scripts.
Acceptance testing is typically done in a ‘black box’ style. In black box testing, the testers do not look at or have access to the source code. Instead they simply execute the scripts and look at the results. If the results are as expected, for example a new server is created or database is deployed, the test passes.
When to Test
Let’s say by the end of this series of articles, you’re sold on testing your PowerShell code with Pester. You’ll want to start by crafting tests for the modules and scripts that you already have. Typically, these tests are written against what you expect the code to do. While you might think your tests would all just pass every time, you’d be surprised at how often you uncover bugs in your existing code when creating tests. Additionally, the creation of these tests will give you a base for testing new updates to your scripts.
The second time to test is before you write your scripts. Yes, you read that right, you should create your tests before you write your new scripts (or update existing ones with new functionality). The concept is known as test driven development, or TDD for short.
With test driven development, you begin with your requirements document. You then create a test for each requirement. In addition, you’ll also want to ensure you create tests for failures. For example, say your requirement is to download a file from a website via FTP every day. Naturally you’ll have a test for successful downloads, but you should also have tests for when the download fails to ensure your code behaves according to the requirements for error handling.
TDD also helps us to answer the question of “are we done”. If you have tests for each requirement when all of your tests pass, you’ve met all of your requirements, and thus development is complete.
As should be obvious, in order to properly do test driven development you must have good, clear, and documented requirements. I cannot stress how important this is. In far too many development shops, requirements are provided with a few scribbles on the back of a napkin, or even worse, verbally.
Your automation strategy is a critical component in your corporation’s infrastructure. Even a small script with just a few lines of code can have an enormous impact in your company. Imagine a simple script meant to remove a single resource group from Azure. Improperly configured, it could wind up deleting ALL of the resource groups, including those in your production environment!
Demand clear, well written requirements. If you cannot get them, then write them yourself! Base them on your understanding of the user’s needs. Once done, send them to the user, letting them know development will proceed once they provide formal approval via email.
The Demos
The demo code for this series of articles was written on Windows 10, 64-bit, using PowerShell 5.1. The code was developed in the PowerShell ISE.
For all of my PowerShell articles, a root folder on the C drive was created, C:\PowerShell. For this article, a new folder Pester-Demo was generated, hence C:\PowerShell\Pester-Demo is where all the code is being executed from. However, you are not locked into this structure. To make it easy at or near the beginning of each script is a variable, $dir, which points to the demo folder. Just update this to point to the folder you want to place the demos in.
|
1 |
$dir = 'C:\PowerShell\Pester-Demo' |
In addition, the final set of demo scripts for can be found on the author’s GitHub repository for this article.
Installing / Updating Pester
Installation of Pester is pretty simple if you are using PowerShell version 5.x (5.0 or 5.1). As version 5 is the most widely used version today, I’ll cover installing using it below. If you are still on an older version of PowerShell the Pester site on GitHub has clear instructions.
Assuming you are on PowerShell version 5.x, you can find out what version of Pester is currently available by using the Find-Package cmdlet.
|
1 |
Find-Package Pester |

As you can see, as of this writing, 4.4.0 is the most recent version as of the date of this article. To install it, simply use the Install-Module cmdlet, but be sure you are running the ISE or PowerShell console in Administrator mode or the install will fail.
|
1 |
Install-Module Pester -Force -SkipPublisherCheck |
If you’ve previously used Install-Module, the switches may not be ones you’ve used before. Force will do the install even if you have Pester installed. The SkipPublisherCheck argument is important if you are running on Windows 10. As mentioned before, Pester was pre-installed on Windows 10. However, the code was installed using a code signing certificate that is different from the one used today on the GitHub / PSGallery version. Because the certificates don’t match, PowerShell will raise an error and not allow you to proceed. Normally this would be a good thing, as it would prevent evil hackers from trying to overwrite a module you trust with one of theirs. In this case, though, you are cognizant of what you are doing and are requesting the update. Hence, you need the SkipPublisherCheck as a way to tell PowerShell you know the certificates don’t match, go ahead and install.
You can include both switches without any issues even if you aren’t on Windows 10 and don’t currently have Pester installed. To validate the version that was installed, you can use Get-Module.
|
1 |
Get-Module Pester -ListAvailable |

On this system there are three versions. Version 3.4.0 was preinstalled with Windows 10. When I first started writing this article, 4.3.1 was the current version, and was installed using the Install-Module cmdlet above. Shortly afterward version 4.4.0 was released, so the following cmdlet was used to update Pester to the most current version.
|
1 |
Update-Module Pester -Force |
If you only have 3.x installed, you will need to use the Install-Module method, after you have version 4.0 or later installed from the gallery, you will be able to use Update-Module to keep it up to date.
You’ll find the code from this section in the file Get-Pester.ps1 in the author’s GitHub repository.
Running Tests
Before you start writing tests, you should know how to run them. The Pester module includes the Invoke-Pester function. With it, you provide either the name of a script containing the tests to execute, or the name of a folder. By convention, although not required, scripts with Pester tests should end with .Tests.ps1. While not a requirement, you will typically create a tests file for each ps1 file you have. If you had a file, DoSomeStuff.ps1, its corresponding test file would be DoSomeStuff.Tests.ps1. This convention allows you to execute all tests in a folder by using Invoke-Pester and passing in the name of a directory. It will find and run all files that have the .Tests.ps1 extension.
For this article, all the tests will be stored in the file BasicPester.Tests.ps1. You’ll use Invoke-Pester to run this tests file. Store the code below in the script, Invoke-BasicPesterTests.ps1, or you can download the file from the GitHub repository for this article.
|
1 2 |
$dir = 'C:\PowerShell\Pester-Demo' Invoke-Pester "$dir\BasicPester.Tests.ps1" |
Alternatively, you could have used Invoke-Pester $dir, and it would have run all files ending in .Tests.ps1, including BasicPester.Tests.ps1. Finally, you could have also just run Invoke-Pester, in which case it would execute all *.Tests.ps1 files in the current folder. If your PowerShell session was currently in C:\PowerShell\Pester-Demo, Invoke-Pester will run all .Tests.ps1 files in that folder.
Now that you know how to run tests, it’s time to start writing them!
Your First Test
Take a look at a very simple test.
|
1 2 3 4 5 |
Describe 'Basic Pester Tests' { It 'A test that should be true' { $true | Should -Be $true } } |
Under the hood, Pester commands are really nothing more than PowerShell functions. Thus, the Describe method (aka function) is the initial method called. One thing you’ll notice about Pester, is that it does not follow the naming conventions of other PowerShell cmdlets. Most, even when you author your own functions, use the verb-noun naming convention.
The authors of Pester chose to go a different route. Pester uses a language of its own, one meant to make tests more readable. This concept is known as a DSL, or Domain Specific Language. With DSLs, a syntax is created that is much more readable and friendlier to the human users. You will find Pester implemented a DSL that is meant to make tests easily read and convey a clear meaning as to what is going on.
As noted, a basic Pester test begins with the Describe command. The Describe function acts as a container for one or more tests. After Describe, a text string that describes the tests contained in it. This example has a simple name of Basic Pester Tests. Under the hood, this string is the first parameter to the Describe function in the Pester module.
At the end of the line there is a { (an opening squiggly brace). The next line has more code, which continues until you find the closing } (squiggly brace). At first glance this structure resembles other built-in PowerShell commands, such as foreach. This is a bit deceptive, though. What is really happening is that you are defining a script block and passing it into the Pester modules Describe function. A script block is PowerShell code that has been defined as an object. The previous code could have been defined like:
|
1 2 3 4 5 6 |
$scriptBlock = { It 'A test that should be true' { $true | Should -Be $true } } Describe 'Basic Pester Tests' $scriptBlock |
It would work, however, this makes the code more difficult to read and thus should be avoided, at least for your Pester tests. For more information on script blocks, see the About Script Bocks article.
This does have one other implication you should be conscious of. With a foreach block, you have the freedom to place the opening squiggly brace on the same line as the foreach, or on the next line. Both of these are valid:
|
1 2 3 4 5 6 7 |
foreach ($x in $list) { # code here } foreach ($x in $list) { # code here } |
This isn’t allowed with Pester tests, as the script block is a parameter to the Describe function. If the brace was on the next line, PowerShell would not be able to find it and return an error for a missing parameter (the script block). If you really wanted to, you could place a line continuation character at the end, then the opening squiggly brace on the next line. However, this doesn’t aid anything in terms of readability.
So now you’ve seen how to call the Describe function, given it a name, and then created a script block to hold one or more tests. A test is defined using the Pester function It. Like the structure of the Describe function, you first pass in a string containing the name of the test. This is followed by a script block that defines the test condition. Save the code from the beginning of this section to your BasicPester.Tests.ps1 file in the folder you created.
For this type of test, you first execute some type of equation, comparison, or function call that results in a Boolean value. This example is simply using the Boolean value of $true.
The results of that equation are then piped to the Pester Should function. The first thing to supply to the Should function is a switch that indicates the expected results. The -Be switch indicates that what is being piped into Should needs to equal the value passed as the second parameter. This example is saying the constant $true must equal the $true being passed into the Should function’s second parameter.
Execute the test and look at the results. With the Describe example at the top of this section saved in a file BasicPeter.Tests.ps1, execute the Invoke-BasicPesterTests.ps1 file (shown in the earlier section Running Tests).
You should see the following output (your output colors may vary depending on your color settings in the ISE or PowerShell console).
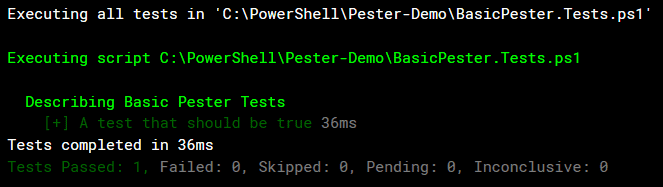
The first line reports that it is executing all tests in the PS1 file. If you had just called Invoke-Pester without providing a specific file, this would just display the name of the folder passed in (or the current folder if no folder was passed in). The next line, Executing script… tells which .Tests.ps1 file is getting executed for this section of output. This is useful when you are executing multiple test files at the same time.
Next, you’ll see the first (and only for this test) Describe block being executed. The Basic Pester Tests echoes back the string supplied as the first parameter to the Describe function.
After the first parameter string, you’ll see a + followed by the name of the test, the string supplied to the It function. The + is the indicator that the test passed successfully! Following is the length of time the test took, 36ms for this example.
On the next line is the total run time for all tests, since it only had one test it took 36ms. The last line is a summary, it tells us how many tests passed, failed, were skipped, pending, or inconclusive. Passed and failed are pretty obvious. In a later article you’ll see how to flag tests to be skipped, or put into pending status, as well as what inconclusive results are.
Your Second Test – Failure Is an Option After All!
What does it look like when your test fails? Modify the original code to add a second test.
|
1 2 3 4 5 6 7 8 |
Describe 'Basic Pester Tests' { It 'A test that should be true' { $true | Should -Be $true } It 'A test that should fail' { $fail | Should -Be $true } } |
The second test in a Describe script block is A test that should fail. Passing in the Boolean fail to the Should function and comparing that to true will of course cause this test to fail. When you run the tests, you’ll see this for our output:
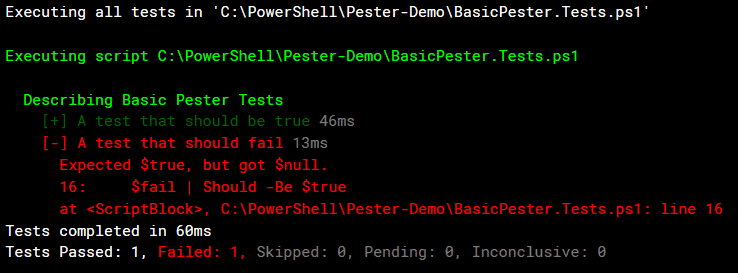
The second test appears with a – sign, and all in red! This is the indication that the test failed in 13ms. The next line displays the expected result (the result after the Should -Be) and what was actually passed in. A line number and the code that trigged the failure are provided. On the last line of the results for this test, you’ll see the full file name with the test.
After this is the total time for all of the tests, then a summary indicating the number that passed, failed, etc. As you can see, the failures are displayed in red letters.
More Should than Should Be Allowed
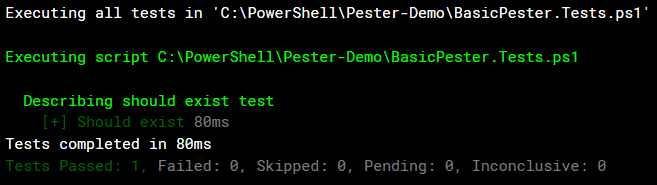
There are actually many variations to the Should function. Another popular one is the -Exist switch. It takes a file name that is piped in and checks to see if it exists.
|
1 2 3 4 5 6 |
Describe 'should exist test' { It 'Should exist' { 'C:\PowerShell\Pester-Demo\Invoke-BasicPesterTests.ps1' | Should -Exist } } |
This can be very useful, especially when testing functions that download or create files. It can also be useful for validating your code. For example, you are writing a module. One of your tests might be to check the existence of your manifest file. The output from the test above looks like:
Nice, but remember this is PowerShell! You can actually use PowerShell code as part of the tests. Take a look at this version of the test.
|
1 2 3 4 5 6 |
Describe 'should exist with variables test' { $someFile = 'C:\PowerShell\Pester-Demo\Invoke-BasicPesterTests.ps1' It "$someFile should exist" { $someFile | Should Exist } } |
Here the file being tested for is placed in a variable. This lets you use string interpolation to make the file name part of the name you give to the test. And you can reuse the variable passing it into the Should.
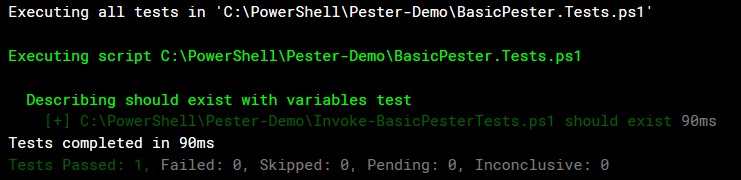
Now the file name is part of the test name itself. You will know exactly what file name was being tested for, making the results more valuable, especially when you may have a situation with multiple files.
Providing Context
Often a Describe block can contain many tests. When there are quite a few, it can be helpful to group related tests into blocks. This is where the Context function comes into play. You can think of a Context as a sub-Describe, it will provide an extra level in the output. In the following code sample, the tests are grouped into Context groups. In addition, you’ll also see some other variations of Should. Finally, for a few of the tests, you’ll condense the script blocks being passed into the It functions onto a single line. Just to demonstrate, it isn’t always necessary to break them up across multiple lines.
|
1 2 3 4 5 6 7 8 9 10 11 12 13 14 15 16 17 18 19 20 21 22 23 24 25 26 27 28 29 30 31 32 33 34 35 36 37 38 39 40 41 42 43 44 45 46 47 48 |
Describe 'Grouping using Context' { Context 'Test Group 1 Boolean Tests' { It 'Should be true' { $true | Should -Be $true } It 'Should be true' { $true | Should -BeTrue } It 'Should be false' { $false | Should -Be $false } It 'Should be false' { $false | Should -BeFalse } } Context 'Test Group 2 - Negative Assertions' { It 'Should not be true' { $false | Should -Not -BeTrue } It 'Should be false' { $true | Should -Not -Be $false } } Context 'Test Group 3 - Calculations' { It '$x Should be 42' { $x = 42 * 1 $x | Should -Be 42 } It 'Should be greater than or equal to 33' { $y = 3 * 11 $y | Should -BeGreaterOrEqual 33 } It 'Should with a calculated value' { $y = 3 ($y * 11) | Should -BeGreaterThan 30 } } Context 'Test Group 4 - String tests' { $testValue = 'ArcaneCode' # Test using a Like (not case senstive) It "Testing to see if $testValue has arcane" { $testValue | Should -BeLike "arcane*" } # Test using cLike (case sensitive) It "Testing to see if $testValue has Arcane" { $testValue | Should -BeLikeExactly "Arcane*" } } Context 'Test Group 5 - Array Tests' { $myArray = 'ArcaneCode', 'http://arcanecode.red', 'http://arcanecode.me' It 'Should contain ArcaneCode' { $myArray | Should -Contain 'ArcaneCode' } It 'Should have 3 items' { $myArray | Should -HaveCount 3 } } } |
Whew, that’s a lot of tests! In fact, it won’t be at all uncommon for your tests files to contain many, many tests. Indeed, the number of lines in your test scripts will often far exceed the number lines in the code being tested. Before analyzing the sample, look at the effect the use of Context had on the output.
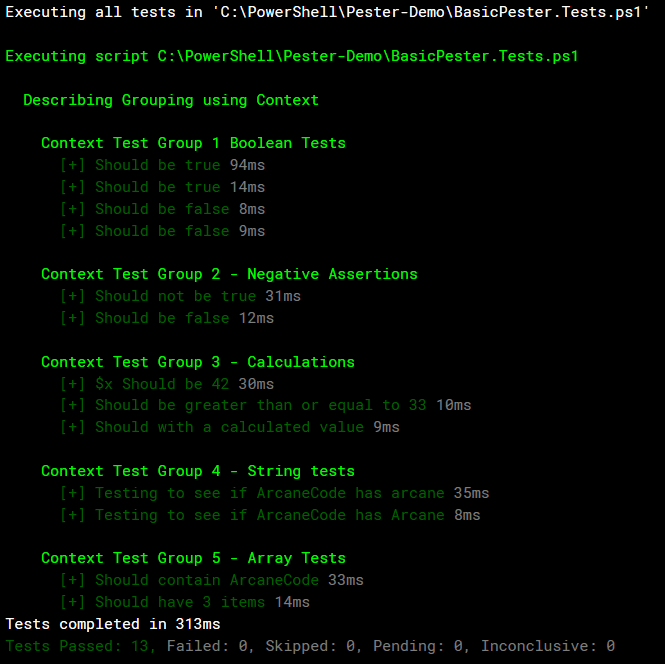
The use of Context broke the results into nice, easy to read sections. Rather than just line after line of tests, you can easily see the results broken into logical groups. Now look at some of the tests that were performed.
Test Group 1 resembled tests performed in the opening section of this article. However, you can shortcut the use of Should -Be $true by using the -BeTrue switch. Likewise, there is a -BeFalse switch. In Test Group 2, you’ll see that Pester also supports negative assertions. Simply add a -Not switch prior to the call to the Be switch, as was shown with Should -Not -BeTrue.
In Test Group 3, you’ll see how Pester handles calculated values. In addition to the BeGreater… switches there are also BeLess… versions of the switches. In the last example in this section, an actual calculation is piped into the Should function. When doing so, you must enclose your entire calculation in parenthesis. This forces PowerShell to do the calculation, then pass the result into the Should.
Pester also supports testing of string values, as demonstrated in Test Group 4. A simple test is to use the like operator under the covers for wild card matches, with one version for case insensitive and another for case sensitive. Although not shown, you can also use the Be switch for string comparisons.
In the last test group, number five, contains some tests for arrays, ascertaining if an array contains a certain value as well as ensuring the array has a specific count.
While these are some of the most common Should tests you can perform, it is by no means a comprehensive list. There are switches for working with files, regular expressions, and more. You can find a complete list at the Pester wiki.
Summary
This article covered the basics of Pester. Using just what you’ve learned here, you can begin testing your PowerShell scripts. Don’t be fooled though, Pester provides an incredibly rich framework for testing. Future articles will cover such things as:
- Using Mocks in tests
- Multiple Describe blocks in tests, and adding tags to them
- Critical things to know in testing Modules
- Advanced options for invoking Pester tests
Go forth and begin Pestering your own PowerShell code, and check back soon for more articles full of Pester goodness.

Load comments