The series so far:
- Azure and Windows PowerShell: The Basics
- Azure and Windows PowerShell: Getting Information
- Azure and Windows PowerShell: Using VM Extensions
As I mentioned in the previous article, I will not explain how to create Virtual Machines in detail, because Robert Cain published a great series about Azure VMs: Create Azure VMs. But after deploying a Virtual Machine in your Azure subscription, you will probably notice that you must configure the VM in order to suit your needs. This step is normal because the Virtual Machine has been deployed based on a template, which is usually generic and without any customization.
Nowadays, deploying a Virtual Machine on premises or in your Azure subscription is very easy and can be done very quickly. Thanks to the DevOps methodology, SysAdmins and developers can work all together in order to automate the deployment process as much as possible. The main goal for the IT department is to be able to deliver the service as quickly as possible because time is money. This is the reason why the provisioning process must be simple, fast, and secure. One essential step you must automate is the configuration of each Virtual Machine. Working with Group Policy Objects is a good idea, but if your Azure Cloud platform is isolated from your on-premises datacenter, then you must consider other options. Azure VMs can be deployed and configured without post-deployment intervention based on a feature which is called ‘Azure VM Extensions,’ so you can use this feature to save time and to automate the configuration management process.
What are Azure VM Extensions?
In the Azure Cloud, a feature called ‘Azure VM Extensions’ can be used to do configuration management. With Azure VM Extensions, you can configure for example:
- Monitoring
- Security
- Configuration management
- Backup
- And more…
This feature uses Windows and Linux Azure agents that are automatically installed during the provisioning process. This agent is named ‘Microsoft Azure Virtual Machine Agent,’ and it is the only prerequisite in order to use the Azure VM extensions. If the agent is not installed in the Virtual Machine, you can install it very easily. In this case, you can download the agent and double-click the Windows installer file.
Do not worry, you can manage these extensions outside of the Virtual Machine. You do not need to connect directly to the Virtual Machine to update the Extension. Note that VM Extensions can be bundled with a new VM deployment or run against any existing system.
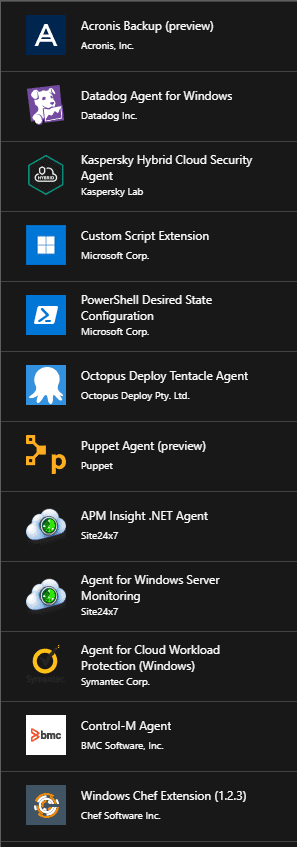
Many VM extensions are available for use with Azure Virtual Machines. As shown below, you can see the list from the Azure Portal by navigating to the Virtual Machine blade, and then by clicking Extensions. To see the available extensions, click the Add button:
Depending on whether you deploy a Linux VM or a Windows VM, the possible VM Extensions will be different. You can also use Windows PowerShell to list the Azure VM Extensions using the following command. The Get-AzureRmVMExtensionImage cmdlet will list the VM Extensions available in the West Europe region. Replace the region where your Azure subscription is located:
|
1 2 3 |
PS > Get-AzureRmVmImagePublisher -Location <Azure_Region> | ` >> Get-AzureRmVMExtensionImageType | ` >> Get-AzureRmVMExtensionImage | Select Type, Version |
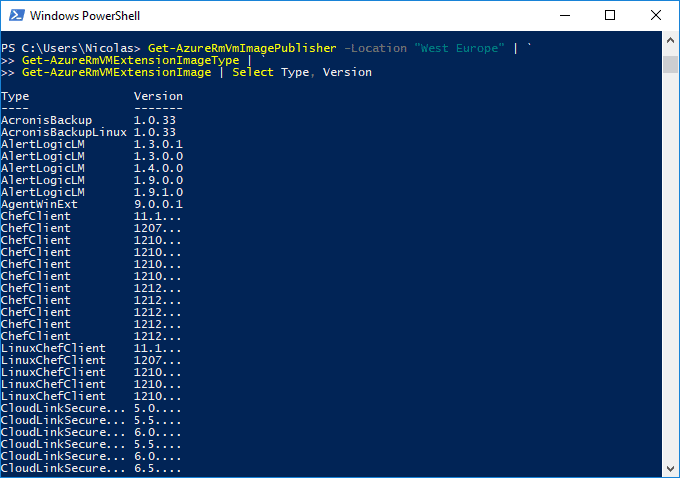
The output has been truncated due to the large number of Azure VM Extensions. In the West Europe region, there are 810 VM extensions at your disposal.
|
1 2 3 |
PS > (Get-AzureRmVmImagePublisher -Location <Azure_Region> | ` >> Get-AzureRmVMExtensionImageType | ` >> Get-AzureRmVMExtensionImage | Select Type, Version).count |

Why is it important to notice that VM Extensions are not available in each Azure Region?
Publishers will update their VM Extension and make them available to regions at different times, so keep in mind that it means you could have VMs in different regions on different Extension versions.
Who authors the VM Extensions?
The VM Extensions are supported by publishers who are registered with Microsoft. It means that you cannot publish your VM Extensions without being in a relationship with Microsoft.
Why use the VM Extensions?
You must use the VM Extensions to simplify the configuration management of Virtual Machines. When you use a VM Extension, you only need to provide mandatory parameters, and that is all. One of the great things is you can install VM Extensions through the Azure Portal, Windows PowerShell, and Azure CLI.
If you do not want to use VM Extensions, then common ways to automate the configuration of the lifecycle of the Virtual Machines are:
- Group Policy Object when it is applicable
- Login script when it is applicable
- Using Remote PowerShell
- Preinstalling software or components directly on the disk, so in other words, installing your tools in your gold image
If you work with DevOps methodology, trust me, you will have to use Azure VM Extensions.
Using Azure VM Extensions
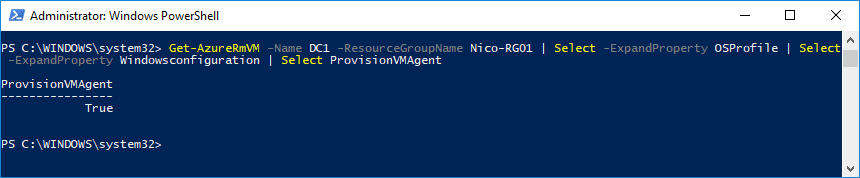
It is time to work with Azure VM Extensions in practice. In this guide, I will work with a Virtual Machine named DC1. First, I need to check the VM Agent status using the following command:
|
1 |
PS > Get-AzureRmVM -Name <VM_Name> -ResourceGroupName <RG_Name> | Select -ExpandProperty OSProfile | Select -ExpandProperty Windowsconfiguration | Select ProvisionVMAgent |
The command returns True which indicates that the VM Agent is installed and running.
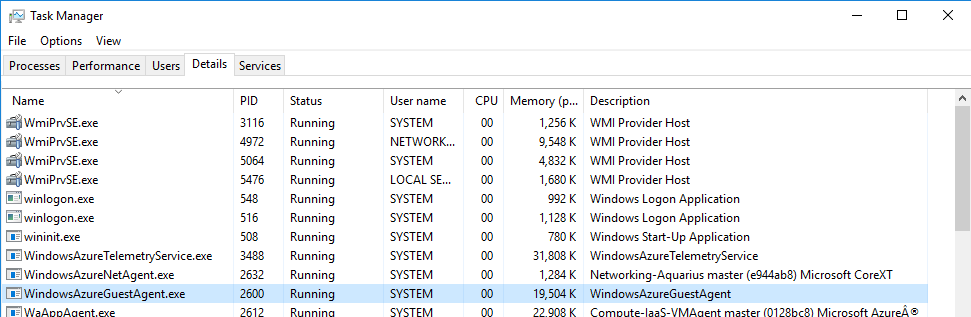
It is also possible to confirm if the agent is installed directly in the Virtual Machine. Log in to the VM and open the Task Manager to check the WindowsAzureGuestAgent.exe process. It means that the VM Agent is installed:
Note: if the VM Agent is not installed, you can download it from here.
VM Extensions using the Azure Portal
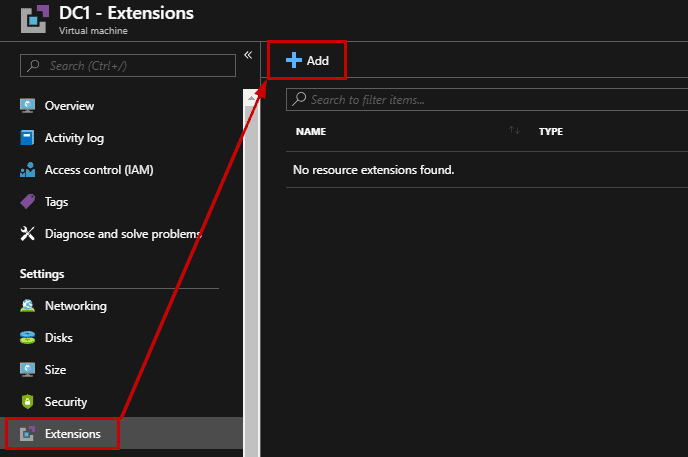
The first way to install a VM Extension is the Azure Portal. Navigate to the Virtual Machines blade, start the Virtual Machine, and click Extension to open a new blade. In my case, no extensions have been found, so I must click + Add and browse the list to select the extension I want to install:
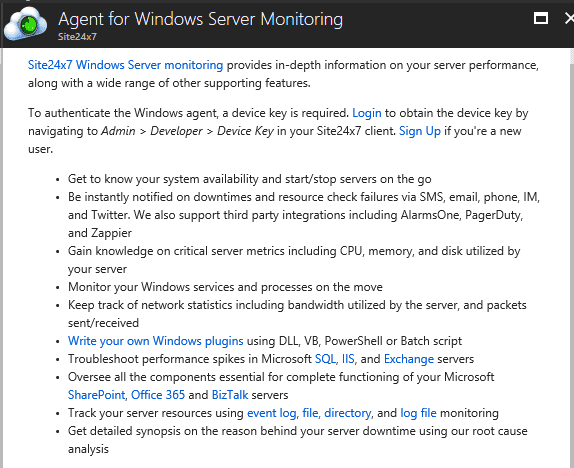
When you select a VM Extension, a new blade will appear and prompt for mandatory parameters. Here, I select the Site24x7 agent, which is a third-party monitoring application.

Information is provided telling you what the extension provides and shows you how to create an account and get a key for the service. After testing this extension, do not forget to remove the extension since this is a paid resource.
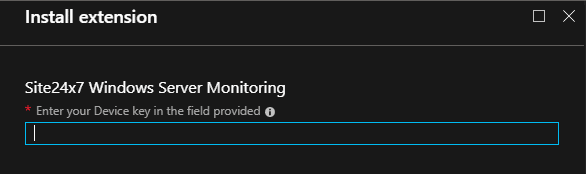
Once you have the key, click Create. You will be asked to supply the key here:
Wait a few minutes until the extension is installed on your VM. You’ll see it in the Start menu:

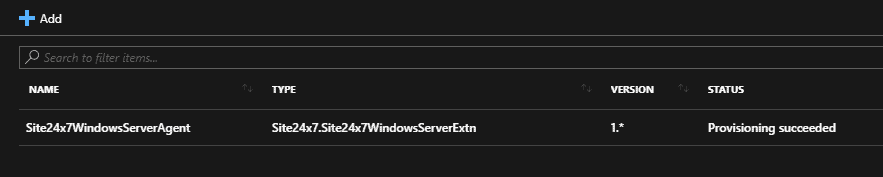
The VM Extension will also be visible in the list in the Azure Portal:
To uninstall the Extension, simply click on the name in your Azure Portal, and select Uninstall. The process is very simple, and it works very well so you can use it without any risk.
VM Extensions using PowerShell
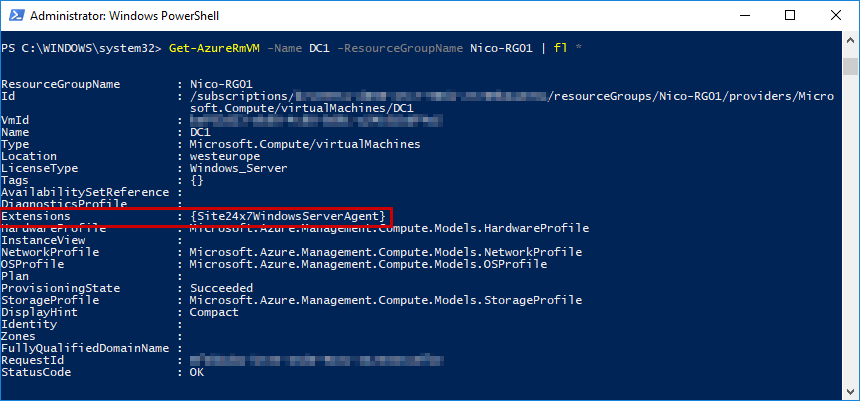
Of course, to automate the configuration management of the VM, it is essential to script some tasks to save time and avoid human mistakes. First, it is possible to check if there are VM extensions already installed on a Virtual Machine. Several properties can be retrieved using the Get-AzureRmVM cmdlet:
|
1 |
PS > Get-AzureRmVM -Name <VM_Name> -ResourceGroupName <RG_Name> | Format-List * |
In my case, I can confirm that a VM Extension is already installed in the VM:
To install a new VM Extension, there are several PowerShell cmdlets at your disposal that you can list using the following command:
|
1 |
PS > Get-Command Set-AzureRM*Extension* |
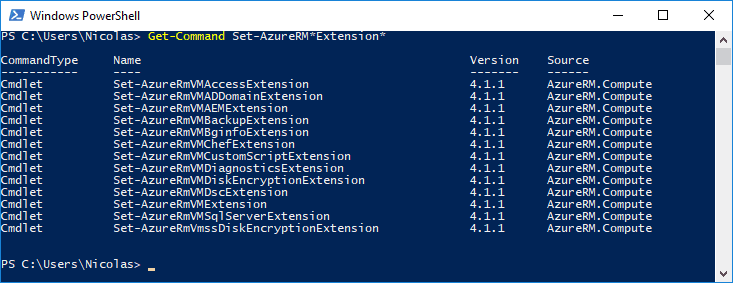
To understand how to use these cmdlets, I advise the Get-Help cmdlet followed by the examples parameter. In the example, the BGInfo tool can be installed in the VM using the following command after substituting your VM name and resource group:
|
1 |
PS > Set-AzureRmVMBGInfoExtension –VMName <VM_Name> -Name "BGInfo" -ResourceGroupName <RG_Name> |

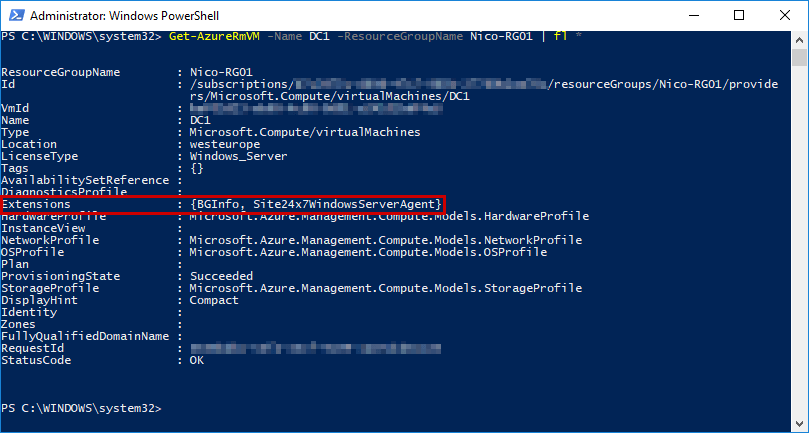
Confirm the new extension installed by listing the properties:
|
1 |
PS > Get-AzureRMVM -Name <VM_Name> -ResourceGroupName <RG_Name> | fl * |
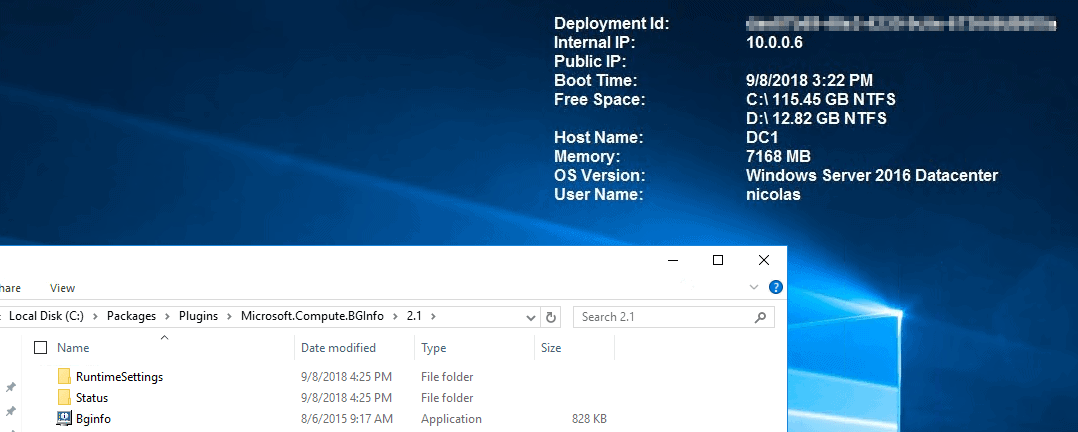
When logging to the Virtual Machine, BGInfo is up and running.
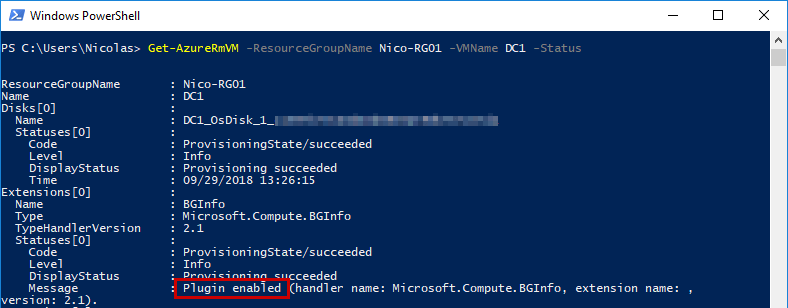
To troubleshoot any issue or deployment error, I advise you to run the following command, which returns the extension status:
|
1 |
PS > Get-AzureRmVM -ResourceGroupName <RG_Name> -VMName <VM_Name> -Status |
VM Extensions using Azure CLI
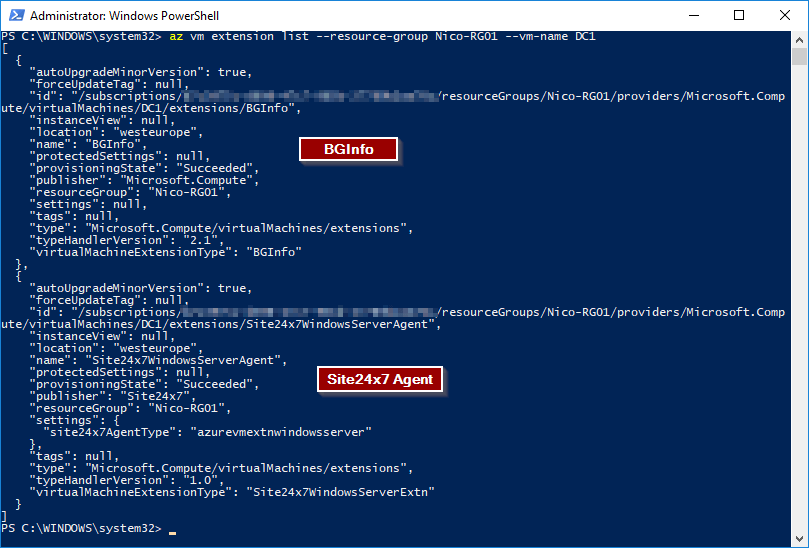
Another way to work with Azure VM Extensions, is to use Azure CLI as you did with PowerShell. To list the VM Extensions attached to a VM, use the following:
|
1 |
az vm extension list --resource-group <RG_Name> --vm-name <VM_Name> |
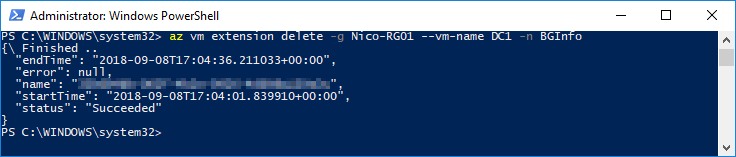
Remove an extension attached to the Virtual Machine with the following command:
|
1 |
Az vm extension delete –g <RG_Name> --vm-name <VM_Name> -n <VMExtension_Name> |

Depending on the VM extension you are removing, it can be time-consuming.
To get more information about VM Extensions with Azure CLI, you can read this article.
Adding VM Extensions during the deployment
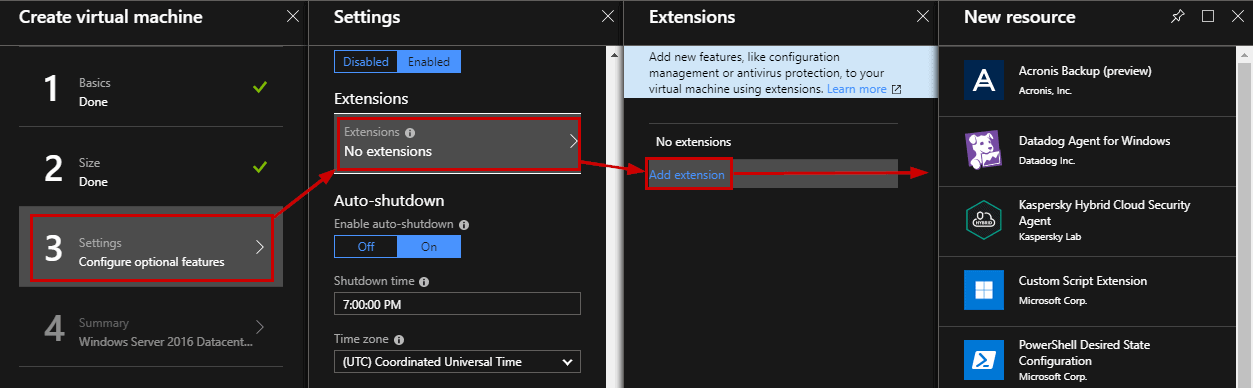
Until now, Azure VM Extensions have been installed after the provisioning process. It is important to know that configuration can be updated after the provisioning process, but it is also important to indicate which configuration will be applied before the provisioning. At the step number 3 of the creation process, click Extensions to open a new blade that will list the available VM Extensions:
Custom Scripts
Using Azure VM Extensions can be very helpful to configure new Virtual Machine, however, sometimes it is not enough to suit your needs, so it is essential to use custom scripts to perform specific tasks. There are few things to take into consideration, such as:
- Script Location: The script can be stored on GitHub, Azure Blob Storage, or anywhere the VM can access the repository.
- Internet Connectivity: If your script is located on the Internet, then the firewall rules must be opened.
- Operating System: if you run a bash script, for example, you must run the script on supported OS’s (e.g. Linux OS)
- Timeout: 90 minutes are allowed for the script to run.
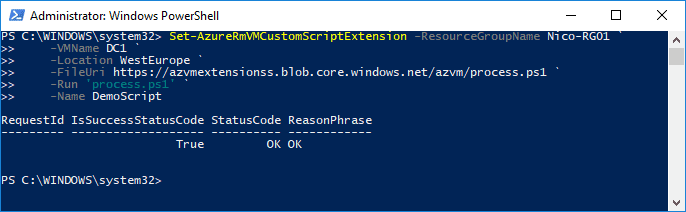
To finish this article, here is an example of custom script implementation with PowerShell:
|
1 2 3 4 5 6 |
PS > Set-AzureRmVMCustomScriptExtension -ResourceGroupName <RG_Name> ` -VMName <VM_Name> ` -Location <Location> ` -FileUri <Script_URL> ` -Run <Command_to_execute> ` -Name <Extension_Name> |
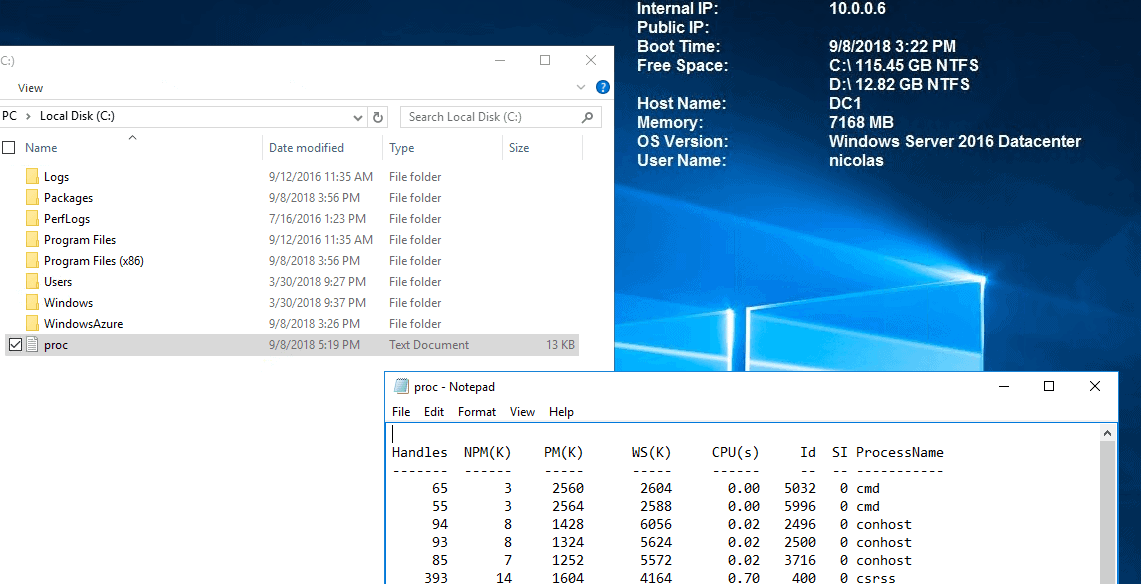
For instance, I can run a custom script stored on my Azure Blob storage. The script is very basic and will write the Get-Process cmdlet results in a text file:
|
1 |
PS > Get-Process | Out-File C:\proc.txt |
Run the following command to deploy your custom script extension:
|
1 2 3 4 5 6 |
PS > Set-AzureRmVmCustomScriptExtension -ResourceGroupName <ResourceGroup> ` -VMName <VM_Name> ` -Location <location> ` -FileUri <url> ` -Run <Script> ` -name <FriendlyName> |
To easily manage your Azure Storage Account, I advise you to read the following article which will help you to easily find the file URL.
Confirm that the script has been executed successfully from the Azure Portal or directly inside the Virtual Machine:
Conclusion
This third article in this series described steps to automate configuration management tasks of the lifecycle of Azure Virtual Machines using the following ways:
- Azure Portal
- Windows PowerShell
- And Azure CLI
Configuring Azure VMs with VM Extensions can be done when the VM Guest Agent is installed in the Virtual Machine. If the agent is not installed and you cannot start the VM, then you can install it in an offline mode.
VM Extensions are software components that extend the functionality of the Virtual Machine. Note that you can add multiple extensions on the same VM. Azure VM Extensions supported Linux and Windows Virtual Machines. If you are limited with the default VM Extensions, do not forget to use the custom script extension to suit your needs.

Load comments