The series so far:
- Reporting Services Basics: Overview and Installation
- Reporting Services Basics: Creating Your First Report
- Reporting Services Basics: Data Sources and Datasets
- Reporting Services Basics: Parameters
- Reporting Services Basics: Adding Groups to Reports
SQL Server Reporting Services (SSRS) is a server-based reporting platform that allows you to create and manage a wide variety of different types of reports and deliver them in a range of formats. You can create basic reports containing tables and graphs, or more complex data visualizations, using charts, maps and sparklines. You can even create dashboards that will run on your phone! Reports can draw their data from SQL Server databases, but also from other relational database such as Oracle or Azure SQL Database, and other types of data sources such as Analysis Services.
You can present your finished reports from the Reporting Services website typically running on premises, called the Web Portal, or users can view them within web- or Windows-based applications. Reports can also be viewed in SharePoint with a special webpart. (In earlier versions of SSRS, there was also a SharePoint integrated mode.) End users can run reports on demand or schedule them as subscriptions. This article is the first in a series that will provide in-depth coverage of the basics of report development with SSRS.
The report development examples in this series will work for SSRS 2017 and later. Many of the examples will also work for earlier versions. If you are still using SSRS 2005, please refer to Steve Joubert’s original SSRS series. If you are working with 2008 to 2012, look at the series I wrote a few years ago.
SSRS Through the Ages
SSRS has been around since 2004, first shipping as an “add-on” for SQL Server 2000, and then fully integrated into SQL Server 2005. I first saw it demonstrated at the 2003 PASS Summit and had the Beta version installed and running at work as soon as I could get my hands on the media. Back in 2003, the SQL Server community were very excited about SSRS as it made available, for the first time, built-in reporting capabilities for SQL Server. If you owned SQL Server, you owned SSRS.
Since its integration into SQL Server 2005, Microsoft has made a number of improvements over the years and gave it a complete overhaul in 2016. One big change in 2016 was the renaming of the website from Report Manager to Web Portal. In 2017, SharePoint integrated mode was discontinued, but a special version for hosting Power BI dashboards called Power BI Reporting Services became available.
SSRS Architecture
An SSRS deployment must be associated with a SQL Server instance. On the instance will be two databases, named by default:
ReportServer – contains the report definitions, configuration, history, security of deployed reports and more
ReportServerTempdb – much like tempdb, it is used as a workspace for building reports and doesn’t maintain any objects permanently.
You will also need a location for the Report Server Web Service, which can be on the same server as the databases, as in the simple deployment architecture shown in Figure 1, or on a different server. On whichever server you choose, you will have access to the Web Portal that allows you to deploy and manage the reports. The data sources will typically be found on other servers throughout the network. End users can run reports from the Web Portal, create subscriptions, and publish their own reports if they have permission.
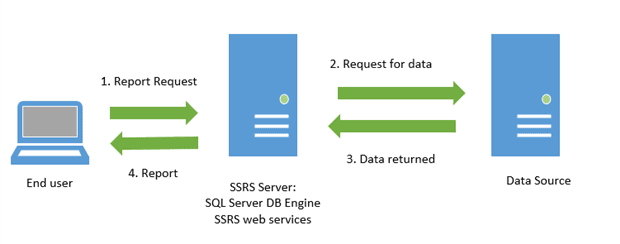
Figure 1: A simple SSRS deployment
The end user sends an HTTP request for a report, providing any required parameters. The SSRS server finds the metadata of the report and sends a request for data to the data sources. The data returned by the data sources is merged with the report definition into a report. As the report is generated, it is returned to the client. There are two layers of security to get past before viewing the report.
SSRS Security
You have many options for securing the reports. The first layer of security is built into the Web Portal. You can control access to folders and individual reports based on network groups or user accounts. The second layer of security is to the database. You can either base the security on the individuals running the report or store an account within the data source that can be passed on to the database system. Security will be covered in more detail in a later article on deploying reports.
Tools for Building SSRS Reports
SSRS reports are XML files with the extension RDL. If you were a robot instead of a human, you might be able to just create the RDL files with a text editor. Instead, there are a number of tools from Microsoft for building reports that can be hosted in the SSRS Web Portal depending on the type of report and who is building the report.
Traditional SSRS reports, which also might be called paginated reports, can be build using an extension for Visual Studio (VS) or Report Builder. Developers will be more comfortable working in the VS environment. VS is based on a solution/project model and integrates with version control software such as Azure DevOps formerly known as Visual Studio Team Services. This is the tool you will use for this series of articles.
Report Builder is meant more for power users to create their own reports, but developers in some shops use this tool in place of VS. Instead of a project model, each report is independently created. One advantage of Report Builder is that it has an Office look and feel which makes it more comfortable for non-developers to use. It also has more wizards to help beginners get started. Users of Report Builder can take advantage of published report parts to make building a dashboard simple. Figure 2 shows what Report Builder looks like when it’s launched:
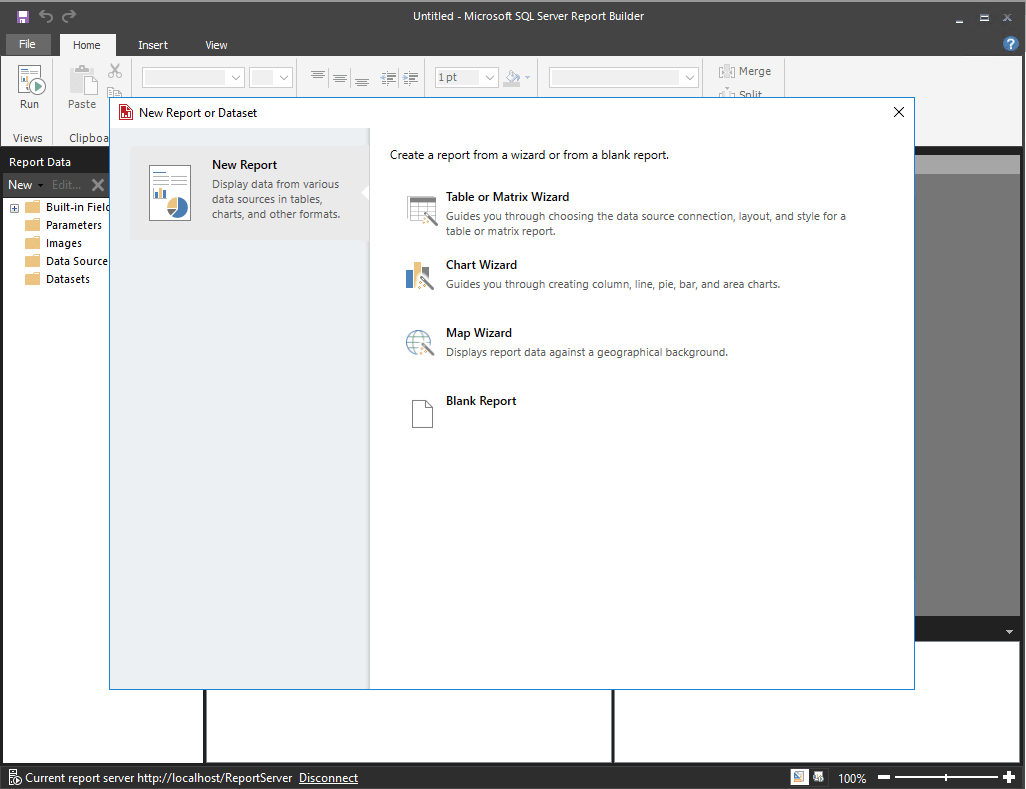
Figure 2: Report Builder
A new type of report available with SSRS 2016 is called Mobile Reports. Mobile Reports must be created with the Mobile Report Publisher which is launched from the Web Portal. These reports are dashboards which can run on phones and tablets as well as the Web Portal. (If you are a previous developer or user of Datazen reports, these will look familiar to you as Microsoft acquired the company and brought the technology into SSRS). Figure 3 shows what the Mobile Report Publisher looks like:
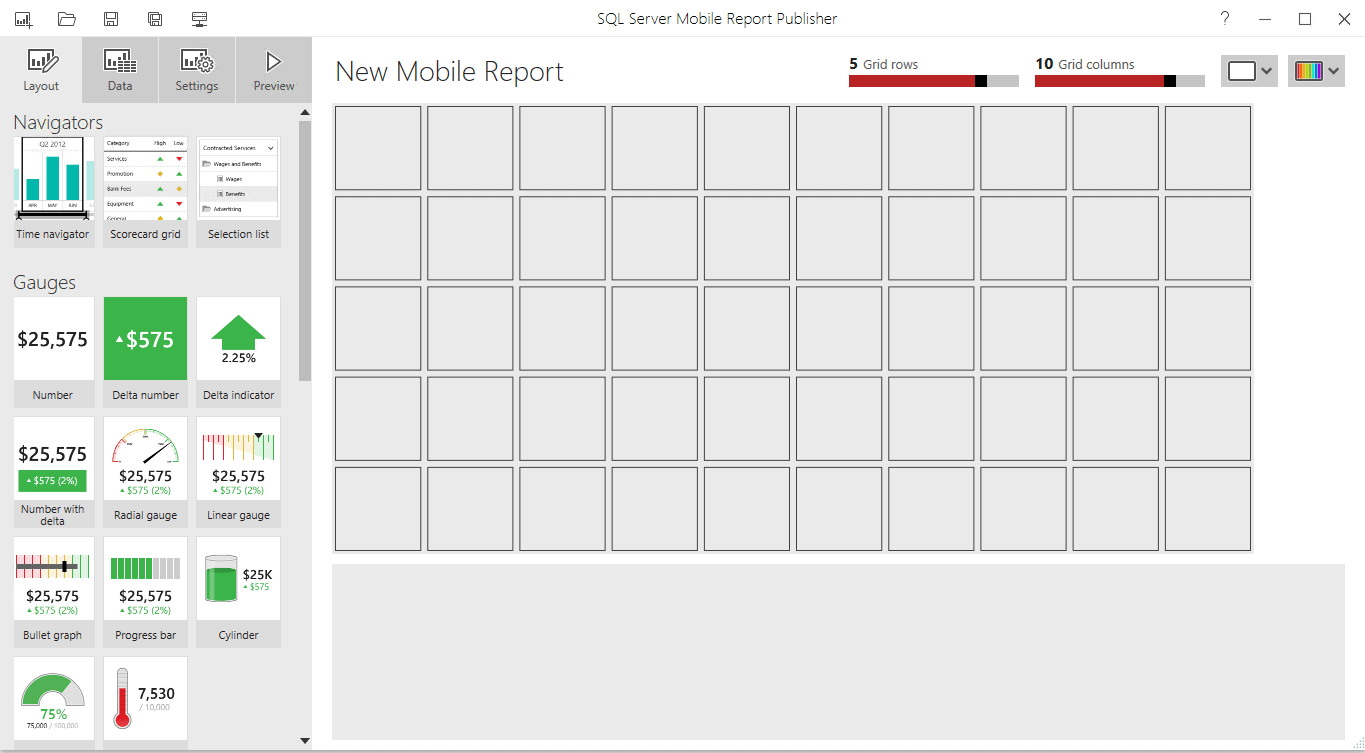
Figure 3: Mobile Report Publisher
Power BI dashboards can also run in a special type of SSRS Web Portal called Power BI Report Server. The tool for creating Power BI dashboards is called Power BI Desktop. Power BI is out of scope for this series, but if you would like to learn more about this topic, take a look at the article series written by Robert Sheldon.
Installing and Configuring SQL Server and Reporting Services
Since this series is focused on report development, it will cover just enough about installation and configuration to help you get things set up on your development computer. This section is not intended to provide information for installing SQL Server or SSRS in a production environment.
To follow along with this series of articles, you will need to install the following:
- A SQL Server instance
- SQL Server Management Studio (SSMS)
- Visual Studio (SSDT with VS 2017 or an extension with VS 2019)
- Report Server 2017
You should be running a Windows 10 computer, making sure that there is at least 50 GB free on the hard drive. You will also need to restore the AdventureWorks sample database to follow along with the examples.
At the time of this writing, SQL Server 2019 is available as a Community Technology Preview (CTP), which is a fancy way of saying Beta version. The following instructions are based on SQL Server 2017, the latest generally available version. One big change made in the installation of SSRS in 2017 is that the SSRS media must be downloaded and installed separately.
SQL Server Instance Installation
If you already have a SQL Server instance in place, version 2008 or later, you can skip this section. The instance is used to host the two databases used by SSRS and the sample databases used in the examples.
To install the SQL Server instance, you will need to first download the media. I will not provide a link here, because invariably it will change, so just search for “SQL Server 2017 downloads.” The page that was current as of this writing had links for a free trial and for a Developer Edition shown in Figure 4. Choose the Developer edition and save the downloaded file.
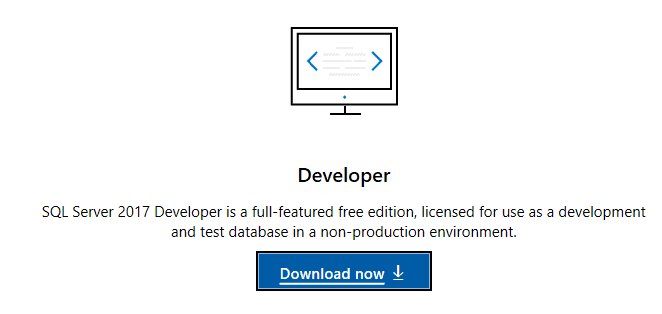
Figure 4: The SQL Server media download page
I’m not going to show you every step of installing SQL Server because that information can be found elsewhere. Here are the important things to note:
- The page mentioned above allows you to download the actual media. Do that first.
- Once you have downloaded the media, run setup.exe to launch the SQL Server Installation Center. You’ll need to click New SQL Server stand-alone installation on the Installation page shown on Figure 5.
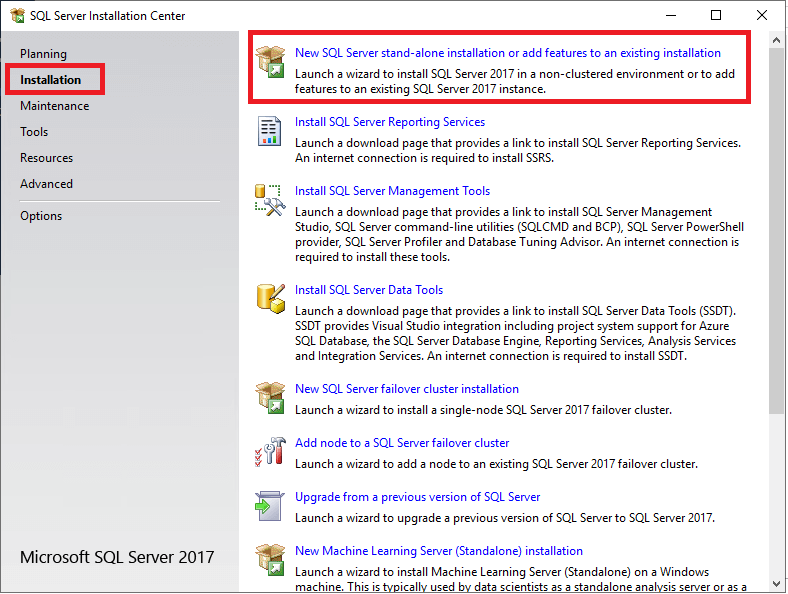
Figure 5: Launch the installation
Make sure to choose the Developer Edition shown in Figure 6.
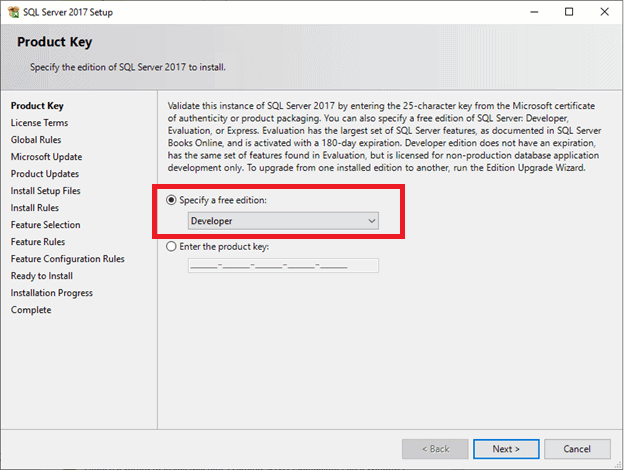
Figure 6: The Developer edition
The only instance feature you will need for learning SSRS is the Database Engine Services shown in Figure 7.
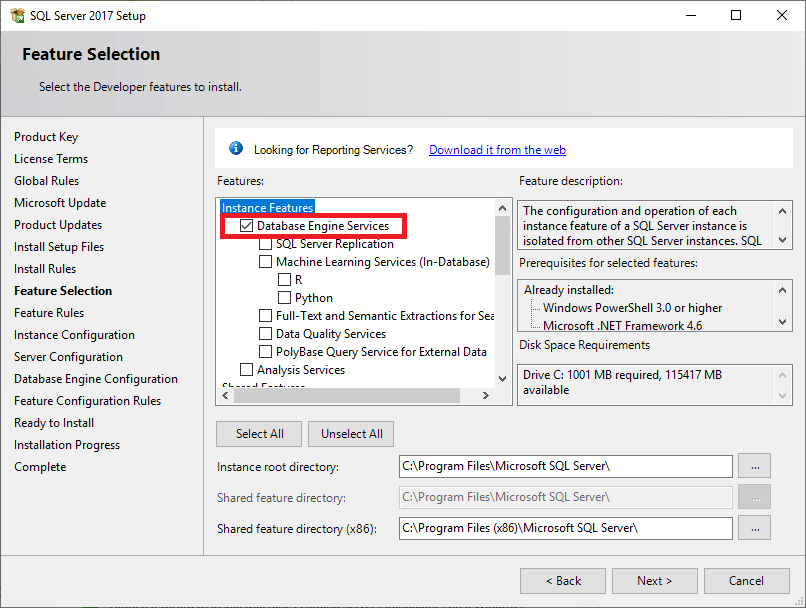
Figure 7: Features
To make things simpler, just install the Default instance shown in Figure 8. If you have already installed an instance, you’ll see it listed. If that’s the case, you may want to just cancel out of the wizard at this point and use the previously installed instance.
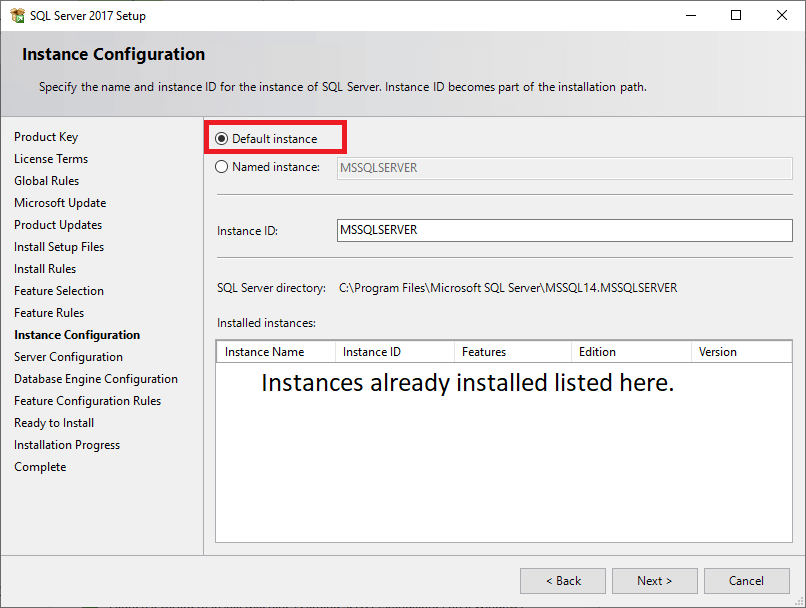
Figure 8: Install the Default instance
Be sure to click Add current user to make your account an administrator. You may also want to set the security to Mixed mode. Figure 9 shows these options.
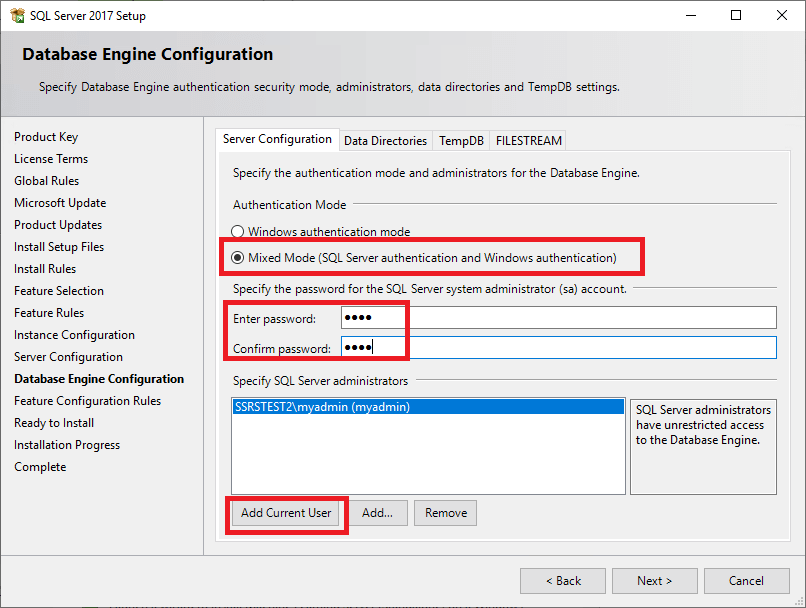
Figure 9: Security settings
Review the summary shown in Figure 10 and go make yourself a cup or coffee or tea after clicking Install because it could take 10 or 20 minutes for the installation to run.
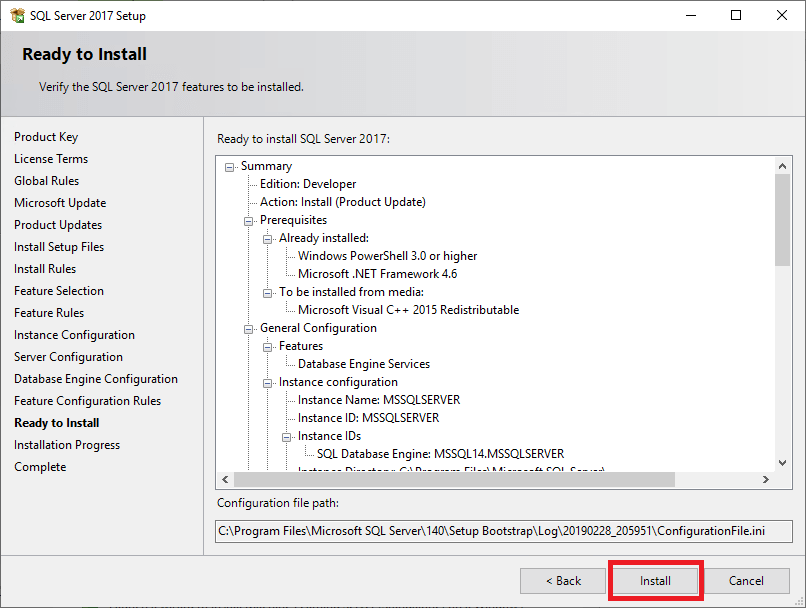
Figure 10: The Summary
Figure 11 shows that the installation was a success!
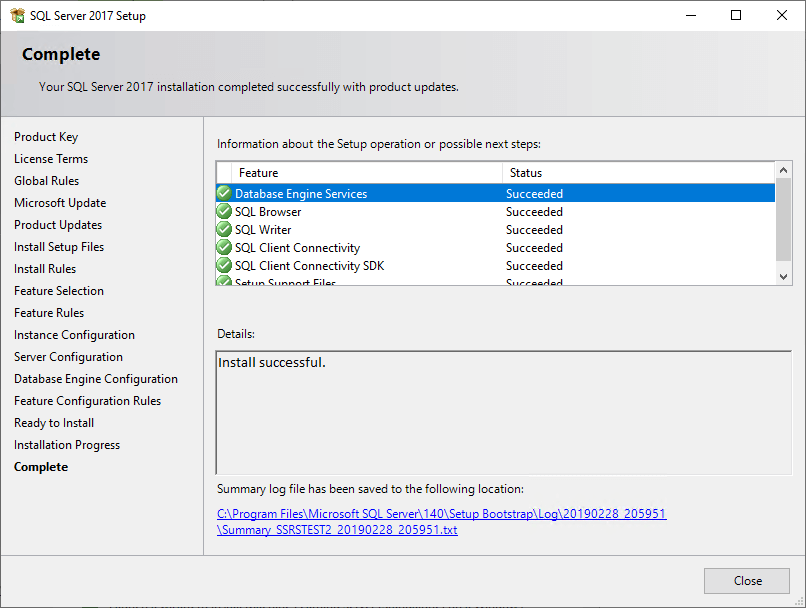
Figure 11: Success!
SSMS Installation
SQL Server Management Studio (SSMS) is the tool you will use to connect to the SQL Server instance to restore the sample databases and run queries. If you already have this tool in place, you can skip to the next section.
Microsoft is now releasing new versions of SSMS on a frequent basis, so it is no longer installed during the database engine installation. You can search for “SSMS download” to find the latest version. You can also find a link on the Installation page of the SQL Server 2017 Installation Center, if you used this to install your instance. You can launch it again from the Windows Start menu. Figure 12 shows where you can find the link.
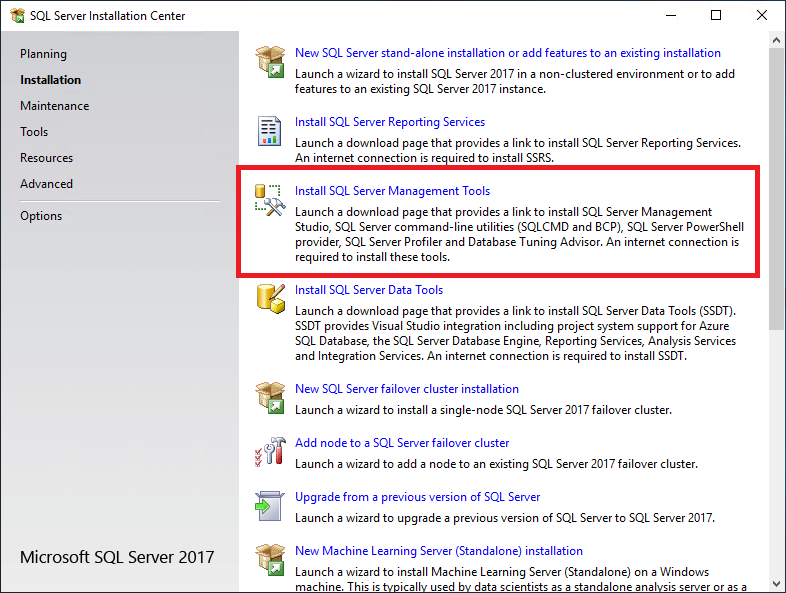
Figure 12: Launching the download page for SSMS
Once you have downloaded the media for SSMS, just run the installation wizard accepting the defaults.
SSRS Service Installation and Configuration
Previous versions of SQL Server allowed you to include SSRS during the installation of the database engine, but that is no longer the case beginning with 2017. Installing them together was quite convenient since the installation took care of the SSRS configuration for you automatically. Now, you must download the media separately and configure SSRS yourself. It’s not difficult, but I’ll walk you through the steps.
Begin by searching for “Download SSRS” or you can also find a link to the download page from the SQL Server 2017 Installation Center shown in Figure 13.
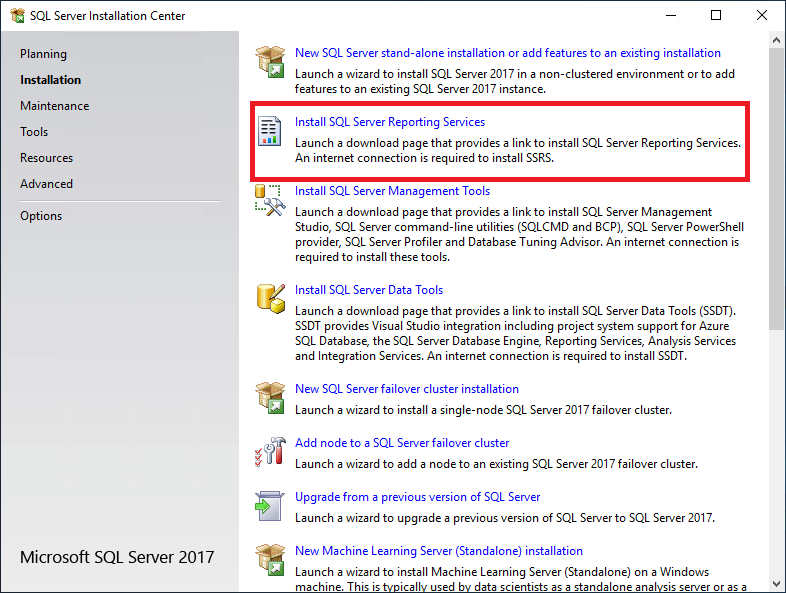
Figure 13: A link to the download page for SSRS
Save and run the downloaded file. To get the installation started, click Install Reporting Services shown in Figure 14.
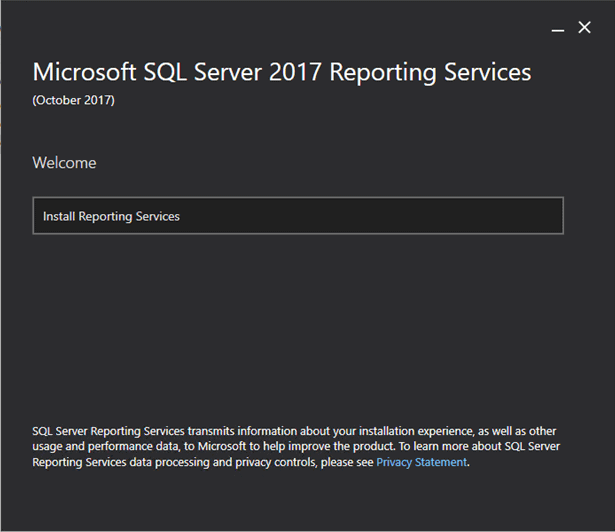
Figure 14: Install Reporting Services
Click through the installation wizard. The most important question for you to answer is to specify the edition. Make sure that you select the Developer edition.
Once the installation is complete, you’ll be asked to configure the report server. If you are required to restart, do that first. After you restart, you will need to launch the Report Server Configuration Manager. You can do this from the item found in the Windows Start menu or from the final page of the SSRS installation shown in Figure 15 if you didn’t have to restart.

Figure 15: The final page of the SSRS installation wizard
Either way you launch Report Server Configuration Manager, you will need to connect as shown in Figure 16.
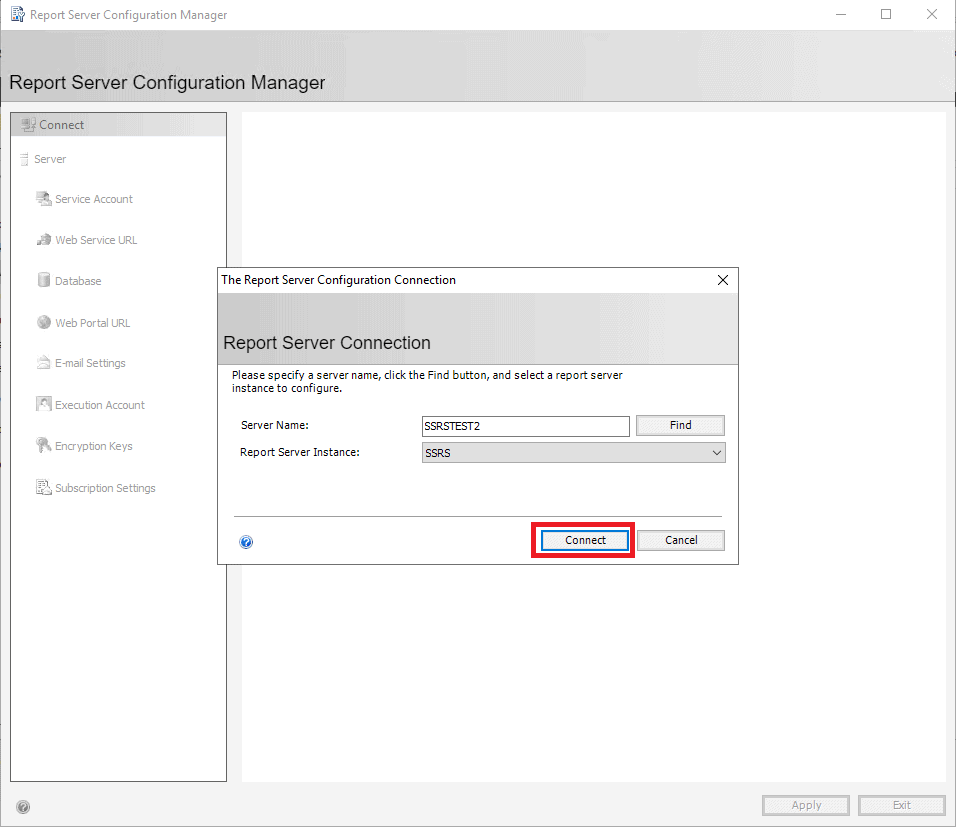
Figure 16: Connect to SSRS
There are three items that must be set up when configuring SSRS just to get it running:
- Database
- Web Service URL
- Web Portal URL
Click Database on the left menu. Click Change Database shown in Figure 17.
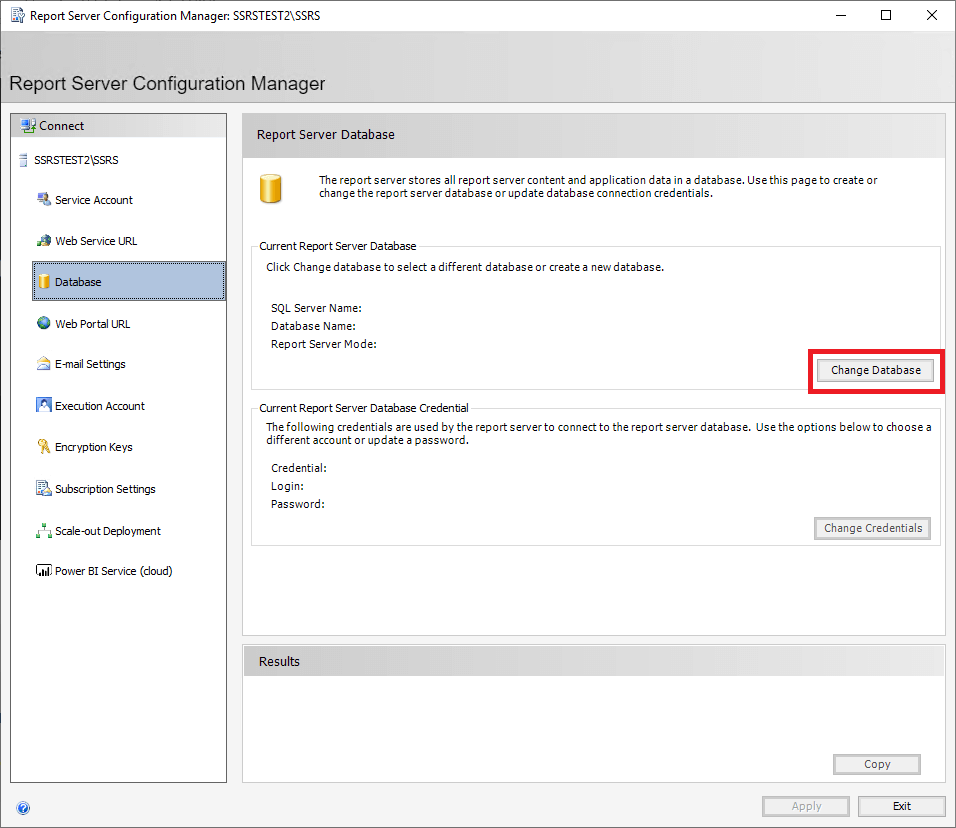
Figure 17: Click Change Database
This will launch the Report Server Database Configuration Wizard. Leave Create a new report server database selected and click Next as shown in Figure 18.
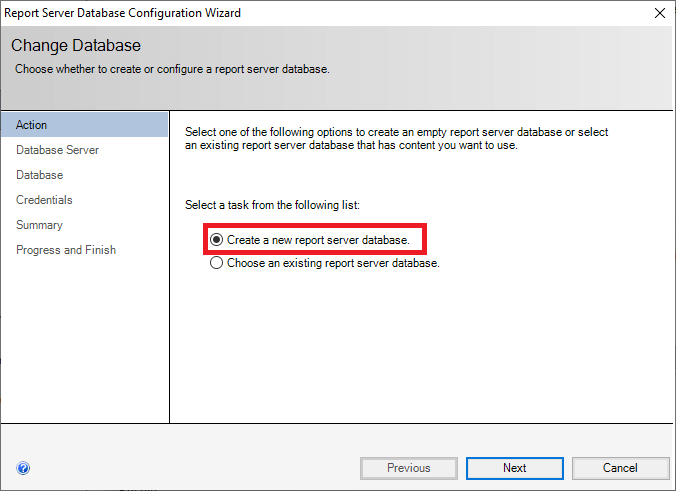
Figure 18: Create a new database
On the following screen, make sure that the local computer name is filled in. If you are using a named instance, then the Server Name will be computer\instance. If you’re not sure, take a look at the “Connecting to Your SQL Server Instance” section later in this article. Leave the Authentication type set at Current User – Integrated Security and click Next as shown in Figure 19.
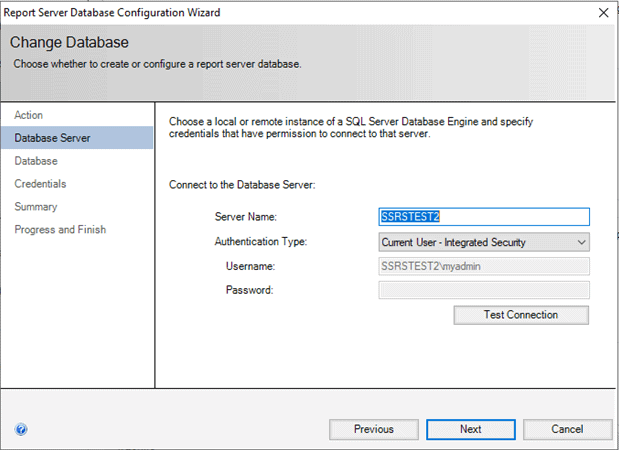
Figure 19: The server name
On the next page, you will specify the SSRS database name. The default database name is ReportServer. Figure 20 shows that you can leave it at the default and click Next.
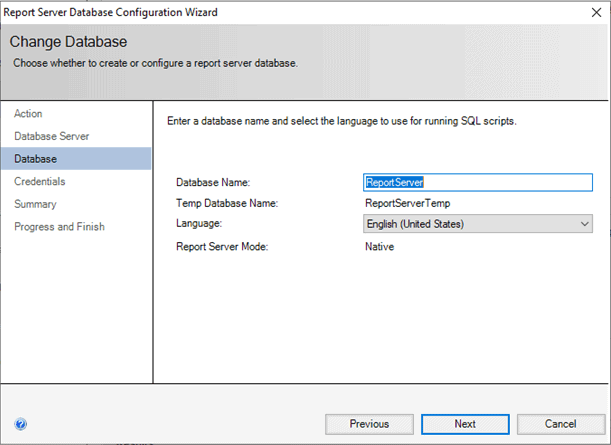
Figure 20: The database name
Leave the Authentication Type set at Service Credentials and click Next as shown in Figure 21.
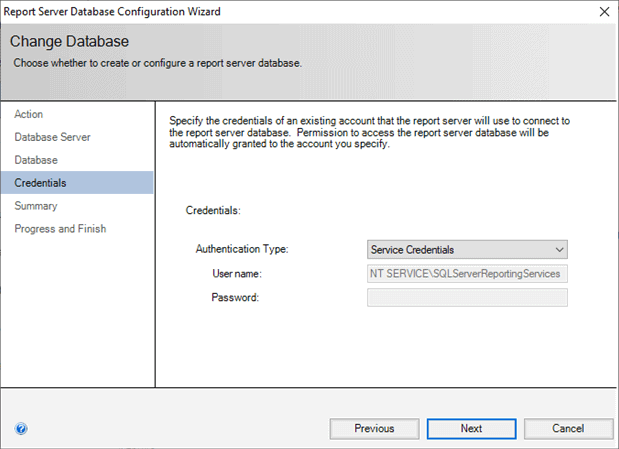
Figure 21: The authentication type
That’s the last question you’ll be asked about the database. Complete the wizard to create the database. Once the database is in place, click Web Service URL.
Leave the defaults in place and click Apply as shown in Figure 22.

Figure 22: The Web Service URL
Click Web Portal URL. Again, leave the defaults in place and click Apply as shown in Figure 23.
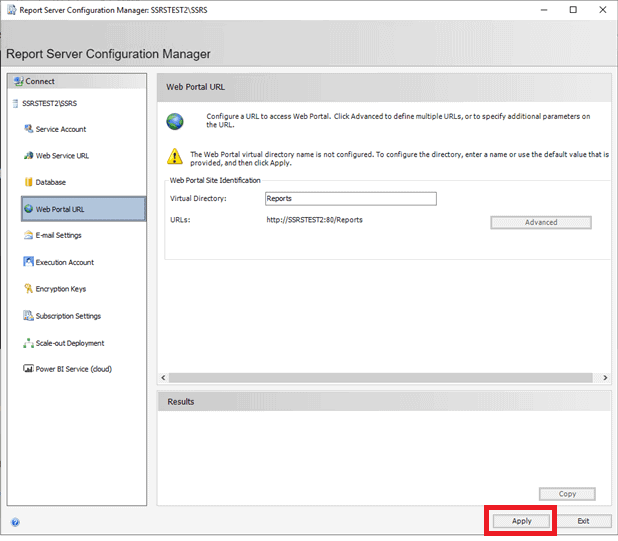
Figure 23: The Web Portal URL
Make a note of the URL. This is what you’ll use to connect to the Web Portal after deploying reports. Once done, exit out of the Report Server Configuration Manager. Now that the SSRS service is in place, the next step is installing the development tool.
Installing in Visual Studio
NOTE: At this time, you can install in one step with VS 2017 using SSDT. If you have VS 2019 installed, add the SSRS extension. The instructions in this section cover the 2017 instructions.
You’ll use the SSRS extension for VS to develop reports, and this is the last item to install. You can search for “SSDT Download” or launch the page from the SQL Server 2017 Installation Center shown in Figure 24.
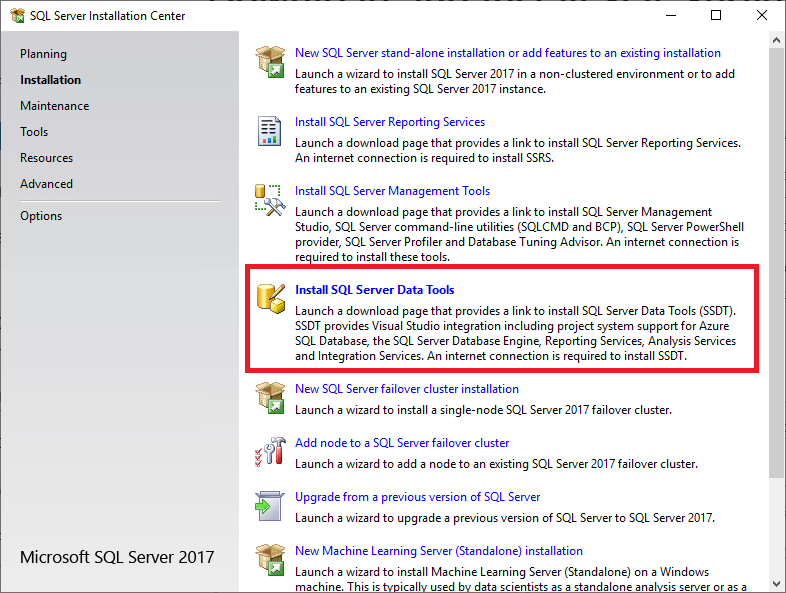
Figure 24: The link to the SSDT download
You will need to scroll down the web page to find the link for SSDT standalone installer as shown in Figure 25.
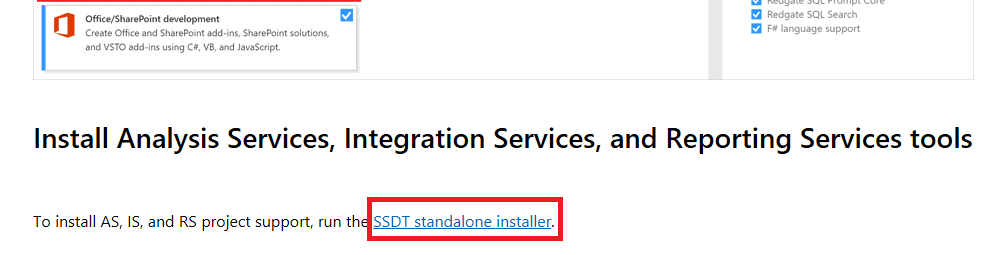
Figure 25: The SSDT installer
Once downloaded, run the file. Make sure that SQL Server Reporting Services is selected and click Install as shown in Figure 26.
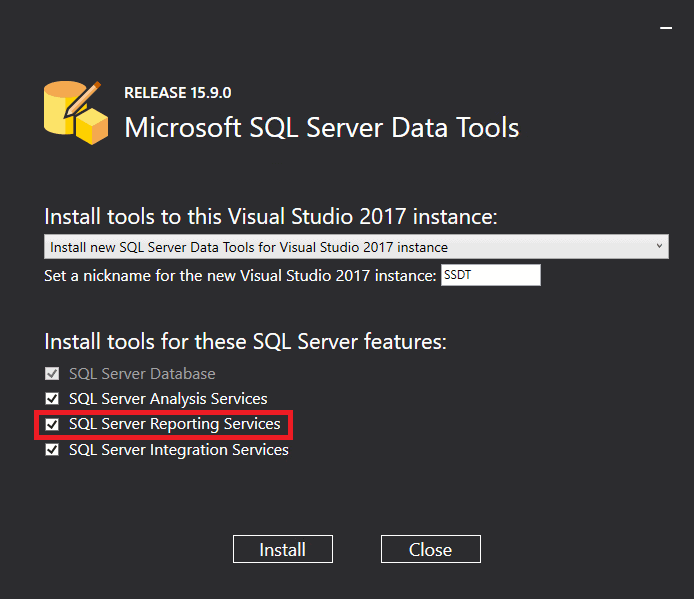
Figure 26: Install SSDT
Accept any other defaults and complete the installation.
Connecting to Your SQL Server Instance
You may have trouble connecting to your local SQL Server instance for a couple of reasons. First, you may not know the actual server name needed to connect to it, especially if you have installed a named instance. The other problem may be that it’s just not running. I’ve seen that happen quite often with laptops.
To solve both problems, launch SQL Server Configuration Manager. You may find it in the SQL Server programs section of the Windows Start menu. If not, take a look at this post for more information. With this tool, you can see the instance name as well as start up an instance that isn’t running. Click SQL Server Services and take a look at the items on the right as shown in Figure 27.
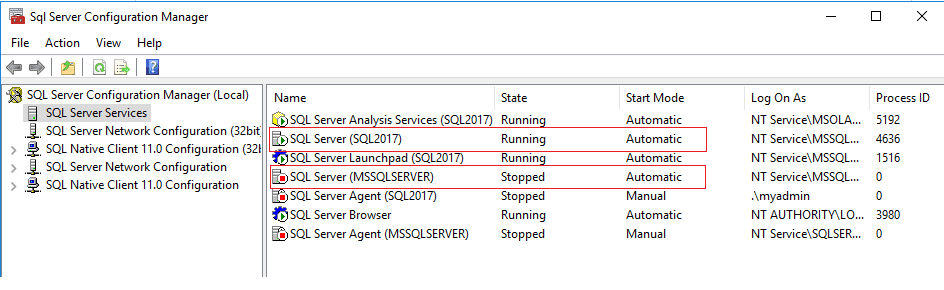
Figure 27: The SQL Server Configuration Manager
Default instances are called SQL Server (MSQLSERVER). When connecting to the default instance locally, you just need the computer name or an equivalent:
- localhost
- (local)
- . (That’s just a period!)
If you see something else in parentheses after the words SQL Server, that’s a named instance. To connect to a named instance, you’ll need the computer name followed by a backslash and the instance name. Here are some examples assuming that my computer is called MyComputerName:
- MyComputerName\SQL2017
- Localhost\SQL2017
- (local)\SQL2017
- .\SQL2017
Notice in the previous image that the default instance is stopped. Just right-click the instance and choose Start to get it running.
Now that you know the name of your SQL Server and have ensured that it’s running, launch SSMS and connect to it as shown in Figure 28.
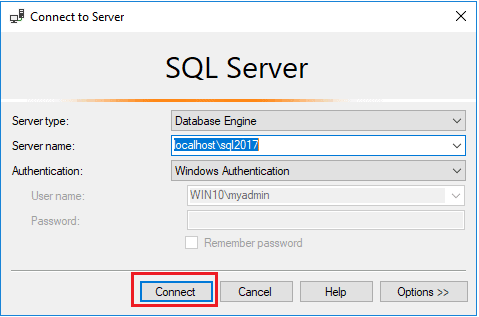
Figure 28: Connect to the SQL Server
You’ll see the SQL Server and several folders in the Object Explorer window shown in Figure 29.
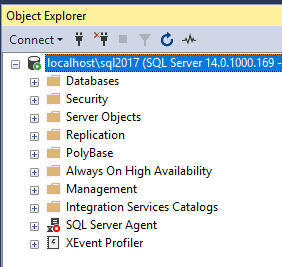
Figure 29: The Object Explorer
Restoring a Sample Database
To follow along with the examples in this series of articles, you’ll need to restore one or more sample databases. The main database that will be used for the examples is called AdventureWorks2017. At the time of this writing, Microsoft is hosting the sample databases on GitHub, a well-known software repository site. Search for the AdventureWork2017.bak file. A bak file is a backup file, and that’s what you need. Figure 30 shows the download page.
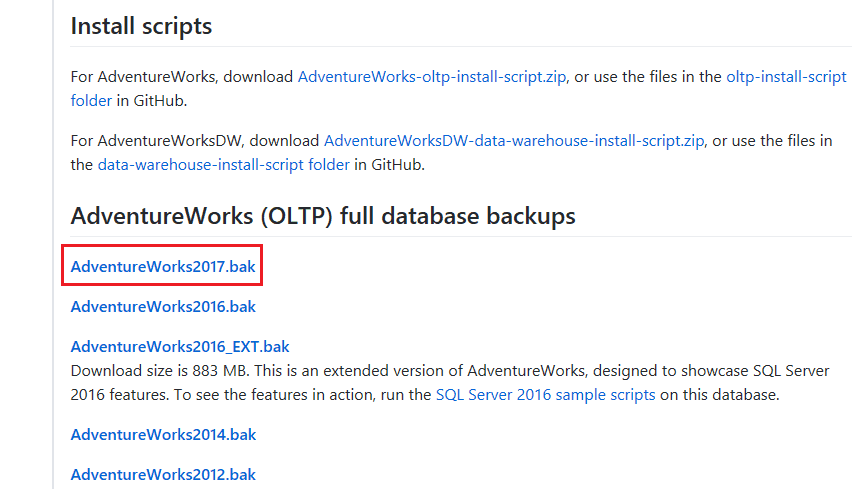
Figure 30: Download AdventureWorks
Do not download the file to your Desktop, Documents, or Downloads file. Since SQL Server is running under an identity that is not you, it can’t see files in those locations. I recommend just downloading to a file in your C:\ drive such as C:\Temp.
Follow these steps to restore the database:
Connect to the SQL Server instance by launching SSMS and connecting to it. If you have trouble, review the “Connecting to Your SQL Server Instance” section.
Right-click on the Databases folder and select Restore Database… as shown in Figure 31.
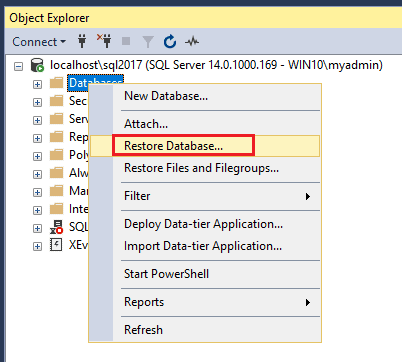
Figure 31: Choose Restore Database
Select Device and click the ellipses as shown in Figure 32.
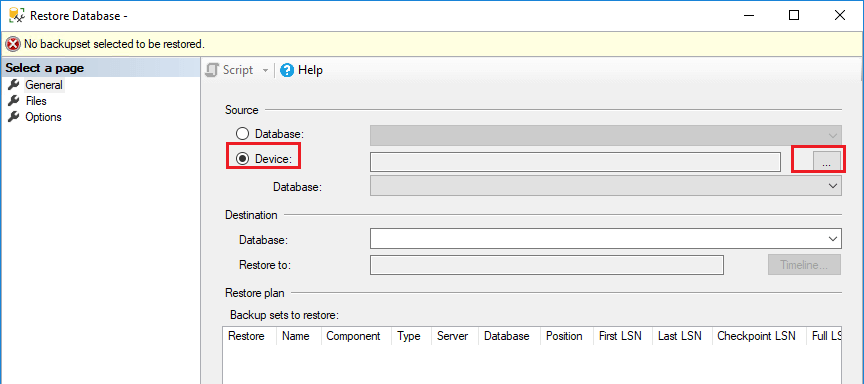
Figure 32: Click the elipses.
This brings up the Select backup devices window. Click Add shown in Figure 33.
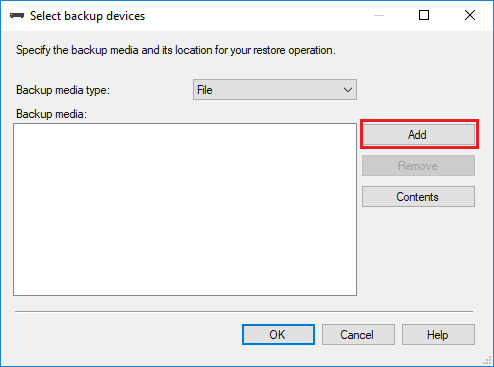
Figure 33. Click Add
Navigate to the folder where the bak file is stored as shown in Figure 34.
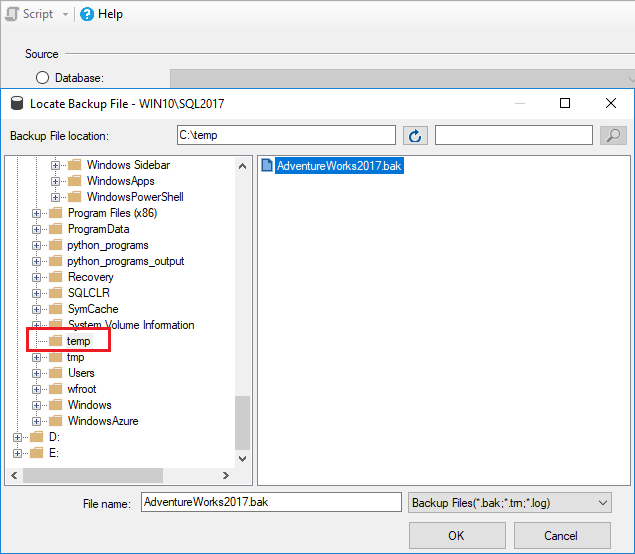
Figure 34: Navigate to the backup file
Select the file and click OK. You’ll click OK two more times to fire off the restore.
Once the database has been restored, you’ll see the message shown in Figure 35. Click OK two more times to dismiss the dialogs.
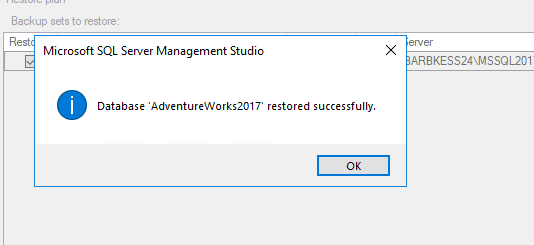
Figure 35: A successful restore
Conclusion
If you have followed the instructions in this article, you now have a development environment for SSRS set up on your workstation or laptop. In the next article, I’ll show you how to create some basic reports.
Load comments