When you develop a SQL Server Integration Services (SSIS) package, you can add package configurations in order to provide property values to the package at runtime. A package configuration is a defined property/value pair that can be modified without updating the package itself. Package configurations are useful when you want to deploy packages to multiple servers, when you move your packages from a development to production environment, or in any situation in which you want to provide property values to a package at runtime.
SSIS provides several methods for storing package configurations. One of the most flexible of those methods is the XML configuration file. The file lets you store one or more package configurations that can be used by one or more packages. The easiest way to create an XML configuration file is to use the Package Configuration wizard after you’ve set up your package. The wizard walks you through the steps necessary to create the file and lets you choose which property values you want to include in that file.
In this article, I walk you through the steps necessary to create an XML configuration file. To demonstrate these steps, I first used the following Transact-SQL code to create the People table in the AdventureWorks2008R2 database:
|
1 2 3 4 5 6 7 8 9 10 |
USE AdventureWorks2008R2 GO IF OBJECT_ID('dbo.People') IS NOT NULL DROP TABLE dbo.People GO SELECT TOP 1 * INTO dbo.People FROM.Person |
Notice that I inserted only one row. I simply wanted to create the table and use the simplest method for doing so. The table will be truncated when you run the package, so it doesn’t matter how many rows you insert into the table.
After I created the People table, I created an SSIS project in SQL Server Business Intelligence Development Studio (BIDS) and renamed the default package LoadPersonData.
You can download the SSIS package from the bottom of the article.
I then added two OLE DB connection managers, which each point to the AdventureWorks2008R2 database on the same instance of SQL Server. (Normally, they would point to two different instances, but for testing purposes, this is fine.) The first connection manager is named Server A. The second one is named Server B.
After I added the connection managers, I defined a string variable named ConnectMngr and set its default value to “Server A.” The variable will be used in the control flow to indicate which connection manager to use. I then added an Execute SQL task and two Data Flow tasks to the control flow, as shown in Figure 1.
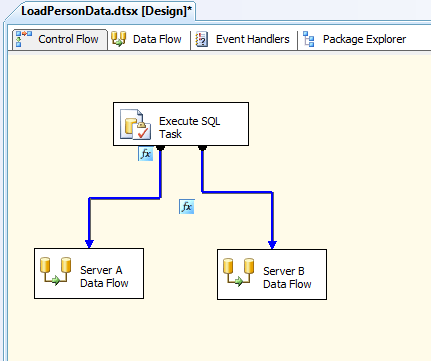
Figure 1: The control flow in the LoadPersonData SSIS package
The Execute SQL task truncates the People table. The precedence constraints that connect to the Data Flow tasks are each configured to evaluate to an expression. For example, Figure 2 shows how I configured the precedence constraint that connects to the Server A Data Flow task. Notice that the expression specifies that the ConnectMngr variable must equal “Server A” in order to evaluate to True.
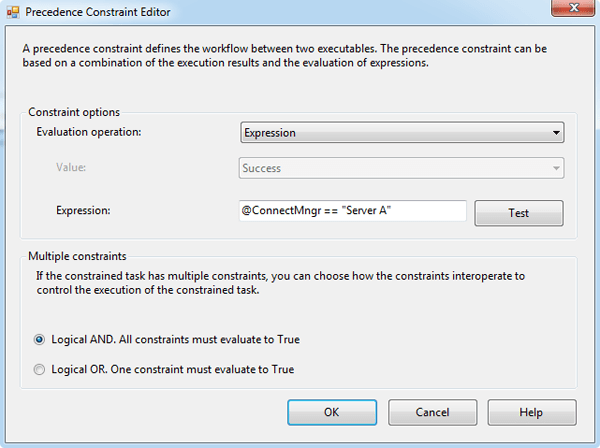
Figure 2: Configuring the precedence constraint to evaluate to an expression
I configured the second precedence constraint just like the first one, except that the expression specifies “Server B” as the variable value.
Next I configured each Data Flow task with an OLE DB source and an OLE DB destination. The sources and destination use their respective connection managers. For example, the Server A data flow uses the Server A connection manager. Figure 3 shows the Server A data flow components. Each data flow retrieves data from the Person table in the AdventureWorks2008R2 database and inserts that data in the People table.
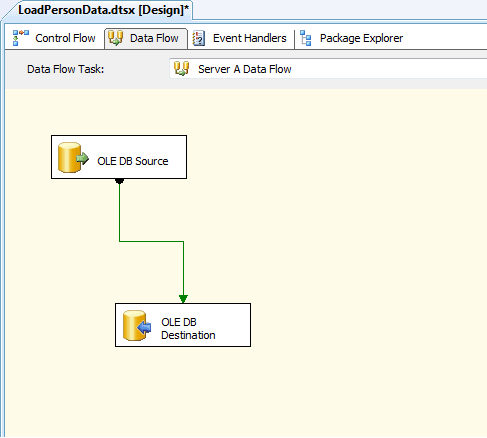
Figure 3: Configuring the data flow for the Server A connection manager
That’s all there is to setting up your SSIS package. Although this is a very simple package, it’s all we need to demonstrate how to implement XML configuration files. (Actually, we don’t even need that much.) If you don’t want to create this package, and instead want to use a package you’ve already created, you should have no trouble applying the steps in the rest of the article to your situation.
Setting Up Your XML Configuration File
After you’ve set up your package, the first step in setting up the XML configuration file is to enable package configurations. To do so, click the Package Configurations option on the SSIS menu. This launches the Package Configuration Organizer, shown in Figure 4.
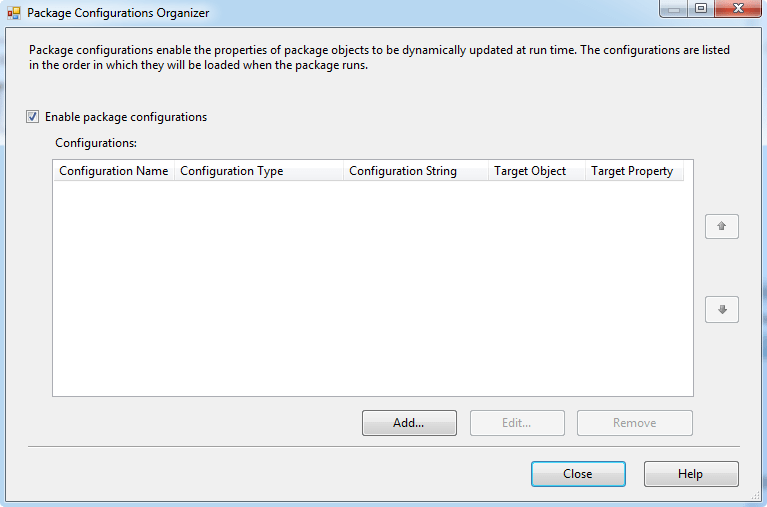
Figure 4: The Package Configuration Organizer in SSIS
To enable package configurations on your package, select the Enable package configurations checkbox. You can then add your package configurations to the package. To do so, click Add to launch the Package Configuration wizard. When the wizard appears, click Next to skip the Welcome screen. The Select Configuration Type screen will appear, as shown in Figure 5.
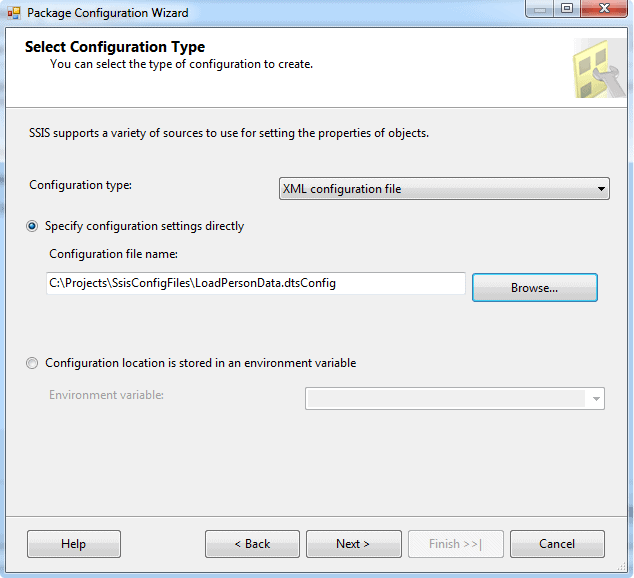
Figure 5: The Select Configuration Type screen in the Package Configuration wizard
From the Configuration type drop-down list, select XML configuration file. You can then choose to specify your configuration settings directly or specify a Windows environment variable that stores the path and file names for the configuration file. For this example, I selected the Specify configuration settings directly option and specified the following path and file name: C:\Projects\SsisConfigFiles\LoadPersonData.dtsConfig. The main thing to notice is that the file should use the extension dtsConfig.
NOTE: If you specify an XML file that already exists, you’ll be prompted whether to use that file or whether to overwrite the file’s existing settings and use the package’s current settings. If you use the file’s settings, you’ll skip the next screen, otherwise, the wizard will proceed as if the file had not existed. Also, if you choose to use an environment variable to store the path and file names, the wizard will not create a configuration file and will again skip the next screen. Even if you use an environment variable, you might want to create the file first and then select the environment variable option afterwards.
The next screen in the wizard is Select Properties to Export. As the name implies, this is where you select the properties for which you want package configurations. In this case, I selected the Value property for the ConnectMngr variable and the ServerName property for each of the two connections managers, as shown in Figure 6.
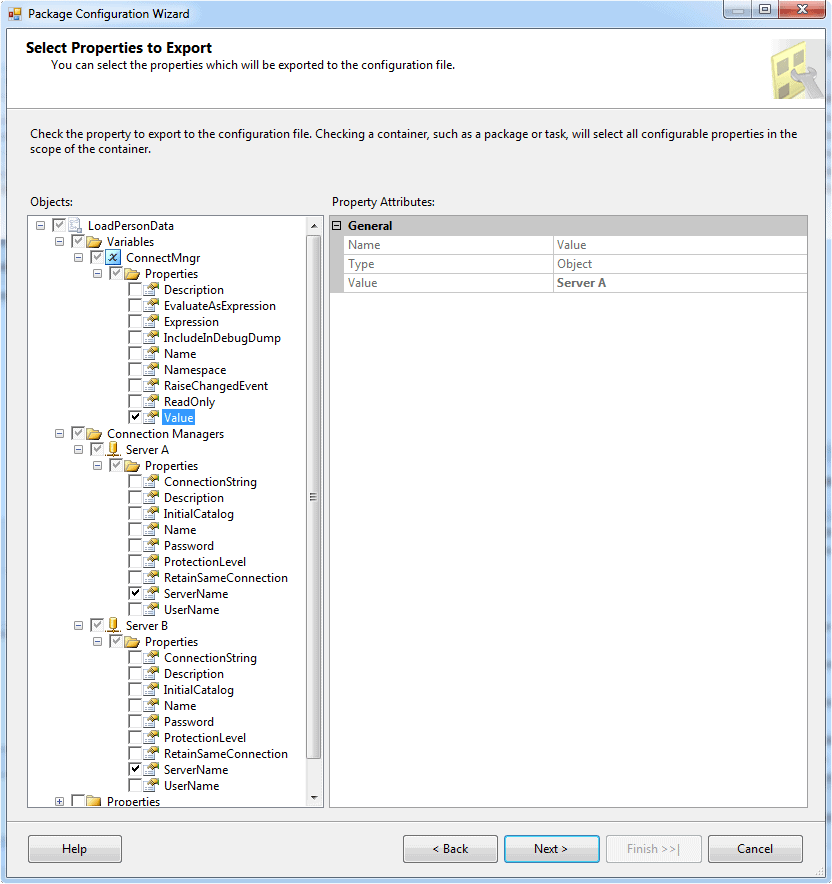
Figure 6: Selecting properties in the Package Configuration wizard
Because I chose three properties, three package configurations will be created in the XML file. You can choose as many properties as you want to add to your file.
On the next screen of the Package Configuration wizard, you provide a name for the configuration and review the settings (shown in Figure 7).
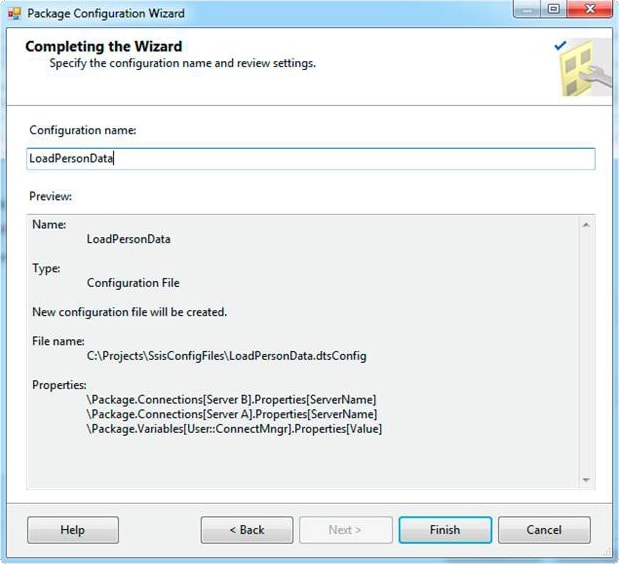
Figure 7: The Completing the Wizard screen in the Package Configuration wizard
If you’re satisfied with the settings, click Finish. The wizard will automatically generate the XML configuration file and add the properties that you’ve specified. The file will also be listed in the Package Configuration Organizer, as shown in Figure 8.
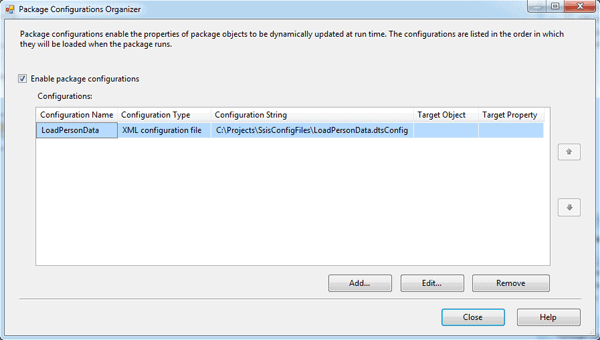
Figure 8: The XML package configuration as it’s listed in the Package Configuration Organizer
NOTE: When you add an XML configuration file, no values are displayed in the Target Object and Target Property columns of the Package Configuration Organizer. This is because XML configuration files support multiple package configurations.
You should also verify whether the XML package configuration file has been created in the specified location. For this example, I added the file to the C:\Projects\SsisConfigFiles\ folder. The file is automatically saved with the dtsConfig extension. If you open the file in a text editor or browser, you should see the XML necessary for a configuration file. Figure 9 shows the LoadPersonData.dtsConfig file as it appears in Internet Explorer.
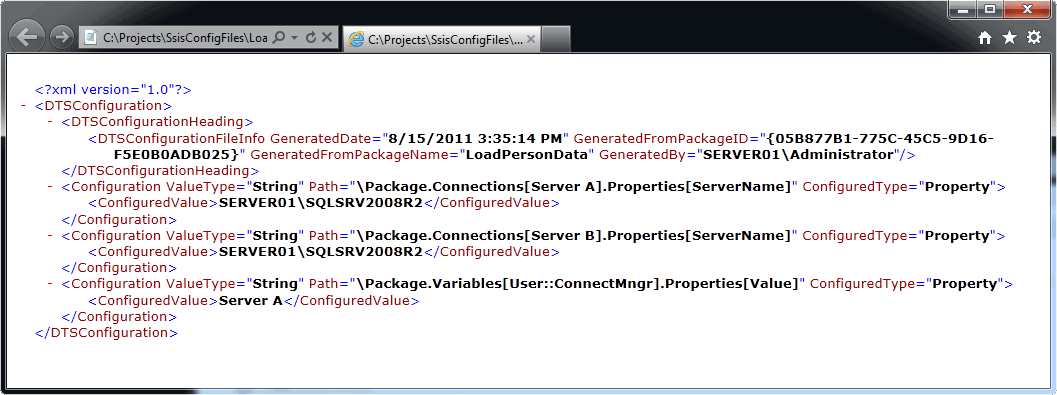
Figure 9: The XML in the LoadPersonData.dtsConfig file
As Figure 9 shows, the XML configuration file includes the <DTSConfigurationHeading> element. The element contains the attributes and their values that define when, who, and how the file was generated. The file also includes one <Configuration> element for each package configuration. Each <Configuration> element includes the attributes and their values necessary to determine which property is being referenced. Within each <Configuration> element is a nested <ConfiguredValue> element, which provides the property’s actual value.
Notice that the property values are the same as that of the package itself. When you first set up an XML configuration file, the current package value is used for each property. You can, of course, change those values, as I demonstrate later in the article.
Running Your SSIS Package
After you’ve created your XML configuration file, you’re ready to run your package. You run the package as you would any other SSIS package. However, because package configurations have been enabled, the package will check for any settings that have been predefined.
For the example I’ve been demonstrating here, the package will run as if nothing has changed because, as stated above, the XML configuration file contains the same values as the properties initially defined on the package. That means the ConnectMngr variable will still have a value of “Server A,” and the connection managers will still point to the same SQL Server computer. Figure 10 shows the package after it ran without modifying the XML configuration file.
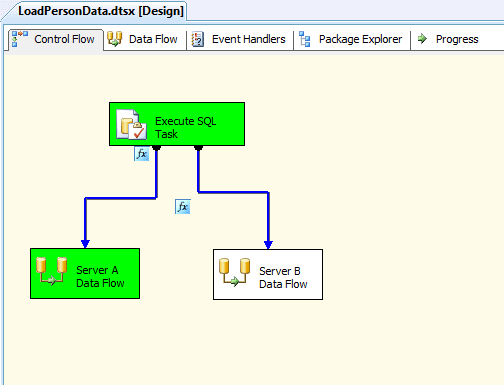
Figure 10: Running the LoadPersonData package with the default settings
As you would expect, the Server A data flow ran, but not the Server B data flow. However, the advantage to using XML configuration files is that you can modify property settings without modifying the package itself. When the package runs, it checks the configuration file. If the file exists, it uses the values form the listed properties. That means if I change the property values in the file, the package will use those new values when it runs.
For instance, if I change the value of the ConnectMngr variable from “Server A” to “Server B,” the package will use the value. As a result, the precedence constraint that connects to the Server A Data Flow task will evaluate to False, and the precedence constraint that connects to the Server B Data Flow task will evaluate to True, and the Server B data flow will run. Figure 11 shows what happens if I change the variable’s value in the XML configuration file to “Server B.”
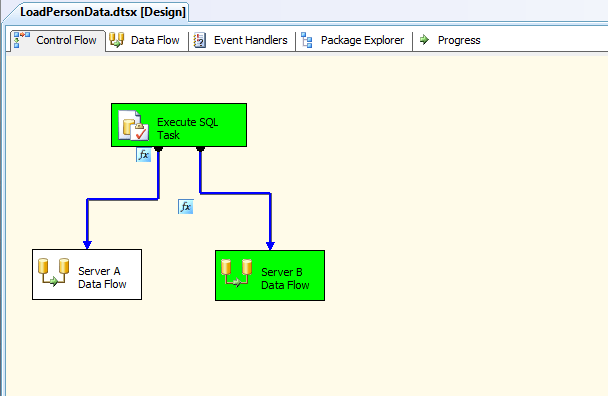
Figure 11: Running the Server B Data Flow task in the LoadPersonData SSIS package
As you would expect, the Server B Data Flow task ran, but not the Server A Data Flow task. If I had changed the values of the ServerName properties for the connection managers, my source and destination servers would also have been different.
Clearly, XML configuration files offer a great deal of flexibility for supplying property values to your packages. They are particularly handy when deploying your packages to different environments. Server and instance names can be easily changed, as can any other value. If you hard-code the path and file name of the XML configuration file into the package, as I’ve done in this example, then you must modify the package if that file location or name changes. You can get around this by using a Windows environment variable, but that’s not always a practical solution. In addition, you can override the configuration path and file names by using the /CONFIGURATION option with the DTExec utility.
Whatever approach you take, you’ll find XML configuration files to be a useful tool that can help streamline your development and deployment efforts. They’re easy to set up and maintain, and well worth the time it takes to learn how to use them and how to implement them into your solutions.