It is a tenet of extreme programming, and other development methodologies (e.g. Test Driven Development and Agile) that Continuous Integration (CI) processes should be used. Continuous Integration means that the development cycles are short, and each small set of code changes is tested with the existing code base, and released (to other developers) quickly. This includes unit testing on a near-continuous basis. Using CI means that development is being done against the latest code at an earlier stage. The idea is to save time overall by spotting and fixing problems early (“a stitch in time saves nine”). It moves the process of quality control to an earlier point in the development process, which allows higher quality code to be developed more quickly, as well as alleviating the difficulties of merging significantly different code branches.
Whilst CI has been used for a number of years within some software languages (e.g. C#, Java), the idea has been adopted less widely with database software, not least because of the difficulty of obtaining unit testing and source control tooling for SQL Server database objects.
The model I will be working towards in this article is to put database objects (tables, stored procedures, data, etc.) into source control, add unit tests to the database then get the CI engine to rebuild a copy of the database, and run tests on a periodic basis to detect any issues with the software.
I’ve been using Red Gate’s SQL Test product which, at the time of writing, is in Preview, together with a TeamCity Continuous Integration development process. I use TeamCity because it is available under both a free and commercial license (lowering cost of trying it out, but giving the ability to pay for support once adopted), its compatibility with a number of version control systems and programming languages, and the number of plug-ins which are available for it. I am also most familiar with this CI engine as TeamCity (and the process outlined in this article) is one of the tools I use in my day-to-day work. A feature-comparison of Continuous Integration systems is available at Alternatives to CruiseControl: CI Feature Matrix.
Initial setup
My starting point for this article is a database which I have under source control using Red Gate SQL Source Control, but which does not have SQL Test tests running on it. I also have a base install of TeamCity version 6.5.6. I’m using Red Gate Source Control, which plugs into SQL Server Management Studio and allows you to put database objects and data into a version-controlled environment. It’s not version control itself, but rather a good interface into your existing system.
The SQL Test product is powered by tSQLt, the TSQL-Based Test framework, which is free and open-source, and stores its objects in the database under test. This is great whilst the database is being developed, but this fact needs to be remembered when it comes to making sure that the tests don’t make it into a shipped product. I’ll explain more about that in a moment. SQL Test provides a convenient add-in to SQL Server Management Studio to help you create and run tSQLt unit tests within the design environment.
First of all, I’m going to set up TeamCity to build my database just as it is, with neither tests nor test infrastructure objects added to it. Then we will insert the call into TeamCity to run the SQL Test tests every time a build runs. This allows us to regression-test each build automatically.
I’m using the AdventureWorksLT2008 sample database for this article, although you can use any database you like – I have a number of cross-database projects using this process in my work environment. The Database can be downloaded from Microsoft’s website. I start by setting up a new Project in TeamCity and calling it AdventureWorksLT.

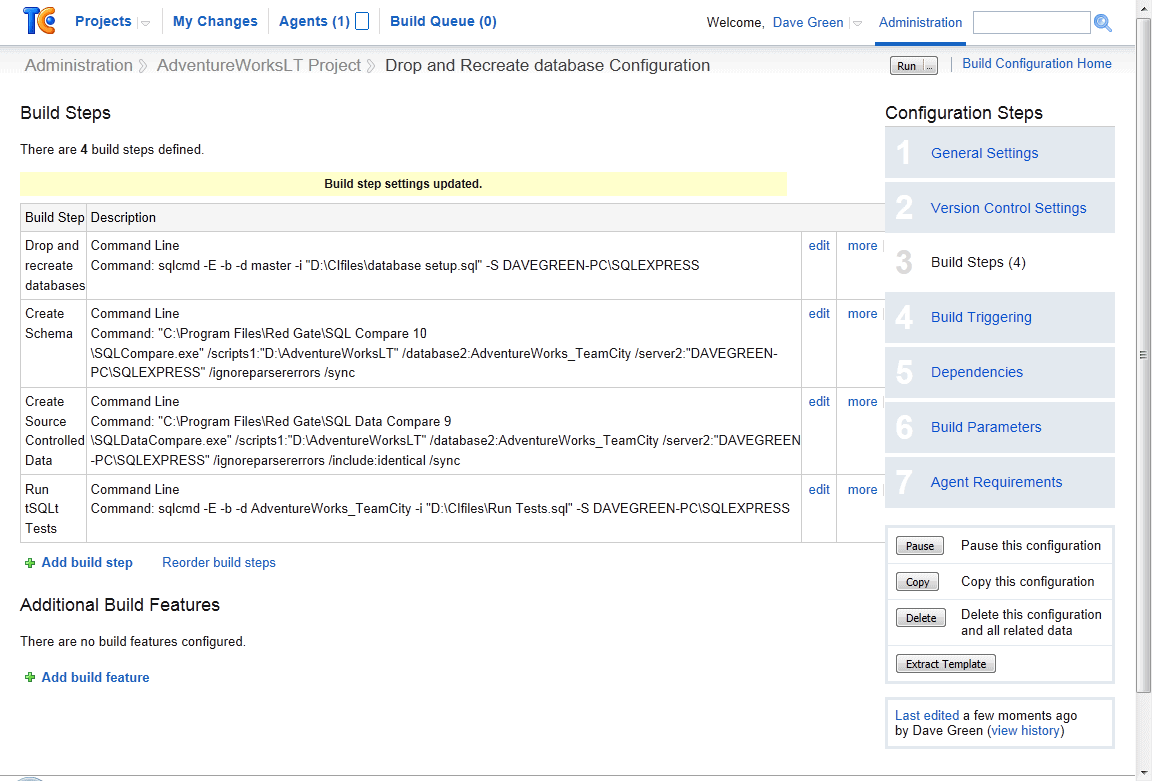
Then I add the build steps as shown in the following screenshots:
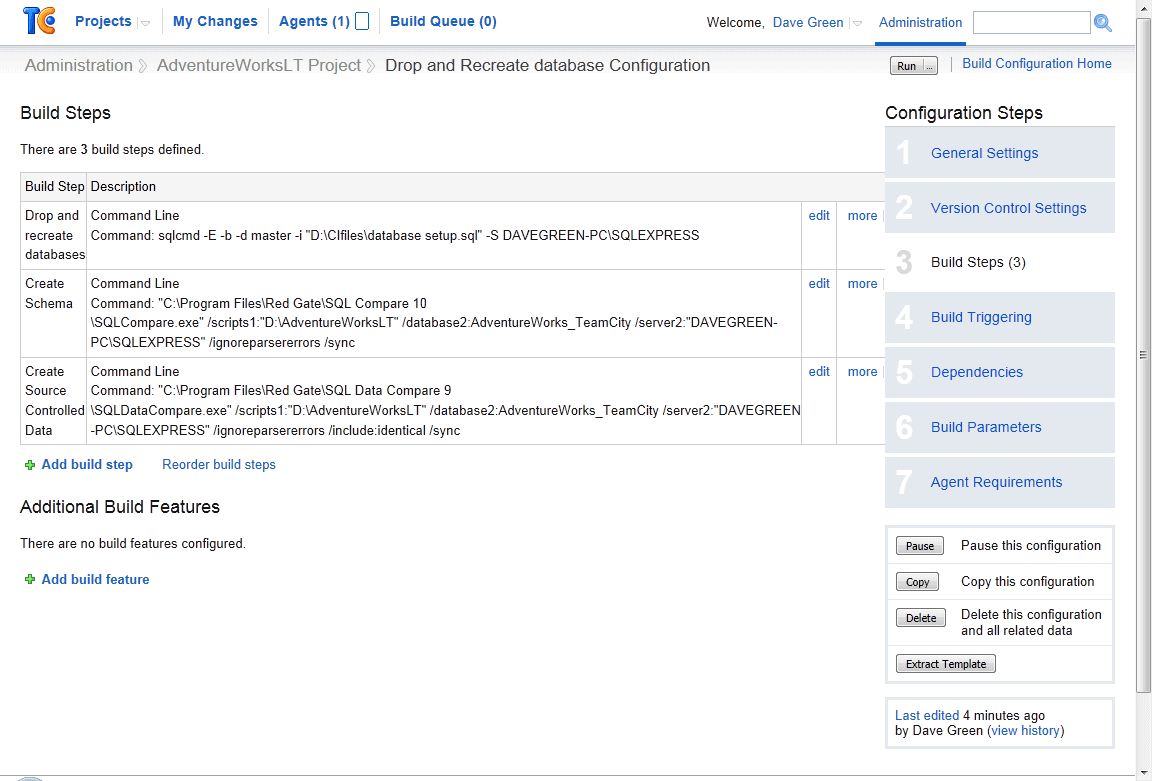
Note: I run through each of the build steps at the end of this article, which will explain what each of the parameters does.
Obviously you will need to change your database name and server to match. If you are using Integrated Windows authentication as I am, you will also need to ensure that the Windows account which the TeamCity Agent is using (the Agent’s service account) has login access to your database server for integrated authentication, and has sufficient rights to create a database. At this point, this means the dbcreator fixed server role.
I’m using Integrated Authentication for the build steps, but you could use SQL Authentication if you want to, or even, perhaps, run the process on a remote server. The command line interface to sqlcmd will accept SQL Authentication and this is documented at MSDN: The sqlcmd Utility. Note that if you decide to use SQL Authentication, these credentials must be passed in as parameters in the build step, so would become visible to other users of the TeamCity application (including guest users if this facility is enabled).
This should now run through OK. Let’s test it by clicking Run on the build step.

You should also be able to see what TeamCity has been doing within the Run Log, which is accessed from the drop down menu next to the run status. This is where you can find more technical information as to any failures, as it is the output (everything returned to the calling process) from the commands that you have run, and this can be examined. This is also time-stamped, so you can spot any significant time delays.
Adding the tSQLt objects
Now let’s add the tSQLt objects to the database. I’m going to use the SQLCop demonstration set of tests, but of course you would want to add in your own tests. Adding the SQL Test objects to a database is done using the SQL Test window within SSMS.
Open the SQL Test window and click the link “+Add Database to SQL Test…”. This will bring up a window like this (I’ve blacked out irrelevant databases on my SQL Server instance):

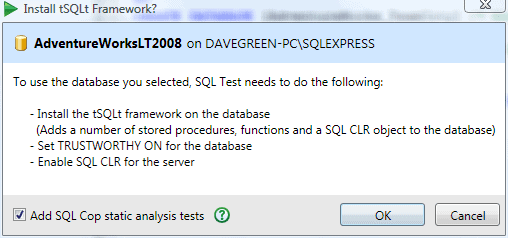
Click on ‘Add Database’, and select the tickbox “Add SQLCop static analysis tests“, then click “OK“. This will make the changes as outlined in the dialog box shown below.
The setting which enables CLR is server-wide, not database specific, and will require appropriate database server permissions (you need to have ALTER SETTINGS permission to run this step; this is implicit for members of sysadmin, or serveradmin server roles)
The SQL Cop tests support best practices, and are useful as an example of how tests work. They are by no means the only types of tests, although custom tests are outside the scope of this article. The tSQLt user guide and this article by the developers behind tSQLt, has more details about the process of creating custom tests.
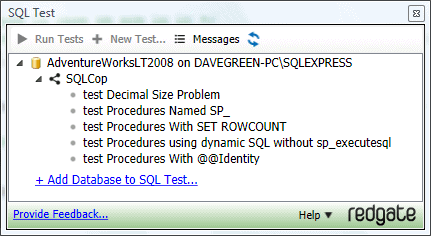
Your window should now look something like this:
Note: I have encountered problems when trying to add the SQL Test objects to the database when the database is not owned by the sa user. You can rectify this by using the ALTER AUTHORIZATION command.
You can manually run all of the tests by clicking on the database name and then the “Run Tests” button (tests or categories can also be individually run). When we run the tests, the following is the output:
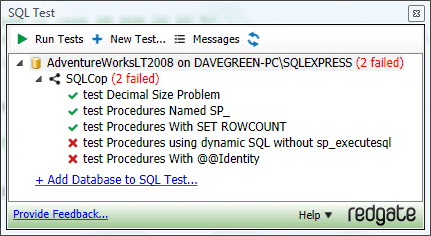
This shows us that we expect two failures – so this is what we will look out for in TeamCity, as, in our demonstration for this article, the test results shown in TeamCity should be the same as those shown by SQL Test. In practice, TeamCity would probably be set up to run other types of test such as system, integration or functional testing in a production instance of the process.
Creating the build process
So as to ensure repeatability by providing a clean build, I use a fresh database for TeamCity testing. This is why the first step in the build process is to run a .sql file (also under source control) which drops and recreates the database. tSQLt requires that the database server is able to use CLR functions, which we can set once with the following code:
|
1 2 3 4 5 6 7 8 9 |
/* Turn on CLR on this server. This setting only needs to be changed once, as it's server level. Note, you need to have ALTER SETTINGS permission to run this - (this is implicit for members of sysadmin, or serveradmin server roles) See - http://technet.microsoft.com/en-us/library/ms188787.aspx */ EXEC sp_configure 'show advanced options',1 ; RECONFIGURE; EXEC sp_configure 'clr enabled',1; RECONFIGURE; |
This is executed as part of the tSQLt install process, but if you use a separate database server for the CI process (as I do, to provide an isolated test environment) then you will need to execute this on the database server as well.
tSQLt also requires that the database is TRUSTWORTHY, because it requires that the CLR assembly it uses has EXTERNAL_ACCESS permission. This is not usually the case for a database freshly created, therefore before running tests on a database, I use the following code to turn these on: (This is the database setup.sql file referenced above)
|
1 2 3 4 5 6 7 8 9 10 11 12 13 |
/* Code to drop and re-create database, then set it to trustworthy. This is used for integrating SQL Test with TeamCity. Coded by Dave Green Jan 2012 */ USE MASTER /* Leave the database in case we are in it */ IF EXISTS (SELECT name FROM sys.databases WHERE name = N'AdventureWorks_TeamCity') DROP DATABASE [AdventureWorks_TeamCity] GO CREATE DATABASE [AdventureWorks_TeamCity] /* More options here for how you want to create the database. */ GO /* Set database as trustworthy for tSQLt Unit Testing CLR objects.*/ USE [AdventureWorks_TeamCity] ALTER DATABASE [AdventureWorks_TeamCity] SET TRUSTWORTHY ON; |
The account used to run this script will need to be a member of the sysadmin fixed server role in order to mark the database as TRUSTWORTHY. If you cannot grant sysadmin permissions to this script, you could instead use a script to empty the database, and not drop/create it. This would only require db_owner database permissions. I’d recommend a clean database if you can though.
Creating the schema build script
I then use Red Gate’s SQL Compare product to get the schema for my database created. I’m calling it via the command line to synchronise my newly created test database (AdventureWorks_TeamCity) with the source controlled database objects.
Note – you may find that on a server with a service account running TeamCity there is a failure when the product tries to generate a message box (which, running in command line mode, it can’t do). Whilst I encountered this when the product attempted to advise me if it should report back to Red Gate on my experiences, I am aware that there are a few dialogue boxes that the system can try to produce even when in command line mode. There is a registry setting you can change if you can’t start the application as that user to turn off the setting – just ask Red Gate’s helpful support team. Red Gate support have advised me that this is set in a registry key (HKEY_CURRENT_USER\Software\Red Gate\SQL Tools\) as a string value called “SmartAssemblyReportUsage”. It’s set to True or False depending on if you want to send in feature usage to Red Gate.
Adding static data
I then use Red Gate’s SQL Data Compare to populate any data which will ship with my database. This usually includes ‘static data’ that it is required for the database to function, such as geographical data or other static reference data. You don’t need to use “test” data explicitly because the SQL Test system allows you to create “fake” tables and use the data you create within them with the tests.
Testing the build
I can run all tests using the code in RunTests.sql:
|
1 2 3 4 5 |
IF EXISTS (SELECT * FROM sys.objects WHERE OBJECT_ID = OBJECT_ID(N'[tSQLt].[RunAll]') AND TYPE IN (N'P',N'PC')) BEGIN EXECUTE [tSQLt].[RunAll] END |
The reason for the IF EXISTS test is in case the objects don’t exist, to prevent an error. This can be useful in the initial stages of a project, where the CI setup may be done in advance of the SQL objects and tests actually existing. By varying the database in which this code is called (the -d parameter for sqlcmd), the same snippet can be used in different build steps. You could explicitly put this code into the command parameter for sqlcmd as a command line query, however I prefer not to do this as I find it clutters the build screen. Keeping it separate also allows me to put my supporting files within my source control program.
I can integrate these into TeamCity using a command line build task, and by calling SQLCMD with the -b parameter, I ensure that should a test fail, the error code which the SQL command raises will result in a failed build step.
So let’s add this step to the build defined above. This will result in a build step list which looks like this:
When we run this build, we expect a failure because we’ve already seen it in the tSQLt output – and sure enough we get one, although TeamCity is not specific as to what went wrong. If you go to the Build Log (accessed from the drop down next to the build failure message), you will see that some of the tests failed – and the detail of which they are.
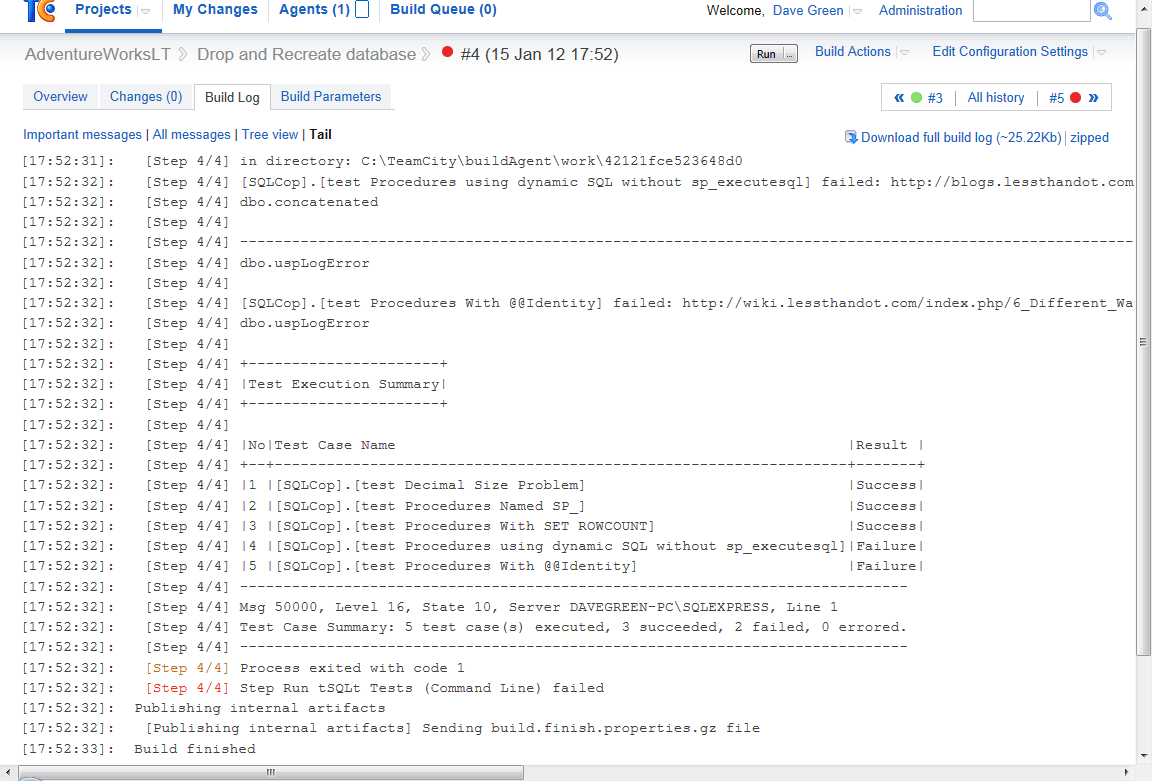
This isn’t that nice however, as it is a two step process to see what failed, and if you have a number of tests it is not very easy to pinpoint what went wrong. The output messages are also somewhat separated from the success or otherwise of the test.
There is a way however to get tSQLt to feed its test results directly into the TeamCity tests tab. This is by using the JUnit XML format to capture the output from tSQLt.
If you click on the “Add build feature” box at the bottom of the build steps window, you will see a pop up window appear. Select the feature “XML Report Processing” and “Ant JUnit” as the report type, and you will be able to type in a location for your XML file. This is where TeamCity will read the test results from during a build run.
Note: you can use wildcards here to denote multiple files, and potentially read in tests from a number of databases. This is useful if your project is spanning multiple databases all with unit tests in them.
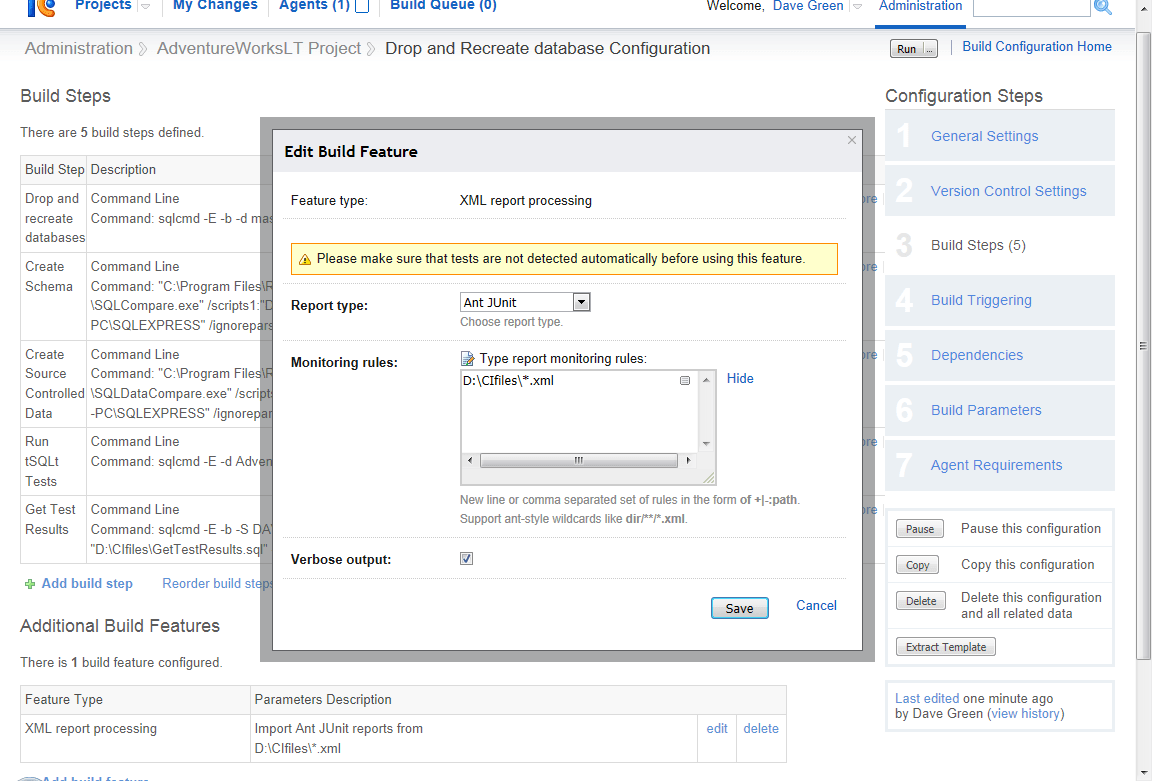
You can use defined variables within the Monitoring Rules window; this can allow you to reference files within your build directory that may only be created on checkout.
Note, I have ticked the “Verbose output” option in the build feature because I have had some issues with the tests not being properly picked up from the XML file if this is not ticked.
We must also add a step to generate the XML, and then remove the -b from the step which runs the tests, as we do not now want the build to stop at this point in the case of a test failure (we will now record that via the XML). I do suggest leaving the -b on the step to generate the XML file though – as this adds protection in the case that something goes wrong with the XML file generation.
I’ve added the “Get Test Results” step in the below screenshot.
Note, you can create this step first if you prefer – there’s no requirement to put in the Additional build feature first.

If we run through again, we still get a failure message, but we now get a list of which tests they are, and the ability to drill into them for more information. This is much more helpful for a developer team.
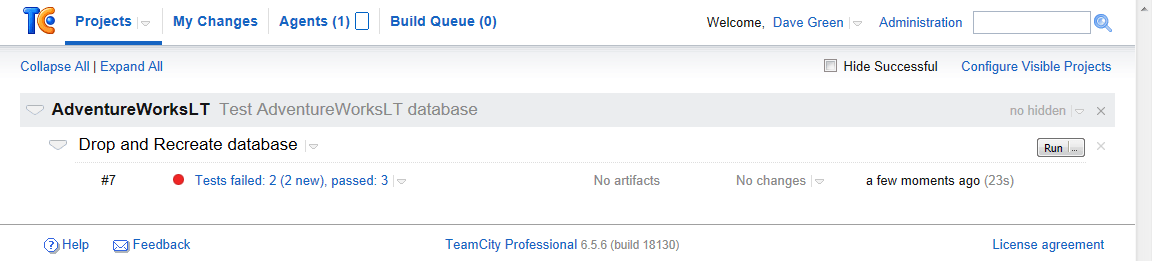
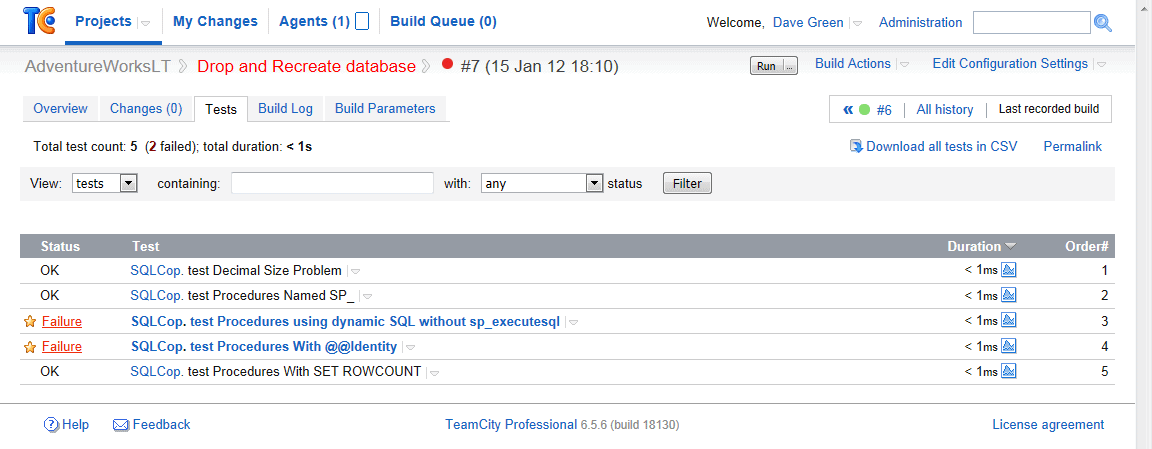
By using the XML result processing, you can use TeamCity’s built in Mute / Investigate test options, to better manage your build process, and prevent a known failure stopping a build.
The run log now looks like :
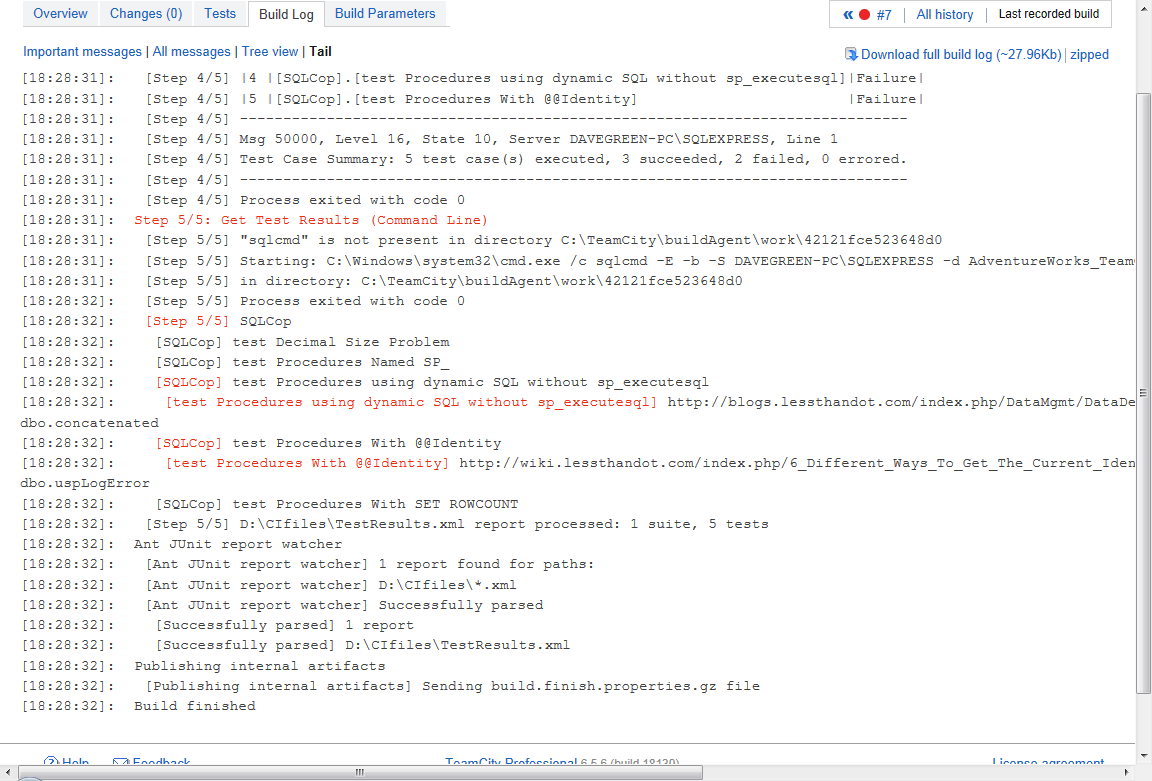
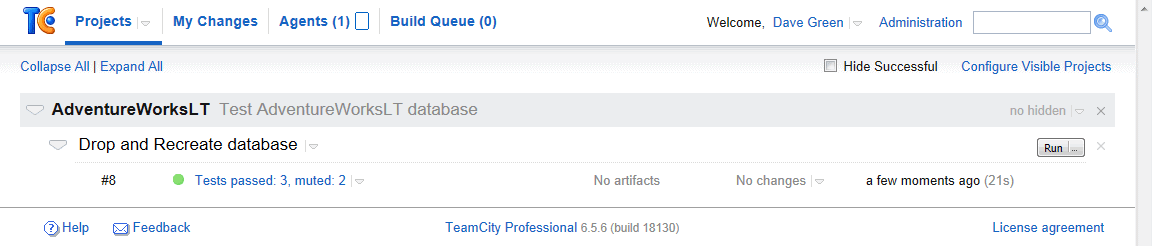
We can see that step 5/5 still shows Red text (which usually indicates failure) for the specific step. This is because tests failed, however because the failing tests are muted the build is successful (Green). The individual tests that failed are also shown in Red here, together with the failure message that the test produced.
Creating the deployment package
Because I plan to use SQL Packager to package my code, I must delete all tests and the tSQLt objects as my next step. I do this with the following code:
|
1 2 3 4 5 6 7 8 9 10 11 12 13 14 15 16 17 18 19 20 21 22 23 24 25 26 27 28 29 30 31 32 33 34 |
/* This is the clear-up script for Red Gate SQL Test */ /* Coded Dave Green 2012-01-11.*/ --DROP ALL tests IF EXISTS (SELECT * FROM sys.views WHERE OBJECT_ID = OBJECT_ID(N'[tSQLt].[TestClasses]')) BEGIN DECLARE @TestClassName VARCHAR(MAX) DECLARE tests CURSOR LOCAL FAST_FORWARD FOR SELECT Name FROM tSQLt.TestClasses; OPEN tests; --Cycle through each test class and drop them (you have to do this one at a time). FETCH NEXT FROM tests INTO @TestClassName; WHILE @@FETCH_STATUS = 0 BEGIN EXECUTE [tSQLt].[DropClass] @TestClassName FETCH NEXT FROM tests INTO @TestClassName; END; CLOSE tests; DEALLOCATE tests; PRINT 'Tests Dropped' END ELSE BEGIN PRINT 'No Tests Found.' END --Drop test Harness - this actually removes the tSQLt objects. IF EXISTS (SELECT * FROM sys.objects WHERE OBJECT_ID = OBJECT_ID(N'[tSQLt].[Uninstall]') AND TYPE IN (N'P', N'PC')) BEGIN EXEC [tSQLt].[Uninstall] PRINT 'Test System Dropped' END ELSE BEGIN PRINT 'Test System Not Found.' END |
You may not need to do this if your build process does not require you to build a deployment package, but it can be useful to clean up the database anyway, if only to ensure that the procedures which do this clear-up are tested.
I would then call SQL Packager as the final build step to package the database. This is outside the scope of this article, however information on how to call SQL Packager from the command line can be found on the Red Gate website.
Conclusion
You now have a continuous build engine which will be able to build from source control and run your unit tests against them. By including schema-based checks, for example those by SQLCop, you can ensure that your development project keeps up with best practice and also conventions within your organisation.
I would suggest that you work out a test naming scheme at this stage and keep to it – particularly for a larger development team this will help prevent ‘losing’ tests, and to make it easier to understanding of their purpose.
The approach taken by SQL Test and tSQLt in putting the tests in as database objects can be a little contentious, but is helpful in that the test versions are in the same source control as the main database, thus helping promote tests being modified at the same time as, or in advance of, code development. There is also more chance that tests will be updated and run with code changes if a CI environment is used.
You can use TeamCity’s ability to integrate with your version control system to allow you to trigger builds for code changes in particular projects, and even automatically promote / deploy working code. This can include migration scripts for updating live environments to avoid potential data loss. This is outside the scope of this article, but a variety of useful information can be found on the TeamCity and Red Gate websites.
I found the process to be fairly painless; and whilst the SQL Test program is currently in preview, it could do with a little work on the process to remove test classes for use in a packaged CI environment. I’ve been very impressed with TeamCity for CI use, and will certainly be using it for on-going development. Overall I am very positive with the process I have demonstrated in this article, as it is a relatively simple to implement solution which helps ensure a higher level of testing and code quality with little subsequent effort for developers.
It’s worth mentioning that I have separately used this process with AccuRev as a source control system, and this integrates well with TeamCity allowing you to trigger builds from source control with a simple plugin.
Appendix
A note on security for TeamCity setup
Whilst I am by no means a security expert, I have thought about the set-up for TeamCity, and the required permissions for using a process such as that outlined above. In my opinion, best practice is that the service should run with the least necessary permissions.
In this article, I have TeamCity running as a local system account, but in my CI environment I use a dedicated network account which has the permissions necessary (sysadmin on the database server to mark DBs as TRUSTWORTHY, and read/write to the file locations under test, and those for the TeamCity agent work directory). The account will also need “log on as a service” rights, in order that TeamCity can run its Agent, as well as the permissions listed in the TeamCity documentation. That being said, it’s not a (Windows) server administrator, nor does it have many permissions on the wider domain. There may optionally be something required (for example file permissions) if you have the TeamCity installation tied into version control using integrated authentication.
In practice, I would try to give the CI system its own database server to use, as I don’t want unchecked (i.e. pre-test-pass) code on a UAT (or production!) server, and I would like to keep it separate from the server on which the code is developed. Your environment will dictate this somewhat.
You might even use different agents on the same server running as different users to segregate permissions. For example, Agent 1 has permissions on local database and runs the job as it currently stands. Agent 2 has permissions on the UAT server, and can only run a new final build step (which Agent 1 can’t run), which deploys the objects to a UAT server. This way, the permissions are isolated to what is required for each environment.
I prefer not to run using SQL Authentication as this means that the credentials are stored within the TeamCity server, and so somewhat more exposed than if we use integrated security. (Who has access to your TeamCity server / configuration?)
Build step breakdown
Step 1 – Drop and recreate databases
|
1 |
sqlcmd -E -b -d master -i "D:\CIfiles\database setup.sql" -S DAVEGREEN-PC\SQLEXPRESS |
This step uses sqlcmd (a command line SQL client which is included in SQL Server) to talk to the server DAVEGREEN-PC\SQLEXPRESS (specified with -S parameter), starting in the database master (-d parameter).
Sqlcmd is set to use integrated authentication (-E parameter) to connect, and runs the contents of the file “D:\CIfiles\database setup.sql” (-i parameter). The -b parameter means that it will cause an error condition to be returned if a SQL error is raised, which will in turn cause a build failure.
The script file (which is listed in the article above) will drop the database, re-create it, and set it to be TRUSTWORTHY.
Step 2 – Create Schema
|
1 |
"C:\Program Files\Red Gate\SQL Compare 10\SQLCompare.exe" /scripts1:"D:\AdventureWorksLT" /database2:AdventureWorks_TeamCity /server2:"DAVEGREEN-PC\SQLEXPRESS" /ignoreparsererrors /sync |
I’m using Red Gate’s SQL Compare product to compare the scripts in “D:\AdventureWorksLT” with the AdventureWorks_TeamCity database on my SQL instance, “DAVEGREEN-PC\SQLEXPRESS”. The 1 and 2 prefixes relate to the “from” and “to” portions – this means you could compare 2 databases. I have specified the /sync parameter to instruct SQL Compare to make changes to my “2” database, and I’ve specified the /ignoreparsererrors parameter because I was initially getting some issues with source controlled data causing parser failures.
Step 3 – Create Source Controlled Data
|
1 2 |
"C:\Program Files\Red Gate\SQL Data Compare 9\SQLDataCompare.exe" /scripts1:"D:\AdventureWorksLT" /database2:AdventureWorks_TeamCity /server2:"DAVEGREEN-PC\SQLEXPRESS" /ignoreparsererrors /include:identical /sync |
Here the SQL Data Compare product is used to compare the data within the source control repository with that in the newly created database. Whilst most parameters are the same as in step 2, the addition of the /include:identical parameter will ensure that only objects which exist in both databases are copied. Note, you can use an XML file to drive SQL Compare and SQL Data Compare if you wish to, which keeps security and other parameters from being exposed within the TeamCity interface, at the cost of making the process a little less clear. Using an XML file is also a way of restricting comparisons to a specific list of tables, and I’ve used it as a way of reading specific tables from another environment which may have more tables in common than I wish to copy across.
Step 4 – Run tSQLt Tests
|
1 |
sqlcmd -E -d AdventureWorks_TeamCity -i "D:\CIfiles\Run Tests.sql" -S DAVEGREEN-PC\SQLEXPRESS |
Again we are using sqlcmd, this time to run a script which runs all the tSQLt tests. Note, we have not put the -b parameter here, since we don’t want the execution to stop if an error is detected in a test. This is because this is handled in the next step:
Step 5 – Get Test Results
|
1 2 |
sqlcmd -E -b -S DAVEGREEN-PC\SQLEXPRESS -d AdventureWorks_TeamCity -h-1 -y0 -I -i "D:\CIfiles\GetTestResults.sql" -o "D:\CIfiles\TestResults.xml" |
We’re now using sqlcmd (with it’s -b parameter to fail on error) to retrieve the test results, and output these to an XML file which the Ant JUnit XML Report Processing feature will pick up. The other parameters -h-1 -y0 -I allow the XML to be output cleanly.
the contents of the file is …
|
1 2 |
:XML ON EXEC [tSQLt].[XmlResultFormatter]; |
References and Acknowledgements:
- SQL Test – http://www.red-gate.com/products/sql-development/sql-test/
- TeamCity – http://www.jetbrains.com/teamcity/
- An article on unit testing with tSQLt –
http://www.simple-talk.com/sql/t-sql-programming/sql-server-unit-testing-with-tsqlt/ - The user guide for tSQLt – http://tsqlt.org/user–guide/
- Troy Hunt’s excellent articles on TeamCity integration – Continuous Integration for SQL Server Databases and TeamCity, Subversion & Web Deploy part 1: Config transforms
Load comments