“Something wonderful
has happened…Number
Five is ALIVE!.”
Although, in a previous POSH article, we gave some reasons why DBAs should learn PowerShell, such as gaining more productivity and flexibility in administrative tasks, we must admit that it isn’t really that easy to give a complete answer to the question, “why learn PowerShell”, in a simple sentence.
PowerShell isn’t the easiest of current programming languages to learn, so it is sometimes treated with a certain amount of mistrust. But this mistrust isn’t entirely justified. Its syntax can be a bit daunting for anyone trained exclusively in VB or C#, but is familiar to anyone who has used the Kern or Posix shell languages or Perl. Whatever prior knowledge you can bring to learning PowerShell, there is very likely to come a time when you decide you need to learn to use it in your day-to-day work.
PowerShell has some unique concepts. Even seasoned programmers will ask ‘What are cmdlets, aliases, and conditions? What is the pipeline and how does it work?’ That’s what this article is about. You must learn the basic concepts to take full advantage of this series. Once you do that, PowerShell comes alive. This article provides a VERY quick run-through of a few the most basic concepts and is not intended to be comprehensive. For a complete overview of all of the PowerShell concepts, refer to the Manning book “Windows PowerShell in Action 2Ed” by Bruce Payette or anyone signed by Jeffery Hicks, Lee Holmes and Ed Wilson (The Scripting Guy). Also you can find more specific subjects as “Windows PowerShell for Developers”, by Douglas Finke and the ebooks from Ravikanth Chaganti
Installing PowerShell
You don’t need to install PowerShell if you are using a relatively recent Windows operating system. Windows 7 and Windows Server 2008 R2 are shipped with PowerShell 2.0 and Windows 8 and Windows Server 2012 with PowerShell 3.0.
|
Windows versions and PowerShell download links |
|
Windows Server 2003 32 Bits: http://bit.ly/UGR3WK |
|
Windows Server 2003 64 Bits: http://bit.ly/UGR5Oq |
|
Windows Vista 32 Bits: http://bit.ly/UGRosC |
|
Windows Vista 64 Bits: http://bit.ly/UGRsbJ |
|
Windows XP: http://bit.ly/UGRh00 |
|
Windows Server 2008 64 Bits: http://bit.ly/UGQKLJ |
The current version is PowerShell 4. This is available for Windows 7 with Service Pack 1, Windows Server 2008 R2 with Service Pack 1 and for Windows Server 2012.. You can download and install PowerShell 3 into earlier operating systems such as Windows Server 2003, Windows Server 2008, Windows XP and Windows Vista. PowerShell version 2.0 for earlier operating systems is available at these links in Table 1:
The new Windows Server 2012 and windows 8 has the PowerShell 3.0 and Windows Server 2012 R2 and 8.1 has PowerShell 4.0
Note As the focus of this series is PowerShell for SQL Server DBAs, all the links above are for PowerShell 2 and 3 Unless otherwise noted, we are not covering PowerShell 1 or 4
Execution Policy. Are you being able to run scripts?
If you don’t enable PowerShell, you’ll still be able to run commands interactively at the console but the execution of scripts in PowerShell is prevented. This policy prevents running unsafe code by accident. If you try to run scripts in PowerShell by default, an error will be displayed:
|
1 2 3 4 5 6 7 |
PS C:\temp> .\myscript.ps1 File C:\temp\MyScript.ps1 cannot be loaded because the execution of scripts is disabled on this system. Please see "get-help about_signing" for more details. At line:1 char:15 + .\myscript.ps1 <<<< + CategoryInfo : NotSpecified: (:) [], PSSecurityException + FullyQualifiedErrorId : RuntimeException |
You’ll need to change this security setting to run PowerShell scripts. To change this setting, use the cmdlet called Set-ExecutionPolicy. You can use this to specify the security option you need. Table 2 shows the most used possible security options:
|
Security Option |
Description |
|
Restricted |
No scripts can be run. Windows PowerShell can be used only in interactive mode |
|
AllSigned |
Only scripts signed by a trusted publisher can be run. |
|
RemoteSigned |
Downloaded scripts must be signed by a trusted publisher before they can be run. |
|
Unrestricted |
No restrictions; all Windows PowerShell scripts can be run. |
Table 2: Security policies for PowerShell
For example, you could use this
|
1 |
Set-ExecutionPolicy RemoteSigned |
Note See Microsoft TechNet “Using the Set-ExecutionPolicy Cmdlet”: https://docs.microsoft.com/en-us/previous-versions/windows/it-pro/windows-powershell-1.0/ee176961(v=technet.10)
Profiles, don’t forget this best friend.
Imagine that you have set up your entire scripting environment, with all the variables assigned, aliases defined and your function module imported into the session. Life seems good. Then, for some reason, you close the window for that session. When you open a new one, what will happen if you have not created your profile with all these settings? Is all lost and you will have to do it again. Not so good.
Unless you thrive on tedium, it is important to create your profile. Once it is set up, you will no longer need to worry about what folder contains the function Get-XPTO or what the value of the variable $Something is set to, because every time you need it, all this information can be used by simply importing the module and environment settings in your Profile. This way, the next time you start a PowerShell session, all your environment configuration will be loaded.
Table 3 shows the types of profiles and the load order:
|
Profile file and path |
Applied |
Lo load |
%windir%\system32\WindowsPowerShell\v1.0\profile.ps1 |
all users and all shells. |
1 |
%windir%\system32\WindowsPowerShell\v1.0\ Microsoft.PowerShell_profile.ps1 |
all users, but only to the Microsoft PowerShell shell. |
2 |
%UserProfile%\My Documents\WindowsPowerShell\profile.ps1 |
only to the current user, but affects all shells. |
3 |
%UserProfile%\My Documents\WindowsPowerShell\Microsoft.PowerShell_profile.ps1 |
only to the current user and the Microsoft.PowerShell shell. |
4 |
Table 3: Types of PowerShell profile
Cmdlets.
The name is suggestive but no, it is not something to eat.
A popular saying in Brazil when we don’t know what something is to ask whether it is something to eat. Cmdlets (pronounced “Command lets”), despite sounding like the name of an exotic food, are not edible. Imagine ordering savory, freshly-butchered, Cmdlets in a fancy restaurant…”
In the Windows CMD command line prompt we had commands such as dir, mkdir, and rmdir. PowerShell also has built-in commands that ship as part of the shell. In PowerShell, these commands are called cmdlets, but they are much more versatile.
PowerShell cmdlets are different from other shell commands such as the built-in CMD commands I’ve just mentioned. Cmdlets return an instance of an object, not text. Unlike text, these objects do not have a default formatting. As I’ve already mentioned in the previous article, everything in PowerShell is an object, and commands do not process and output text, but objects.
Note: In PowerShell, commands are not built in to the PowerShell.exe executable, but they are instances of the .NET Framework class System.Management.Automation.Cmdlet which is defined in the assembly System.Management.Automation.dll.
Hmmm….Objects? An object is a representation of a physical entity with defined boundaries whereas a class is an abstraction of a set of objects that have similar properties, common behaviors and relationships with other identical objects. The class is the encapsulation of objects in common.
Each object has its own characteristics, properties and methods. A property represents something the object has, and method represents what it can do, specifying the action itself. You may imagine your dog, Rex, as an object. It has the property size, weight, color but also has the methods runs, barking and sleeping.
In PowerShell these concepts are fully applied. Any output of a cmdlet is an object with properties, methods and other specific member types. One example of this is the Get-Process cmdlet, which lists all the running processes on the machine. It has the StartTime property that indicates the date and time that the process was started, but also has the Kill method to end the process. Because PowerShell deals with objects, it can use the full power and range of features in the .NET Framework.
Note: The term Object Orientation, or OOP, was created in 1967 by Alan Kay who created the Smalltalk language. Even before this, more specifically, earlier in 1967, this concept was already used by Johan Dahl and Kristen Nygaard and applied in the language Simula 67. Despite being widely used in recent years, the concept of OOP is more than 40 years old.
Cmdlets have their own terminology
There is a special convention for naming PowerShell cmdlets.
This differs from that of any other shell. This syntax is one of verb-noun, with a restricted range of verbs that each have a precise meaning. This makes it so much easier for you to find a cmdlet and have a reasonable idea what it does. For example, the set of cmdlets that return some information has “Get” as its verb. The cmdlets that export objects start with “Export.” This allows you to determine what types of formatting you can use by simply looking for cmdlets that have a “Format” in the verb.
To give an example of this, just look at the output from this command. (get-command is listing the cmdlets that perform an operation, and so start with the verb ‘Set’:
|
1 |
Get-Command -Verb "Set" |
Hey Get-ChildItem, can I call you Dir?
I’m pretty sure you’ve enjoyed a movie directed by Allen Stewart Konigsberg or one that Frederick Austerlitz has acted in. You probably like the music of Anna Mae Bullock. You think not? You’ve never seen a movie by Woody Allen, or one who starred by Fred Astaire? You’ve never listened to the tunes of Tina Turner? Yes, all these monikers are artistic names or aliases. PowerShell also has aliases for its cmdlets, but why use aliases?
They’re easier to remember and spell aren’t they? Demetria Gene Guynes is her real name but you remember her as Demi Moore. It’s the same with PowerShell. For many of us, it’s easier to type Dir than Get-ChildItem, just as it’s easier to remember Demi Moore than Demetria Gene Guynes.
PowerShell already has some built-in aliases to allow you to build command lines based on the commands that were used in DOS, such as dir, mkdir, or rmdir. This is a great help to those of us who’ve spent years working at the command-line, because we can get some way with PowerShell just with the knowledge of the DOS command line. Table 3 shows the comparison with some DOS command and aliases in PowerShell:
|
DOS Command |
PowerShell Cmdlet |
PowerShell Alias |
|
Copy |
Copy-Item |
Copy |
|
CD |
Set-Locaton |
CD |
|
Move |
Move-Item |
Move |
|
Ren |
Rename-Item |
Ren |
|
Dir |
Get-ChildItem |
Dir |
Table 4: PowerShell Aliases
To get the PowerShell cmdlet name for a specific alias, use the Get-Alias ââCmdlet, for example to get the name of the PowerShell cmdlets for the alias dir:
|
1 2 3 4 5 |
PS C:\> Get-Alias Dir CommandType Name Definition ----------- ---- ---------- Alias dir Get-ChildItem |
Pipeline, the bridge.
In Brazil, all cars are at least part-powered by Ethanol. This biofuel that is produced by sugar cane, cassava, corn or beet, is widely used in Brazil as a sustainable alternative to gasoline. Factories turn sugar cane into sugar and feedstock and send the cane-waste (bagasse) to other factories that convert this into Ethanol. Each type of process is self-sustainable, with a well-defined function. One produces the bagasse and the other, the distillery, then processes it into the fuel. Someone has to deliver the product of one to the other to be turned into biofuel. As the factories are usually separated by a few kilometers, a pipeline is the best connection between them, taking the cane-waste to the ethanol factory.
Back to PowerShell, the two factories are the cmdlets and pipeline will create a connection between them, in order to obtain a final process. PowerShell uses the pipeline to stream objects connecting the output of one cmdlet with the input of the next one. This way you can perform complex operations in just a few command lines, perhaps even a single command line. Figure 2 illustrates this process:
Imagine now that are sitting at your desk, drinking good Brazilian coffee, and your boss calls to saying that one of the SQL Server instances is slow. Of course there are many actions you can take to monitor the situation; one of them is to list all the active processes in order to look for some that is using much CPU. Using PowerShell as your tool, you type in the PowerShell Console:
|
1 2 3 4 5 6 7 8 |
PS C:\> Get-Process -Computer Handles NPM(K) PM(K) WS(K) VM(M) CPU(s) Id ProcessName ------- ------ ----- ----- ----- ------ -- ----------- 32 5 1016 2420 29 1.56 2156 conhost 82 8 1756 5616 60 0.55 2496 dwm 0 0 0 24 0 0 Idle 161 7 2608 3676 18 4.23 596 lsm |
We can see that there is a property named CPU, and the output would be easier to read if it were ordered in descending order by CPU, so you use the pipeline to perform this operation. As in Windows or UNIX shells, the pipeline is represented by the character “|”:
|
1 |
PS C:\> Get-Process | Sort-Objet CPU -Descending |
Note The property CPU does not return the percentage of CPU used by the processor but the amount of processor time that the process has used on all processors, in seconds. Type Get-Help Get-Process -full for a complete information.
Perfect, now we have all processes sorted with those who are using most CPU first. But your boss turns back and asks you to send an email to him with this list. Again, you can use the pipeline and export all the script’s output to a CSV file:
|
1 |
PS C:\> Get-Process | Sort-Objet CPU -Descending | Export-Csv "c:\Temp\ProcessHighMemory.csv" -NoTypeInformation |
Here, you are “piping” the output of the Get-Process cmdlet, to Sort-Object cmdlet and “piping” this to the Export-CSV cmdlet. You did ââa relatively complex task with a single line of script.
Some Cmdlets you must know.
PowerShell has several built-in cmdlets and they are categorized according to what they do. There are some of them that are very important to know, since you’ll use them a lot when you are doing PowerShell programming. They will also be used in the course of this series of articles. Let’s take a look on them:
Get-Help: Each built-in cmdlet has help-text embedded in it which includes its syntax, parameters settings, usage examples and a series of information to help you use it. To access this help, we need to use the Get-Help cmdlet. If we want to know everything about the Get-Process cmdlet, we’d just type:
|
1 |
PS C:\> Get-Help Get-Process -full |
Note the Get-Help Cmdlet has some parameters that limit or expand the display to help, as -full, -detailed, or -samples. For further information just type Get-Help
Get-Command: This cmdlet returns basic information about another cmdlet or any other element of PowerShell. Figure 3 displays the cmdlets that have a “List” in the noun:

Get-Process: display the list of running processes. If you specify the parameter -ComputerName you can choose the machine, otherwise it will run locally :
|
1 2 |
PS C:\> Get-Process PS C:\> Get-Process -ComputerName Server1 |
Get-Member: displays the properties and methods of the objects. We already know that everything in PowerShell is an object. When we typed Get-Process by itself without parameters, you will see all active processes on the machine displayed. What is outputted are the default properties, already pre-defined. We may want something else, in which case we could specify that: But what else is there? If we want to see all the methods and properties that can be used, we can do:
|
1 2 |
PS C:\> Get-Member -InputObject (Get-Process) PS C:\> Get-Process | Get-Member |
In this example, we are doing one operation in two different alternative ways. At first the Get-Process cmdlet is passed as parameter and the second it is piped to the Get-Member.
Where-Object: is one of the most important cmdlets, because it filters the object that is coming down the pipeline, according to a condition, similarly to the WHERE clause in a SQL statement. If the condition is true then the object is accepted, otherwise it is ignored. Using our current example, we can filter only those processes that have CPU greater than or equal 100:
|
1 |
PS C:\> Get-Process | Where-Object {$_.CPU -ge 100} |
Here we can see the power of the pipeline. Using the example of CPU time, we can continue the process of sorting and exporting the output to a CSV file:
|
1 |
PS C:\> Get-Process | Where-Object {$_.CPU -gt 100} | Sort-Object CPU | Export-Csv "c:\Temp\ProcessHighMemory.csv" -NoTypeInformation |
There are two points here. One is the $_ ‘automatic variable’. This represents the current object in the pipeline and, when used with the .CPU, tells the Where-Object to filter on the CPU property. In this case, Get-Process sends one object at a time to the Where-Object and it uses the CPU property with the automatic variable, $_.CPU, to check if it is above 100. If it is, the object is passed through the pipeline to the next cmdlet. If it is not, then it is removed from the pipeline. This automatic variable is often used inside flow structures, for example, ForEach-Object.
NOTE In PowerShell version 3 onwards, the syntax was simplified because there is no possible ambiguity about the object you want to filter on. Now, the automatic variable $_ is no longer needed. We can directly use the property without $_, just typing Get-Process | Where-Object CPU -ge 100
Another point is that if we’re filtering only processes with CPU above or equal 100, why didn’t we use $._CPU >= 100 but instead used $ _.CPU -gt 100? In PowerShell operators are named and begin with “-“. The table 5 illustrates some operators:
|
Operator |
What it does |
|
-eq |
Equal to |
|
-ne |
Not Equal to |
|
-ge and -le |
Greater than or equal to, and less than or equal to, |
|
-gt and -lt |
Greater than and less than |
Table 5: PowerShell Operators
For comparison on character data, there is also -like and -notlike. These two operators accept ‘*’ as a wildcard. That means if I compare ‘SQL Server’ -like ‘*SQL*’, will be true.
Note For information about the complete set of help operators, type Get-Help about_operators
Get-Content: As its name implies, this cmdlet reads the contents of a file and returns an object for each line read from file. Using the example of section 2.1 to read the contents of servers.txt use:
|
1 |
PS C:\> Get-Content c:\ PoshForSQLServer2012\servers.txt |
You will notice that some cmdlets and functions accept arrays as parameters as the -ComputerName parameter in Get-Process. The actual type of the parameter is a STRING[]. This means that I can type …
|
1 |
PS C:\> Get-Process -ComputerName "Server1","Server2" |
… or use the Get-Content to the servers.txt list:
|
1 |
PS C:\> Get-Process -ComputerName (Get-Content c:\ PoshForSQLServer2012\servers.txt) |
Table 6 describes some other cmdlets used in this series of articles and its purpose:
|
Cmdlet |
Description |
|
Out-File |
Redirects the output to a file |
|
Export-Csv |
Converts the object to a comma-separated value format and saves in a CSV File |
|
Get-Service |
Returns the services in local or remote computers |
|
Test-Path |
Check if all elements in a path exists |
|
Join-Path |
Join a path and child path in a single path |
|
Foreach-Object |
Performs an operation against each of a set of input objects |
|
Write-Verbose |
Writes text to the verbose message stream |
|
Write-Error |
Writes object to the error stream |
Table 6: Useful built-in cmdlets
These commands in the table above are built in cmdlets, but we will use, in the course of this series of articles, some others advanced functions that was made by well-known names in the PowerShell Community and they were exhaustively tested. They are part of the Toolkit POSHToolkit.zip attached to this article and the Table below shows them:
|
Out-Datatable |
Creates a DataTable based on an objects properties |
|
Write-Datatable |
Writes data only to SQL Server tables |
|
Invoke-SQLCmd2 |
Runs a T-SQL script. Invoke-Sqlcmd2 only returns message output, such as the output of PRINT statements when -verbose parameter is specified |
|
Send-SmtpMail |
Sends an email by use of an SMTP server |
|
Show-BalloonTip |
Displays a balloon tip message in the taskbar’s notification area |
|
Get-DiskSpace |
Returns the information about the space in disk |
|
Export-Xls |
Saves Microsoft .NET Framework objects to a worksheet in an XLS file |
|
New-Zip/Copy-ToZip |
Used to generate zip files |
|
Convert-CSVToExcel |
Converts one or more CSV files into an excel file |
|
Get-WindowsUpdates |
Display all the windows updates applied in the machine, locally or remotely |
|
Split-Job |
Heavily used in this series of articles to perform asynchronous operations, it runs commands in multiple concurrent pipelines |
|
Get-ProcessName |
Snippet to returns the name of the SQL Server instance is running in a Get-Process or Get-Counter cmdlet |
|
New-TiedVariable |
Creates a ReadOnly variable that recalculates it’s value each time it’s read |
|
Test-SQL |
Test the connection to a SQL Server Instance |
Table 7: Community-supported cmdlets
These are some of the most important cmdlets and functions that we will use at this series of articles. As I said earlier, PowerShell has a vast content of cmdlets for you to explore.
Modules, code packaging.
If you are traveling through Europe, I doubt if you’d take all your belongings with you. You will pack your suitcase with essential items.
Modules in PowerShell do the same. Modules encapsulate, in a reusable unit, all the most important functions that you use all the time. This makes these functions easier to maintain, and makes it easier for you to share them with others.
There are four different types of modules in PowerShell, but the script module is the most important one to start with. We will use this to set up the environment for the examples in this series of articles. This type of module has the extension, psm1 and can contain any valid PowerShell code. Our module file will be called Functions.psm1.
Note Type Get-Help about_modules for more information about the module types
To access the module’s code, just import the module using the cmdlet Import-Module. This means that you’d just type …
|
1 |
PS C:\>Import-Module Functions.psm1 -force |
… to load the module Functions.psm1
Note PowerShell 3.0 made it unnecessary to explicitly import the module using a cmdlet. Now, the module will be automatically loaded the first time you use a function that is within it. You can choose whether to use this feature or not.
When you want to import a module, PowerShell will look in the paths specified in the $ENV:PSModulePath environment variable to search for it. This variable stores two paths
|
1 |
%windir%\System32\WindowsPowerShell\v1.0\Modules |
… and …
|
1 |
%WindowsUserProfile%\Documents\WindowsPowerShell\Modules. |
You must create a new folder in any of these paths with the same name as the module and put all the files belonging to it inside this folder.
Note If you have a SQL Server 2012 installed, there is also other path for modules, %Drive%\Program Files (x86)\Microsoft SQL Server\110\Tools\PowerShell\Modules\ that is the location of the SQLPS module, but we’ll discuss this in another article
The Power of the Remote Administration
How many times have System Administrators lost a night’s sleep because they must perform a single operation in a number of remote servers? Almost every working DBA has I suspect. Let’s start with a short, simple example of how PowerShell can help with this task.
Windows PowerShell remoting uses WS-Man, a Microsoft implementation of a systems-standard management protocol. This is a new feature in PowerShell 2.0 that enable users run PowerShell commands on remote machines, with operations that can be performed using one-to-many remoting (1:N).In other words one user is able to perform actions in many Servers with a few lines of commands encapsulated in a script.
In PowerShell 2.0 this feature is enabled by the cmdlet Enable-PSRemoting but in the 3.0 version it is enabled by default. This means that a single administrator can easily, for example, drop old files from any number of servers with a single script. To illustrate this point, I’ll create a list of servers stored in a flat file called servers.txt in the PoshForSQLServer2012 folder
Note For a more detailed overview, and to fully understand of the feature, its cmdlets and usage, we suggest you read the EBook Administrator’s Guide to Windows PowerShell Remoting
The next step is to write an example PowerShell script that creates a remote session for each server in turn and deletes files older than twenty days from the current date. The files are located in the c:\oldfiles folder directory.
|
1 2 3 4 5 6 7 8 9 10 11 12 13 14 15 16 17 18 19 |
$PowerShellSessions = New-PSSession -computerName (Get-Content c:\PoshForSQLServer2012\Servers.txt ) #A $PowerShellJob= Invoke-Command -Session $PowerShellSessions -ScriptBlock { Get-ChildItem "c:\oldfiles\*.txt" | where { $_.lastwritetime -le (Get-Date).adddays(-20)} | Remove-Item -Verbose } -AsJob #B get-job #C Wait-Job $PowerShellJob #D Receive-Job $PowerShellJob #E Id Name State HasMoreData Location Command -- ---- ----- ----------- -------- ------- 19 Job19 Running True quigonjinn,obiwan... Get-ChildItem "c:\... VERBOSE: Performing operation "Remove File" on Target "C:\oldfiles\Files - Copy (10).txt". VERBOSE: Performing operation "Remove File" on Target "C:\oldfiles\Files - Copy (11).txt". VERBOSE: Performing operation "Remove File" on Target "C:\oldfiles\Files - Copy (12).txt". VERBOSE: Performing operation "Remove File" on Target "C:\oldfiles\Files - Copy (13).txt". |
- #A – Open a remote session for each computers listed in c:\PoshForSQLServer2012\Servers.txt.
- #B – Invoke the command asynchronously to delete files older than thirty days from the current date and store it in PowerShellJob Variable.
- #C – Invoke the Jobs created.
- #D –Wait until the job finishes assigned to the PowerShellJob variable
- #E – Display the output
This is the kind of the power that system administrators can have in their hands. With a few line of PowerShell code they can control and manage a large number of servers remotely. No more sleepless nights, right?
Setting up the environment.
As part of the POSH DBA series, I’m providing a POSH PowerShell toolkit with a whole lot of Cmdlets, provided by the community of users, that are generally useful for anyone doing database administration. A lot of my examples that I provide will use them.
As this series of articles is intended the provide some of the solutions that are run regularly by a DBA using PowerShell, we will have set up the environment in which the examples will run.
You will have the code, example by example, of each article of this series in a set of PS1 files, and the functions used in the next articles will be in a module called Functions.psm1. All of them will be compressed in the file I’ll provide called POSHToolkit.zip. The other articles will have their own settings and will be listed in their subsections.
First you must enable scripting in your system. Open a PowerShell session and type:
|
1 |
Set-ExecutionPolicy -ExecutionPolicy RemoteSigned -Force |
The next step is to unzip the POSHToolkit.zip. In that file you will find the folder Functions and the ones with SQLPSX functions. Copy all these folders to the path %WindowsUserProfile%\ÂDocuments\ÂWindowsPowerShell\ÂModules.
An important detail is that, for this function module to work in your computer, then SSMS should be installed or at least the SMO library.
Our final step is to configure the profile. We will use the load order 4 in Table 2 above, the profile that is applied to only to the current user and host. To perform this operation type:
|
1 |
Notepad $Profile |
If the profile are already created will load it, if not will ask to you to create as show in the Figure 4 :
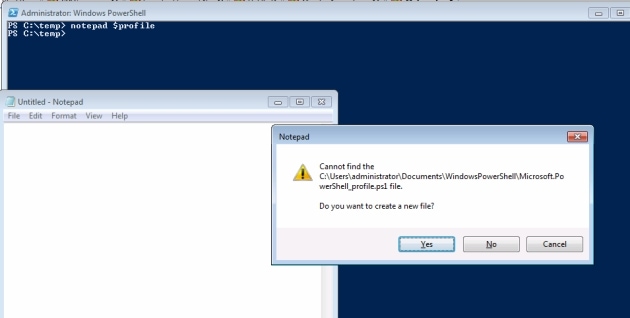 If this is the case, then just choose ‘Yes‘ and in the notepad type :
|
1 2 3 |
Import-Module SQLServer -Force -DisableNameChecking Import-Module Agent -Force -DisableNameChecking Import-Module Functions -Force -DisableNameChecking |
Note: Here we are only loading the SQLPSX modules that will be used in the series of articles. To import all of them remove the first three lines and replace them with Import-Module SQLPSX -force
Save the file and done. Your profile is created. Just to check if all goes well, open a new PowerShell Session and type:
|
1 |
Get-Module |
The output should be:
|
1 2 3 4 5 6 |
ModuleType Name ExportedCommands ---------- ---- ---------------- Manifest SQLServer {Get-SqlDatabaseRole...} Manifest Agent {Get-AgentTargetServerGroup...} Script Functions {Export-Xls, New-TiedVariable...} Manifest ShowMbrs {Get-ShowMbrs, New-ShowMbrs...} |
Some of the solutions in this series use functions made by some well-known names in SQL Server and PowerShell as we saw above. All of these functions give credit to these authors, and I would like to thank these people explicitly for their effort to support our community. The table 8 shows the functions and who created them:
|
Cmdlet |
Author |
|
SQLPSX, Write-DataTable, Out-DataTable, Invoke-SQLCmd2 |
Chad Miler (@cmille19) |
|
Get-DiskSpace |
Aaron Nelson (@sqlvariant) |
|
Export-Xls |
Luc Dekens (@lucD22) |
|
New-Zip,Copy-ToZip |
PowerShellPack |
|
Convert-CSVToExcel |
Boe Prox(@proxb) |
|
Split-Job |
Arnoud Jansveld |
Table 8: Types of PowerShell profile
In many of the scripts that this series of articles describes, we will need to use a list of Servers Name and a list of SQL Server Instances Names. To standardize, we will create a folder called c:\PoshForSQLServer2012 and inside it two text files called Servers.txt and SQLInstance.txt and all the examples will use it.
You can do the same with your environment and the structure for both is just to provide the name of the Server, or the SQL Server Instance, one-per-line, one below the other as we can see in the Figure 5:
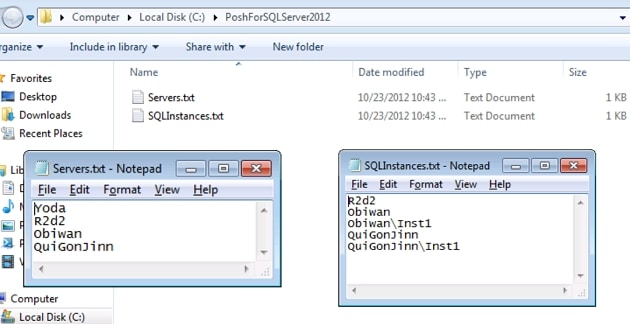
Figure 5 – Text files with the Servers and SQL Server Instance names used in this series of articles.
Now your environment is set up. Let the fun begin.
Note: PowerShell 3.0 introduces the auto load feature. It means that if you have the module in any of the paths of $psmodulepath variable, and you refer to any it cmdlet/function/script, it will be automatically loaded.
There are many other concepts to study, such as PowerShell drivers and providers, worfkflows in the 3.0 etc… But I believe that these are the most core concepts.
Summary.
Uffa!!! This article was wearing to write, but essential. I hope it wasn’t wearing to read! We saw that PowerShell is already installed in recent versions of Windows, both client and server. We also commented on the power of remote administration on a day-to-day of the DBA professional using PowerShell.
We described the basic concepts of PowerShell cmdlets and saw that they are not good to eat, but are actually PowerShell commands, and are the way you will speak to PowerShell. We understand that everything in PowerShell is an object. We discussed an object, class and properties.
After that, we went a little deeper into the idea of cmdlets and why their naming conventions are so important. We saw that we can use aliases for them, to make them easier to identification and use.
We touched on the the concept of pipelines between cmdlets was, and illustrated this with examples using some important built-in cmdlets such as Get-Help and Get-Member.
The next step was to see that functions are most easily used, managed, shared and reused by using Modules, in our case the Script Module. We also saw that the environment can be set up and used whenever you start a PowerShell session using the profiles and, by default, we cannot run scripts until we specify a suitable policy for their execution.
Finally with all these concepts, we setup the environment to use the series’ examples. In the next article we will begin to really see how the PowerShell applies to SQL Server 2012 with the concepts of SQL Server PowerShell, or SQLPS.
Load comments