
Exploratory Testing is a hands-on approach in which testers are involved in doing as little planning as possible for the maximum of testing. As Agile techniques evolve and DevOps becomes more common, tests are being done by a wider range of stakeholders including managers, developers and testers. With more people getting involved with testing, the old specialist tools are becoming less appropriate because they require specialist knowledge and skills in the mechanics of issue-reporting. There is room in application development for a tool that doesn’t require extensive training and which helps the agile team to increase the productivity of test-runs and bug-hunts in a way that makes it more enjoyable for the participants. The Exploratory Testing tool, which is a Chrome plugin from Microsoft, attempts to provide solution for this requirement.
Installation from Marketplace
You can install the Exploratory Testing tool from Visual Studio Marketplace and the Chrome Web Store. You will need to open the marketplace in Chrome and use the ‘exploratory’ search term under the ‘Visual Studio Team Services’ product.

Select the ‘Exploratory Testing’ item and click on Install to install the tool.
Connect to TFS
The Exploratory Testing tool supports two different modes; ‘Connected’ and ’Standalone’. When you are in ‘connected’ mode, the tool will connect to Team Foundation Server (TFS) or Visual Studio Team Services (VSTS) and the work-items are created directly in TFS/VSTS. In this article, we will be exploring the connected mode and showing how we can log the bugs we find, and create test cases using the tool.
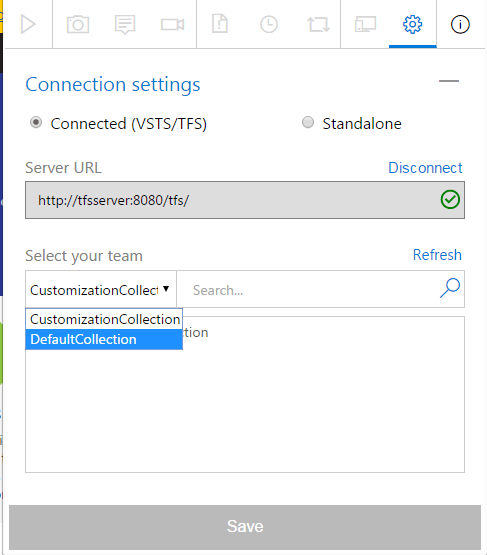
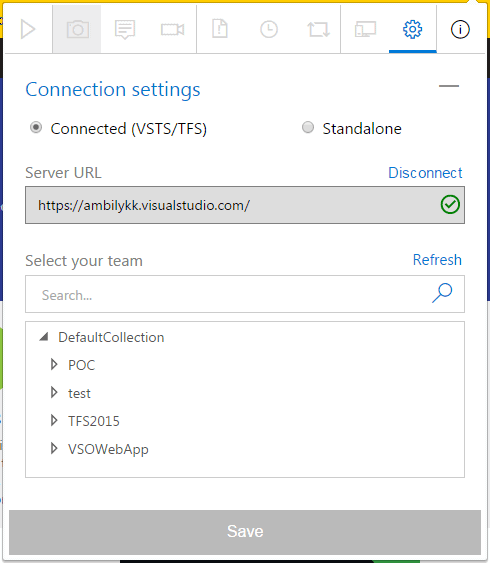
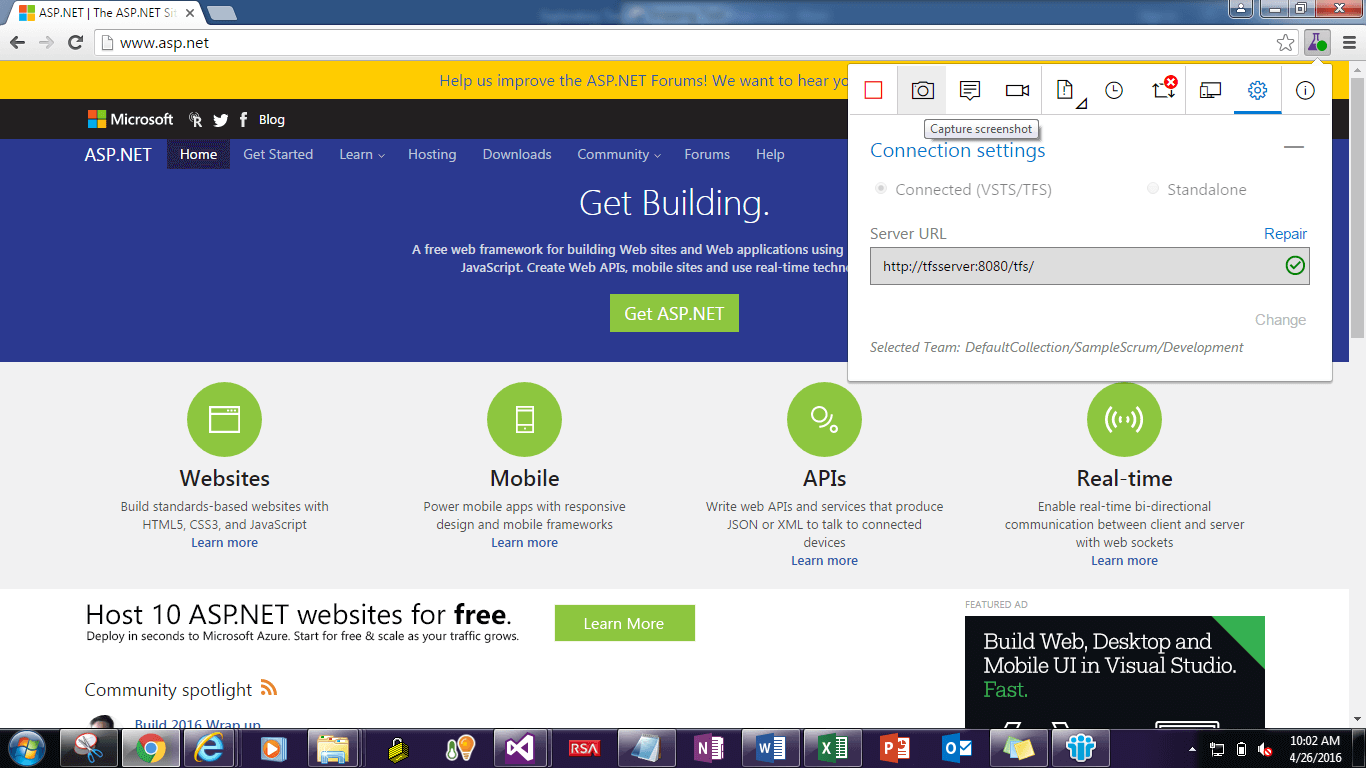
To put the tool into ‘connected’ mode, click on the Exploratory Testing plugin icon in Chrome to invoke the options. Click on the settings (  ) icon, if not selected. Select the Connected(TFS/VSTS) option from the Connection settings and provide the TFS server URL as shown below.

Click on ‘Next’ to connect to the TFS server. If you have already established the connection with TFS server or are connecting via the TFS web access, it will not prompt for the authentication. Otherwise, the system will prompt for credentials in order to connect to TFS server. Provide the TFS access credentials, if required, and continue.
Once you are connected, the tool will list all the project collections to which you have access. We can select the appropriate project collection from the list of project collections.
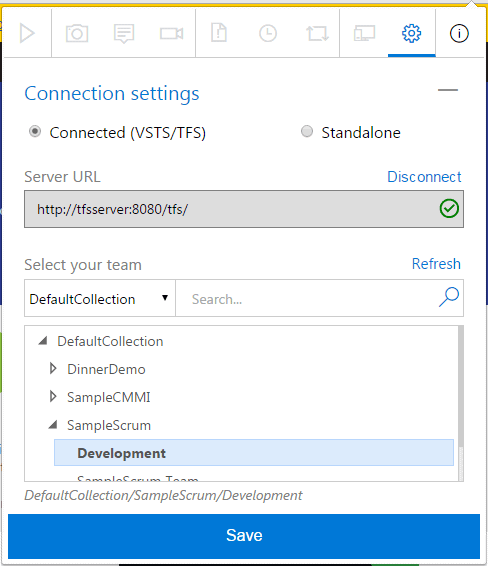
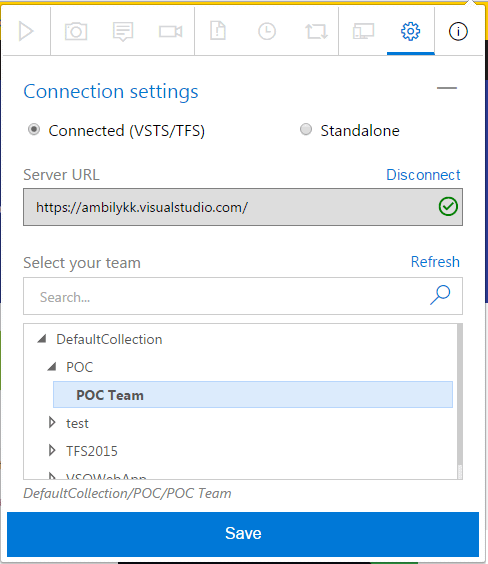
Projects under the selected project collection will be displayed within a tree view with the selected project collection as the root node. Expand or select the project against which we are planning to perform the Exploratory Testing. This will display the teams created under the project. Select a team to create the work-items against the team. Once the work-items like bug, task created, it will appear in the product backlog of the selected team.
If you have many projects and teams, you can use the Search box near to the project collection dropdown list in order to filter or locate the project/team.
Select the project team and Click on ‘Save’ to complete the TFS project configuration.
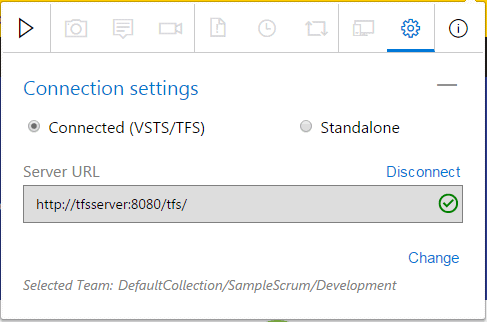
If you need to, you can change these settings by using the Change option or link provided. If you want to connect to a different TFS/VSTS server or want to work in Standalone mode, select the Disconnect option/link.
Connect to VSTS
Visual Studio Team Services (VSTS) is the cloud-based TFS offering from Microsoft. For more details on VSTS, please refer Visual Studio Team Services.
The Exploratory Testing tool supports both TFS and VSTS for work-item management. You can connect to VSTS in the same way we connected to TFS.
Go to the Connection Settings screen, select the ‘Connected (TFS/VSTS)’ option and provide the VSTS URL as the server URL.

Click on the ‘Next’ button, which will invoke the live id authentication screen, as shown below. Provide the live account associated with the VSTS account and then authenticate.
Once you are connected, the tool will display a list of the projects under the project collection. The VSTS server URL you have entered in the ‘connection settings’ window refers to a single project collection, but TFS will have set of project collections associated with it. As shown below, we don’t have the project collection drop-down list in case of VSTS connection.
Select the project and the team for which you are planning to perform the Exploratory Testing.
Click on ‘Save’ to connect with VSTS.
New session
Now that you are connected, you can start a new Exploratory Testing session. Open the Chrome browser and navigate to the web application that needs to be tested.
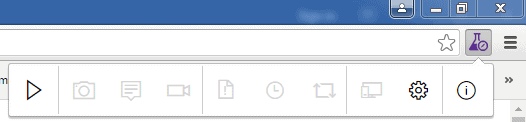
Once the Exploratory Testing tool is connected to TFS/VSTS, or is used in Standalone mode, (as you’ve already selected under Connection Settings), the Start Session icon (  ) will be enabled.
Click on the Start Session icon to start the testing session.
For the sample, we will use the www.asp.net site.
Once the session started, all the other icons such as screenshot capture and video recorder will get enabled.
Capture screen-shot
We can capture screen-shots of the application using the Capture screenshot (  ) icon. Click on the icon to start the screen capture. Using the screen capture handler, we can select the complete or portion of the screen as shown below.
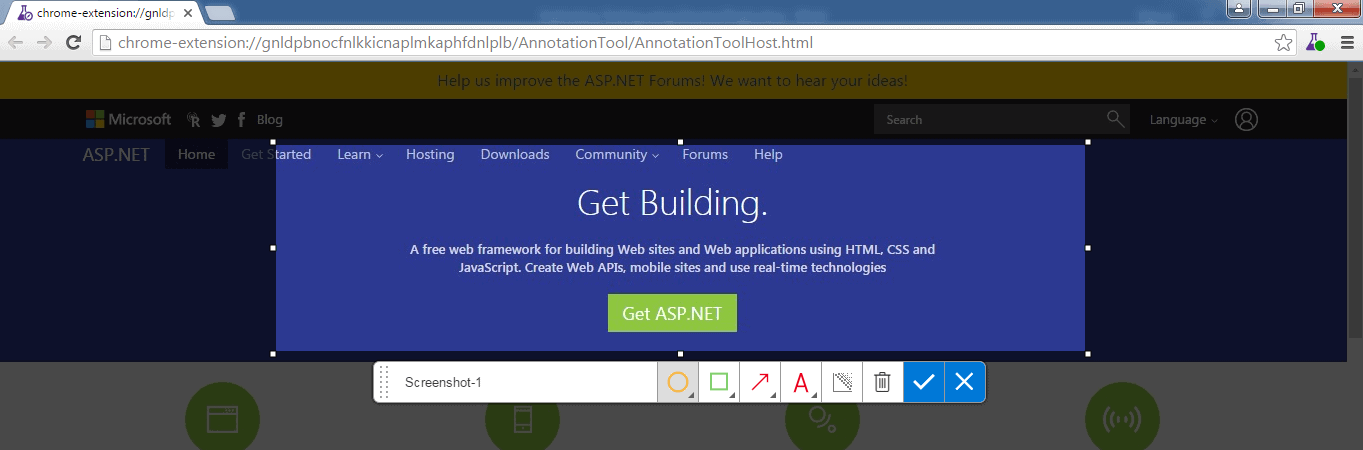
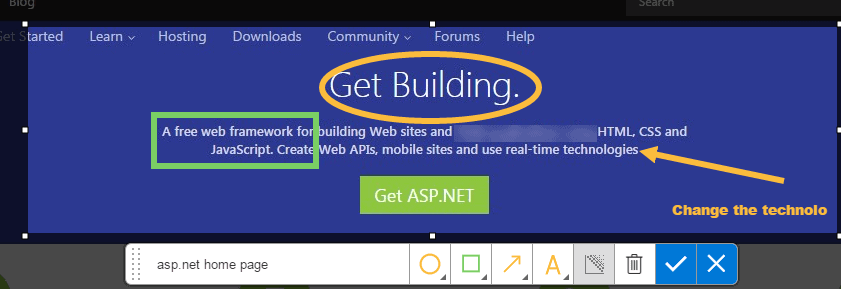
Select the area of the screen where we found some defects or something that requires to be improved. We can use various markers and highlighters that are available in the screen-capture toolbox to point to the objects or areas.
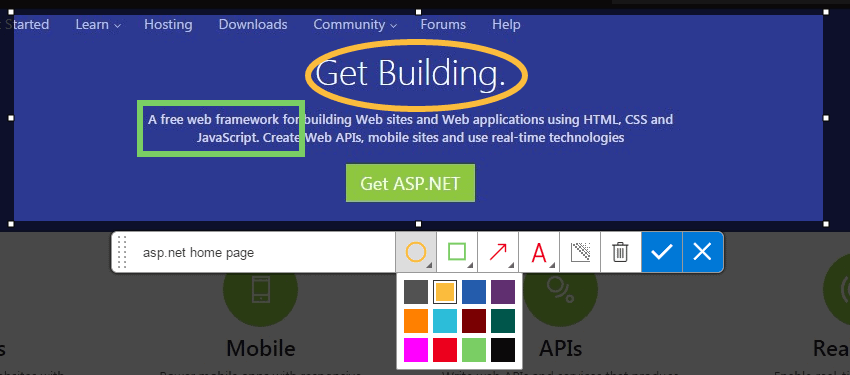
In this screenshot, we have used the eclipse and rectangle tools to highlight specific areas. As shown above, we have the option to select the color for the eclipse, rectangle, arrow and text.
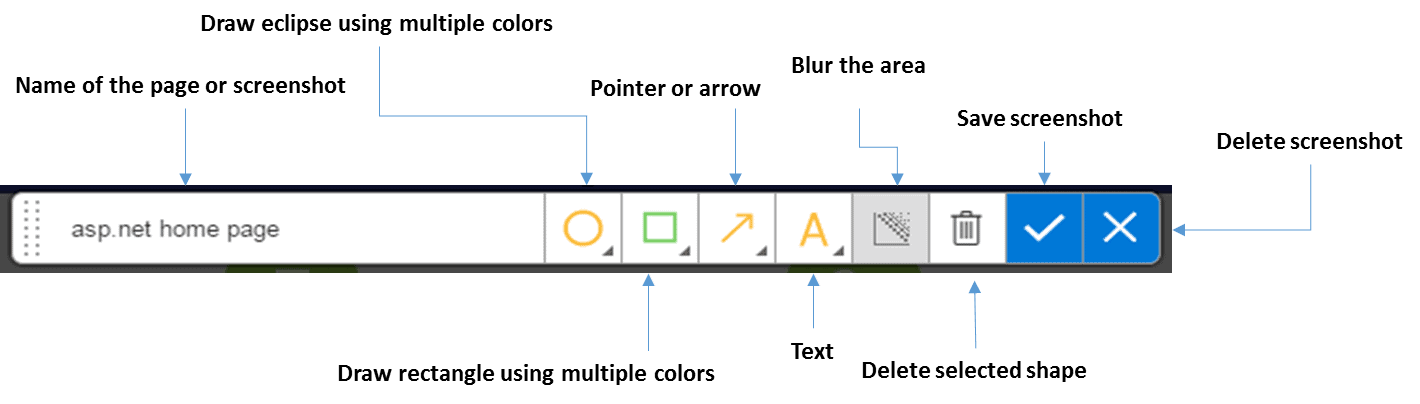
Capture Screenshot Toolbar
The ‘Capture Screenshot Toolbar’ provides various options to capture the screenshots along with whatever annotations are required. The options available are:
- Name: Allows you to name the screenshot properly to identify it later
- Draw eclipse: helps to draw an eclipse in the selected screen portion
- Draw rectangle: draws a rectangle over any part of the image
- Arrow: draws an arrow to point any object in the screen
- Text: helps to annotate or add text description in the screen itself
- Blur: Blurs the area of the screen. This will be useful to hide the secret information such as personal identification details, subscription keys, etc.
- Delete: Deletes an already-added shape
- Save: Saves the screenshot as part of the exploratory test session
- Delete: Removes the screenshot from the report
This figure shows the result of using the different toolbox feature such as blur, rectangle, text, arrow and rectangle.
Save the screenshot as part of the Exploratory Testing session using the Save option from the toolbar.
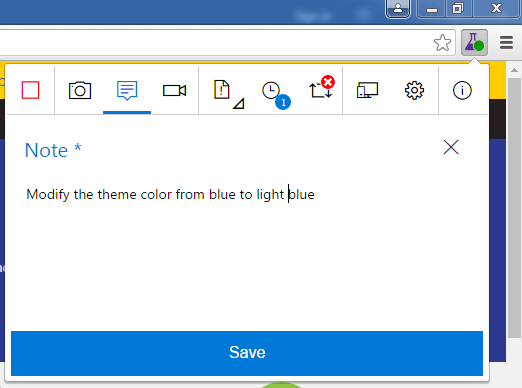
Add note
We may need to add specific notes as part of the Exploratory Testing session to explain the process or steps followed in the testing process. We can use the Add note (  ) icon from the Exploratory Testing tool for adding a new note.
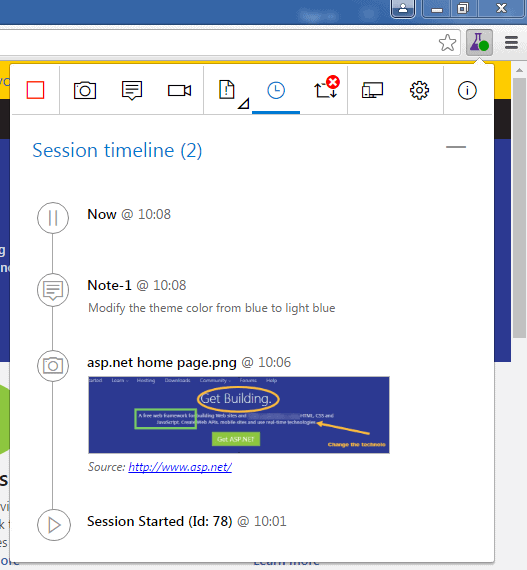
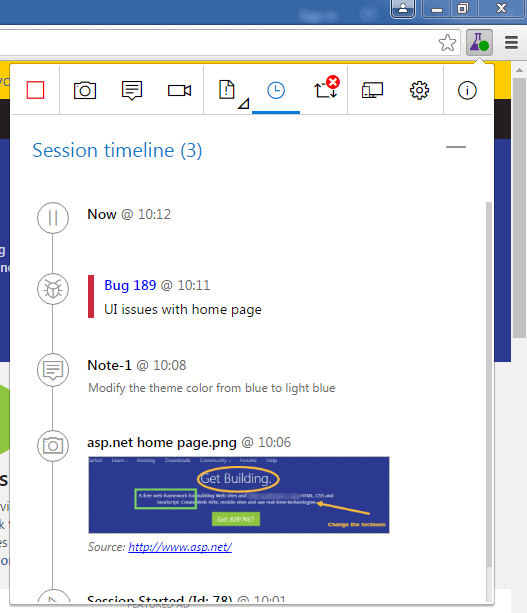
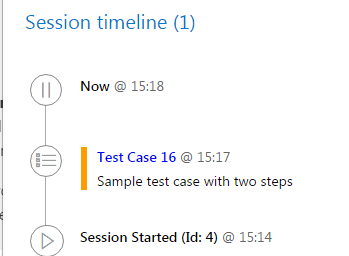
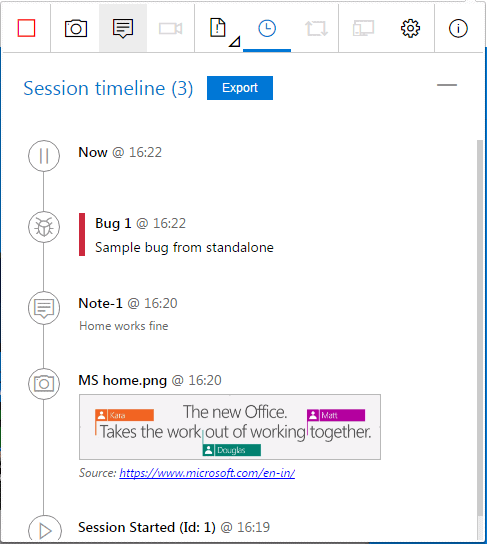
View session timeline
You can review, or see what we did, as part of the session by selecting the View session timeline (  ) icon. The following figure shows a session timeline with one screenshot capture and note.
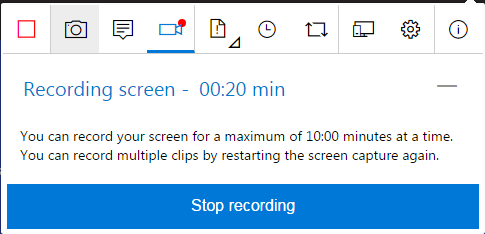
Record screen
Screenshots may not able to capture the navigational issues or the rich UI elements as expected. If you hit a problem like this, the Exploratory Testing tool offers another option for showing what the bug was: you can record the screen. Invoke the screen recorder by clicking on the Record screen (  ) icon.
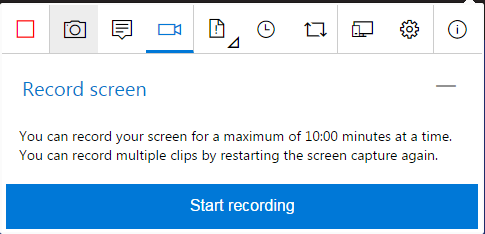
We can record for a maximum of ten minutes, so if you need to record more than this you can split the recording into two different videos.
Click on ‘Start recording’ to capture the screen navigations properly.
The Start Recording button will open the ‘Share Screen’ popup window. This window will display all applications opened in our system like pdf documents, PowerPoint presentations, browser windows along with an option to share entire window. In following screen shot, I can share any of the displayed items like the browser window with asp.net site, pdf file, calculator, presentation, document file or the entire screen.
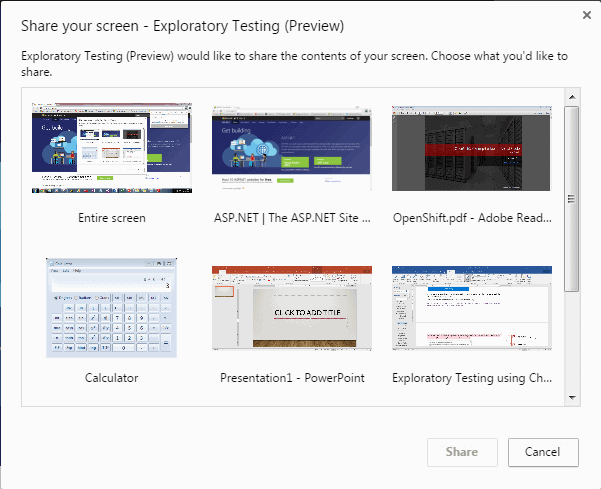
Note: This option helps us to do exploratory testing for a windows application or application running on another browser window like internet explorer. All other options are restricted to chrome browser only.
Once the actions or navigations are complete, open the Exploratory Testing tool and select ‘stop recording’.
If you need to check the recording, move to the session timeline and view the recording that has been added to the timeline
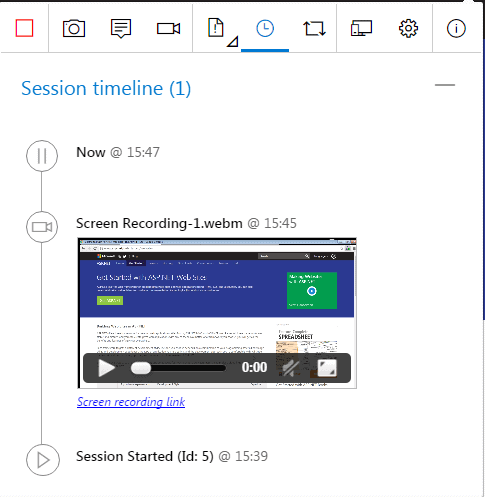
Click on the ‘Screen recording link’ to play the recording.
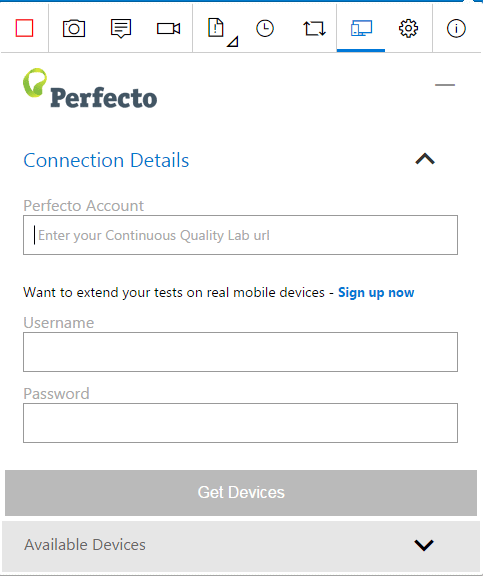
Connect to Device
If you need to test the Responsive web design (RWD) of a new web application development, you can check the multi-device support for your application. The Exploratory Testing tool has an integration with Perfecto. Launch the device connection using the Connect to Device (  ) icon.
Perfecto is the leader in Mobile Front-end test automation. For more details about Perfecto, please refer https://www.perfectomobile.com/
Stop Session
Click on the Stop session (  ) icon to stop the testing session. This will clear the captured details and clean the timeline.
Create a Work-item
Once we identify a new bug or task, we can directly create the work-item from the Exploratory Testing tool.
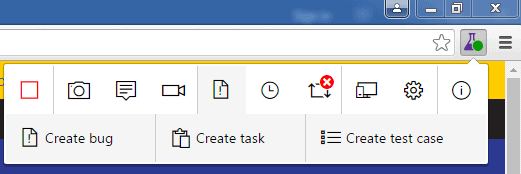
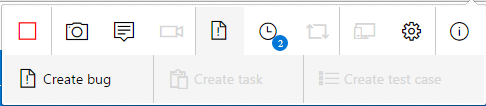
Create Bug
Expand the Create bug (  ) icon to view other options such as ‘Create task’ and ‘Create test case’.
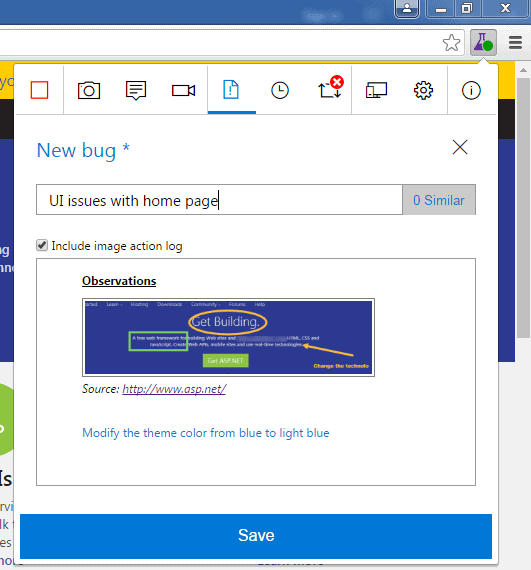
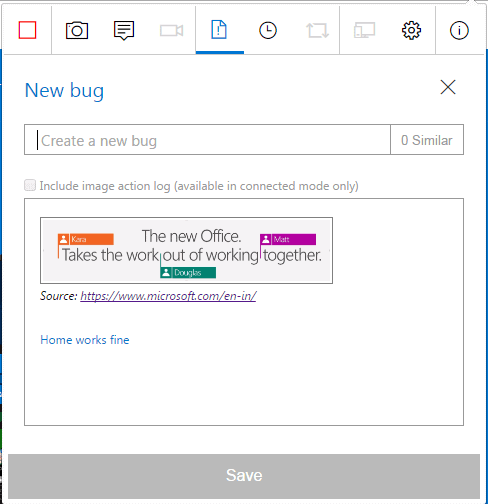
Click on the ‘Create bug’ option to create a rich bug by adding all the details captured as part of the timeline. Provide the bug title in the ‘New bug’ window and select ‘Save’ to create the bug.
Click on the Session timeline to view the details
Open the TFS Web Access and you should see the bug (id: 189). The Exploratory Testing tool created a bug with all the captured screenshots and notes included.
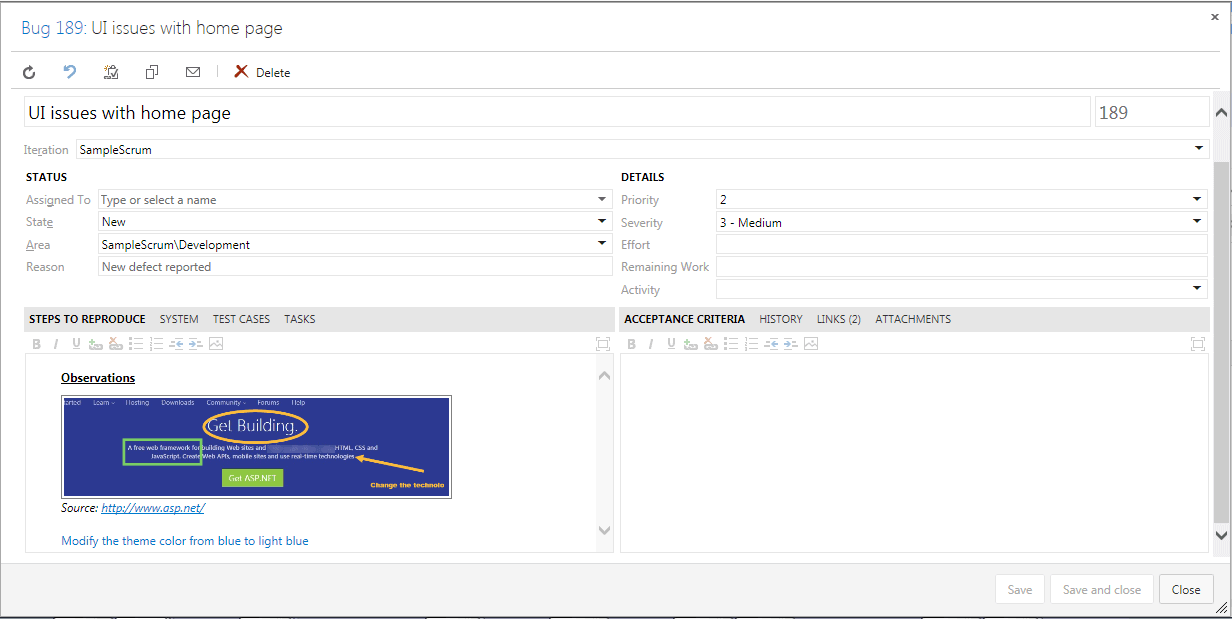
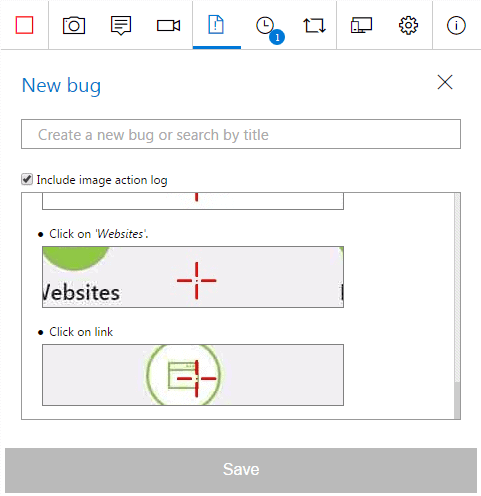
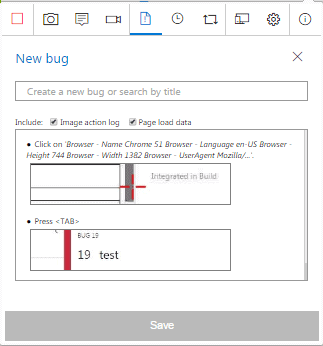
Image Action Log
When we create a work-item, we have the option to include the image action log. If we select the checkbox “Include image action log”, this will include all the actions performed on the screen such as the selection of a URL, clicking a link. In the below figure, the user clicked on the ‘Websites’ link/button on the screen. This option will be helpful to record the test steps.
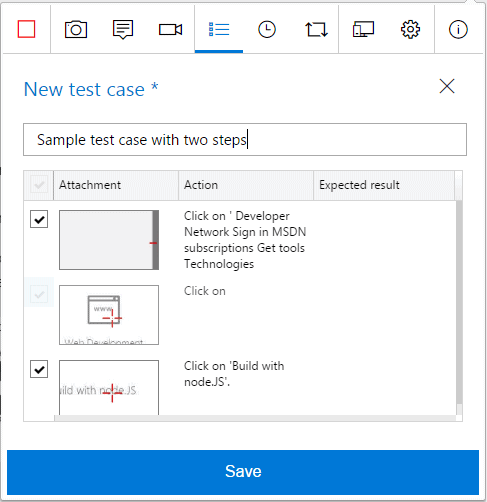
Create Test case
We can create the test case directly from the Exploratory Testing tool. Expand the ‘Create bug’ icon and select the ‘Create test case’ option. Provide the title for the test case and select the actions or steps that should be included in the test case.
For creating the test case, we selected only two actions/steps out of the three actions. Click on ‘Save’ to create the test case.
Check the test case id from the timeline and verify the same in TFS/VSTS.
Open the test case with id 16 and you should see the steps added to it. As we selected only two actions, the newly-created test case will have only two steps as shown in next figure.

Create Task
Just like the bug and test case, we will be able to create tasks from the Exploratory Testing tool. As tasks are not related to the actions performed in the application, we are unchecking the ‘Include image action log’ checkbox and creating a task using the screenshots and notes only.

Click on ‘Save’ to create the task. Get the task id from timeline and verify it in TFS/VSTS
Explore Work-items to link
New work-items such as a bug, task and test case may link to an existing work-item. For example, a newly-found bug is related to an existing test case. Exploratory Testing tool provides an option to explore the existing work-items for linking to the new ones.
Select Explore work-items to link (  ) icon and search for an existing work-item. In the following figure, we are searching for a work-item with the text “test”.
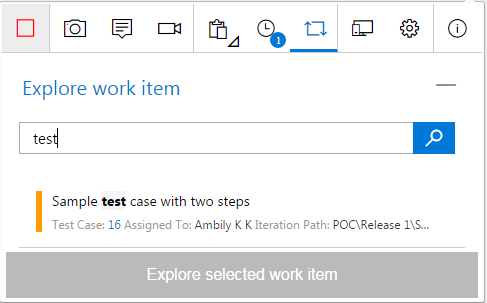
Select the appropriate work-item from the search result and click on ‘Explore selected work-item’. This will link your session with the selected work-item, in our case test case 16.
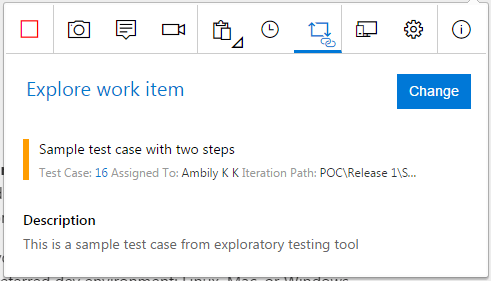
We will now create a new bug and verify the link with test case 16 from the timeline.
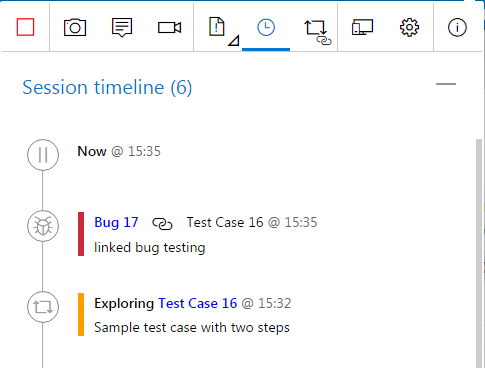
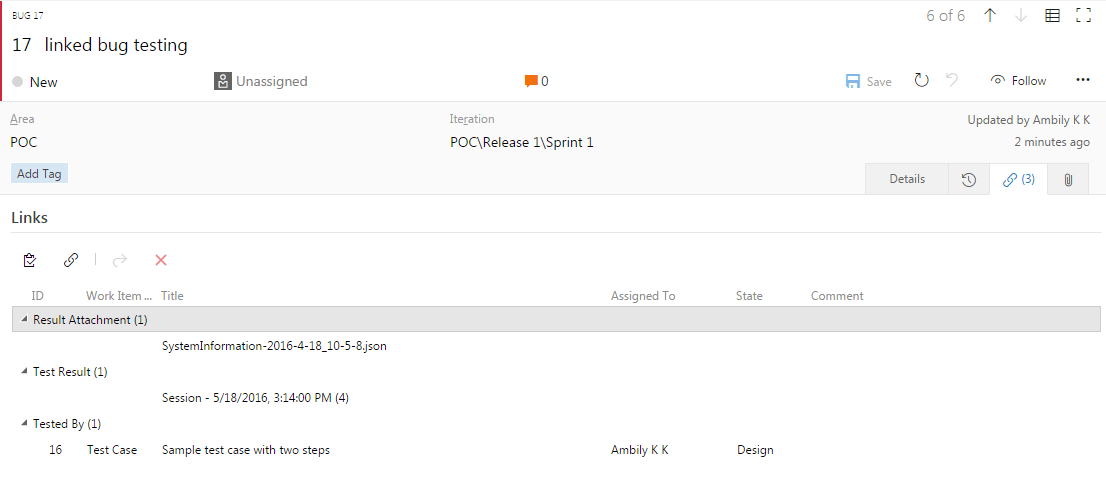
Now we’ll open the bug 17 from VSTS and verify whether the link is working or not. As you can see in the next figure, test case 16 is linked to our newly created bug 17 along with system information and test results.
Standalone mode
Standalone mode is for everyone to explore the power of the Exploratory Testing. Anyone can test the application in either connected or disconnected mode. Irrespective of whether you have your defect management in TFS or HP ALM, we can use the Exploratory Testing tool for capturing rich defect information.
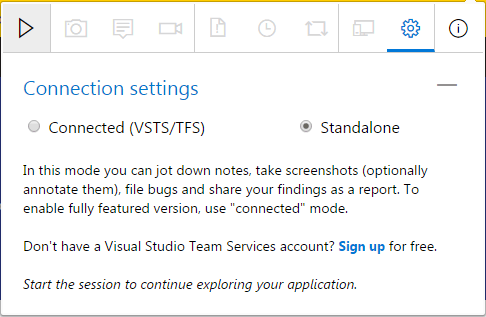
If you don’t have TFS or VSTS set up, select Standalone mode from Connection settings.
Start the session and perform the operations I’ve already described. Once the testing is complete, select the Export option available under Session timeline to export the session report.
Only the ‘Create bug’ option is available in Standalone mode compared to the connected mode.
Create a bug and you’ll notice that the image action log is available only for connected mode.
Move to timeline and select ‘Export’ to export the session details.
This will export the captured details, bugs and other information into an html file.

You can use this file to file bugs in the defect tracking tool or share with teams to fix the same.
Error Fix
While doing the Exploratory Testing, if you find any of the issues I’m about to illustrate, please go to ‘Connection Settings’ page and select the ‘Repair’ option.
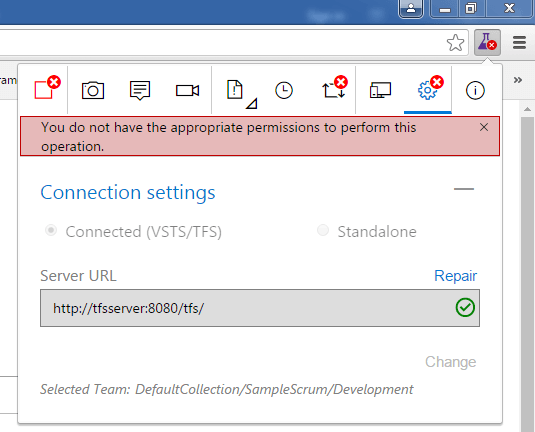
This action may cause the application to prompt for the TFS/VSTS authentication. Provide the required credentials to reconnect to the server.
Update
Introduced a new feature to capture the page load data, which captures page load data along with timing of the resources loaded for your web application.
Page load data will be added as part of the work-item as System info, which provides more information about the environment where the defects found.

Conclusion
With the ‘Exploratory Testing using Chrome’ plugin, team members including project managers can test the application from anywhere, and capture the bugs in a more appropriate and consistent format. This handy tool reduces the complexity of defect-management and test-management tools. Moreover, it helps the managers to create tasks on the fly. It is likely that we can expect more integrations and features in upcoming versions of Exploratory Testing tool.