
This article is part of Greg Larsen's continuing series on Learning T-SQL. To see all the items in the series, click here.
Before data can be read from of a SQL Server database table, the table needs to contain rows of data. One of the most typical ways to get data into a table is to use the INSERT statement. One row or multiple rows can be inserted with a single execution of an INSERT statement. You can even use the output of a stored procedure to insert rows. In this article, I will explore the basics of inserting data into a SQL Server table using the INSERT statement.
Syntax of the basic INSERT statement
As with most SQL Server commands, there are multiple ways to use them. The INSERT statement is no different. For this article, let’s review the syntax of the basic INSERT statement found in Figure 1.
|
1 2 |
INSERT [INTO] <object >[ (<column_list>)] VALUES (<value_list1>)[,(<value_list2>)…,(<value_list N>)]; |
Figure 1: Basic Insert statement
Figure 1 only contains the syntax for the basic INSERT statement. For the complete syntax of the INSERT statement, refer to the Microsoft Documentation. You will see that there is quite a bit more syntax available, but in this article, I will include only the basics.
The object is the name of the table or view in which a single row or multiple rows will be inserted. The column_list contains the comma delimited names of the columns that will be populated with values identified in the VALUES parameter. The column_list is only required if a subset of the object’s columns is populated with values, although it can also be included if all the columns in the table are being populated.
value_list1 will include the values used to populate the columns inserted in the first row. If multiple rows are inserted with a single INSERT statement, then value_list2 through value_listN will be used to identify the additional sets of values for any other rows to be inserted.
A few examples are provided to better understand how to use this basic syntax to insert data into a SQL Server table.
Creating table to insert rows of data
Before the examples in this article can be executed, a target table for insert rows needs to be created. The code in Listing 1 will create that table.
|
1 2 3 4 5 6 7 8 9 |
USE tempdb; CREATE TABLE dbo.Cars ( CarID tinyint NULL, Manufacture varchar(30) NULL, Model Varchar(30) NULL, ModelYear int NULL, PurchaseDate date NULL ); |
Listing 1: Code to create target table
The code in Listing 1 creates a table named dbo.Cars, that will be created in the tempdb database. If you want to follow along and run the example code in this article, then run the code in Listing 1 to create the dbo.Cars table on your SQL Server instance. Any database, even tempdb as included in the code, will suffice.
Populating each column in a table
An INSERT statement can be used to insert a value for every column in a table, or a subset of columns. In this section, two examples will be shown that populate values for all the columns in the dbo.Cars table. The code for the first example can be found in Listing 2.
|
1 2 3 4 5 6 |
INSERT INTO dbo.Cars (CarID, Manufacture, Model, ModelYear, PurchaseDate) VALUES (1, 'Ford', 'F250', 2017, '2021-11-25'); |
Listing 2: Populating each column using the column list parameter
The code in Listing 2 inserts a single row into the dbo.Cars table. This INSERT statement uses the optional column_list parameter, which in this case identifies every column in the table. Since every column in the dbo.Cars table is being populated, the column list is not required. But including the column_list parameter is a common practice for clarity and reducing breaking changes as it allows new columns with DEFAULT constraints to be added without affecting existing code.
The VALUES clause in Listing 2 contains only the value_list1 parameter since only one row is being inserted. The first value in column_list1 specifies the numeric value 1. This value will be used to populate the first column identified in the column_list, which in this case is CarID. The second column in the column list Manufacture is populated with the second value in column_list1 parameter, “Ford”. Each of the following values in value_list1 are used to populate each additional column listed in the column_list parameter.
The code in Listing 3 shows adding a second row to the dbo.Cars table, where every column is populated with a value. But this example doesn’t include the column_list parameter.
|
1 2 |
INSERT INTO dbo.Cars VALUES (2, 'Subaru', 'Outback', 2019, '2018-12-31'); |
Listing 3: Populating each column without using the column_list parameter
When no column_list parameter is specified, the values in the column list must be specified in a specific order to ensure the correct column gets populated with the correct value. The order to specify the values is based on the column’s ordinal position in the table. The first value specified places a value in the first column in the table, the second value goes in the second column, and so on.
Populating only a few columns with an INSERT statement
There are times when a row needs to be inserted, but there are no values available for every column in the table. For instance, suppose the dbo.Cars table tracks the inventory of cars on a car dealer’s parking lot. Typically, cars on a car lot have not yet been purchased. Because of this, the purchase date for a car will not be known until the car is bought by a customer. You can create a new row in the dbo.Cars table without including a value for the PurchaseDate column, the INSERT statement in Listing 4 can be run. The value will either be NULL or use a DEFAULT constraint value if one exists.
|
1 2 |
INSERT INTO dbo.Cars (Manufacture, Model, ModelYear, CarID) VALUES ('Chevrolet', 'Suburban', 2005,3); |
Listing 4: Inserting a row without populating the PurchaseDate column.
In Listing 4, a new Chevrolet Suburban was added to the dbo.Cars table, without a purchase date. The code in Listing 4 didn’t have the PurchaseDate column listing in the column list parameter or a matching purchase data value in the VALUES parameter. Therefore, this INSERT statement populated all columns but the PurchaseDate column.
One other thing worth mentioning about Listing 4 is the first column listed in the column_list and first value listed value_list1 parameters are not for populating the first column, ordinal position-wise in the dbo.Cars table. The first ordinal column in the dbo.Cars table is CarID, which is specified last in the column_list of this example. Therefore, this example demonstrates that the columns listed in the column_list parameter and value list don’t have to be specified in the ordinal position order relative to the other column/value pairs listed. If you’d like to know the ordinal positions of each column in the dbo.Cars table, then you can run the code in Listing 5.
|
1 2 3 4 |
SELECT column_id, name FROM sys.columns WHERE OBJECT_ID = OBJECT_ID('dbo.Cars') ORDER BY column_id; |
Listing 5: Showing the original position for columns
To verify that each column was populated with the correct value and the PurchaseDate column didn’t get a value the code in Listing 6 can be run.
|
1 |
SELECT * FROM dbo.Cars where CarID = 3; |
Listing 6: Reviewing the row inserted by the code in Listing 4
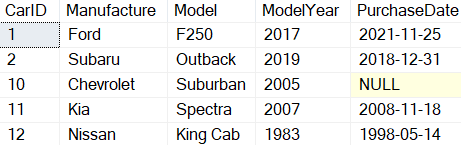
In Report 1 is the output when the code in Listing 6 is executed.

Report 1: Output produced when Listing 5 is executed
Report 1 shows the PurchaseDate column value was not populated with a value. Plus, all the other columns were correctly populated even though the columns in the column_list parameter were specified in a different order then their ordinal position in the dbo.Cars table.
Automatically generating an identity column value when inserting rows
A table definition might have at most one column identified as an identity column. When a column has been defined as an identity column, the values assigned for the column will typically be automatically generated when each new row is inserted. The values generated are based on the seed and increment value associated with the identity column. The seed value identifies the value of the identity column for the first row populated. Whereas the increment value identifies the value that will be added to the previous inserted identity value to obtain the next identity value.
When an identity column is defined on a table, the value for that column can’t be manually populated with an insert statement. In order to demonstrate this, the dbo.Cars table will need to be dropped and recreated by running the code in Listing 7.
|
1 2 3 4 5 6 7 8 9 10 11 12 |
USE tempdb; GO DROP TABLE dbo.Cars; GO CREATE TABLE dbo.Cars ( CarID tinyint identity, Manufacture varchar(30), Model Varchar(30), ModelYear int, PurchaseDate date ); |
Listing 7: Dropping and recreating dbo.Cars table
In Listing 7, the new dbo.Cars table created specified that the CarID column is an identity column without specifying an seed and increment value. When the seed and increment values are not identified, the default values of 1 will be used for the seed and increment values. The seed value is the first value used, and the increment is how much will be added to the previous value for the next value.
If an INSERT statement tries to manually insert an identity column value, an error will occur. To demonstrate this, the code in Listing 2 can be executed again. This second execution produces the error shown in Report 2.
![]()
Report 2: Error received when inserting row
This error occurs because the code in Listing 2 tried to insert the value “1” into the identity column while the IDENTITY INSERT property for the dbo.Cars table is set to off. Before discussing this property first let’s show the correct way to automatically insert rows when a table contains an identity column.
The code in Listing 8 demonstrates how to automatically generate identity column values when using the basic INSERT statement without providing the value for the CarID column.
|
1 2 3 4 5 6 7 |
INSERT INTO dbo.Cars (Manufacture, Model, ModelYear, PurchaseDate) VALUES ('Ford', 'F250', 2017, '2021-11-25'); INSERT INTO dbo.Cars VALUES ('Subaru', 'Outback', 2019, '2018-12-31'); SELECT * FROM dbo.Cars; |
Listing 8: Automatically generating identity values when inserting a row
Report 3 shows the output from SELECT statement when Listing 8 is run.

Report 3: Output when Listing 8 is run
The code in Listing 8 has the INSERT statements that were included in Listing 2 and 3, but with one exception. It doesn’t contain the CarID column in the column list parameter. Report 3 shows how the identity value on the first row inserted was assigned the value 1 and the next row inserted got an identity value of 2.
IDENTITY_INSERT property and manually assigning identity values
Identity value can be assigned manually if needed. It is generally not a good practice to manually insert identity values. But there are times when you might need to assign an identify column manually, like if you need to recreate some missing data (for example an errantly deleted row).
To do this, the IDENTITY_INSERT option needs to be turned on for the table in which identity columns are going to be inserted. To demonstrate this, execute the code in Listing 9.
|
1 2 3 4 5 6 7 |
SET IDENTITY_INSERT dbo.Cars ON; INSERT INTO dbo.Cars (CarID,Manufacture, Model, ModelYear) VALUES (10,'Chevrolet', 'Suburban', 2005); SET IDENTITY_INSERT dbo.Cars OFF; SELECT * FROM dbo.Cars; |
Listing 9: Manually inserting an identity value.
This code first turned on the IDENTITY_INSERT property on dbo.Cars table using a SET command. Turning on IDENTITY_INSERT tells the SQL Server database engine that an INSERT statement will supply the identity value in an INSERT statement. The INSERT statement in Listing 9, inserts a new dbo.Cars row, and supplies value of 10 for the CarID column. Lastly, the code uses another SET command to turn off the IDENTITY_INSERT property.
Note: The best practice is to turn on IDENTITY_INSERT just before inserting identity values and turning it off immediately following the last INSERT statement that assigns an identity value.
Report 4 shows the output produced when the SELECT statement is Listing 9 was executed. See how the third row has a value of 10 for the CarID column.

Report 4: Output when Listing 9 was executed
Care should be taken when manually setting identity values because it is possible to insert a row with an identity value that already exists.
When identity values are assigned manually, SQL Server keeps track of the highest identity value added. It then uses this highest value to generate the next identity value when a new row is inserted (this is demonstrated in the next section).
Add multiple rows to a table using a single INSERT statement
Prior to SQL Server 2008, only one row could be added to a table using the VALUES clause of an INSERT statement. With SQL Server 2008 or above, multiple rows can be inserted using a single INSERT statement when it contains multiple items in the VALUES clause. The code in Listing 10 shows how to insert 2 new rows into the dbo.Cars table with a single INSERT statement.
|
1 2 3 4 5 |
INSERT INTO dbo.Cars (Manufacture, Model, ModelYear,PurchaseDate) VALUES ('Kia', 'Spectra', 2007,'2008-11-18'), ('Nissan','King Cab',1983,'1998-05-14'); SELECT * FROM dbo.Cars; |
Listing 10: Inserting two rows with a single INSERT statement
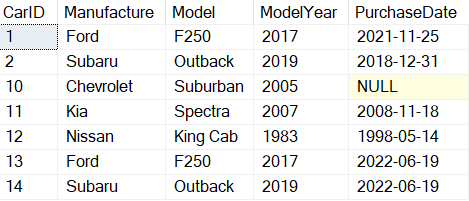
By reviewing Listing 10, you can see there are two different sets of values listed in the VALUES parameter. Each set of values is contained inside a set of parathesis, with a comma between them. When Listing 10 is executed, two rows will be inserted. The SELECT statement in Listing 9 produced the output in Report 5.
Report 5: Output when Listing 9 is run
The last two rows, with identity values 11 and 12, were the ones added with the single INSERT statement.
Using a SELECT statement to feed an INSERT statement
In all the examples so far, the values for each new row added were supplied by using the VALUES parameter. But that is not the only way to provide values. A SELECT statement can also provide new row values for an INSERT statement, as is shown in Listing 11.
|
1 2 3 4 5 6 |
INSERT INTO dbo.Cars(Manufacture, Model, ModelYear,PurchaseDate) SELECT Manufacture, Model, ModelYear, SYSDATETIME() FROM dbo.Cars WHERE CarID = 1 OR CarID = 2; SELECT * FROM dbo.Cars; |
Listing 11: Using a SELECT statement to identify values for new rows
In Listing 11, a SELECT statement was used to select the column values for two rows from the dbo.Cars table that have CarID values 1 and 2. The two rows selected provided the values for the INSERT statement. The last two rows added can be seen in Report 6.
Report 6: Output when code in Listing 11 was executed
The rows with CarID values of 13 and14 are the rows that were added. These rows have the same Manufacture, Model, and ModelYear as the first two rows, except the PurchaseDate is different. The PurchaseDate values were set by using the SYSDATETIME() function in the VALUES clause.
Inserting data from the output of a stored procedure
There are times when more complicated logic is needed to prepare rows for insert. For example, an application might need to run a stored procedure that reviews a table or a series of tables to determine what rows need to be inserted into a table.
In this example code in Listing 12, a stored procedure is created that will determine what rows and values to insert. The stored procedure makes multiple passes through a WHILE loop. Each pass through the loop programmatically determines if information will be inserted into a temporary table or not. Once the WHILE loop completes, all the rows in the temporary table are displayed.
Instead of outputting the rows to the screen, the output from the stored procedure will then be used to feed values into an INSERT statement to create new rows in the dbo.Cars table. The code for the described stored procedure can be found in Listing 12.
|
1 2 3 4 5 6 7 8 9 10 11 12 13 14 15 16 17 18 19 |
CREATE PROC dbo.RecsToInsert AS DECLARE @I int = 0; CREATE TABLE #T ( Manufacture varchar(30), MadeUpModel Varchar(30), MadeupModelYear int, PurchaseYear date); WHILE @I < 2 BEGIN SET @I = @I + 1; INSERT INTO #T SELECT CASE WHEN @I = 1 THEN 'Ford' WHEN @I = 2 THEN 'Tesla' END AS Manufacture, CAST (@I as CHAR(1)) AS MadeUpModel, YEAR(SYSDATETIME()) AS MadeupModelYear, SYSDATETIME() AS PurchaseDate; END SELECT * FROM #T; DROP TABLE #T; |
Listing 12: Sample Stored Procedure
The stored procedure created in Listing 11 will insert two rows into the temporary table #T. Those two rows will then be displayed using a SELECT statement. To execute this stored procedure and insert the two rows contained in the temporary table, execute the code in Listing 13.
|
1 2 |
INSERT INTO dbo.Cars EXEC RecsToInsert; |
Listing 13: Inserting the output of a stored procedure into a table.
The stored procedure dbo.RecsToInsert was executed by specifying the “EXEC” statement in conjunction with the INSERT statement, similar to how the SELECT statement was executed in Listing 11. The output produced by this stored procedure provides the values for the different rows and their values for the INSERT statement. In this example, two rows output by the store procedure were inserted into the dbo.Cars table.
Note: While this method will not be available for other statements, it is very common to create a temporary table to receive the output of a stored procedure, then use that in an UPDATE, DELETE, MERGE, etc. statement.
Basic of Inserting Data into a SQL Server Table
If an application plans to capture data and store it in a SQL Server table, one of the primary ways to accomplish that task is with an INSERT statement. INSERT statements allow storing a single column value, multiple column values or all the column values into a table. It is also possible to insert multiple rows with a single INSERT statement or a stored procedure. Knowing the basics of inserting data into a SQL Server table using the INSERT statement is a key skill that every T-SQL programmer should have.