Among the many command-line utilities provided with SQL Server, one of particular note is tablediff, a handy tool that lets you compare the data in two tables in order to identify any discrepancies. Though originally intended primarily as a utility for troubleshooting non-convergence in a replication topology, tablediff can actually be used to perform a row-by-row comparison of any two tables that share a similar schema. Although it is not fast in doing so, it can be used for running automated unit tests for database routines. In addition, you can, with limitations, use the tool to generate the T-SQL script necessary to update the data in the second table to conform to the first table, if discrepancies are found.
Getting Started with the tablediff Utility
The best way to learn how to use the tablediff utility is to see it in action. This article includes a number of examples that demonstrate how to compare tables that contain both matching and non-matching data. The tables in our examples reside in databases on different SQL Server instances, one SQL Server 2012, the other SQL Server 2008 R2, both installed on the same local system. However, you can compare any two tables-within the same database or within different databases on the same or different servers-so if you want to try out these examples on your system, modify the T-SQL code and example tablediff commands as necessary to accommodate your setup.
Now let’s get started. First we’ll compare identical tables on the two SQL Server instances. To prepare the environment, I ran the following code on each instance to create the TableDiffDB database and the DiffTest1 table within the database:
|
1 2 3 4 5 6 7 8 9 10 11 12 13 14 15 16 17 18 19 20 21 22 23 24 25 26 27 |
USE master; GO IF DB_ID('TableDiffDB') IS NOT NULL DROP DATABASE TableDiffDB; GO CREATE DATABASE TableDiffDB; GO USE TableDiffDB; GO IF OBJECT_ID('DiffTest1', 'U') IS NOT NULL DROP TABLE DiffTest1; GO CREATE TABLE DiffTest1 ( DiffID INT IDENTITY(101, 1) PRIMARY KEY, DiffName VARCHAR(25) NOT NULL ); GO INSERT INTO DiffTest1 (DiffName) VALUES ('test tablediff utility'); GO 10 |
Notice that the DiffTest1 table contains the DiffID and DiffName columns. I populated each row in the tables with the same DiffName value, but let the IDENTITY property populate the DiffID values, starting with 101.
That’s all you need to test the tablediff utility; however, before you do, you might want to first prepare your Windows environment. Although tablediff is installed by default, you cannot reference the utility without using the full path name or switching to the folder where the executable file is stored. However, you can modify your operating system’s Path environmental variable to include the full path to that folder. Once you add the path, you can run the tool at a command prompt without having to navigate to the utility’s folder.
The process you use to modify the Path system variable varies from one Windows operating system to the next. In Windows 7, for example, one way to access the Path variable is to open Control Panel, click System and Security, and then click System. In the left pane, select Advanced system settings, which launches the System Properties dialog box. On the Advanced tab, click the Environment Variables button. When the Environmental Variables dialog box appears, select the Path variable in the System variables list, and then click Edit. This launches the Edit System Variable dialog box. In the Variable value text box, append the current value by adding a semi-colon and the path to the tablediff directory, as in ;C:\Program Files\Microsoft SQL Server\110\com.
Once you’ve modified the Path variable, you’re ready to go. Open a command prompt window and enter the following command:
|
1 |
tablediff -sourceserver localhost\sqlsrv2012 -sourcedatabase tablediffdb -sourcetable difftest1 -destinationserver localhost\sqlsrv2008r2 -destinationdatabase tablediffdb -destinationtable DiffTest1 |
Before we go into the command’s details, first note that a tablediff command is a single-line operation. It wraps across multiple lines here because of margin limitations; however, you should not press Enter until you’ve typed in the entire command.
Now let’s look at the command itself. After specifying the tablediff command name, you must include the six options contained in the example:
- -sourceserver: The SQL Server instance that contains the table used as the basis for the comparison. If it’s the default instance, specify only the server name.
- -sourcedatabase: The database on the source SQL Server instance that contains the table used as the basis for the comparison.
- -sourcetable: The table in the source database that serves as the basis for the comparison.
- -destinationserver: The SQL Server instance that contains the table to be compared to the source table. If it’s the default instance, specify only the server name.
- -destinationdatabase: The database on the destination SQL Server instance that contains the table to be compared to the source table.
- -destinationtable: The table in the destination database that will be compared to the source table.
The tablediff utility compares the data in the source table to the table in the destination table. In the example above (as well as those to follow), the localhost\sqlsrv2012 instance serves as the source and the localhost\sqlsrv2008R2 instance serves as the destination. Be aware, however, that when using the tablediff utility to compare two tables, the source table must be configured with a primary key or an IDENTITY or ROWGUID column.
NOTE: The tablediff utility uses Windows authentication to connect to SQL Server. However, you can also specify a username and password when connecting to the source instance, the destination instance, or both. For information about the login-related options (as well as details about other tablediff options), see the Books Online topic “tablediff Utility.”
As you saw in the example, when specifying an option in the tablediff command, you include the option name, preceded by a hyphen and followed by the option value, if one is required. In this case, the option values are the source and destination SQL Server instances, the TableDiffDB databases, and the DiffTest1 tables. When we run the command, it returns the information shown in Figure 1.
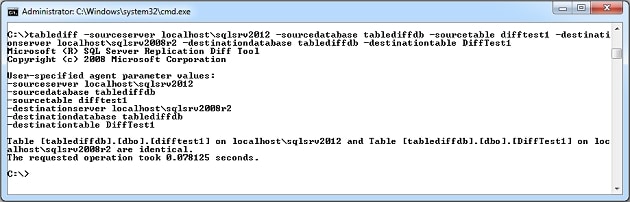
Figure 1: Comparing tables in two different databases
Notice that the results indicate that the tables are identical. In other words, they share a similar schema and contain the same data. In this case, the example compares tables defined in the default schema, dbo, but you might need to compare tables within other schemas. To demonstrate how this work, we need to first add a schema to each of our databases and then create a table within that schema, as shown in the following T-SQL script:
|
1 2 3 4 5 6 7 8 9 10 11 12 13 14 15 16 17 18 |
IF SCHEMA_ID('diff') IS NULL EXECUTE('CREATE SCHEMA diff'); GO IF OBJECT_ID('diff.DiffTest2', 'U') IS NOT NULL DROP TABLE diff.DiffTest2; GO CREATE TABLE diff.DiffTest2 ( DiffID INT IDENTITY(101, 1) PRIMARY KEY, DiffName VARCHAR(25) NOT NULL ); GO INSERT INTO diff.DiffTest2 (DiffName) VALUES ('test tablediff utility'); GO 10 |
The script creates a schema named diff and a table named DiffTest2 within that schema. Once again, we have two identical tables that we can compare. However, our tablediff command must now include the -sourceschema and -destinationschema options:
|
1 |
tablediff -sourceserver localhost\sqlsrv2012 -sourcedatabase tablediffdb -sourceschema diff -sourcetable difftest2 -destinationserver localhost\sqlsrv2008r2 -destinationdatabase tablediffdb -destinationschema diff -destinationtable DiffTest2 |
As you can see, the command now points to the DiffTest2 table and includes the schema-related options. Otherwise, the command is the same as the preceding example. In addition, the results of this command, like the results of the preceding one, indicate that the table data is identical.
Of course, the data won’t always be the same between the two tables. For example, suppose we add the following five rows to the DiffTest2 destination table:
|
1 2 3 |
INSERT INTO diff.DiffTest2 (DiffName) VALUES ('another tablediff test'); GO 5 |
If we now rerun the last tablediff command, our results will be quite different, as shown in Figure 2.
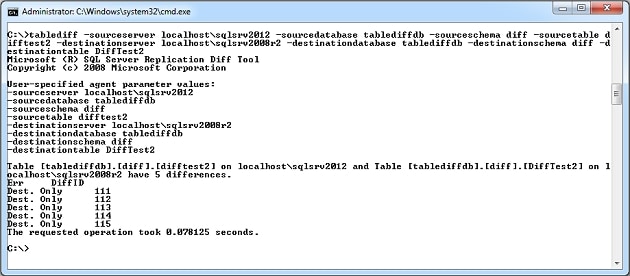
Figure 2: Using the tablediff utility to view the differences between table data
This time around, the results show that there are five differences between the two tables. The results also list the primary key values for each row in the destination table that does not exist in the source.
Now let’s look at an example in which the data differences between the compared tables are a bit more complex. But first, we need to create those tables. The following T-SQL script adds the diff.DiffTest3 table to the source SQL Server instance:
|
1 2 3 4 5 6 7 8 9 10 11 12 13 14 15 |
IF OBJECT_ID('diff.DiffTest3', 'U') IS NOT NULL DROP TABLE diff.DiffTest3; GO CREATE TABLE diff.DiffTest3 ( DiffID INT IDENTITY(101, 1) PRIMARY KEY, DiffName VARCHAR(25) NOT NULL, DiffGuid UNIQUEIDENTIFIER NOT NULL DEFAULT NEWID() ); GO INSERT INTO diff.DiffTest3 (DiffName) VALUES ('test tablediff utility'); GO 10 |
Notice that we’ve added the DiffGuid column, using the NEWID function to assign a GUID to each new row. We then add 10 rows to the table. Next, we add the same table to the destination instance, only we change the configuration of the IDENTITY property:
|
1 2 3 4 5 6 7 8 9 10 11 12 13 14 15 |
IF OBJECT_ID('diff.DiffTest3', 'U') IS NOT NULL DROP TABLE diff.DiffTest3; GO CREATE TABLE diff.DiffTest3 ( DiffID INT IDENTITY(101, 2) PRIMARY KEY, DiffName VARCHAR(25) NOT NULL, DiffGuid UNIQUEIDENTIFIER NOT NULL DEFAULT NEWID() ); GO INSERT INTO diff.DiffTest3 (DiffName) VALUES ('test tablediff utility'); GO 10 |
By modifying the IDENTITY property to increment values by two, rather than one, we offset the primary key values between the tables in order to complicate the data differences. We can then update our tablediff command to reference the two new tables:
|
1 |
tablediff -sourceserver localhost\sqlsrv2012 -sourcedatabase tablediffdb -sourceschema diff -sourcetable difftest3 -destinationserver localhost\sqlsrv2008r2 -destinationdatabase tablediffdb -destinationschema diff -destinationtable DiffTest3 |
When we run the command, the results will now show when a row exists only in the source table, only in the destination, or in both, but with values that don’t match, as shown in Figure 3.
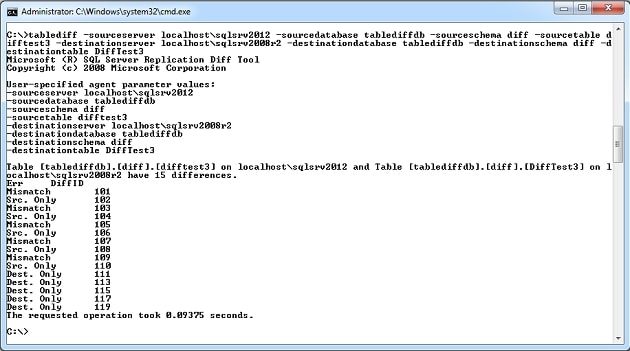
Figure3: Comparing tables with multiple types of mismatches
As you can see, there are 15 differences between the two tables, five of which are mismatches. Because the comparison between the two tables is based on the primary key, the mismatched rows are those with the same primary key, but different DiffGuid values. The other differences are rows with a primary key value in the source table or destination table, but not both.
Failed comparisons
To be able to use the tablediff utility to compare tables, the tables must share a similar schema. As a result, the tables must have the same number of columns and the compared columns must be defined with the same name and compatible data types. You can, for example, compare a smallint column in the source table with an int column in the destination table, but you cannot compare a smallint column with an nvarchar column.
NOTE: The tablediff utility also supports the -strict option. When used, the data types must match exactly between the two tables in order to perform the comparison.
If you try to compare two tables that don’t share a similar schema, the tablediff utility returns a message saying that the tables cannot be compared. For example, suppose we compare the DiffTest2 table on the source instance with the DiffTest3 table on the destination instance, as shown in the following command:
|
1 |
tablediff -sourceserver localhost\sqlsrv2012 -sourcedatabase tablediffdb -sourceschema diff -sourcetable difftest2 -destinationserver localhost\sqlsrv2008r2 -destinationdatabase tablediffdb -destinationschema diff -destinationtable DiffTest3 |
When we run the command, we receive the results shown in Figure 4. Notice they include a message indicating that tables with different schemas cannot be compared.
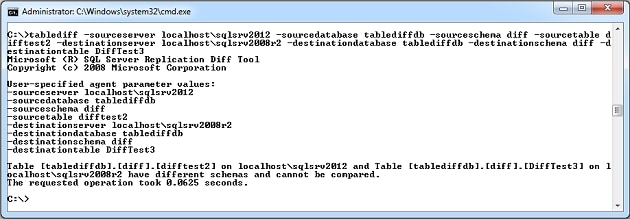
Figure 4: Trying to compare tables with different schemas
You’ll also run into a similar issue if you try to compare tables in which one doesn’t exist. For example, suppose we add the following table to our source instance:
|
1 2 3 4 5 6 7 8 9 10 11 12 13 14 15 |
IF OBJECT_ID('diff.DiffTest4', 'U') IS NOT NULL DROP TABLE diff.DiffTest4; GO CREATE TABLE diff.DiffTest4 ( DiffID INT IDENTITY(101, 1) PRIMARY KEY, DiffName VARCHAR(25) NOT NULL, DiffGuid UNIQUEIDENTIFIER NOT NULL DEFAULT NEWID() ); GO INSERT INTO diff.DiffTest4 (DiffName) VALUES ('test tablediff utility'); GO 10 |
Now suppose that, after we create and populate the DiffTest4 table on our source, we assume that it’s been replicated to the destination server and we run the following command:
|
1 |
tablediff -sourceserver localhost\sqlsrv2012 -sourcedatabase tablediffdb -sourceschema diff -sourcetable difftest4 -destinationserver localhost\sqlsrv2008r2 -destinationdatabase tablediffdb -destinationschema diff -destinationtable DiffTest4 |
This time around, the tablediff command returns a slightly different message, but the sentiment is the same, as shown in Figure 5.
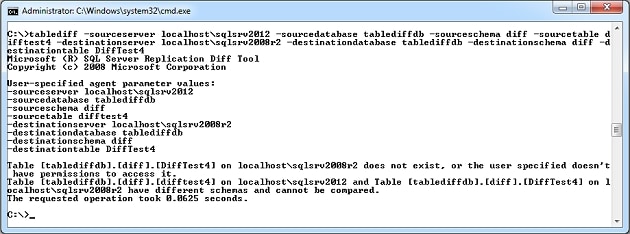
Figure 5: Message returned by the tablediff utility when the destination table doesn’t exist
The message indicates that destination table doesn’t exist or we don’t have permission to access the table. A second message says that different schemas can’t be compared. Certainly, if one table exists and the other does not, we can comfortably assume the two tables don’t share the same schema.
Outputting Comparison Results
Up to this point, the example commands we’ve looked at displayed their results in the command shell window. However, we can instead send those results to a text file in order to log the information. To do so, we add the -o option followed by the full path and filename of the target text file, as shown in the following example:
|
1 |
tablediff -sourceserver localhost\sqlsrv2012 -sourcedatabase tablediffdb -sourceschema diff -sourcetable difftest3 -destinationserver localhost\sqlsrv2008r2 -destinationdatabase tablediffdb -destinationschema diff -destinationtable DiffTest3 -o c:\datafiles\tablediff\results.txt |
As you saw in an earlier example, we’re simply comparing the DiffTest3 table on each SQL Server instance. The only new element in the command is the -o argument, which specifies that the output be saved to the results.txt file. After we run the command, the output file will contain the following results:
|
1 2 3 4 5 6 7 8 9 10 11 12 13 14 15 16 17 18 |
Table [tablediffdb].[diff].[difftest3] on localhost\sqlsrv2012 and Table [tablediffdb].[diff].[DiffTest3] on localhost\sqlsrv2008r2 have 15 differences. Err DiffID Mismatch 101 Src. Only 102 Mismatch 103 Src. Only 104 Mismatch 105 Src. Only 106 Mismatch 107 Src. Only 108 Mismatch 109 Src. Only 110 Dest. Only 111 Dest. Only 113 Dest. Only 115 Dest. Only 117 Dest. Only 119 The requested operation took 0.09375 seconds. |
The tablediff tool also offers a second option for persisting the utility’s results. Instead of saving them to an output file, we save them to a table in the destination database. The tablediff utility provides two arguments that support this functionality. The -et argument specifies the name of the table, and the -dt argument indicates that the table identified in the -et argument should be dropped if it already exists. The following example shows how to use these two arguments to save the results to a table named DiffResults:
|
1 |
tablediff -sourceserver localhost\sqlsrv2012 -sourcedatabase tablediffdb -sourceschema diff -sourcetable difftest3 -destinationserver localhost\sqlsrv2008r2 -destinationdatabase tablediffdb -destinationschema diff -destinationtable DiffTest3 -dt -et DiffResults |
Notice that I’ve replaced the -o argument with the -dt argument and the -et argument and table name. After we run the command, we can retrieve the results by running a query similar to the following in our destination database:
|
1 |
SELECT* FROM DiffResults; |
The SELECT statement returns the results shown in the following table. This is the data outputted by the tablediff command and saved to that table.
|
DiffID |
MSdifftool_ErrorCode |
MSdifftool_ErrorDescription |
|
101 |
0 |
Mismatch |
|
102 |
2 |
Src. Only |
|
103 |
0 |
Mismatch |
|
104 |
2 |
Src. Only |
|
105 |
0 |
Mismatch |
|
106 |
2 |
Src. Only |
|
107 |
0 |
Mismatch |
|
108 |
2 |
Src. Only |
|
109 |
0 |
Mismatch |
|
110 |
2 |
Src. Only |
|
111 |
1 |
Dest. Only |
|
113 |
1 |
Dest. Only |
|
115 |
1 |
Dest. Only |
|
117 |
1 |
Dest. Only |
|
119 |
1 |
Dest. Only |
You might have noticed that the table contains information we haven’t seen before-the error codes. These are fairly straightforward and correlate directly to the error messages. The 0 indicates a mismatch, the 1 indicates that the destination contains a row not contained in the source, and the 2 indicates that the source contains a row not in the destination. Again, these error codes (and their related descriptions) are tied to the primary key values.
Generating T-SQL Scripts
One of the handiest features of the tablediff utility is the ability to generate a T-SQL script that includes the data manipulation language (DML) statements necessary to update the destination table in order to bring it inline with the source table. To generate the script, we need only add the -f option, followed by the full path and filename of the script file. For example, the following command again compares the DiffTest3 tables in each SQL Server instance, only this time also generates the DML script file:
|
1 |
tablediff -sourceserver localhost\sqlsrv2012 -sourcedatabase tablediffdb -sourceschema diff -sourcetable difftest3 -destinationserver localhost\sqlsrv2008r2 -destinationdatabase tablediffdb -destinationschema diff -destinationtable DiffTest3 -o c:\datafiles\tablediff\results.txt -f c:\datafiles\tablediff\script.sql |
As we did in an earlier example, we’re saving our output to the results.txt file (rather than a SQL Server table). We’re also using the -f option to generate the T-SQL script and save it to the script.sql file. If we were to view the script file after running the command, we would find the following contents:
|
1 2 3 4 5 6 7 8 9 10 11 12 13 14 15 16 17 18 19 20 |
-- Host: localhost\sqlsrv2008r2 -- Database: [tablediffdb] -- Table: [diff].[DiffTest3] SET IDENTITY_INSERT [diff].[DiffTest3] ON UPDATE [diff].[DiffTest3] SET [DiffGuid]='c659a110-6780-44ab-bd4f-624136035630' WHERE [DiffID] = 101 INSERT INTO [diff].[DiffTest3] ([DiffGuid],[DiffID],[DiffName]) VALUES ('dae4b8f7-10b6-4e4e-bf69-242cb77eeb63',102,N'test tablediff utility') UPDATE [diff].[DiffTest3] SET [DiffGuid]='0af314a1-5753-4e5f-83d8-f99d28750110' WHERE [DiffID] = 103 INSERT INTO [diff].[DiffTest3] ([DiffGuid],[DiffID],[DiffName]) VALUES ('7a54ad98-8659-40ab-8519-4dfd6cbc9492',104,N'test tablediff utility') UPDATE [diff].[DiffTest3] SET [DiffGuid]='a404dc92-5253-4962-8a6c-5fa1cbf6bc53' WHERE [DiffID] = 105 INSERT INTO [diff].[DiffTest3] ([DiffGuid],[DiffID],[DiffName]) VALUES ('2e6f4a64-851a-419b-bc92-b565e52dbcd4',106,N'test tablediff utility') UPDATE [diff].[DiffTest3] SET [DiffGuid]='6078117d-9622-4c35-8e04-6d88665a5698' WHERE [DiffID] = 107 INSERT INTO [diff].[DiffTest3] ([DiffGuid],[DiffID],[DiffName]) VALUES ('c1991f55-f1df-4e7f-bc24-e6061a14eba4',108,N'test tablediff utility') UPDATE [diff].[DiffTest3] SET [DiffGuid]='fdb1cc7f-c6e4-47b2-a623-9ccaa5d20b59' WHERE [DiffID] = 109 INSERT INTO [diff].[DiffTest3] ([DiffGuid],[DiffID],[DiffName]) VALUES ('e67badcb-ab16-403a-97a8-5a84f678454a',110,N'test tablediff utility') DELETE FROM [diff].[DiffTest3] WHERE [DiffID] = 111 DELETE FROM [diff].[DiffTest3] WHERE [DiffID] = 113 DELETE FROM [diff].[DiffTest3] WHERE [DiffID] = 115 DELETE FROM [diff].[DiffTest3] WHERE [DiffID] = 117 DELETE FROM [diff].[DiffTest3] WHERE [DiffID] = 119 SET IDENTITY_INSERT [diff].[DiffTest3] OFF |
As expected, our script file contains all the INSERT, UPDATE, and DELETE statements necessary to modify the data in the DiffTest3 table in the destination database so the data can be brought into sync with the source table. Beware, though, that the synchronization feature doesn’t work with varchar(max) nvarchar(max), varbinary(max), timestamp, xml, text, ntext or image datatypes so is of limited usefulness.
Also worth noting is the contents of the results.txt file. When we generate a T-SQL script, the command’s output also includes the name of the column where a mismatch exists, as the following file contents show:
|
1 2 3 4 5 6 7 8 9 10 11 12 13 14 15 16 17 18 19 |
Table [tablediffdb].[diff].[difftest3] on localhost\sqlsrv2012 and Table [tablediffdb].[diff].[DiffTest3] on localhost\sqlsrv2008r2 have 15 differences. Fix SQL written to c:\datafiles\tablediff\script.sql. Err DiffID Col Mismatch 101 DiffGuid Src. Only 102 Mismatch 103 DiffGuid Src. Only 104 Mismatch 105 DiffGuid Src. Only 106 Mismatch 107 DiffGuid Src. Only 108 Mismatch 109 DiffGuid Src. Only 110 Dest. Only 111 Dest. Only 113 Dest. Only 115 Dest. Only 117 Dest. Only 119 The requested operation took 0.078125 seconds. |
In this case, our mismatches occur in the DiffGuid column. If we had not generated the T-SQL script, this information would not have been included in the results, unless we had added another option to our command, as you’ll see in the next section.
Modifying the Command Output
In the last example, you saw how the output file contains the names of the mismatched column. However, if you do not create a script file when returning the results, the output will not contain the column information unless you add the -c option to your command, as shown in the following example:
|
1 |
tablediff -sourceserver localhost\sqlsrv2012 -sourcedatabase tablediffdb -sourceschema diff -sourcetable difftest3 -destinationserver localhost\sqlsrv2008r2 -destinationdatabase tablediffdb -destinationschema diff -destinationtable DiffTest3 -c |
In this case, we’ve taken a basic command and simply added the -c option. The results will now include the column information, as shown in Figure 6.
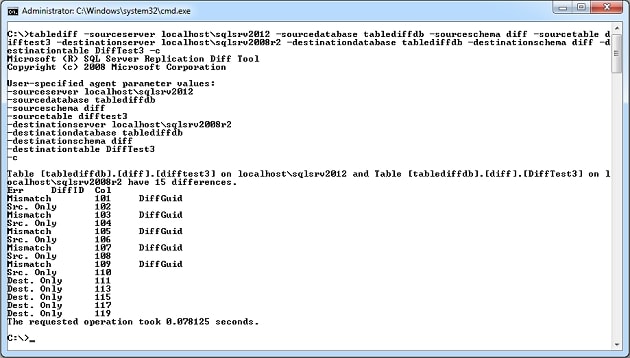
Figure 6: Viewing the columns in which data is mismatched
Another tablediff option to be aware of is the -q option, which specifies that only a fast comparison be performed. When you include this option, the utility compares only the schema and row counts. For example, the following command again compares the DiffTest3 tables, but now includes the -q option:
|
1 |
tablediff -sourceserver localhost\sqlsrv2012 -sourcedatabase tablediffdb -sourceschema diff -sourcetable difftest3 -destinationserver localhost\sqlsrv2008r2 -destinationdatabase tablediffdb -destinationschema diff -destinationtable DiffTest3 -q |
As you can see in Figure 7, the results show that the tables are identical, each table sharing the same schema and number of rows.
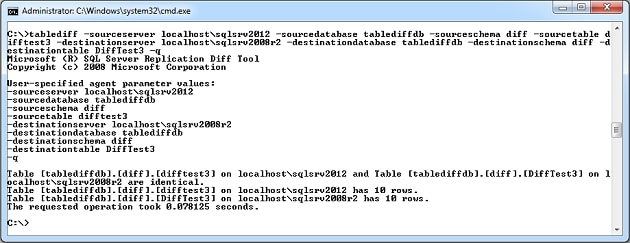
Figure 7: Using the tablediff utility to compare row counts and schema differences
The problem with the -q option, as you probably noticed, is that it fails to take into account actual differences in the data. As you’ll recall from when we created and populated these tables, there are a number of issues. Although the schema is similar, as are the number of rows, the data in those rows is different. So the -q option might be useful for a quick comparison, but don’t assume the data is the same because the results show identical tables.
Using PowerShell to Compare Databases
At times, you might want to use the tablediff utility to compare multiple tables in a database without having to manually enter the command for each comparison. That’s where PowerShell comes in. You can create a PowerShell script that uses the tablediff utility to compare each matching table in two databases.
To run such a script, the SQL Server PowerShell provider must be installed in order to navigate the SQL Server objects. The provider is installed by default when you run PowerShell from SQL Server Management Studio (SSMS). However, if you want to access SQL Server from a regular PowerShell command prompt, you must import the sqlps module into PowerShell by running the following command:
|
1 |
Import-Module "sqlps" -DisableNameChecking |
The command uses the Import-Module cmdlet to import the sqlps module. By default, when you import the module, it changes the provider to SQLSERVER. But you can change it back to your current directory by entering a command similar to the following:
|
1 |
cd c: |
The approach you take to scripting your tablediff operations depends on whether multiple schemas are involved. For example, suppose we want to compare tables in the AdventureWorks2012 and AdventureWorks2008R2 databases. We can use a couple foreach loops to retrieve the schema names and then retrieve the table names in each schema, as shown in the following PowerShell script:
|
1 2 3 4 5 6 7 8 9 10 11 12 13 14 15 16 17 18 19 20 21 22 23 24 25 |
$OutFolder = "C:\DataFiles\TableDiff\" $OutResults = $OutFolder + "output.txt" $SourceSrv = "localhost\SqlSrv2012" $SourceDb = "AdventureWorks2012" $DestSrv = "localhost\SqlSrv2008R2" $DestDb = "AdventureWorks2008R2" $schemas = Get-ChildItem SQLSERVER:\SQL\$SourceSrv\Databases\$SourceDb\schemas\ | select name foreach ($schema in $schemas) { $tables = Get-ChildItem SQLSERVER:\SQL\$SourceSrv\Databases\$SourceDb\tables\ | where {$_.schema -eq $schema.name} | select name foreach ($table in $tables) { $OutSql = $OutFolder + $schema.name + "." + $table.name + ".sql" tablediff -sourceserver $SourceSrv -sourcedatabase $SourceDb -sourceschema $schema.name -sourcetable $table.name -destinationserver $DestSrv -destinationdatabase $DestDb -destinationschema $schema.name -destinationtable $table.name -f $OutSql -o $OutResults } } |
The first task is to declare variables that identify the folder to use as the target folder (C:\DataFiles\TableDiff\) and the file to use for the output of each operation (output.txt).
|
1 2 |
$OutFolder = "C:\DataFiles\TableDiff\" $OutResults = $OutFolder + "output.txt" |
Next, we declare the variables necessary to identify the source and destination SQL Server instances and databases:
|
1 2 3 4 |
$SourceSrv = "localhost\SqlSrv2012" $SourceDb = "AdventureWorks2012" $DestSrv = "localhost\SqlSrv2008R2" $DestDb = "AdventureWorks2008R2" |
So far, all fairly clear-cut. The next step is only slightly more complicated. We declare the $schemas variable, which uses the Get-ChildItem cmdlet and SQLSERVER provider to retrieve the name of each schema in the source database:
|
1 |
$schemas = Get-ChildItem SQLSERVER:\SQL\$SourceSrv\Databases\$SourceDb\schemas\ | select name |
Note that this approach retrieves all schemas but dbo, which is what we want in this case, but if you want to include dbo, you would need to add the necessary logic. We then pipe the results to the Select-Object cmdlet, which specifies that we return only the name property. (In this case, we’re using the select alias to reference the cmdlet.)
The next step is to set up the first foreach loop to iterate through the list of schemas:
|
1 |
foreach ($schema in $schemas) |
The $schema variable will hold the name of each schema in $schemas as we iterate through the list. From there, we can then retrieve our tables for that schema and save it to the $tables variable:
|
1 |
$tables = Get-ChildItem SQLSERVER:\SQL\$SourceSrv\Databases\$SourceDb\tables\ | where {$_.schema -eq $schema.name} | select name |
We again use the Get-ChildItem cmdlet and SQLSERVER provider, but this time to retrieve a list of tables in the specified schema. Next, we embed a second foreach loop in the first foreach loop in order to retrieve each table from the set of tables:
|
1 |
foreach ($table in $tables) |
The $table variable stores the name of each table as we loop through the list of tables. Within that loop, we also specify the name of the file to hold the T-SQL script, saving this information to the $OutSql variable:
|
1 |
$OutSql = $OutFolder + $schema.name + "." + $table.name + ".sql" |
The filename is based on a combination of the current schema and table names. After we define the logic for our script file, we create our tablediff command, using the different variables to provide our option values:
|
1 |
tablediff -sourceserver $SourceSrv -sourcedatabase $SourceDb -sourceschema $schema.name -sourcetable $table.name -destinationserver $DestSrv -destinationdatabase $DestDb -destinationschema $schema.name -destinationtable $table.name -f $OutSql -o $OutResults |
Each time PowerShell iterates through the embedded foreach loop, it will run a comparison of the table currently in the $table variable. The results will then be added to the output.txt file, and the T-SQL script will be generated and saved to a file whose name is based on the schema and table name.
That’s all there is to creating a basic script to compare tables and generate the necessary update scripts. You can, of course, parameterize the PowerShell script to make it reusable. You can also include error handling and any other components to refine the script to meet your needs. But the script shown here should give you the foundation you need to get started.
Making the Most of the tablediff Utility
If you haven’t already discovered the tablediff utility, you’ll find it well worth your time to check it out. The tool is part of the SQL Server installation and is relatively simple to use. Just open a command prompt window and start typing. Not only can you compare tables across SQL Server instances, but you can also generate the T-SQL scripts necessary to update those tables just so long as they don’t contain LOB data such as Varchar(MAX). And you can run the utility from within scripts created in command shells such as PowerShell, thus letting you automate operations and reuse code. The tablediff utility might not meet all your needs when comparing tables, but in those cases where it does, you’ll likely find tablediff to be a valuable addition to your arsenal of tools.
Load comments