As a budding SysAdmin who is always keen to test out the latest Operating System, Server software or application, I always used to find it a bit of a challenge to get my test environments going using only physical hardware. Sometimes you may be limited by the hardware you have at your disposal, or perhaps you don’t have any spare servers to use at your workplace (Shame on your so-called IT hardware hording skills if you don’t!) In these cases, you may find that setting up your own simple (and free) virtualized test environment will be extremely useful for your testing and evaluation purposes.
There are a quite a few free virtualization products out there, such as VMware Server, VMware ESXi, and Sun’s VirtualBox, to name just a few. I will be concentrating on using VMware Server 2.0 here, as it’s simple to set up and install on top of a base Windows (or even Linux) operating system, and also provides a handy web interface, which you can access remotely over the network.
Prerequisites
To get started, I recommend you have a decent amount of RAM if you’d like to run multiple Virtual Machines; 4GB is a good figure to get a few VMs running on top of your base OS. Furthermore, if you’d like to support 64-bit Virtual Machines, you’ll need to ensure that your host PC or Server’s processor supports Virtualization Technology. (Intel VT or AMD-V), as no VT will mean you can only run 32-bit guest VMs. If you are unsure as to whether your processor supports this technology, you can look through your BIOS for something along the lines of “Virtualization Technology” or “Hardware Virtualization”. Otherwise, try downloading this ISO image from VMware, burning it to disc and booting off of it; it should tell you whether or not your host machine supports this feature.
Installation
- Download the VMware Server 2.0 product. You’ll need to register for the free download, if you haven’t done so already, sign up and you will receive a download link, as well as your product key. Note this key down somewhere safe, and then start the installation and proceed through the installation wizard.
- Usually, leaving most settings on their defaults will work just fine, although for best performance you do want your VMs to be running on a disk or RAID array which is separate to that which your operating system runs on. Choose to place the Virtual Machine folder on a different disk or volume if possible.
- The installer will create some basic web services that run on your host machine during installation, and these are used to host the web interface through which you will manage your Virtual environment. For those who are interested, the web services run off a locally installed Apache Tomcat service.
- Once the installation is finished, restart your computer to complete the setup and, once you’re logged in again, open your web browser and go to
https://localhost:8333. This will load the VMware Server 2.0 administration console in your browser of choice. - Your login details will be the name of the account you installed the software with, and your usual Windows or machine password.
- If you have any trouble getting to the web page, try some basic service troubleshooting; for Windows systems, run services.msc and check your VMware services. Ensure they are all running and, if any are stopped, try to start them manually or check their logon credentials are correct.
On Linux
If you’re running a Linux host machine, you are still in luck, as I’ve successfully installed VMware Server 2.0 on an Ubuntu 8.04 “Hardy Heron” host machine. The installer is shell based, but don’t be put off by that fact; It is really simple to follow through. The installer script (PERL) asks you a series of questions to get VMware Server set up as you go through the process. After this, you are prompted to reboot, after which you can access the VMware Server interface via the website it configures for you.
In some cases, depending on the distribution of Linux you are using, you may need to open a few ports for VMware server to run. This was not the case with Ubuntu but, as an example, Red Hat Linux may require this additional configuration due to the built-in firewall. Some of the ports that a default installation of VMware Server uses can be seen in the screenshot below, however there are others, such as port 902 for the VM console connections.
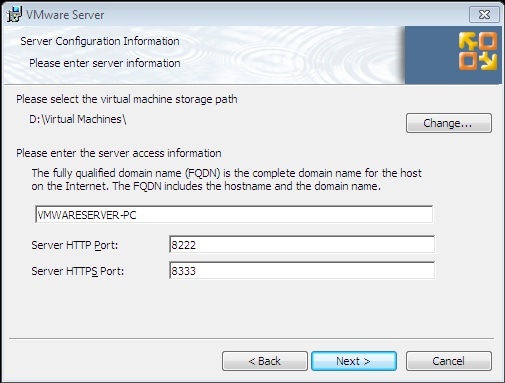
Figure 1. Some of the default ports required for VMware Server to function.
OS Differences
You may now be wondering whether there are any major differences between running VMware Server on a Windows or Linux based host machine. To be honest, at first glance, there aren’t really any on the surface, and the differences that do exist are actually more about the Operating System themselves, rather than how VMware performs on any particular platform. However, let’s go through some of the differences that may sway your decision as to where you install:
- Licensing – Most people re-using old hardware with a Windows OS already installed don’t need to worry about OS licensing. However if you do a new build, you may want to consider the cost of a Windows license when deciding. Linux is free, but also has the optional paid support.
- Resource usage – depending on your set up, Linux can often provide a much smaller memory and CPU usage footprint, allowing more resources for your VMs to use.
- Ease of use / Installation on Host machine – This point is arguable, as some people may be more comfortable using Windows, whereas others just prefer Linux.
Where to now?
So, you now have your basic Virtualization host installed and ready to go. Are you ready to start making your host machine sweat? Good! This is the whole point of virtualization; you should be getting every ounce of potential out of your hardware. For large companies and enterprises, virtualization allows them to consolidate services, use less hardware, less space, less cooling and hopefully less power too.
Next, you need to have some ISO images or CD/DVD installation discs ready with the operating systems you are going to install. If you don’t have them already, get them downloaded, or pop the disc into your CD/DVD tray. From the main VMware console, you can now choose “Create Virtual Machine” the “Virtual Machine” menu, and then just complete the simple wizard. You should choose which Operating System you are going to be installing, the amount of RAM to assign to it, as well as how many virtual CPUs it will use (This is obviously where your extra RAM comes into play).
There is also a section which allows you to choose the Virtual CD/DVD drive for your new VM(s). Select “Use a Physical Drive” if you want to use your host PC’s CD or DVD drive, or choose “Use an ISO image” to select an ISO image saved on your hard drive. Which option you choose naturally depends on how you’d like to load your VM Operating Systems and any software you’re hoping to test. Ensure your ISOs are placed in the “Virtual Machines” folder you created during the installation and that “Connect at power on” is also selected if you would like your VM to boot off the ISO image when it starts up.
After finishing the wizard, a new VM will be created on the left side of your Administration panel; highlight it and click the green “Play” button or select “Power on” to start it up. By default, your VMs should use the “Bridged” Network mode, which means that the primary network or wireless card that connects your host device to the network will be used to “Bridge” the VM’s network to your physical LAN. This is probably the easiest mode to use for a basic set up. If you have a DHCP server on the same network, your VM should just pull an IP address from this, or else you can manually assign an IP address on the same range as your local LAN so that it can communicate with other devices.
The VM’s files will be stored in your “Datastore” (The Virtual Machine folder chosen earlier), and each VM will consist of a handful of files on your host machine. Some of these file types are listed below and are commonly found in most VMware virtualization products:
|
Filetype |
Description |
|
.VMDK |
This is the virtual disk file, storing all the contents of your VM’s hard disk. |
|
.NVRAM |
Stores the state of the VM BIOS |
|
.LOG |
Log activity for your VM, which can be useful for troubleshooting. |
|
.VMEM |
The VM’s paging file, which only exists while the VM is running, or if it’s in a crashed state. |
|
.VMX |
The main configuration file for your VM; memory, CPU, network and other configurations are stored here. |
|
.VMXF |
This is a supplemental configuration file for your VM. |
|
.VMSD & .VMSN |
The files used for VM snapshots. VMSN files are used to store the current state of the virtual machine at the point the snapshot was taken and, should you wish, you can revert back to the same state the VM was in when this snapshot was taken. The VMSD file stores metadata about the snapshots that have been taken. |
What, No Cloning Feature in VMware Server?
VMware Server 2.0 gives you the basics to get a simple virtualized environment up and running; you can run multiple VMs on a host machine and have them networked. But what if you wanted to create a base “Template” VM that you can quickly provision other VMs off of without having to install the OS all the time? Usually I keep a “Template” VM for each different operating system, each of which consists of a base installation of the OS I want, together with the features and settings customized to my requirements. Unfortunately, VMware Server doesn’t give you a clone option, but there is a simple trick I’ve found which allows you to “clone” your Windows-based VMs. The same principle should also apply to Linux-based VMs too.
Power down your “Template” VM (or the VM you would like to clone), navigate to your “Virtual Machine” folder, right-click on the folder for the template VM in question and make a copy in the same root folder, but with a different name (of course). Once the VM files have finished copying, just go into the new folder and rename all the files to whatever you want to call your VM, preserving their file extensions.
For example, let’s say my original VM is called “TEMPLATE”; I’d just need to rename all of the TEMPLATE.xxx files to “MyNewVMName.xxx”. Now for the important part; open the “MyNewVMName.VMX” file in a text editor (notepad will do), Scroll through and find all the references to the old VM file names (TEMPLATE.xxx) and change these all to the VM’s new name. Specifically, you should change the following lines to contain the name of your new VM:
- nvram = ” TEMPLATE.nvram”
- displayName = ” TEMPLATE “
- extendedConfigFile = ” TEMPLATE.vmxf”
- scsi0:0.fileName = ” TEMPLATE.vmdk” (Note that you may have more “scsi0:x” lines if your VM has more than one disk).
Save the file once you’re done, then open MyNewVMName.vmxf and find the following section, replacing the old VM name with your new VM name:
|
1 |
<vmxPathName type="string">TEMPLATE.vmx</vmxPathName> |
Finally, open your VMware Administration console, select “Add Virtual Machine to Inventory” from the “Virtual Machine” menu, then browse to the new VM folder, open the MyNewVMName.vmx file, and your new VM will be loaded and ready to power up. Upon the first power up, VMware Server will ask you if you recently moved, copied or changed the VM; you can just select “I copied it” and then “OK” to complete the process. Your new VM will power up and should be ready to use.
Remember to change your IP address and machine name if they are going to be on the same network, and don’t worry about changing the new VM’s SID – as explained by Mark Russinovich (the creator of NewSID), it turns out that duplicate SIDs are not actually a problem. You can also handle any SysPrep or post-cloning procedures you may have at this point.
Summary
So, to wrap this all up, these steps should give you the basis for a simple virtualized testing environment which you can use to test new software, operating systems, domains and environment configurations. This is also a great way to start out in the world of Virtualization, as it teaches you the basic concepts, and is relatively simple and cheap to set up. All you need is a bit of old hardware or a home PC with a fair amount of RAM to start off.
You may also wish to try out other virtualization products. VMware Workstation is another product that may be worth investigating; although it’s not a free product, it does offer some great features to get test environments set up, and is considered to be one of the best “Desktop Virtualization” products out there at the moment. Either way, whichever route you do end up taking, you’ll soon be able to enjoy your new virtualized test environment!
This article was commissioned by Red Gate Software, engineers of ingeniously simple tools for optimizing your Exchange email environment. Find out more.
Load comments