The Questions
- “What are the differences between primary keys and foreign keys in SQL Server?”
- “How do I create a primary key on a SQL Server table?”
- “How do I know which columns to include in a primary key?”
- “Why would I create a primary key with a nonclustered index?”
- “How do I delete a primary key?”
- “How do I create a foreign key?”
- “How do I view information about a foreign key?”
- “Does my foreign key have to reference a primary key in another table?”
- “Can I create a foreign key against only part of a composite primary key?”
- “Should I create an index on a foreign key column?”
- “How do I temporarily disable a foreign key constraint?”
- “How do I create a self-referencing foreign key?”
- “How do I view all the primary keys and foreign keys in my database?”
“What are the differences between primary keys and foreign keys in SQL Server?”
There are many differences between primary keys and foreign keys. In fact, the only real similarity is that you can define each of them on one or more columns in a SQL Server table. Otherwise, they serve very different purposes and each is governed by its own set of rules. That said, they can often be related to each other in very important ways, but they still remain separate entities.
A primary key provides a mechanism for ensuring that the rows in a table are unique. The values contained in the column or columns that make up the primary key serve to identify each of those rows. For example, a primary key is often made up of a single IDENTITY column. Regardless of how many values are repeated in other columns, the primary key values are always unique and consequently ensure that each row can be identified separately from all other rows. Other columns might also contain unique values, but a table can contain only one primary key.
Because the primary key must be able to identify each row, no columns that participate in a primary key can contain NULL values. In addition, if you create a composite primary key (more than one column), the individual columns can contain duplicate values, but the columns collectively cannot and together must provide the unique identifiers for each row.
For example, the AdventureWorks2012 sample database includes the SalesOrderDetail table, with a primary key defined on the table’s SalesOrderID and SalesOrderDetailID columns. Figure 1 shows part of the data stored in the table. Notice that values are duplicated in the SalesOrderID column. However, when both columns are considered as a whole, there are no duplications.
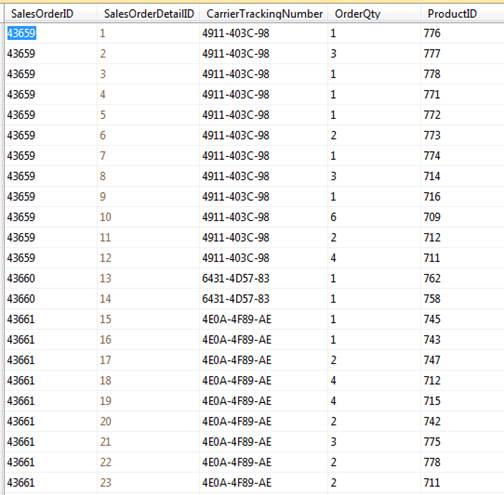
Figure 1: Primary key columns in the SalesOrderDetail table
When you create a primary key, SQL Server automatically creates an index based on the key columns. If no clustered index is defined on the table, SQL Server creates a clustered index; otherwise, a nonclustered index is created. That said, you can specify that a nonclustered index be created instead of a clustered index, thus overriding the default. If a clustered index already exists, then you have no choice but to create a nonclustered index on the primary key.
Like a primary key, a foreign key is also a type of constraint placed on one or more columns in a table. The foreign key establishes a link between the key columns and related columns in another table. (You can also link the foreign key columns to columns within the same table.) The table that contains the foreign key is considered the child table, and the table that the foreign key references is the parent table. The foreign key restricts what data can be stored in the foreign key columns in the child table, based on the data in the referenced columns in the parent table.
An example will help better illustrate this concept. Figure 2 shows two tables from the AdventureWorks2012 sample database: Product and ProductSubcategory. In the Product table, the ProductID column is configured as the primary key. In the ProductSubcategory table, the ProductSubcategoryID column is configured as the primary key.

Figure 2: Foreign key defined on the ProductSubcategoryID column in the Product table
A foreign key is also defined on the ProductSubcategoryID column in the Product table. The foreign key references the ProductSubcategoryID column in the ProductSubcategory table. As a result, the ProductSubcategoryID column in the Product table cannot include any values that are not also included in the ProductSubcategoryID column of the ProductSubcategory table.
In this way, the foreign key enforces referential integrity between the two tables. That means you can add only permitted data to the foreign key columns in the child table, in this case, the Product table. At the same time, you cannot modify the parent table (ProductSubcategory) in such a way that the modification would negatively impact the foreign key values in the child table. For example, if you delete a row from the ProductSubcategory table, it could impact the data in the ProductSubcategoryID column of the Product table. By default, SQL Server prevents these types of actions. However, SQL Server also provides several methods for working with foreign keys and referential integrity when modifying a table referenced by a foreign key.
Other ways that foreign keys differ from primary keys are that you can create more than one foreign key on a table and you can define foreign keys on columns that permit NULL values. In addition, SQL Server does not automatically index the foreign key columns like it does for primary keys. If you want to index the foreign key columns, you must do so as a separate step.
There are, of course, many other rules that govern the use of both foreign keys and primary keys, so be sure to refer to SQL Server Books Online for more details about both of them.
“How do I create a primary key on a SQL Server table?”
You can add a primary key to a table when you create the table or after you’ve created it, as long as a primary key doesn’t already exist. If nullability has not been defined on the columns that participate in the primary key, the database engine will automatically configure those columns as NOT NULL.
SQL Server supports a number of ways to define a primary key when creating a table. If you’re defining the primary key on only one column, you can include it as part of the column definition, as shown in the following example:
|
1 2 3 4 5 6 |
CREATE TABLE OurStuff ( StuffID INT PRIMARY KEY, StuffName VARCHAR(10) NOT NULL ); GO |
In this case, the primary key is being defined on the StuffID column. Because we did not specify nullability in our column definition, SQL Server automatically creates the column as NOT NULL. SQL Server also automatically creates a clustered index on the column because we did not specify the index type and no clustered index is defined elsewhere on the table. In addition, we did not provide a name for our primary key, so SQL Server automatically generates a name for the key and the index, in this case, PK__OurStuff__4B9415EE02542683.
We can better control these processes-and avoid those tedious auto-generated names-by including all the specifics in our statement:
|
1 2 3 4 5 6 7 |
CREATE TABLE OurStuff ( StuffID INT NOT NULL CONSTRAINT pk_OurStuff PRIMARY KEY CLUSTERED, StuffName VARCHAR(10) NOT NULL ); GO |
This time around, we’ve specified nullability (NOT NULL) and a name for our primary key and index (pk_OurStuff). We’ve also specified that a clustered index be created, rather than a nonclustered one. The advantage to spelling everything out is that it leaves no doubt in the minds of other developers what your intentions were when you created the original table.
Another method we can use to define a primary key when creating a table is to separate out the primary key as its own constraint definition, as the following example shows:
|
1 2 3 4 5 6 7 |
CREATE TABLE OurStuff ( StuffID INT NOT NULL, StuffName VARCHAR(10) NOT NULL, CONSTRAINT pk_OurStuff PRIMARY KEY CLUSTERED (StuffID) ); GO |
All we’ve done is move things around a bit and added the name of the target column (StuffID). The advantage of this approach is that we can also use it to create a composite primary key, that is, a primary key that contains more the one column. In the next example, we again create the OurStuff table, but we now include a column named StuffSubID:
|
1 2 3 4 5 6 7 8 |
CREATE TABLE OurStuff ( StuffID INT NOT NULL, StuffSubID INT NOT NULL, StuffName VARCHAR(10) NOT NULL, CONSTRAINT pk_OurStuff PRIMARY KEY CLUSTERED (StuffID, StuffSubID) ); GO |
Notice that our primary key definition specifies both the StuffID and StuffSubID columns. That means the values must be unique collectively across those two columns, although the individual columns can contain duplicate values. Note that the clustered index is created on both columns.
In some cases, you’ll want to add your primary key after the table has been created. For example, suppose we create the OurStuff table as follows:
|
1 2 3 4 5 6 |
CREATE TABLE OurStuff ( StuffID INT NOT NULL, StuffName VARCHAR(10) NOT NULL ); GO |
We’ve created no primary key to the table, nor have we indexed any of the columns. We can now use an ALTER TABLE statement to add a primary key, as shown in the following example:
|
1 2 |
ALTER TABLE OurStuff ADD CONSTRAINT pk_OurStuff PRIMARY KEY CLUSTERED (StuffID); |
All we’ve done is include an ADD clause that creates a primary key constraint, just like the one we added in the previous examples. You can also use Table Designer in Management Studio to create your primary key, rather than T-SQL. Be sure to check our SQL Server Books Online for details on how to do that.
“How do I know which columns to include in a primary key?”
Over the years, there has been much debate over which columns to include in a primary key, with no clear winner ever emerging. To make matters worse, the most common advice you’ll likely find on the subject goes something like this: “Use the column or columns that make the most sense in a given situation.” That’s a lot of help.
Many database developers default to using a simple surrogate key-a single column, usually an INT, that identifies each row in the table but is not related to the rest of the table’s data in any meaningful way. You’ll often see an IDENTITY column used for this purpose, in which a unique integer is automatically assigned to each new row added to the table.
There’s good reason for going this route. SQL Server’s query processor often uses the index associated with the primary key to perform lookups and comparisons. Part of the reason for this is that queries frequently join tables based on primary key columns, usually in conjunction with foreign keys. More often than not, then simpler the primary key, the better your queries will perform. An integer takes only four bytes, is fixed length, includes no special characters or spaces, and is easily sorted and searched. What could be better?
GUIDs are better, according to some developers, and they also have some good reason for feeling this way. For example, GUIDs can be generated at the application layer, rather than the data layer, and can provide uniqueness across the entire database. On the other hand, GUIDs are much larger than integers and do not perform as well. They can also be annoying to work with. Yet business needs might override performance considerations, especially if you’re dealing with small quantities of data, in which GUIDs will work fine.
Even if adopting GUIDs for your primary key, you still get some of the benefits from using a surrogate column. For example, you can avoid having to create a composite primary key. The more columns in the primary key, the harder the database engine has to work to sort and maintain indexes, as well as process queries that reference the primary key. And with a surrogate key, you never have to worry about unexpected NULL values or the business logic changing in a way that would require modifying the schema. A surrogate key has no meaning, other than to provide a quick and easy way to point to a row of data.
All this said, there are many who would argue that a surrogate key has no place in a relational database. They believe in the natural key, which is more in line with traditional relational thinking. A natural key has meaning within the context of the data and provides, in effect, a way into the data. Such data as social security numbers, online order numbers, employee identification numbers, or website usernames could all qualify as natural primary keys, as long as their uniqueness can be guaranteed within the context that database.
Natural keys can also make searching for relevant information easier and do not require additional columns, as is the case with surrogate keys. On they other hand, queries might not perform as well as surrogate keys and a natural key might need to include multiple columns to ensure uniqueness. Even then, uniqueness can be a challenge. For example, a table with a natural primary key based on first, middle, and last names could potentially run into duplicate values across all three columns.
In addition, natural keys might raise issues if business logic changes. For example, if a book wholesaler has been using ISBN numbers as natural primary keys, database developers will have to come up with a way to transition from the ISBN-10 standard to the ISBN-13 standard, which can mean a bit of refactoring in the database.
If you do plan to use natural keys for at least some of your tables, then you still want to keep performance in mind. For instance, if you use social security numbers, you might remove the hyphens and spaces and treat each value as an integer. You should also try to minimize the number of columns in each primary key and try to use data types that will offer your queries the best performance.
In the end, the debate will likely continue on which columns to include in your primary keys, and what we’ve covered here only touches the surface of the issues involved. Whatever you decide to do, be sure to keep both data integrity and query performance in mind. Primary keys not only ensure each row’s uniqueness throughout the table, they can be instrumental in how you query your data and maintain your database.
“Why would I create a primary key with a nonclustered index?”
There might be times when a clustered index is better served elsewhere on the table, in which case, you might choose to create a primary key with a nonclustered index. The process of creating a primary key with a nonclustered index is itself simple enough. You need only specify the NONCLUSTERED keyword, rather than the CLUSTERED keyword, as shown in the following example:
|
1 2 3 4 5 6 7 |
CREATE TABLE OurStuff ( StuffID INT NOT NULL, StuffName VARCHAR(10) NOT NULL, CONSTRAINT pk_OurStuff PRIMARY KEY NONCLUSTERED (StuffID) ); GO |
As you can see, creating the nonclustered index is quite easy. What the example doesn’t show is why you would do so in the first place.
A clustered index determines the physical sort order of the entire table, based on the key columns. In essence, a clustered index is the table. All data associated with the table is stored within the index structure. A nonclustered index is a separate structure. The indexed columns are duplicates of the original columns stored separately from the table. The index also includes pointers back to the source table, much like an index in the back of a book points to the page numbers where you can find the actual information. In addition, you can add non-key columns to a nonclustered index to facilitate faster data retrieval.
A table can include only one clustered index because you can sort the data in only one way. Queries that rely on the indexed columns tend to perform better because the data is all nicely sorted and all right there. Queries that reference key columns in a nonclustered index often have to hop from the index to the table itself to get all the data it needs. Throw a few joins in there and your query plans grow increasingly more complex.
The primary key can be a good match for the clustered index because it is often the reference point for many of your queries. For example, foreign keys typically reference the primary keys on other tables, which not only enforces referential integrity, but also helps the query optimizer maximize performance. That said, it’s not a foregone conclusion that all clustered indexes should be based on the primary keys.
When planning your table’s clustered index, you should take into account a number of considerations. For example, if a lot of nonclustered indexes point to the clustered index, the size of the clustered key columns and frequency of updates to those columns can significantly impact the nonclustered indexes, resulting in hits to both performance and maintenance schedules.
You should base your clustered index on columns that will remain relatively stable and be incremented in an orderly fashion, rather than grow randomly and change frequently. In addition, you want your clustered index to support the queries that will most commonly access the table’s data so you can take full advantage of how data is stored and the index structured. If it turns out that the primary key is best suited to the clustered index, then use it. Otherwise, create your clustered index elsewhere and create a primary key with a nonclustered index
“How do I delete a primary key?”
The process of deleting a primary key is fairly straightforward. You can use Object Explorer in Management Studio or you can use a T-SQL statement. Let’s look at how T-SQL works. First, we’ll start by creating our table, complete with a primary key named pk_OurStuff and its associated clustered index:
|
1 2 3 4 5 6 7 |
CREATE TABLE OurStuff ( StuffID INT NOT NULL, StuffName VARCHAR(10) NOT NULL, CONSTRAINT pk_OurStuff PRIMARY KEY CLUSTERED (StuffID) ); GO |
Now let’s remove the primary key. If we’re using T-SQL, we can issue an ALTER TABLE statement, as shown in the following example:
|
1 2 |
ALTER TABLE OurStuff DROP CONSTRAINT pk_OurStuff; |
Notice that we simply include a DROP CONSTRAINT clause that points to our primary key (pk_OurStuff). In many cases, though, we won’t know the name of the primary key. To find it, we can use Object Explorer or we can query the sys.key_constraints catalog view:
|
1 2 3 4 |
SELECT name FROM sys.key_constraints WHERE type = 'pk' AND OBJECT_NAME(parent_object_id) = N'OurStuff'; |
All we’re doing here is returning the primary key name for the OurStuff table. If a primary key name was provided when creating the constraint, that name will be returned; otherwise, the auto-generated name will be returned.
Clearly, deleting a primary key is an easy enough process. Be aware, though, that doing so also deletes the index associated with the primary key. If that index is clustered, that means we suddenly have a heap on our hands, which can impact all nonclustered indexes that were pointing to the clustered index. That can equate to a lot of index rebuilding and significant hits on performance, depending on the amount of data and the complexity of the queries. So consider carefully what you’re about to do before you start dropping those primary keys. Certainly don’t start dropping them on a production server during peak hours.
“How do I create a foreign key?”
Creating a foreign key is almost as easy as creating a primary key, except that SQL Server imposes several more rules on foreign keys. For example, the foreign key must reference a primary key or unique constraint, although that reference can be on the same table or on a different table. A foreign key must also have the same number of columns as the number of columns in the referenced constraint, and the data types must match between corresponding columns. In addition, the values in the foreign key columns are limited to the values in the referenced columns, with one notable exception. Foreign key columns can contain NULL values.
There’s more to be aware of, so be sure to check out SQL Server Books Online. In the meantime, let’s look at how to create a foreign key. As with other database objects, you can use Management Studio or T-SQL. We’ll stick with T-SQL. Our first task is to create our parent table. This is the table that the foreign key will reference:
|
1 2 3 4 5 6 |
CREATE TABLE StuffType ( TypeID INT NOT NULL PRIMARY KEY, TypeName VARCHAR(10) NOT NULL ); GO |
As you can see, we’ve created a simple table with two columns, one defined as the primary key. Now let’s create the child table, which includes a foreign key that references the primary key columns in the StuffType parent table:
|
1 2 3 4 5 6 7 8 9 |
CREATE TABLE OurStuff ( StuffID INT NOT NULL PRIMARY KEY, StuffName VARCHAR(10) NOT NULL, OurTypeID INT NULL, CONSTRAINT fk_StuffType FOREIGN KEY (OurTypeID) REFERENCES StuffType(TypeID) ); GO |
In this statement, we include a foreign key constraint definition named fk_StuffType. The foreign key is based on the OurTypeID column in the OurStuff table and references the TypeID column in the StuffType table. You’ll often find that developers name their foreign key columns the same as the referenced columns, but in this case I used different names so you can clearly see where the column names are positioned within the constraint definition.
Once we create the foreign key, the two tables are considered related, as illustrated in Figure 3. SQL Server will now enforce referential integrity between the two tables. That means we can’t insert any values in the OurTypeID column that do not exist in the TypeID column.
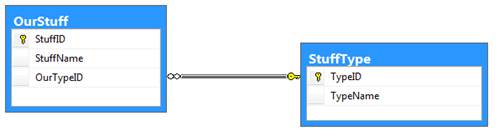
Figure 3: Foreign key defined on the TypeID column in the OurStuff table
There is another consequence to referential integrity. We cannot do anything with the StuffType table that would negatively impact the foreign key in the OurStuff table. For example, suppose we try to run the following T-SQL in order drop the StuffType table:
|
1 2 3 |
IF OBJECT_ID('StuffType', 'U') IS NOT NULL DROP TABLE StuffType; GO |
Even though we have not yet inserted data into either table, the statement will still generate the following error:
|
1 2 3 |
Msg 3726, Level 16, State 1, Line 1 Could not drop object 'StuffType' because it is referenced by a FOREIGN KEY constraint. |
Once we create the foreign key, SQL Server will prevent us from doing anything that is potentially damaging. This even extends to the data itself. For example, we would not be able to delete a row from the StuffType table if it would leave an orphaned value in the OurTypeID column in the OurStuff table. One way around this is to manually delete or update the referencing row in the child table before modifying the parent table. Another option is to include the necessary cascading options in your foreign key definition.
The foreign key cascading options determine what actions the database engine should take if you try to delete or update data in the referenced columns in the parent table. (Adding data is not a problem). For each action (delete or update), you can set one of the following four options:
- NO ACTION: The database engine raises an error if you try to modify data in the parent table that is being referenced in the child table. This is the default behavior.
- CASCADE: The database engine updates or deletes the corresponding rows in the child data if you update or delete that data in the parent table.
- SET NULL: The database engine sets the foreign key columns to
NULLin the child table if you update or delete the corresponding values in the parent table. - SET DEFAULT: The database engine sets the foreign key columns to their default values in the child table if you update or delete the corresponding values in the parent table.
In your foreign key definition, you can include both an ON DELETE clause and an ON UPDATE clause along with one of these four options. In the following T-SQL, the foreign key definition in the OurStuff table uses the CASCADE option for both clauses:
|
1 2 3 4 5 6 7 8 9 10 11 12 13 14 15 16 17 18 19 |
CREATE TABLE StuffType ( TypeID INT NOT NULL, TypeName VARCHAR(10) NOT NULL, CONSTRAINT pk_StuffType PRIMARY KEY (TypeID) ); GO CREATE TABLE OurStuff ( StuffID INT NOT NULL PRIMARY KEY, StuffName VARCHAR(10) NOT NULL, OurTypeID INT NULL CONSTRAINT fk_StuffType FOREIGN KEY (OurTypeID) REFERENCES StuffType(TypeID) ON DELETE CASCADE ON UPDATE CASCADE ); GO |
By including the ON DELETE and ON UPDATE clauses with the CASCADE option, any data modifications in the referenced columns in the parent table are reflected in the foreign key columns in the child table.
“How do I view information about a foreign key?”
To view information about a foreign key, you can do one of two things: You can dig around Object Explorer in Management Studio, or you can query a couple catalog views. I’ll leave it up to you to figure out the interface-based approach and focus on the T-SQL approach. Let’s start with a couple of tables:
|
1 2 3 4 5 6 7 8 9 10 11 12 13 14 15 16 17 18 19 20 |
CREATE TABLE StuffType ( TypeID INT NOT NULL, AltID INT NOT NULL, TypeName VARCHAR(10) NOT NULL, CONSTRAINT pk_StuffType PRIMARY KEY (TypeID, AltID) ); GO CREATE TABLE OurStuff ( StuffID INT NOT NULL PRIMARY KEY, StuffName VARCHAR(10) NOT NULL, OurTypeID INT NULL, OurAltID INT NULL, CONSTRAINT fk_StuffType FOREIGN KEY (OurTypeID, OurAltID) REFERENCES StuffType(TypeID, AltID) ON DELETE CASCADE ); GO |
The OurStuff table includes a foreign key that references the TypeID and AltID columns in the StuffType table. But suppose we don’t have these table definitions in front of us and want to view information about the foreign key. We need only to know the name of the child table. We can then make use of the sys.foreign_key_columns and sys.foreign_key_columns catalog views to retrieve the information, as shown in the following example:
|
1 2 3 4 5 6 7 8 9 10 11 12 13 |
SELECT fk.name AS ForeignKey, OBJECT_NAME(fk.parent_object_id) AS FkTable, COL_NAME(fkc.parent_object_id, fkc.parent_column_id) AS FkColumn, OBJECT_NAME(fk.referenced_object_id) AS ReferencedTable, COL_NAME(fkc.referenced_object_id, fkc.referenced_column_id) AS ReferencedColumn, delete_referential_action_desc AS OnDelete, update_referential_action_desc AS OnUpdate FROM sys.foreign_keys AS fk INNER JOIN sys.foreign_key_columns AS fkc ON fk.object_id = fkc.constraint_object_id WHERE fk.parent_object_id = OBJECT_ID('OurStuff'); |
Our query includes an inner join that joins the views based on the object ID of our child table. (It’s unfortunate that Microsoft chooses to use column names that are the same as function names or other keywords, in this case, object_id.) We then pull the data we want from the views. The following table shows the results returned by the SELECT statement:
|
ForeignKey |
FkTable |
FkColumn |
ReferencedTabe |
ReferencedColumn |
OnDelete |
OnUpdate |
|
fk_StuffType |
OurStuff |
OurTypeID |
StuffType |
TypeID |
CASCADE |
NO_ACTION |
|
fk_StuffType |
OurStuff |
OurAltID |
StuffType |
AltID |
CASCADE |
NO_ACTION |
Notice that the results include one row for each column in the foreign key. If more than one foreign key had been defined on the table, we would be viewing that information as well, but even with one, we can see the type of information returned. We get the name of the foreign key, the child and parent tables, the participating columns, and the cascading action. Because we specified no ON UPDATE clause when we defined the foreign key, SQL server uses the default setting, NO_ACTION.
“Does my foreign key have to reference a primary key in another table?”
No, it does not. Unfortunately, you’ll come across plenty of documentation that suggests otherwise, when in fact a foreign key can reference a primary key or a unique constraint. It can even reference one or more columns on which a unique index has been defined, without the formality of a constraint. (When you create a primary key or unique constraint, SQL Server automatically creates a unique index.) The key is that the referenced columns must be guaranteed to be unique. You can use any of these approaches to get there.
And we can prove it with a demonstration. First lets create our parent table, the one that will be referenced by the foreign key:
|
1 2 3 4 5 6 7 |
CREATE TABLE StuffType ( TypeID INT NOT NULL PRIMARY KEY, AltID INT NOT NULL UNIQUE, TypeName VARCHAR(10) NOT NULL ); GO |
The statement defines a primary key on the TypeID column and a unique constraint on the AltID column. As already noted, the unique constraint will automatically generate a unique index. Now let’s create the child table that contains the foreign key:
|
1 2 3 4 5 6 7 8 9 |
CREATE TABLE OurStuff ( StuffID INT NOT NULL PRIMARY KEY, StuffName VARCHAR(10) NOT NULL, OurAltID INT NULL, CONSTRAINT fk_StuffType FOREIGN KEY (OurAltID) REFERENCES StuffType(AltID) ); GO |
Notice that the foreign key is referencing the AltID column. This is the column in the parent table defined with a unique constraint. The statement runs with no problem and creates the foreign key as we would expect. This can be a handy approach when you want to enforce referential integrity based on columns other than the primary key.
“Can I create a foreign key against only part of a composite primary key?”
No. Your foreign key columns must match the number of columns in the referenced primary key or unique constraint. In addition, the data types must be the same within the corresponding columns. If you don’t have a match, you can’t create the foreign key. For example, suppose we start with the following table:
|
1 2 3 4 5 6 7 8 |
CREATE TABLE StuffType ( TypeID INT NOT NULL, AltID INT NOT NULL, TypeName VARCHAR(10) NOT NULL, CONSTRAINT pk_StuffType PRIMARY KEY (TypeID, AltID) ); GO |
The statement creates a table with a composite primary key based on the TypeID and AltID columns. Now let’s try to create a table with a foreign key that references only one of these columns:
|
1 2 3 4 5 6 7 8 9 |
CREATE TABLE OurStuff ( StuffID INT NOT NULL PRIMARY KEY, StuffName VARCHAR(10) NOT NULL, OurTypeID INT NULL, CONSTRAINT fk_StuffType FOREIGN KEY (OurTypeID) REFERENCES StuffType(TypeID) ); GO |
Although the foreign key column matches the data type of the TypeID column in the parent table, the TypeID column, by itself, is not a primary key or unique constraint. In other words, there is no unique index associated with that column alone. If we were to try to run this statement, we will receive the following error messages:
|
1 2 3 4 |
Msg 1776, Level 16, State 0, Line 1 There are no primary or candidate keys in the referenced table 'StuffType' that match the referencing column list in the foreign key 'fk_StuffType'. Msg 1750, Level 16, State 0, Line 1 Could not create constraint. See previous errors. |
If we must reference the primary key in the StuffType table, we will have to create a foreign key that references both columns in the parent table, as shown in the following CREATE TABLE statement:
|
1 2 3 4 5 6 7 8 9 10 |
CREATE TABLE OurStuff ( StuffID INT NOT NULL PRIMARY KEY, StuffName VARCHAR(10) NOT NULL, OurTypeID INT NULL, OurAltID INT NULL, CONSTRAINT fk_StuffType FOREIGN KEY (OurTypeID, OurAltID) REFERENCES StuffType(TypeID, AltID) ); GO |
Now everything works fine, but notice that we had to add the OurAltID column to the table to make it work. Even though we can do that, at least in this case, this might not be what we’re after. What we might want is for the OurTypeID column in our child table to be related only to the StuffID column in our parent table and nothing else. To make this happen, we can define a unique index (or unique constraint) on the TypeID column in the parent table, as shown in the following T-SQL code:
|
1 2 |
CREATE UNIQUE INDEX uq_TypeID ON StuffType(TypeID); |
We can then modify our foreign key definition to reference only the TypeID column in the parent table, as shown in the following example:
|
1 2 3 4 5 6 7 8 9 |
CREATE TABLE OurStuff ( StuffID INT NOT NULL PRIMARY KEY, StuffName VARCHAR(10) NOT NULL, OurTypeID INT NULL, CONSTRAINT fk_StuffType FOREIGN KEY (OurTypeID) REFERENCES StuffType(TypeID) ); GO |
The only catch to this approach is that we now have an additional index to maintain. Whenever you implement this sort of solution, keep in mind the overhead. For a numerical column like this, it might not be too big a deal, but you should weigh the costs of additional indexes nonetheless. Nothing in SQL Server comes for free.
“Should I create an index on a foreign key column?”
If your foreign key is often referenced in your queries, particularly when joining the child and parent tables that form the foreign key relationship, chances are you’ll want to create an index on the foreign key column or columns. In fact, resources that discuss SQL Server tuning often suggest that you index the foreign keys. Like any indexing strategy, however, it’s probably best to take this on a case-by-case basis. Indexing brings with it its own overhead, and there’s no sense creating indexes that are not needed. Let your queries and data be your guide.
Unlike primary keys, SQL Server doesn’t automatically create an index on a foreign key. You must do so manually. For example, suppose we’ve created the following two tables:
|
1 2 3 4 5 6 7 8 9 10 11 12 13 14 15 16 17 |
CREATE TABLE StuffType ( TypeID INT NOT NULL, TypeName VARCHAR(10) NOT NULL, CONSTRAINT pk_StuffType PRIMARY KEY (TypeID) ); GO CREATE TABLE OurStuff ( StuffID INT NOT NULL PRIMARY KEY, StuffName VARCHAR(10) NOT NULL, OurTypeID INT NULL, CONSTRAINT fk_StuffType FOREIGN KEY (OurTypeID) REFERENCES StuffType(TypeID) ); GO |
In this case, we’ve defined a foreign key on the OurTypeID column in the OurStuff table. The key references the TypeID column in the StuffType column. Because a clustered index exists on the OurStuff table, we can create only a nonclustered index on that table, as shown in the following statement:
|
1 2 |
CREATE NONCLUSTERED INDEX idx_OurTypeID ON OurStuff(OurTypeID); |
As you can see, creating the index is easy enough, but as with any indexing strategy, be sure to follow best practices. For example, the foreign key column is nullable in this case. If you anticipate a large number of rows with a high percentage of NULL values, the benefits of the index might not outweigh the overhead. Again, it depends on your particular circumstances.
“How do I temporarily disable a foreign key constraint?”
You can temporarily disable a foreign key by using an ALTER TABLE statement to disable constraint checking. Once you’ve completed whatever operations you need to perform, you should then run a different ALTER TABLE statement to re-enable constraint checking.
Being able to disable the foreign key can be useful if you have to perform an insert or update that requires you to temporarily add or modify data in the table that would normally violate the foreign key constraint. For example, if you’re working in a test environment, you might want to be able easily load and delete various types of data. You might also want to disable the foreign key if you’re modifying the table structure for any reason or performing another operation that requires you to suspend referential integrity checks.
To demonstrate how to disable a foreign key, let’s look an example. We’ll start with the following two tables:
|
1 2 3 4 5 6 7 8 9 10 11 12 13 14 15 16 17 |
CREATE TABLE StuffType ( TypeID INT NOT NULL, TypeName VARCHAR(10) NOT NULL, CONSTRAINT pk_StuffType PRIMARY KEY (TypeID) ); GO CREATE TABLE OurStuff ( StuffID INT NOT NULL PRIMARY KEY, StuffName VARCHAR(10) NOT NULL, OurTypeID INT NULL, CONSTRAINT fk_StuffType FOREIGN KEY (OurTypeID) REFERENCES StuffType(TypeID) ); GO |
Notice that we’ve defined a foreign key on the OurTypeID column in the OurStuff table. The key references the TypeID column in the StuffType column. Next, let’s insert a row of data into the StuffType table:
|
1 2 3 |
INSERT INTO StuffType VALUES(101, 'type1'); GO |
The data is inserted with no problem, as to be expected. But now suppose we want to insert a row into the OurStuff table that violates the foreign key:
|
1 2 3 |
INSERT INTO OurStuff VALUES(1001, 'stuff1', 102); GO |
We’re trying to insert the value 102 into the OurTypeID column. However, the column will currently accept only the values 101 or NULL. If we try to run this statement, we receive the following error message:
|
1 2 3 |
Msg 547, Level 16, State 0, Line 1 The INSERT statement conflicted with the FOREIGN KEY constraint "fk_StuffType". The conflict occurred in database "AdventureWorks2012", table "dbo.StuffType", column 'TypeID'. The statement has been terminated. |
But it’s possible we need to insert the value 102 only temporarily. To do so, we can disable constraint checking on the table by first running an ALTER TABLE statement before running our INSERT statement, as shown in the following example:
|
1 2 3 4 5 6 |
ALTER TABLE OurStuff NOCHECK CONSTRAINT fk_StuffType; INSERT INTO OurStuff VALUES(1001, 'stuff1', 102); GO |
This time around, we can insert the row with no problem. However, we don’t want to leave the table in its current state, so we should run another ALTER TABLE statement to re-enable constraint checking:
|
1 2 3 |
ALTER TABLE OurStuff CHECK CONSTRAINT fk_StuffType; GO |
Any values we add going forward are checked for referential integrity. The problem with this approach, though, is that the 102 remains in the table. In fact, the foreign key column is now considered to be in an untrusted state.
In most cases, when we re-enable constraint checking, we also want to confirm that all values within the column can be trusted. For that, we need to add the WITH CHECK keywords to our CHECK CONSTRAINT clause, as shown in the following example:
|
1 2 3 |
ALTER TABLE OurStuff WITH CHECK CHECK CONSTRAINT fk_StuffType; GO |
Not surprisingly, if we were to run this statement with the column in its current state, we would receive the following violation error:
|
1 2 |
Msg 547, Level 16, State 0, Line 1 The ALTER TABLE statement conflicted with the FOREIGN KEY constraint "fk_StuffType". The conflict occurred in database "AdventureWorks2012", table "dbo.StuffType", column 'TypeID'. |
Remember, you normally disable constraint checking only on a temporary basis. That means, whatever data you insert that would violate referential integrity should be addressed before reinstating constraint checking, by either updating or removing the data. For example, we might run the following UPDATE statement and then re-enable constraint check, using the WITH CHECK option:
|
1 2 3 4 5 6 7 |
UPDATE OurStuff SET OurTypeID = 101 WHERE StuffID = 1001; ALTER TABLE OurStuff WITH CHECK CHECK CONSTRAINT fk_StuffType; GO |
After we’ve run these statements, the foreign key column will be considered trusted, with all data conforming to the referential integrity. Any data going forward will also be checked to make sure it does not violate the foreign key.
“How do I create a self-referencing foreign key?”
You create a self-referencing foreign key just like you do a regular foreign key, except that the referenced column (or columns) is on the same table where you’re defining the foreign key, as shown in the following example:
|
1 2 3 4 5 6 7 8 9 |
CREATE TABLE OurStuff ( StuffID INT NOT NULL PRIMARY KEY, StuffSubID INT NULL, StuffName VARCHAR(10) NOT NULL, CONSTRAINT fk_StuffID FOREIGN KEY (StuffSubID) REFERENCES OurStuff(StuffID) ); GO |
In this example, we’re creating a foreign key on the StuffSubID column. The foreign key references the StuffID column in the same table. Now let’s add a few rows to our table:
|
1 2 3 4 5 6 7 |
INSERT INTO OurStuff VALUES (1001, NULL, 'stuff1'), (1002, 1001, 'stuff2'), (1003, 1002, 'stuff3'), (1004, 1002, 'stuff4'), (1005, 1003, 'stuff5'); GO |
As required, all values added to the StuffSubID column first exist in the StuffID column, except for the NULL value. This approach provides a handy way of representing a hierarchy within your table, as we’ve done here. For example, the rows with the StuffID values of 1003 and 1004 are associated with StuffID value 1002, and the row whose StuffID value is 1002 is associated with 1001, forming a hierarchy with 1001 at the top.
By defining a foreign key on the StuffSubID column, that column must now adhere to the rules of referential integrity, as they apply the two columns. Consequently, if we were to run the following UPDATE statement:
|
1 2 3 |
UPDATE OurStuff SET StuffSubID = 101 WHERE StuffID = 1005; |
We would receive the following error message:
|
1 2 3 |
Msg 547, Level 16, State 0, Line 1 The UPDATE statement conflicted with the FOREIGN KEY SAME TABLE constraint "fk_StuffID". The conflict occurred in database "AdventureWorks2012", table "dbo.OurStuff", column 'StuffID'. The statement has been terminated. |
And if we were to try to delete a row containing a referenced value:
|
1 |
DELETE FROM OurStuff WHERE StuffID = 1004; |
We would again receive an error message:
|
1 2 3 |
Msg 547, Level 16, State 0, Line 1 The DELETE statement conflicted with the SAME TABLE REFERENCE constraint "fk_StuffID". The conflict occurred in database "AdventureWorks2012", table "dbo.OurStuff", column 'StuffSubID'. The statement has been terminated. |
What this error message points to, beyond the obvious, is that deleting data within a self-referencing table can be a little tricky. Part of the problem is that SQL Server doesn’t let you specify any cascading options (update or delete), other than the default. Of course, you can manually delete the referencing row, before deleting the referenced row:
|
1 2 |
DELETE FROM OurStuff WHERE StuffID = 1005; DELETE FROM OurStuff WHERE StuffID = 1004; |
But if you want to make the process a bit more automatic, you’ll probably need to turn to common table expressions or triggers to create the logic you need to delete or update rows, although the use of triggers is itself a fairly controversial topic. Before embarking on any of the operations, you should review the SQL Server documentation or other resources.
“How do I view all the primary keys and foreign keys in my database?”
If all you’re after is a basic list of primary key and foreign key constraints, you can use the information_schema.table_constraints system view to retrieve the information you need. Let’s start with a couple tables.
|
1 2 3 4 5 6 7 8 9 10 11 12 13 14 15 16 17 18 19 20 21 22 23 |
CREATE TABLE StuffType ( TypeID INT NOT NULL, AltID INT NOT NULL, TypeName VARCHAR(10) NOT NULL, CONSTRAINT pk_TypeID PRIMARY KEY (TypeID), CONSTRAINT uq_AltID UNIQUE (AltID) ); GO CREATE TABLE OurStuff ( StuffID INT NOT NULL, StuffName VARCHAR(10) NOT NULL, OurTypeID INT NULL, OurAltID INT NULL, CONSTRAINT pk_StuffID PRIMARY KEY (StuffID), CONSTRAINT fk_StuffType1 FOREIGN KEY (OurTypeID) REFERENCES StuffType(TypeID), CONSTRAINT fk_StuffType2 FOREIGN KEY (OurAltID) REFERENCES StuffType(AltID) ); GO |
In our T-SQL code, we’re creating two primary keys, two foreign keys, and one unique constraint. We can then use the following query to retrieve a list of those constraints:
|
1 2 3 4 5 6 |
SELECT table_name AS TableName, constraint_name AS ConstraintName, constraint_type AS ConstraintType FROM information_schema.table_constraints ORDER BY TableName; |
The following table shows the results returned by the SELECT statement:
|
TableName |
ConstraintName |
ConstraintType |
|
OurStuff |
pk_StuffID |
PRIMARY KEY |
|
OurStuff |
fk_StuffType1 |
FOREIGN KEY |
|
OurStuff |
fk_StuffType2 |
FOREIGN KEY |
|
StuffType |
pk_TypeID |
PRIMARY KEY |
|
StuffType |
uq_AltID |
UNIQUE |
Notice that we have our table names, constraint names and constraint types. The information_schema.table_constraints view will return additional information as well, such as the table and constraint schema names, but you get the idea. Plus, if the database had contained more tables, their constraints would have been listed as well, in which case, we might want to narrow our search to specific tables:
|
1 2 3 4 5 6 7 |
SELECT table_name AS TableName, constraint_name AS ConstraintName, constraint_type AS ConstraintType FROM information_schema.table_constraints WHERE table_name = 'OurStuff' OR table_name = 'StuffType' ORDER BY TableName; |
In this same way, we could also limit the results to specific constraint types. However, for more specific information, you’ll likely want to turn to catalog views such as sys.foreign_key_columns or sys.foreign_key_columns. And, of course, you can use Object Explorer in Management Studio to find information about the constraints in your database.

Load comments