Both SQL Server 2008 R2 and SQL Server 2012 are relatively easy to install using the default choices and configurations, by simply clicking the next button a number of times: Because of this, it isn’t always installed and configured to best advantage. Many DBAs do not know that much about operating systems, servers or storage subsystems and many system administrators do not know very much about SQL Server. The choices you make when you initially prepare to install and configure a new instance of SQL Server are quite important for the performance, reliability, and security of the system.
Before you install an instance of SQL Server 2008 R2 or SQL Server 2012 on a new server, you should complete a number of steps.
Domain Accounts
You should request that a dedicated domain user account be created for use by the SQL Server service. This should just be a regular, domain account with no special rights on the domain. You do not need or want this account to be a local admin on the machine where SQL Server will be installed. The SQL Server setup program will grant the necessary rights on the machine to that account during installation.
You will also want a separate, dedicated domain user account for the SQL Server Agent service. If you are going to be installing and using other SQL Server related services such as SQL Server Integration Services (SSIS), SQL Server Reporting Services (SSRS), or SQL Server Analysis Services (SSAS), you will want dedicated domain accounts for each service. The reason you want separate accounts for each service is because they require different rights on the local machine, and having separate accounts is both more secure and more resilient, since a problem with one account won’t affect all of the SQL Server Services.
Depending on your organization, getting these domain accounts created could take anywhere from minutes to weeks to complete, so make sure to allow time for this. For each one of these accounts, you will need their logon credentials for the SQL Server setup program. You are going to want to make sure that the accounts don’t have a temporary password that must be changed during the next login. If they are set up that way, make sure to change them to use a strong password, and record this information in a secure location.
Installing, Patching and Configuring the Operating System
While you are waiting on these domain accounts, you will want to get the operating system installed, patched and configured on your new database server. You will want to use either Windows Server 2008 R2 SP1 or Windows Server 2012 when it is available. If you are planning on using Windows Failover Cluster Services, either for a traditional, shared storage Failover Cluster Instance or for SQL Server 2012 AlwaysOn Availability Groups, you will need to use the Enterprise Edition of the operating system.
For basic redundancy purposes, it is pretty common to install the operating system to an internal, two-drive RAID 1 array, managed by a hardware RAID controller. This will keep the server from going down due to the loss of a single hard drive. After the operating system has been installed, you will want to use either Windows Update or an internal Windows Server Update Services (WSUS) server to get all of the required Windows Updates downloaded and installed. After the initial operating system installation and subsequent Windows Updates are complete, you should manually defragment the C: drive, since it will have a significant amount of fragmentation after all of this activity.
At the operating system level, you need to check these four items:
- Confirm that the Windows power plan is set to high performance
- Confirm that the processors are running at full speed using CPU-Z
- Confirm that the Perform volume maintenance tasks right has been granted to the SQL Server service account
- Conform that the Lock pages in memory right has been granted to the SQL Server service account
By default, Windows Server 2008 and above will set the Windows power plan to the Balanced power plan. This will reduce electrical consumption by reducing the clock multiplier (and clock speed) of your processors when your system is under a light load. It can also reduce the voltage supplied to things like PCI-E expansion slots, which can affect things like RAID controllers, Host Bus Adapters (HBAs), and Fusion-io cards. When the system encounters a heavier load, the clock multiplier will quickly be increased back to full speed, and full voltage will be restored to the rest of the system.
Reducing electrical consumption is good for extending the battery life in a laptop, and it is good for the environment, but it is not a good idea for a mission critical database server. This is because this “throttle up” mechanism does not react quickly enough to avoid having a negative effect on performance, particularly for certain popular processor families such as the Intel Xeon 5500, 5600, 7500 and E7 series (the Intel Nehalem and Westmere families). This is especially important for OLTP workloads with frequent, short-duration queries. I have seen and heard of a typical range of a 15-25% performance hit for Nehalem and Westmere systems using the default Balanced power plan compared to the High performance power plan. The newer Intel Sandy Bridge and Ivy Bridge processors handle power management better and do not seem to be nearly as sensitive to this as the older processors. The Control Panel applet that you use to change the Windows power plan is shown in Figure 1. You can change this setting in Windows, and the effect will show up immediately, with no reboot required.

Figure 1: Windows Server 2008 R2 Power Options
After you have changed the Windows power plan to High performance, you should use a utility such as CPU-Z to confirm that your processor cores are not being throttled back due to some form of hardware power management. A screenshot of CPU-Z, showing an Intel Xeon E5-2690 processor that is not being throttled back is shown in Figure 2.

Figure 2: CPU-Z Showing Processor Core Speed
Hardware Power Management Settings
Hardware power management is controlled in your main system BIOS setup, where you usually can choose between an overall power management setting of None, OS Control, or Hardware. If you see your processor cores running at less than their rated clock speed in CPU-Z (after you have changed to the High performance power plan in Windows), you should go into your main BIOS setup during the initial stages of the Power On Self-Test (POST) sequence, and change your hardware power management to either None or OS Control, as you see in Figure 3.
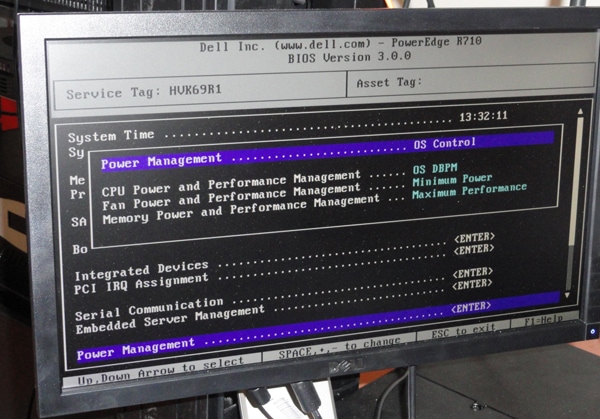
Figure 3: Power Management Setting in Main System BIOS
Policy Settings and Rights for the SQL Server service account
After you have taken care of the OS and hardware power management settings, you will want to grant the “Perform volume maintenance tasks” right on your database server to the SQL Server service account, using the Group Policy Editor, which you can start by typing GPEDIT.MSC in a Run window. After you navigate to Windows Settings â Security Settings â Local Policies â User Rights Assignment, you will want to find the “Perform volume maintenance tasks” right in the right-hand pane of the editor window. Then you should double-click on the item, and then add the logon for the SQL Server service account to grant that right to the SQL Server service. This is shown in Figure 4.
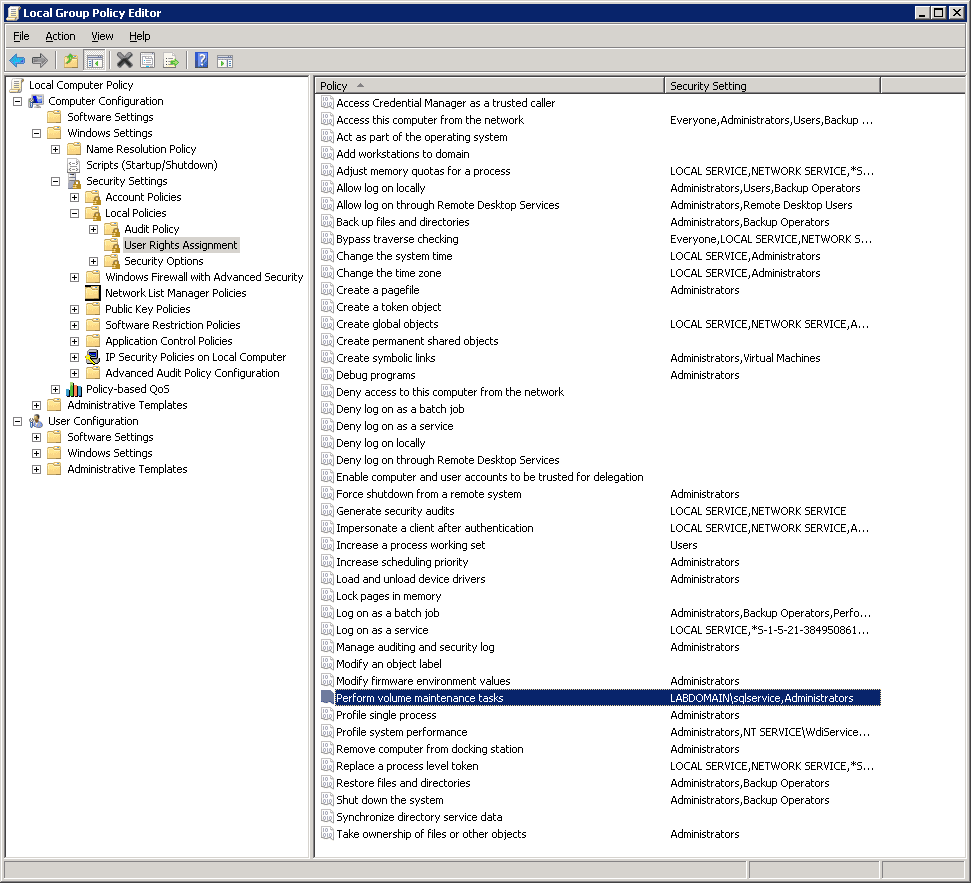
Figure 4: Perform Volume Maintenance Tasks Right
The reason to do this is in order to allow SQL Server to skip the default step of “zeroing out” the space within a SQL Server data file after it is created, grown, or restored. This can save a lot of time, anywhere from seconds to many, many minutes, depending of the initial size of the file or file growth and your I/O subsystem performance, so it makes it much easier to proactively manage the size of your data files. It also can have a dramatic effect on the time it takes to restore a database from a full database backup, which is important for meeting your Recovery Time Objective (RTO) goals.
There is a security risk, slight in my opinion, associated with granting this right to the SQL Server service account. There is a possibility that a SQL Server Administrator who was not also a Windows Local Administrator could open and read the contents of recently deleted files that they would not otherwise have access to. Kimberly Tripp talked about this risk in more detail several years ago on her blog.
Keep in mind that this setting only works for SQL Server data files (including TempDB), and not for SQL Server log files. If SQL Server was already installed before you enabled this right, you would have to restart the instance in order for the change to take effect.
While you are in the Group Policy Editor, you should go ahead and double-click on the “Lock pages in memory” right, and add the SQL Server service account logon information to grant that right to the SQL Server service account. This will prevent the operating system from paging out memory from the SQL Server process if the operating system is under memory pressure. This used to be a very common issue with the x64 version of SQL Server 2005 running on Windows Server 2003. It has become less common with newer versions of the operating system and SQL Server, but I still think it is a good idea to enable LPIM on a new system. When you enable LPIM on a system, it is even more important to set a reasonable Max Server Memory setting for your SQL Server instance, depending on what SQL Server components are running on the system, in order to ensure that your operating system is never under memory pressure.
By default, LPIM will only work with SQL Server Enterprise Edition. If you have a newer build of SQL Server 2005 or 2008 Standard Edition, or any build of SQL Server 2008 R2 or 2012 Standard Edition, you can add TF 845 to your SQL Server startup options in order to be able to enable LPIM. If SQL Server was already installed before you enabled LPIM, you would have to restart the instance in order for the change to take effect. The screens for setting LPIM are shown in Figures 5 and 6.
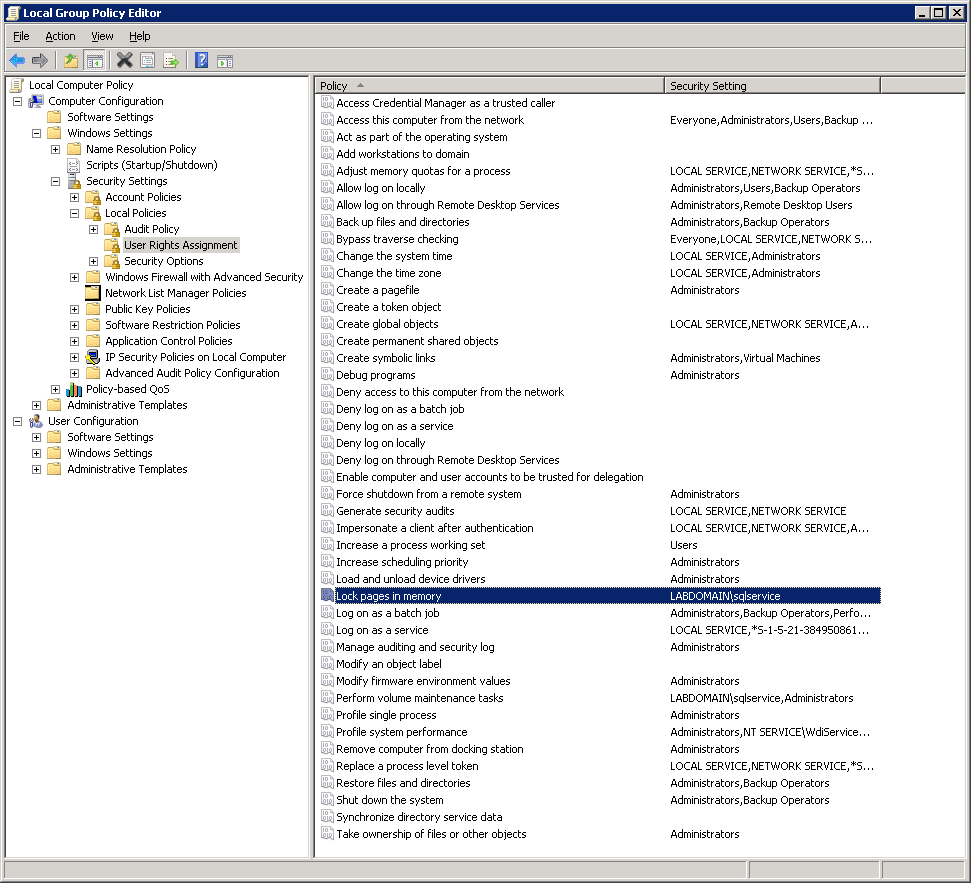
Figure 5: Lock Pages in Memory Right
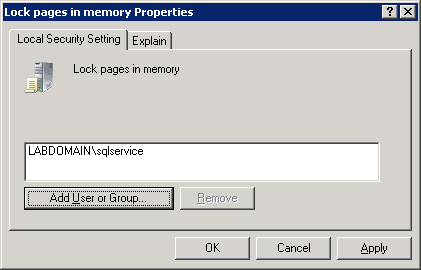
Figure 6: Granting Right to SQL Server Service Account
Checklist before Installing SQL Server:
So now we have the operating system properly configured with the appropriate settings and rights granted to the SQL Server service account. Here are the next steps we need to complete before we are ready to install SQL Server:
- The main BIOS on the server is up to date
- You have decided whether to enable Intel hyper-threading in your BIOS
- All other firmware (for RAID controllers, HBAs, NICs, backplanes, etc.) is up to date
- All of the necessary drivers for the motherboard chipset, NICs, RAID controllers are installed and functioning properly
- Your database server has a static IP address and has been added to the correct Windows domain
- You have a standardized naming scheme for your logical disks and directories
- You have considered your workload and I/O performance requirements when requesting your logical disk requirements
- All of your logical disks have been provisioned and presented to the host machine
- All of your logical disks have been added and formatted with Windows Disk Management
- You have tested the I/O performance of your logical disks using SQLIO
- You have access to the SQL Server installation media and license keys
- You know the login credentials for all of the SQL Server related service accounts
- You know which SQL Server components need to be installed on this instance
- You have downloaded the latest SQL Server Service Pack and/or Cumulative Update for your major version of SQL Server
- There are no pending reboots in Windows
The first installment of this series has laid out the main steps required in order to get a new machine with a fresh copy of the operating system completely ready to install SQL Server properly. This is to maximize performance, reliability, and security. By following these steps, you are more likely to experience a smooth installation of SQL Server, and so avoid a lot of headaches over the long term.
Load comments