The series so far:
- Power BI Introduction: Tour of Power BI — Part 1
- Power BI Introduction: Working with Power BI Desktop — Part 2
- Power BI Introduction: Working with R Scripts in Power BI Desktop — Part 3
- Power BI Introduction: Working with Parameters in Power BI Desktop — Part 4
- Power BI Introduction: Working with SQL Server data in Power BI Desktop — Part 5
- Power BI Introduction: Power Query M Formula Language in Power BI Desktop — Part 6
- Power BI Introduction: Building Reports in Power BI Desktop — Part 7
- Power BI Introduction: Publishing Reports to the Power BI Service — Part 8
- Power BI Introduction: Visualizing SQL Server Audit Data — Part 9
Power BI Desktop, the downloadable application that supports the Power BI service, lets you define parameters that you can use in various ways when working with datasets. The parameters are easy to create and can be incorporated into the import process or later to refine a dataset or add dynamic elements. For example, you can create parameters that supply connection information to a data source or that provide predefined values for filtering data.
This article demonstrates how to create a set of parameters to use with data imported from a local SQL Server instance. The examples are based on data from the AdventureWorks2017 database, but you can use an earlier version of the database or whatever database you choose, as long as the returned data follows a structure similar to what is used here. Just be sure to update the parameter values accordingly as you work through the article.
Adding Connection-Specific Parameters
Some data source connections in Power BI Desktop—such as SharePoint, Salesforce Objects, and SQL Server—let you use parameters when defining the connection properties. For example, if retrieving data from SQL Server, you can use a parameter for the SQL Server instance and a parameter for the target database.
Because parameters are independent of any datasets, you can create them before adding a dataset or at any time after creating your datasets. However, you must define them and set their initial values in Query Editor. The parameters you create are listed in the Queries pane, where you can view and update their values, as well as reconfigure their settings.
In this article, you will create two connection parameters for retrieving data from a SQL Server database. The first parameter will include a list of SQL Server instances that could host the source data. (Only one instance needs to work in this case. The rest can be for demonstration purposes only.)
To create the parameter, open Query Editor, click the Manage Parameters down arrow on the Home ribbon, and then click New Parameter. In the Parameters dialog box, type SqlSrvInstance in the Name text box, and then type a parameter description in the Description text box.
From the Type drop-down list, select Text, and from the Suggested Values drop-down list, select List of values. When you select the List of values option, a grid appears, where you type in the individual values you want to assign to the variable, as shown in the following figure. Be sure that at least one of those values is the name of an actual SQL Server instance.
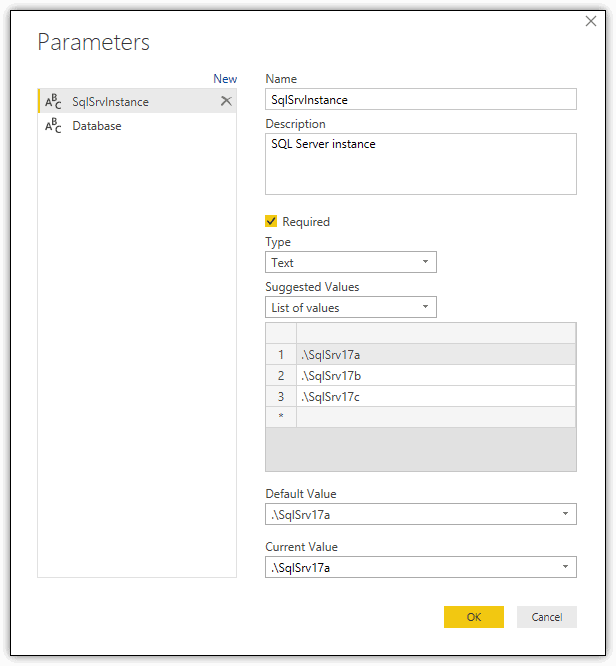
After you type the list of values, select a default value from the Default Value drop-down list and then select the variable’s current value from the Current Value drop-down list. In the figure above, a local SQL Server instance named SqlSrv17a is used for both the default and current values.
Click OK to close the Parameters dialog box. Query Editor adds the parameter to the Queries pane, with the current value shown in parentheses. When you select the parameter, Query Editor displays the Current Value drop-down list and the Manage Parameter button in the main pane, as shown in the following figure.
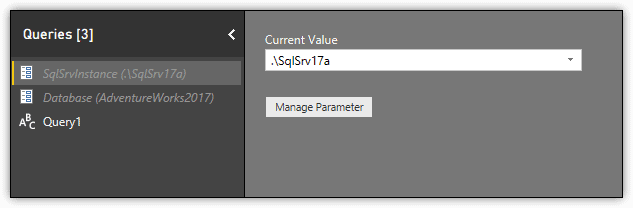
You can change the current value at any time by selecting a different one from the Current Value drop-down list, or you can change the parameter’s settings by clicking the Manage Parameter button, which returns you to the Parameters dialog box.
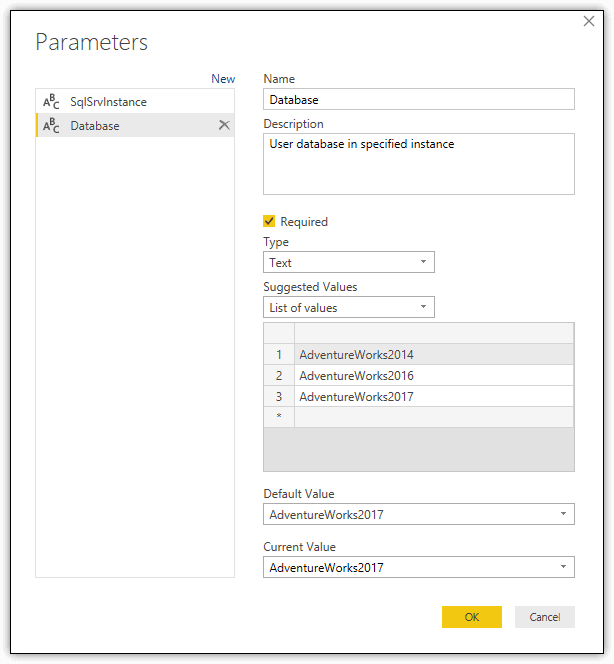
To create the parameter for the target database, repeat the process, but name the parameter Database, as shown in the following figure. Be sure to provide at least one valid database in your list of databases. When you click OK, Query Editor adds the parameter to the Queries pane, just like it did for the SqlSrvInstance parameter.
That’s all there is to creating the connection parameters. You can also configure parameters with different data types, such as decimals or dates, or with different value formats. For example, you can configure the parameter to accept any value or to use values from a list query, a type of query that contains only one column. You can create a list query manually by using an M statement, or you can create a list query based on a regular dataset, although this approach still seems somewhat buggy. For this article, you’ll stick with lists, but know you have other options.
Using Parameters to Connect to a Data Source
With your parameters defined, you’re ready to connect to the SQL Server instance and retrieve data from the target database. If you haven’t already done so, apply your changes in Query Editor and close the window.
For this exercise, you will be running a T-SQL query, but before you try to do this, verify that the Require user approval for new native database queries property is disabled. If it is enabled, you will receive an error when trying to run the query. To access the property, click the File menu, point to Options and settings, and then click Options. In the Options dialog box, go to the Security category, clear the property’s checkbox if selected, and click OK.
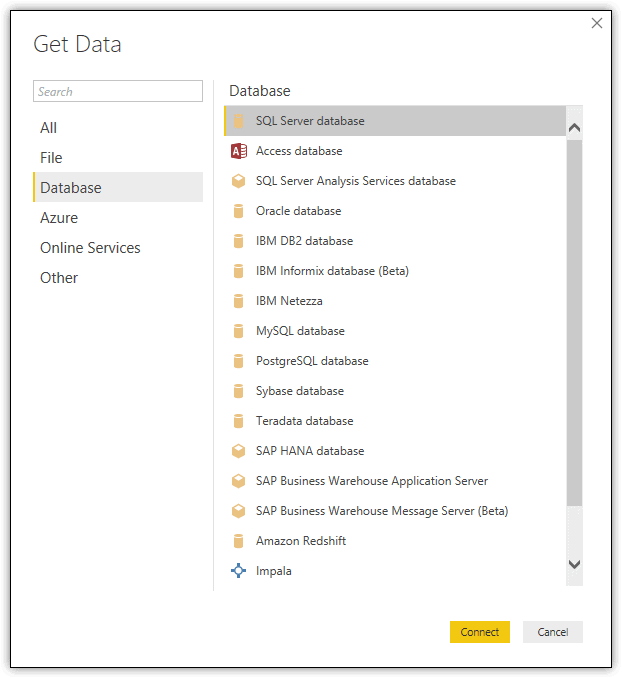
Then, in the main Power BI Desktop window, go to Data view and click Get Data on the Home ribbon. In the Get Data dialog box, navigate to the Database connections and select SQL Server database, as shown in the following figure.
When you click the Connect button, the SQL Server database dialog box appears. In the Server section at the top of the dialog box, click the down arrow associated with the first option (the one to the left) and then click Parameter. The second option will change from a text box to a drop-down list that contains the two parameters you just created. Select SqlSrvInstance, and then repeat the process in the Database section, only this time, select Database.
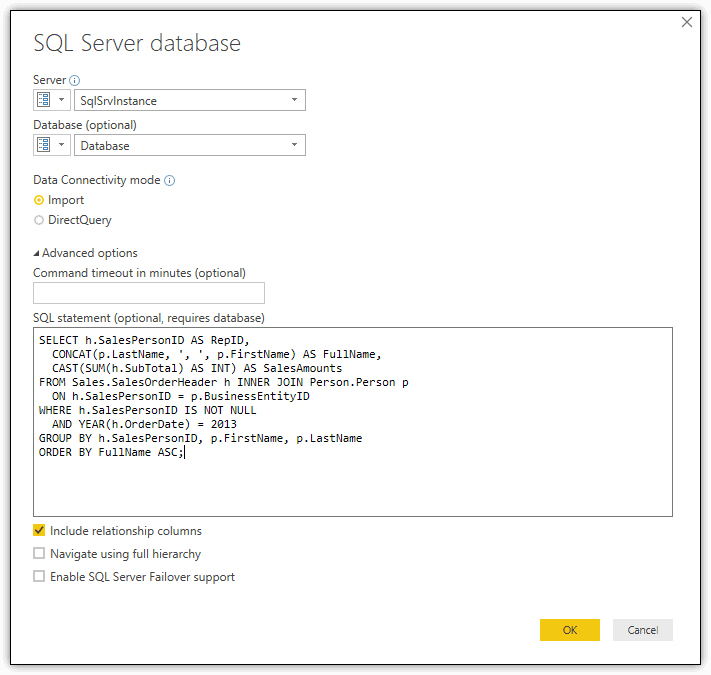
Next, click the Advanced options arrow and enter the following T-SQL statement in the SQL statement box (or a comparable statement appropriate for your data):
|
1 2 3 4 5 6 7 8 9 |
SELECT h.SalesPersonID AS RepID, CONCAT(p.LastName, ', ', p.FirstName) AS FullName, CAST(SUM(h.SubTotal) AS INT) AS SalesAmounts FROM Sales.SalesOrderHeader h INNER JOIN Person.Person p ON h.SalesPersonID = p.BusinessEntityID WHERE h.SalesPersonID IS NOT NULL AND YEAR(h.OrderDate) = 2013 GROUP BY h.SalesPersonID, p.FirstName, p.LastName ORDER BY FullName ASC; |
The SQL Server database dialog box should now look similar to the one shown in the following figure, with the SqlSrvInstance and Database parameters selected.
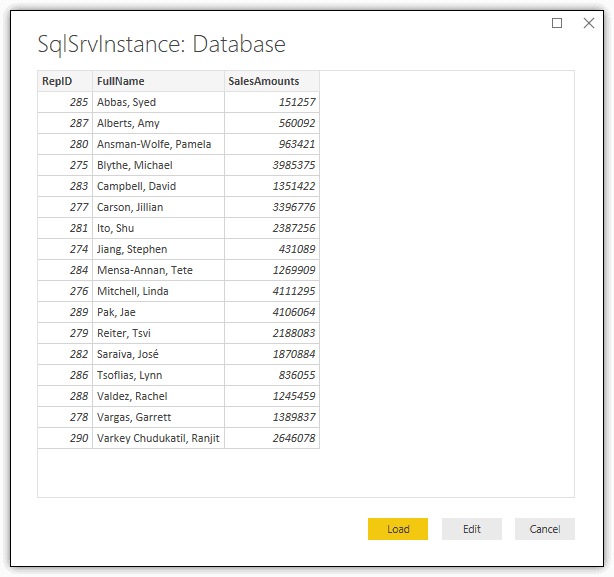
When you click OK, Power BI Desktop displays a preview window (assuming everything is working as it should), with the name of the two parameters at the top, as shown in the following figure.
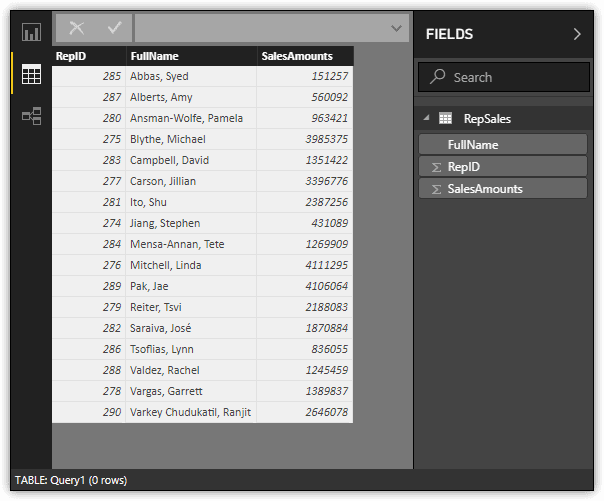
When you click the Load button, Power BI Desktop adds the dataset to Data view. Before taking any other steps, rename the dataset to RepSales or something to your liking. You should end up with a dataset that looks similar to the one shown in the following figure.
By defining parameters for the connection properties, you can easily change their values at any time, should you need to retrieve the data from a different SQL Server instance or database. You can also use the same parameters for multiple datasets, saving you the trouble of having to repeat connection information each time you create a dataset based on the same data source.
Later in the article, you’ll learn more about working with existing parameters after they’ve been incorporated into your dataset. But for now, open Query Editor and view the M statement associated with the dataset’s Source step in the Applied Steps section, as shown in the following figure.
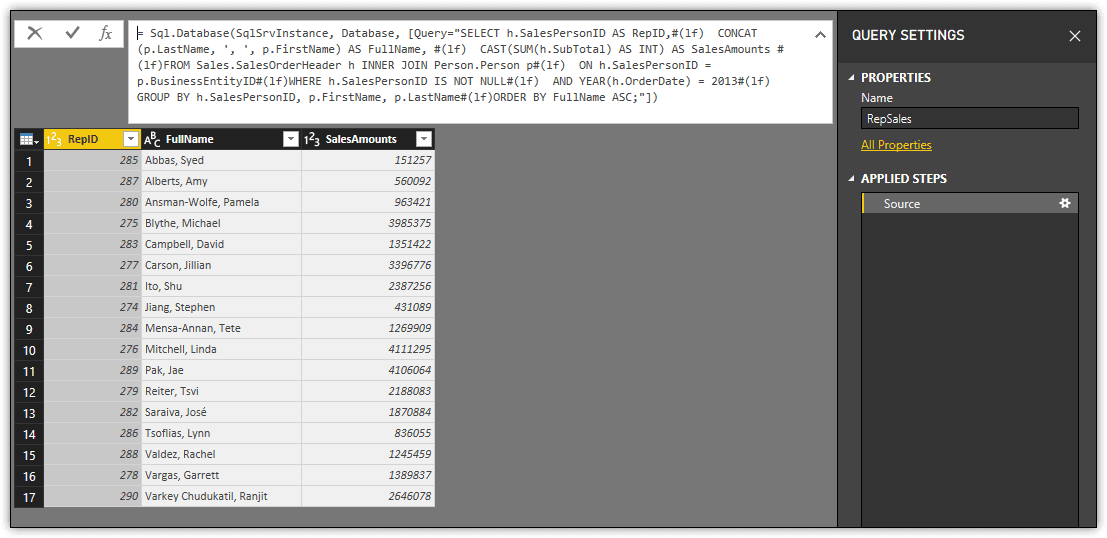
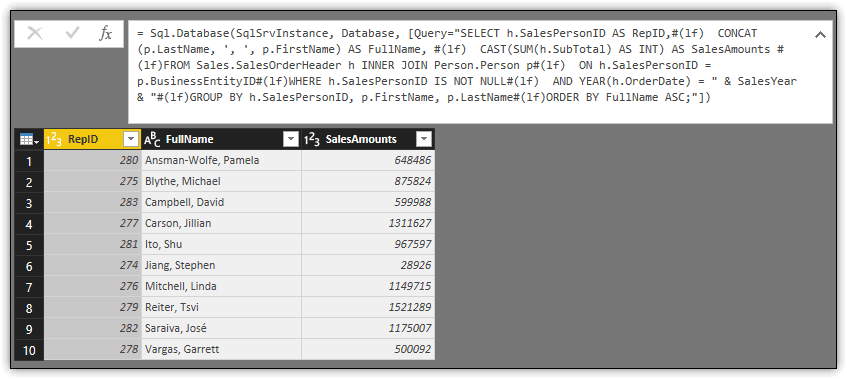
If you examine the M statement closely, you’ll see that the SQL Server connection data references the SqlSrvInstance and Database parameters. They’re included as the first two arguments to the Sql.Database function. I’ve copied the statement here and highlighted the two parameters for easier viewing:
|
1 |
= Sql.Database(SqlSrvInstance, Database, [Query="SELECT h.SalesPersonID AS RepID,#(lf) CONCAT(p.LastName, ', ', p.FirstName) AS FullName, #(lf) CAST(SUM(h.SubTotal) AS INT) AS SalesAmounts #(lf)FROM Sales.SalesOrderHeader h INNER JOIN Person.Person p#(lf) ON h.SalesPersonID = p.BusinessEntityID#(lf)WHERE h.SalesPersonID IS NOT NULL#(lf) AND YEAR(h.OrderDate) = 2013#(lf)GROUP BY h.SalesPersonID, p.FirstName, p.LastName#(lf)ORDER BY FullName ASC;"]) |
An interesting implication of all this is how easily you can reference parameters within your M statements, providing you with a very powerful and flexible tool for customizing the applied steps that make up your dataset.
Adding Parameters to Filter Data
In some cases, you might want to use parameters to filter a dataset, rather than applying a Filtered Rows step, an approach that can be inflexible and difficult to update. For example, you might want to use a parameter in place of the hard-coded 2013 specified the WHERE clause of the original T-SQL statement:
|
1 |
YEAR(h.OrderDate) = 2013 |
You can replace the hard-coded value with a parameter that supports a range of values. To do so, create a parameter just like you saw earlier, only this time, name the parameter SalesYear, define a list that contains the years 2011 through 2014, and set the default and current values to 2011, as shown in the following figure.

After you’ve created the parameter, update the M statement associated with the dataset’s Source step by replacing the 2013 value with the following code snippet (including the quotation marks):
|
1 |
" & SalesYear & " |
Once you’ve updated the code, click the checkmark to the left of the statement to verify that your changes are formatted correctly and that you didn’t somehow break the code. The statement and dataset should now look similar to those shown in the following figure.
To test the new variable, select SalesYear in the Queries pane and choose a different year from the default 2011. Then re-select the RepSales dataset and verify that the data has been updated.
Adding Parameters to Control Statement Logic
In some cases, you might want to use parameters to control a query’s logic, rather than just filtering data. For example, the SELECT clause in the original T-SQL statement uses the SUM aggregate function to come up with the total sales for each sales rep:
|
1 |
CAST(SUM(h.SubTotal) AS INT) AS SalesAmounts |
You can instead insert a parameter in the M statement that allows you to apply a different aggregate function. First, create a parameter name AggType and then define a list that includes one item for each function, using the SUM function as the default and current values, as shown in the following figure.
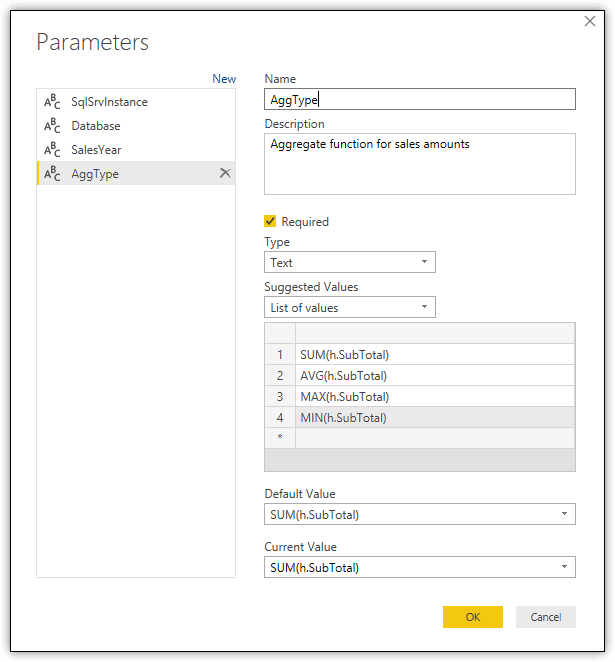
I’ve included the SubTotal column within the options in part to keep the logic clearer, but also to demonstrate that you can summarize the data based on other columns as well, as long as your dataset supports them. For example, you dataset might also include the DiscountAmounts column, which provides the total sales amounts, less any discounts. In such cases, each parameter option can define the specific function and column, including such values as SUM(h.DiscountAmounts) and AVG(h.SubTotal).
After you create the parameter, update the M statement associated with the dataset’s Source step by replacing the hard-coded SUM(h.SubTotal) fragment with the following snippet (including the quotes):
|
1 |
" & AggType & " |
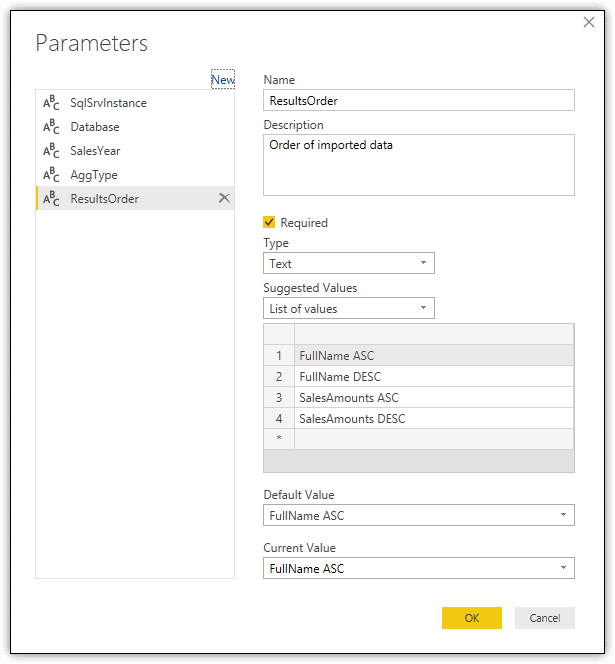
You can also do something similar with the original ORDER BY clause, using a variable to provide options for how to order the data. First, create a variable named ResultsOrder. Then, for each option in the list, specify the column on which to base the sorting (FullName or SalesAmounts) and whether the sorting should be done in ascending or descending order, as shown in the following figure. In this case, the option FullName ASC is used for the default and current values.
Once you’ve created the parameter, update the M statement by replacing the FullName ASC code fragment with the following snippet (including the quotes):
|
1 |
" & ResultsOrder & " |
Your M statement and dataset should now look similar to the ones shown in the following figure.

Once you understand how to incorporate parameters into your M statements, you have a wide range of options for manipulating data and making your datasets more flexible and accommodating, without having to add a lot of steps to you query. Just be sure that whenever you make any changes, you apply and save them so you know they work and won’t get lost.
Using Parameters to Name Dataset Object
Another fun thing you can do with parameters is to use them for applying dynamic names to objects. For example, you can change the name of the SalesAmounts column to one that reflects the sales year and type of aggregation being applied. A simple way to do this is to first add a Renamed Columns step to your dataset in Query Editor and then update the associated M statement to include the parameter values.
To add the Renamed Columns step, right-click the SalesAmounts column header, click Rename, type Sales as a temporary column name, and then press Enter. Query Editor adds the Renamed Columns step to the Applied Steps section, along with the following M statement:
|
1 |
= Table.RenameColumns(Source,{{"SalesAmounts", "Sales"}}) |
To incorporate the SalesYear and AggType parameters into the statement, replace Sales with the following code:
|
1 |
Sales (" & SalesYear & "-" & Text.Range(AggType, 0, 3) & ") |
The concatenation operator (&) joins the name Sales with the two variable values, which are separated by a dash and enclosed in parentheses. The Text.Range function retrieves only the first three characters from the AggType variable.
After you update the statement, be sure to verify your changes. The dataset and M statement should now look similar to the ones shown in the following figure.
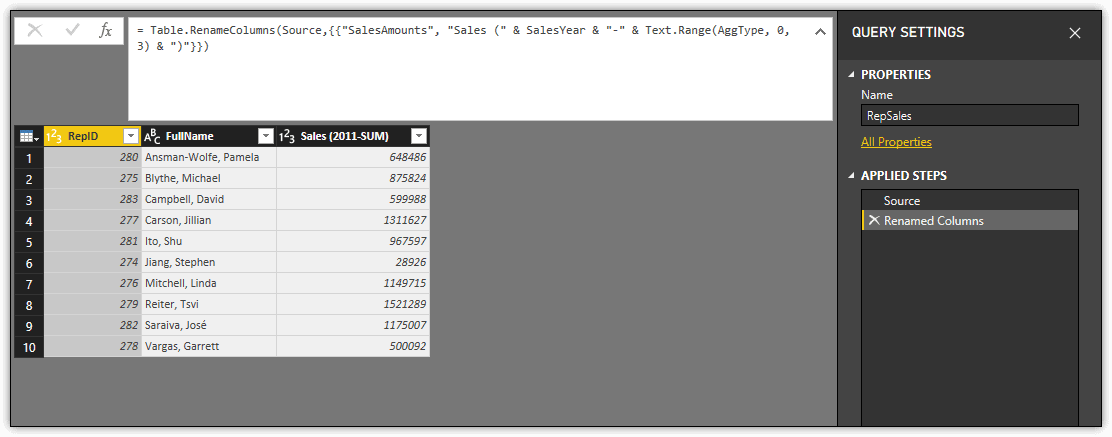
Notice that the name of the dataset’s third column now includes the year and function in parentheses, making it easy to see what parameter values have been applied to the data set.
Working with Parameters in Data View
As you saw earlier, to change a parameter value in Query Editor, you need to select the parameter in the Queries pane and update its value accordingly. However, this can be a cumbersome process, especially when you want to update multiple parameter values concurrently.
Fortunately, you can set parameter values directly in Data view. To set the values, click the Edit Queries down arrow on the Home ribbon and then click Edit Parameters. When the Enter Parameters dialog box appears, select the values you want to apply to your datasets and then click OK. The following figure shows the Enter Parameters dialog box and the current parameter settings.
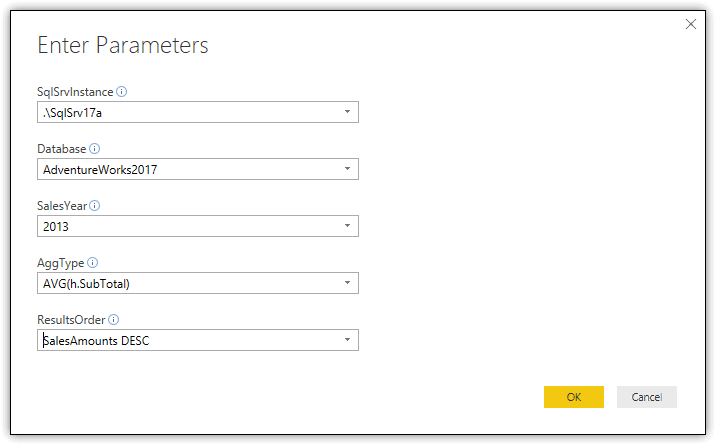
Although the Edit Parameters option name and the Enter Parameters dialog box name are somewhat misleading, the features they represent provide an effective way to update the parameter values and in turn update the data. Be aware, however, that the changes you make here apply to all datasets using the parameters. If you want to include similar types of parameters in multiple datasets, but you do not what them to all share the same values, you should create parameters specific to the dataset, naming them in such a way to make them easily distinguishable from each other.
Once you know how to set the parameter values, you can try different variations, viewing the dataset each time you apply the new settings. For example, the following figure shows the dataset after applying the parameter settings shown in the previous figure.
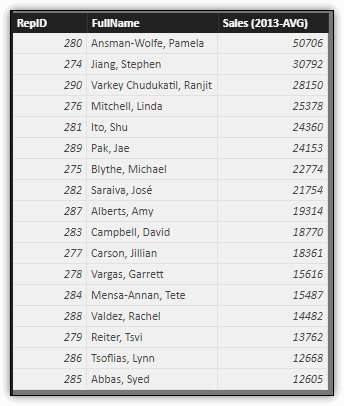
Notice that the Sales column includes the year and aggregation type in the column name and that the data is sorted based on the Sales values, in descending order. You can also change the parameter values while in Report view, allowing you to see you changes immediately within your visualizations.
Clearly, the parameter capabilities help to make Power BI Desktop an even more robust and flexible tool, and you can use parameters in a variety of ways, regardless of where the data originates. The more comfortable you become working with parameters, the more effectively you can use them, and the more control you’ll have over your datasets.