
One of the new features in SQL Server 2019 is SQL Server Big Data Clusters, and one part of this feature is PolyBase. Now you may wonder: Hasn’t PolyBase been around for quite a while? And you’re right! PolyBase was introduced in SQL Server 2016 and is also a key feature in Azure SQL Data Warehouse to bring in data from flat files sitting on an HDFS Cluster. It treats these sources as external tables which you can query through T-SQL just like any local table stored in your SQL database.
So, what’s new then? In SQL Server 2019, Microsoft greatly enhanced the capabilities of PolyBase. Instead of only flat files, you can now bring in data residing on other relational and non-relational data sources such as other SQL Servers, Oracle, Teradata or MongoDB.
Microsoft is using PolyBase – a technology which has been around since SQL Server 2016 – to deliver a solution for data virtualisation.
Data integration has been accomplished in the past by using tools like SSIS, PowerShell, bcp and others to copy data from one data source to another. Data virtualisation allows the data to be queried at its original source. This means that any query against such data becomes a real-time query while at the same time, it avoids the redundancy of storing data in two places. From a user perspective, a query against a PolyBase table is no different than against a regular table so you may also offload and switch local tables into external tables at some point without breaking any queries. Such a change can, of course, imply substantial positive or negative performance impacts.
One potential use case would be offloading older data to cheaper storage and servers or even to Azure while still having it accessible within your central data hub through PolyBase.
What will I need to do to use the new PolyBase capabilities?
First, you will need an installation of SQL Server 2019, which is currently in the Customer Technology Preview (CTP) phase. You can download the latest preview here.
During the installation, you must also add the PolyBase feature:
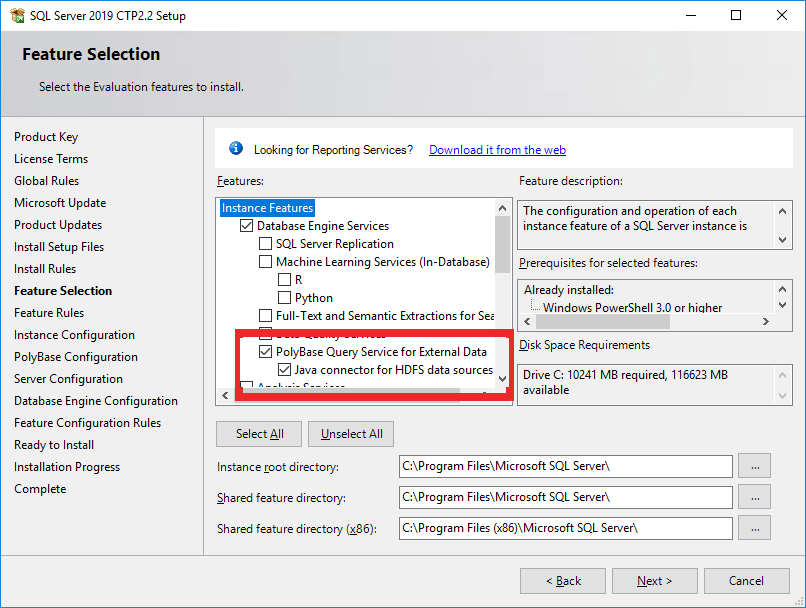
If you plan to use PolyBase against a Teradata source, you will need the C++ Redistributable 2012.
If you are using Chocolatey, you can install it using this line in a command prompt:
|
1 |
choco install vcredist2012 -y |
In the PolyBase Configuration screen, you can decide between a standalone as well as a scale-out option. Both will work, however the standalone option is recommended unless you have a specific interest or need in the additional installation overhead that comes with scale-out.
Once the installer has finished, connect to your SQL Server instance to enable Polybase. This is done through a small T-SQL script:
|
1 2 |
exec sp_configure @configname = 'polybase enabled', @configvalue = 1; RECONFIGURE |
TCP-IP must also be enabled. Be sure to review the PolyBase installation instructions for more information. After enabling the feature, restart your SQL Server instance. PolyBase is now ready to use.
OK, I got it installed. But how do I use it? How can I query another SQL Server?
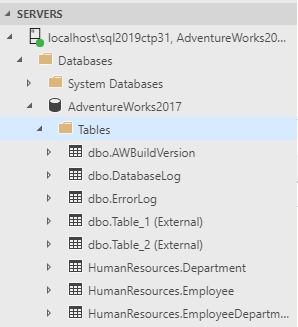
Once you connect a table from another server using PolyBase, you’ll see the table listed just as if the table was local. The table is read-only, however, and has the word “External” next to the name when viewing from ADS. At this time, you won’t see the tables in the Object explorer in SSMS, but you can still query them from that tool.
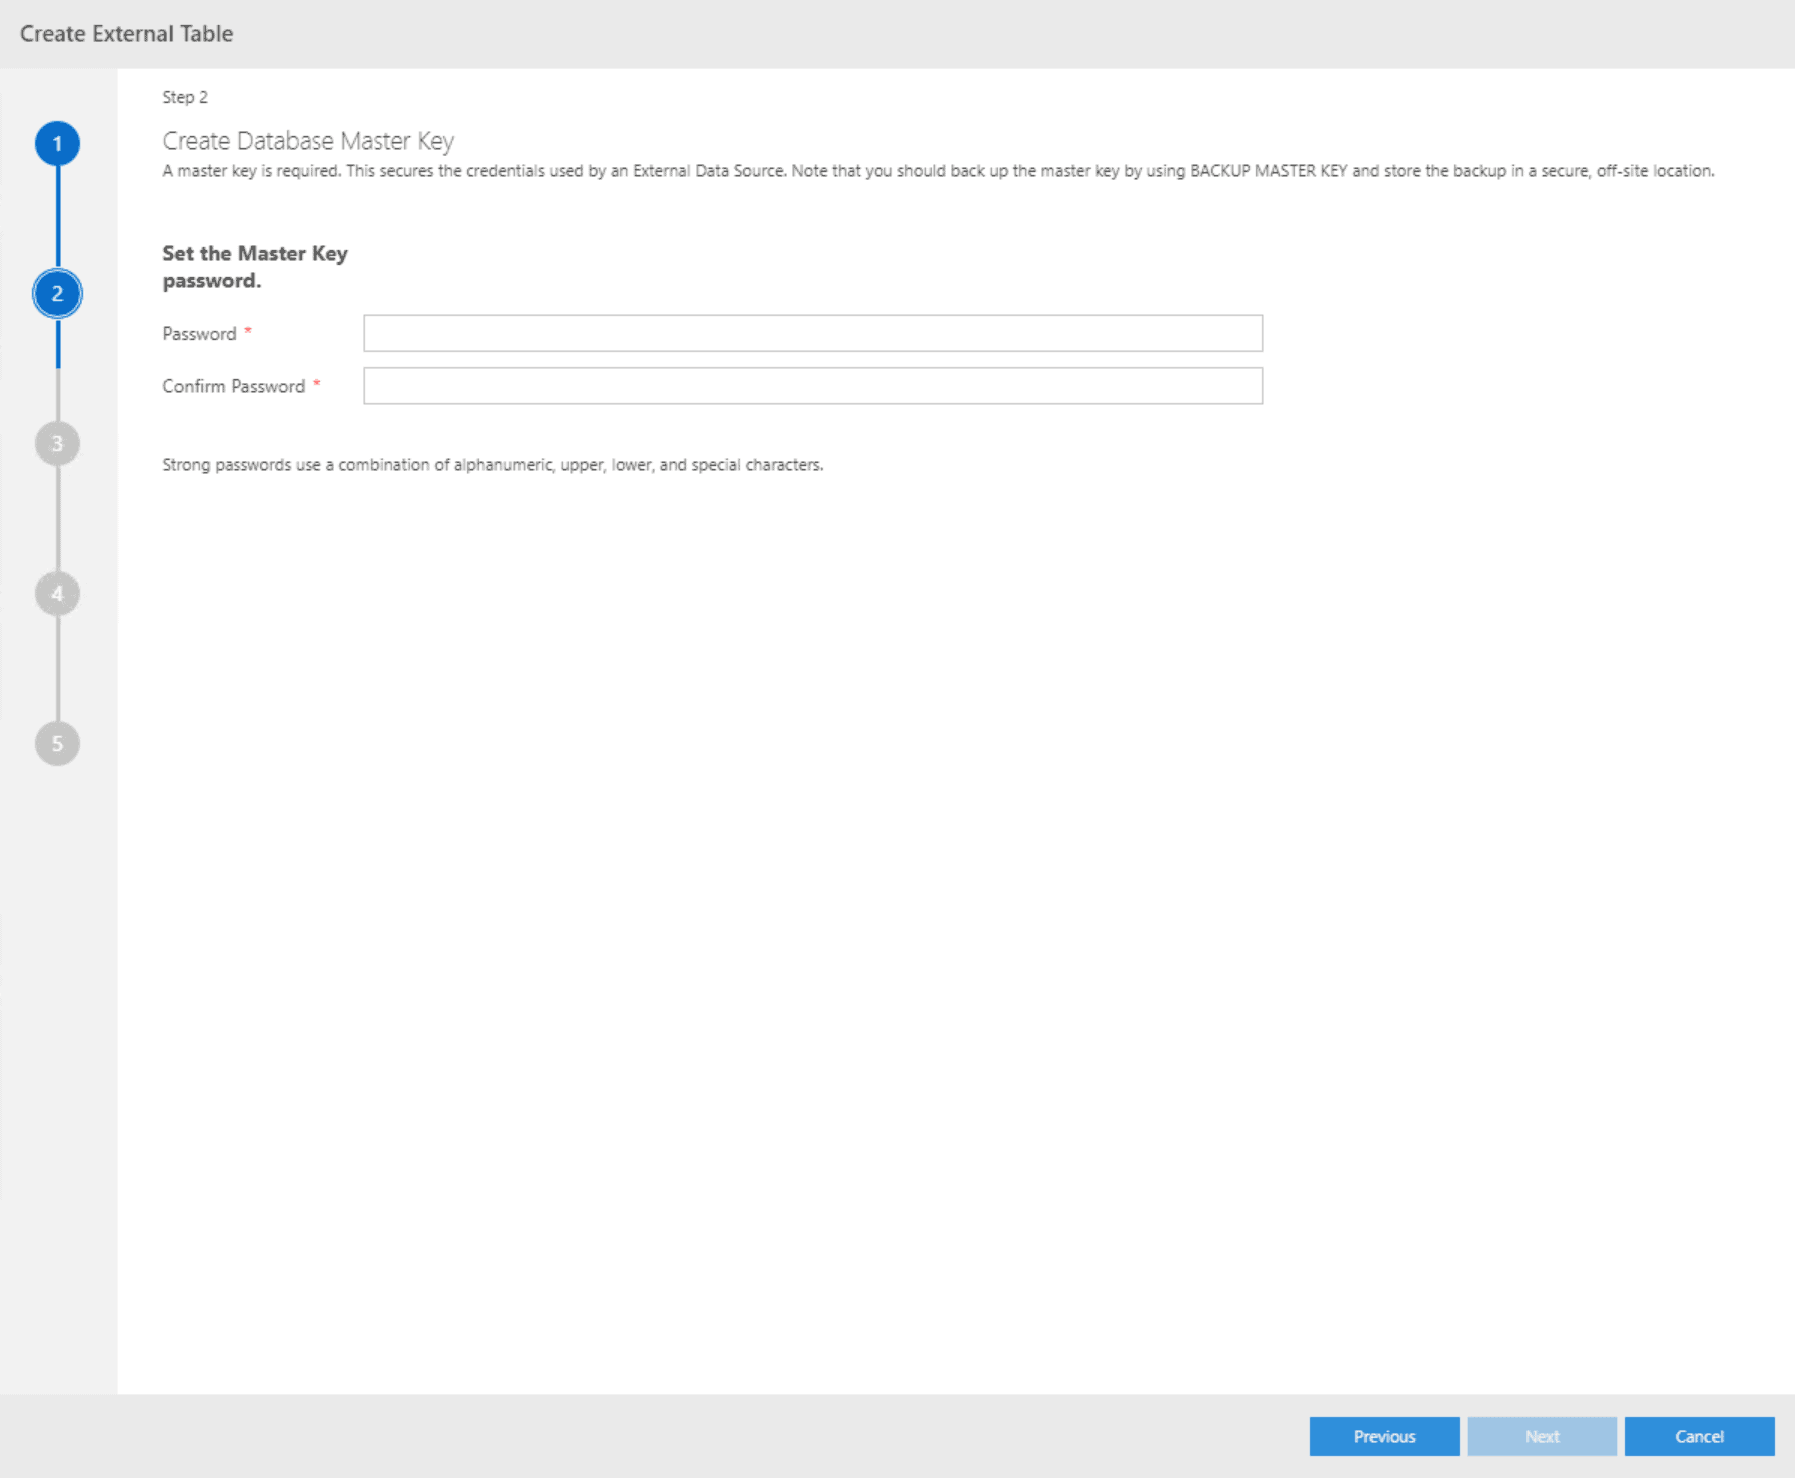
To add a table from another SQL Server as a PolyBase source to your database, you will need a master key (to encrypt credentials), credentials to connect to the other database (PolyBase only supports simple authentication), the external data source itself (server- and database name) as well as the definition of the table(s) you want to add.
While you can achieve all this through T-SQL, the easiest way is to make use of the external table wizard in Azure Data Studio (ADS). To get the wizard, you will need to add the SQL Server 2019 extension for Azure Data Studio. Follow the instructions on the download page to perform the installation.
Note that at the time of this writing, you must change the downloaded file’s extension from .zip to .vsix.
Before getting started, make sure that the source instance is using mixed-mode and set up a SQL Server login with read permission to the table you will link.
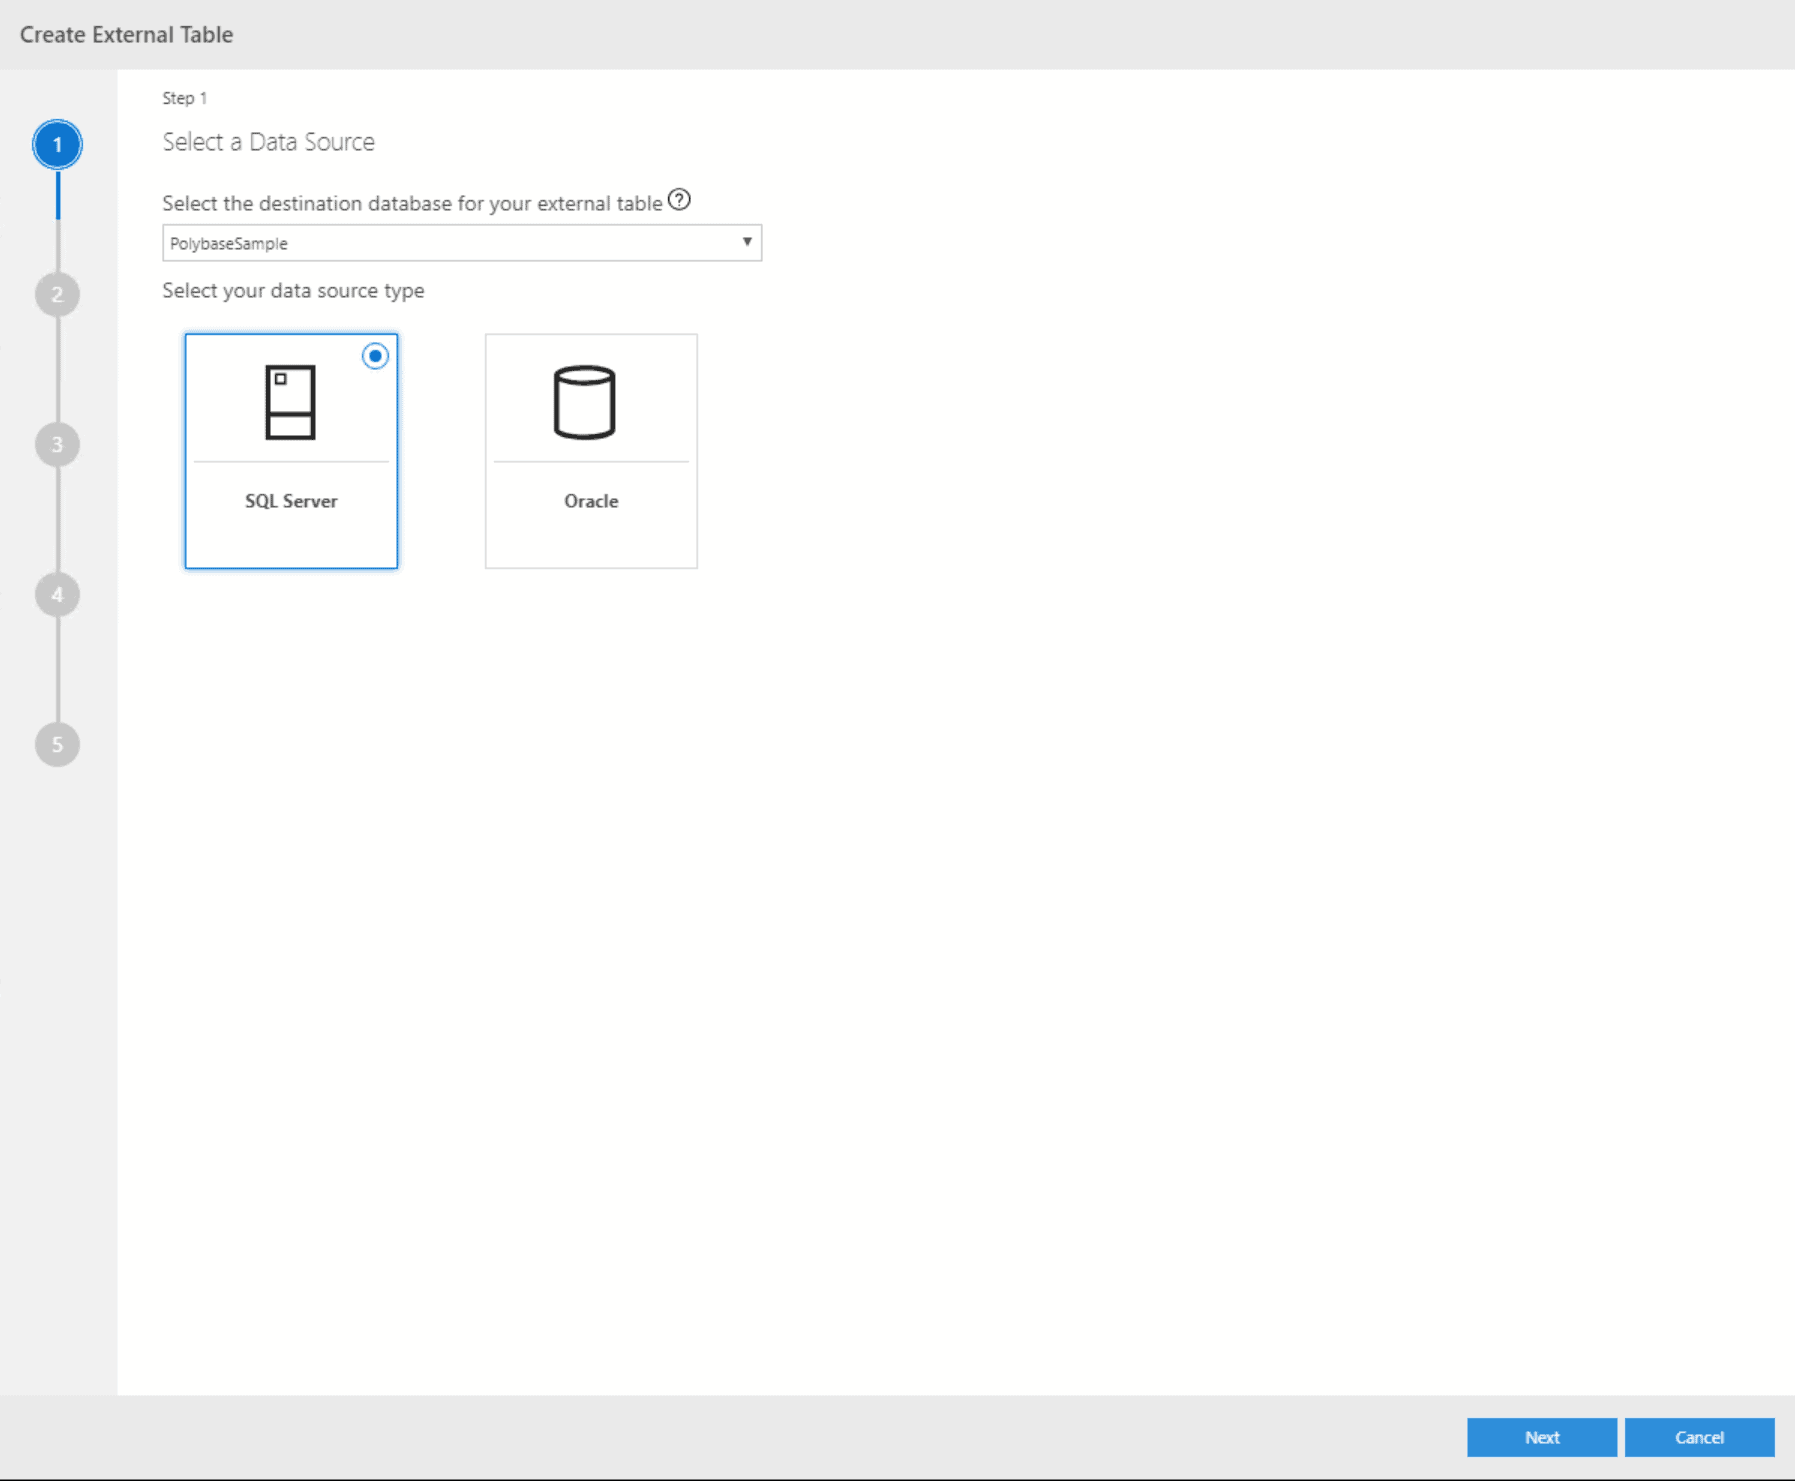
To open the wizard, connect to the instance running PolyBase and the database where you want to see the external table. Right-click the user database and select “Create External Table.”

The wizard will first prompt you to confirm the destination database and pick a data source. While PolyBase in SQL Server 2019 supports a wide range of external sources like Teradata or DB2, the Wizard currently only supports SQL Server and Oracle. There is another wizard for flat files. All others will need manual scripting. In this case, select SQL Server.
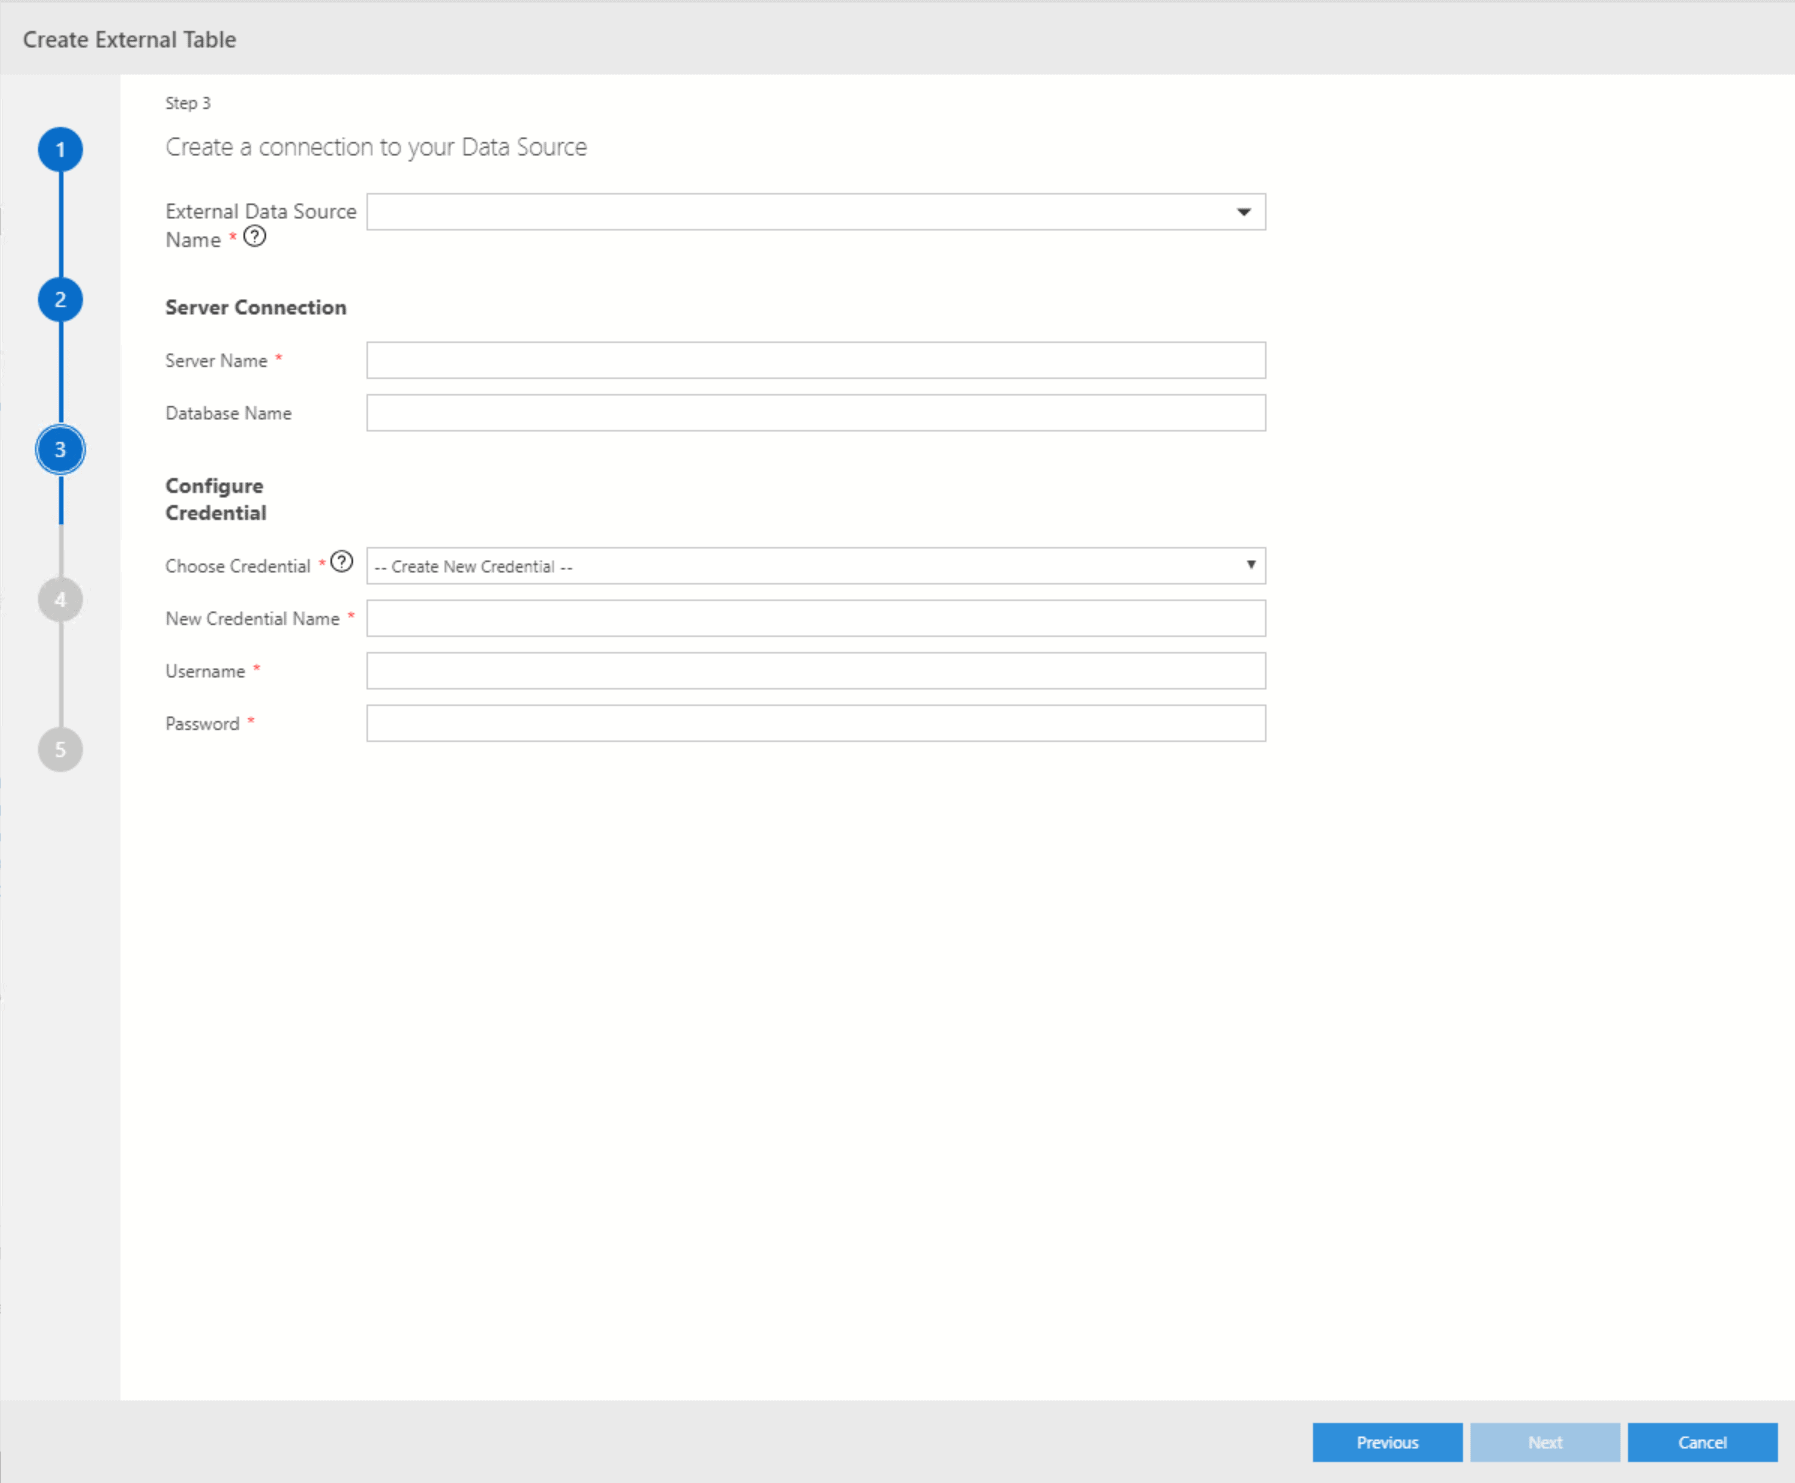
As SQL Server will store the usernames and passwords required to connect to the external data sources, these need to be encrypted. This requires a master key to be set on the source database which will be taken care of by the wizard if no key exists yet:
 In the next step, you need to provide a server as well as a database name. Supply a name for the new Credential and add the login and password that you created. This will link the login to the new Credential which will be used to connect to the source instance.
If you have created such a connection and credentials before, you can re-use them by picking their respective entry from the select box:
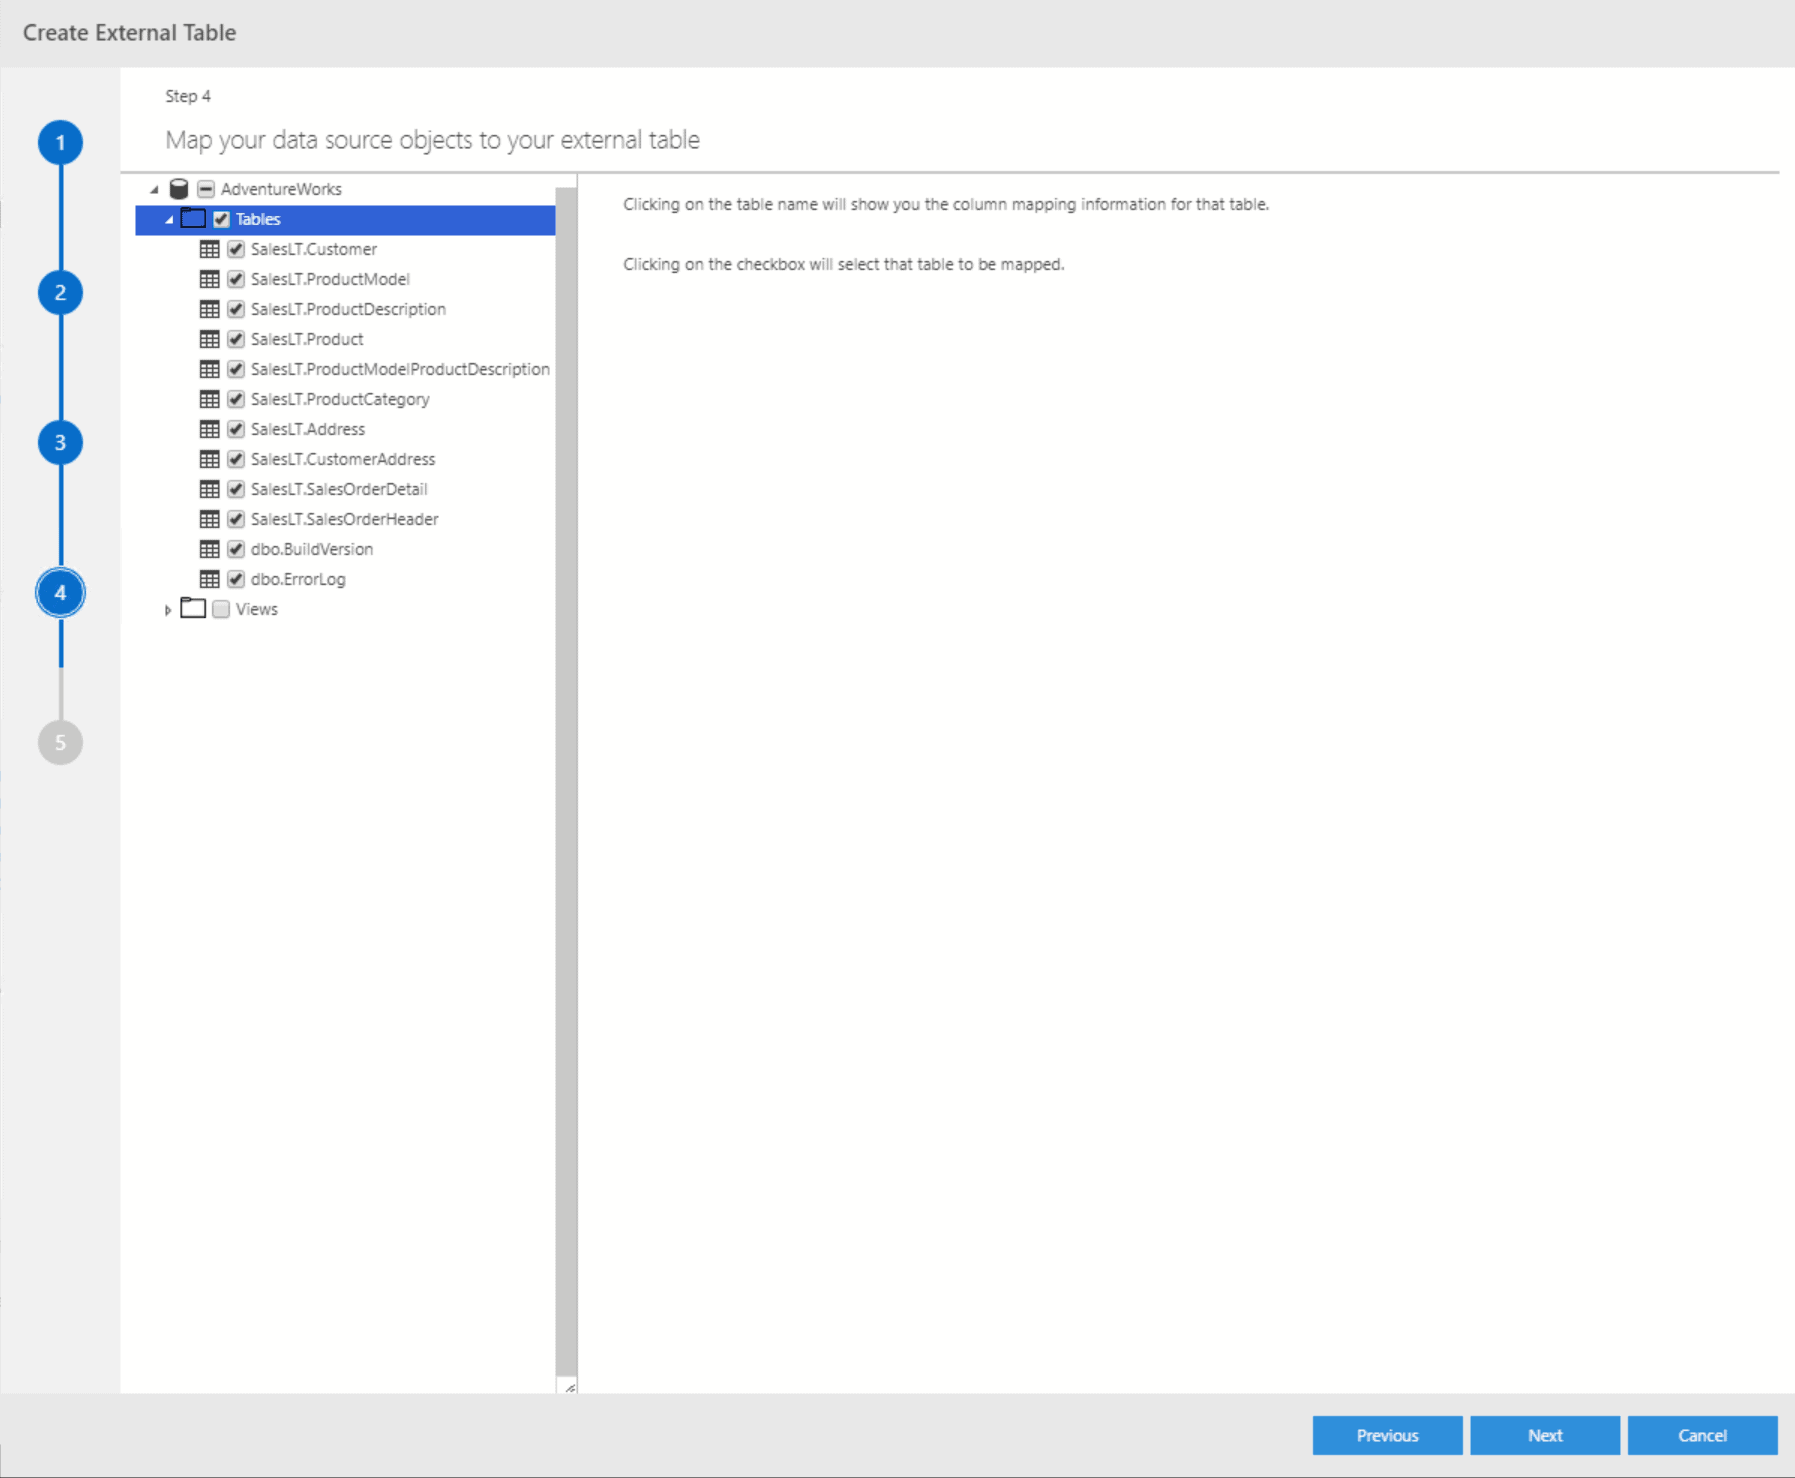
Now that you have a connection to the external server, the wizard will get a list of all tables and views included in the respective source database. You can either select specific tables/views or all of them:
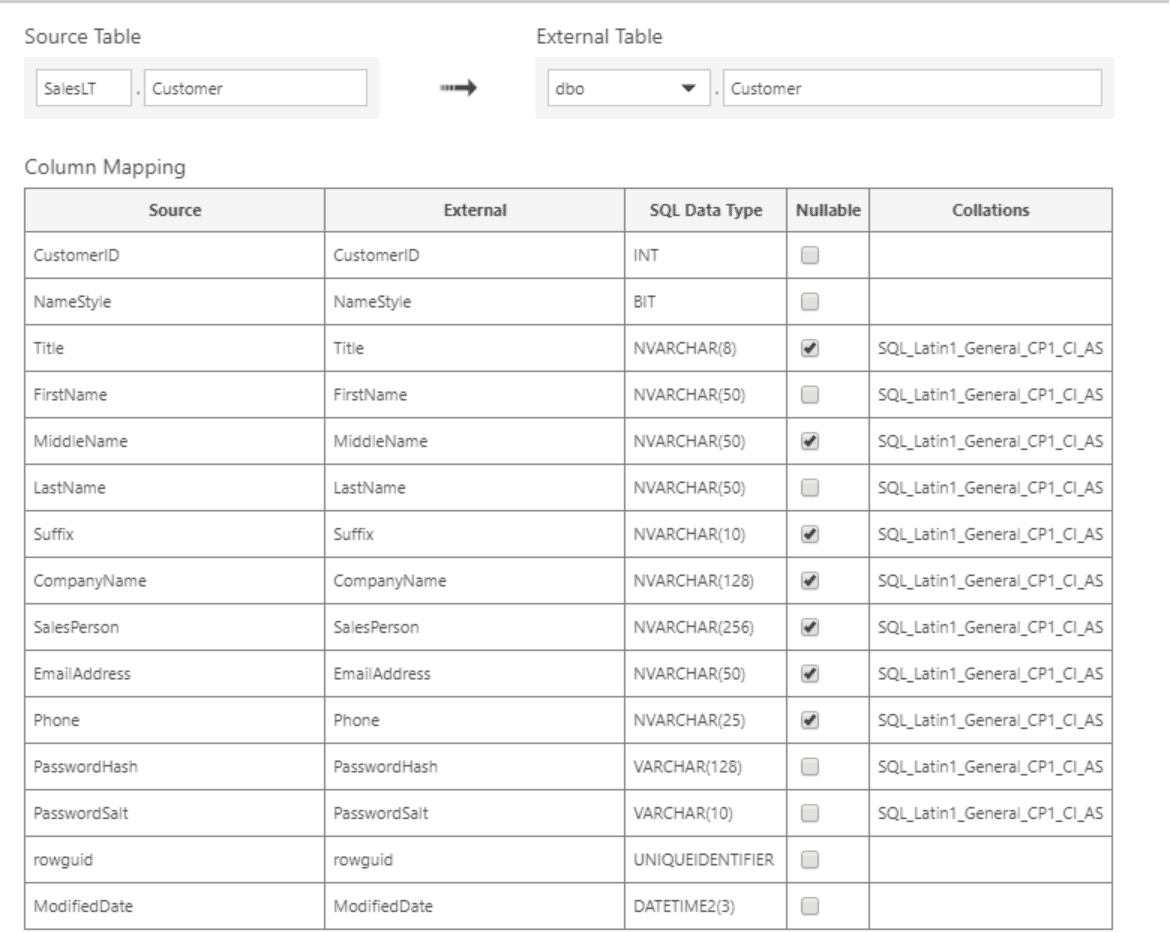
 For each table, you can change the schema as well as the table name itself which will be used for the external table as shown in the next figure. To get to this screen, just click in the respective table name in the list. You cannot change data types or column names, nor can you only select specific columns. While this may seem confusing to begin with, it doesn’t matter as no actual data is being transferred at this point. That will only happen later when querying the table, and at this point, your SELECT statement will determine which columns are about to be used.
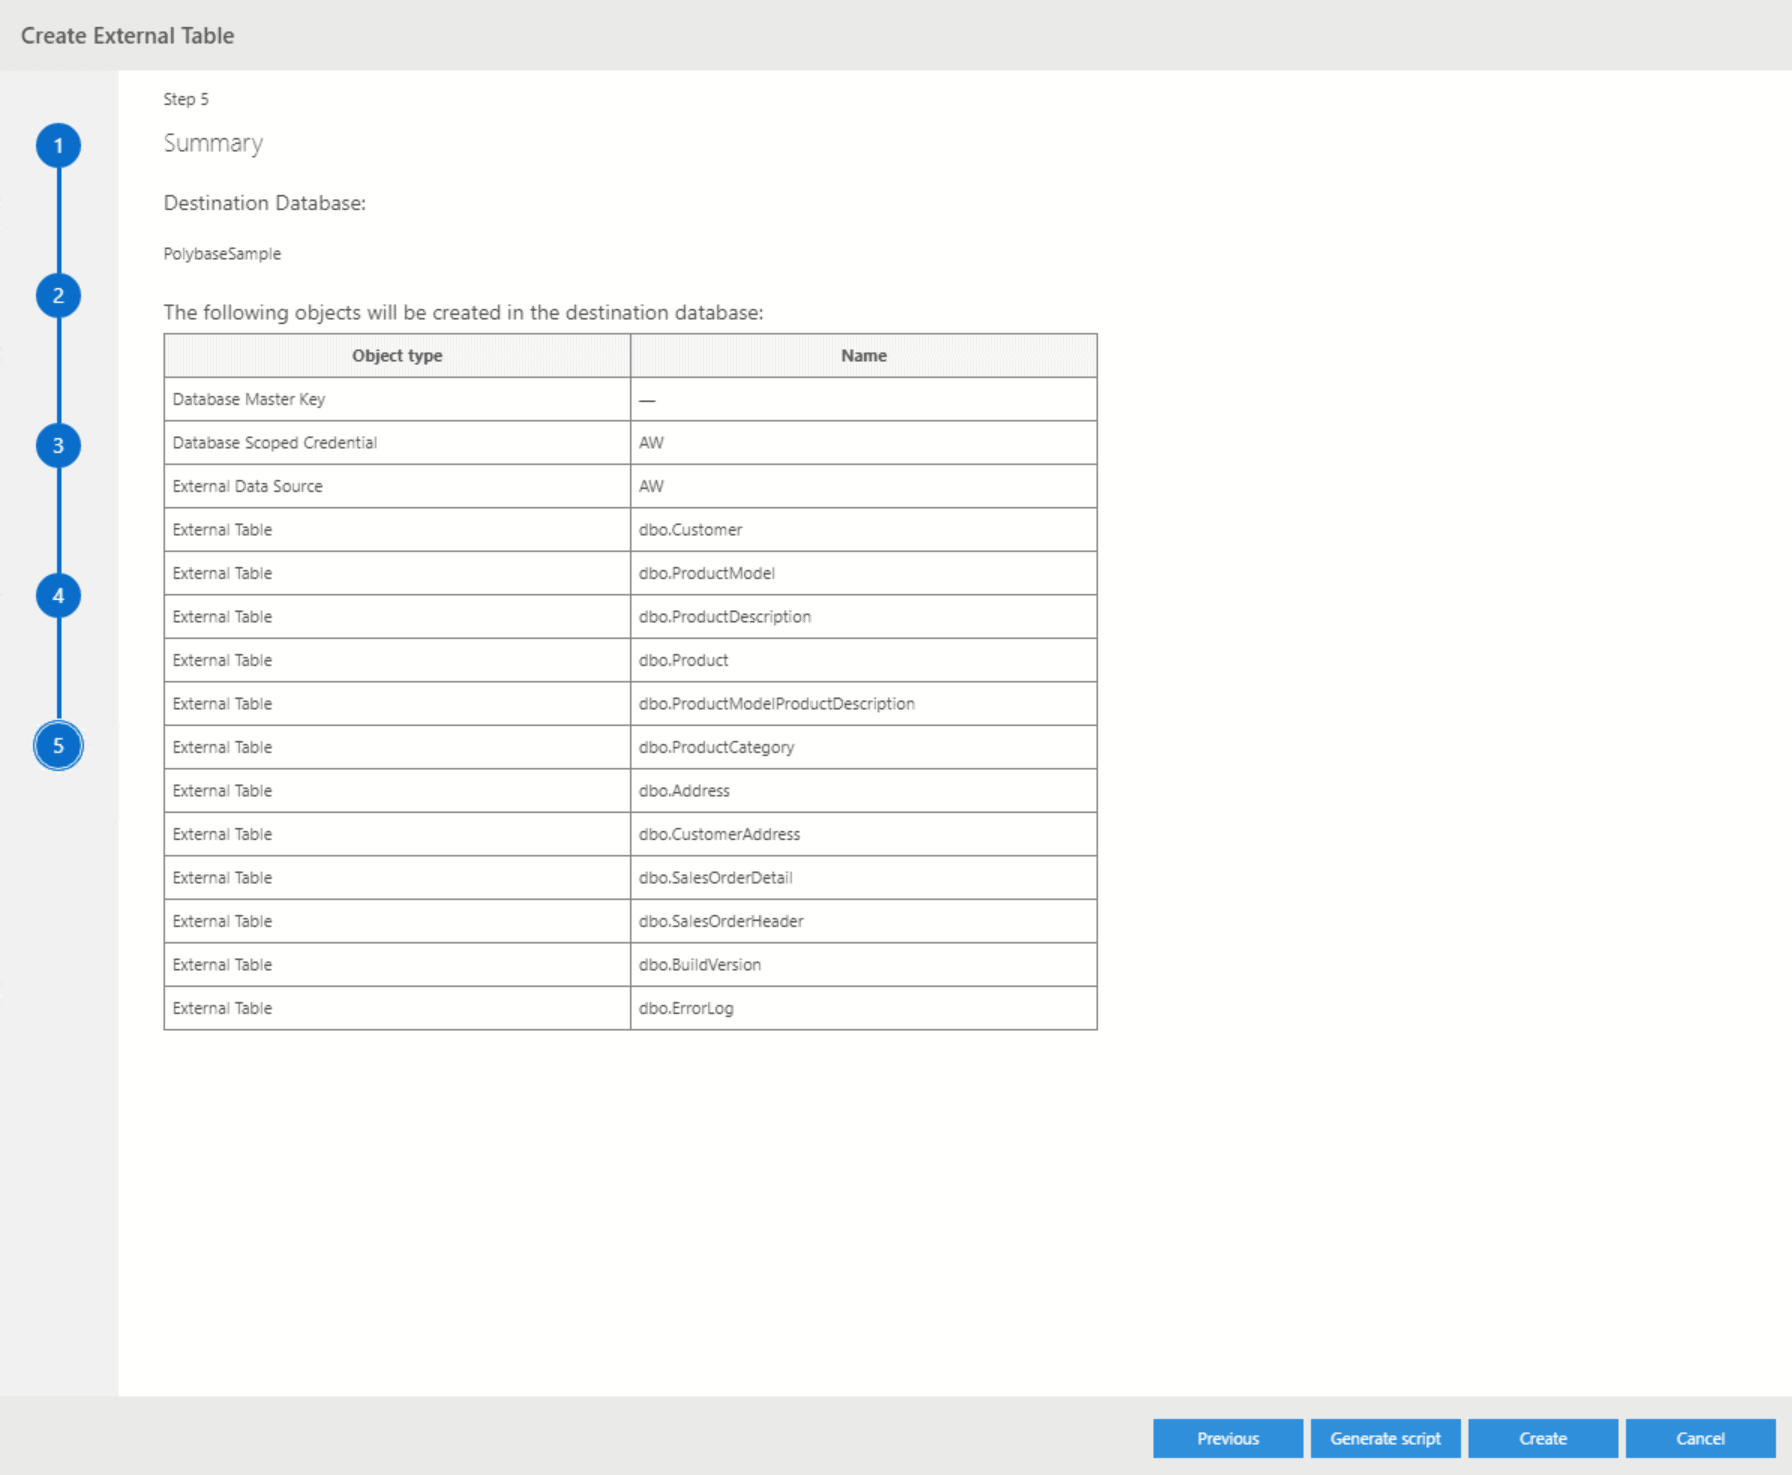
In the end, the wizard will give you a summary as well as the option to either generate everything that you’ve just defined or to create a script which you can manually execute at any later point in time:
You can also complete all the steps using T-SQL. In this example, I have just brought in the Customer table for an AdventureWorksLT database in Azure SQLDB:
|
1 2 3 4 5 6 7 8 9 10 11 12 13 14 15 16 17 18 19 20 21 22 23 24 25 26 27 28 29 30 31 32 33 34 35 36 37 |
BEGIN TRY BEGIN TRANSACTION Tf86fd76a5b6a42f3a5fb144c4c0713f EXEC('USE [PolybaseSample]'); CREATE MASTER KEY ENCRYPTION BY PASSWORD = N'Password'; CREATE DATABASE SCOPED CREDENTIAL [AW] WITH IDENTITY = N'Username ', SECRET = N'Password'; CREATE EXTERNAL DATA SOURCE [AW] WITH (LOCATION = N'sqlserver://YourServer', CREDENTIAL = [AW]); CREATE EXTERNAL TABLE [dbo].[Customer] ( [CustomerID] INT NOT NULL, [NameStyle] BIT NOT NULL, [Title] NVARCHAR(8) COLLATE SQL_Latin1_General_CP1_CI_AS, [FirstName] NVARCHAR(50) COLLATE SQL_Latin1_General_CP1_CI_AS NOT NULL, [MiddleName] NVARCHAR(50) COLLATE SQL_Latin1_General_CP1_CI_AS, [LastName] NVARCHAR(50) COLLATE SQL_Latin1_General_CP1_CI_AS NOT NULL, [Suffix] NVARCHAR(10) COLLATE SQL_Latin1_General_CP1_CI_AS, [CompanyName] NVARCHAR(128) COLLATE SQL_Latin1_General_CP1_CI_AS, [SalesPerson] NVARCHAR(256) COLLATE SQL_Latin1_General_CP1_CI_AS, [EmailAddress] NVARCHAR(50) COLLATE SQL_Latin1_General_CP1_CI_AS, [Phone] NVARCHAR(25) COLLATE SQL_Latin1_General_CP1_CI_AS, [PasswordHash] VARCHAR(128) COLLATE SQL_Latin1_General_CP1_CI_AS NOT NULL, [PasswordSalt] VARCHAR(10) COLLATE SQL_Latin1_General_CP1_CI_AS NOT NULL, [rowguid] UNIQUEIDENTIFIER NOT NULL, [ModifiedDate] DATETIME2(3) NOT NULL ) WITH (LOCATION = N'[AdventureWorks].[SalesLT].[Customer]', DATA_SOURCE = [AW]); COMMIT TRANSACTION Tf86fd76a5b6a42f3a5fb144c4c0713f END TRY BEGIN CATCH IF @@TRANCOUNT > 0 ROLLBACK TRANSACTION Tf86fd76a5b6a42f3a5fb144c4c0713f DECLARE @ErrorMessage NVARCHAR(4000) = ERROR_MESSAGE(); DECLARE @ErrorSeverity INT = ERROR_SEVERITY(); DECLARE @ErrorState INT = ERROR_STATE(); RAISERROR(@ErrorMessage, @ErrorSeverity, @ErrorState); END CATCH; |
Isn’t that the same thing, as a linked server?
At first sight, it sure looks like it. But there are a couple of differences. Linked Servers are instance scoped, whereas PolyBase is database scoped, which also means that PolyBase will automatically work across availability groups. Linked Servers use OLEDB providers, while PolyBase uses ODBC. There are a couple more, like the fact that PolyBase doesn’t support integrated security, but the most significant difference from a performance perspective is PolyBase’s capability to scale out – Linked Servers are single-threaded.
From a user perspective, keep in mind that a query against a Linked Server looks like this:
|
1 |
SELECT * FROM SERVER.DATABASE.SCHEMA.TABLE |
If your server moves or the database is renamed, your queries need to be adjusted.
With PolyBase, it’s something like
|
1 |
SELECT * FROM SCHEMA.TABLE |
The link to the external database is managed centrally through the external data source, so if your data moves, the queries remain the same.
What about other data sources? What if I want to use it for flat files?
As mentioned above, if your external data source is an Oracle database, you can use the same wizard as for a SQL Server.
For flat files sitting in your HDFS storage as part of a Big Data Cluster, there is another wizard in Azure Data Studio.
For all other data sources, you will have to come up with the T-SQL code for them manually. The full list of options can be found in the documentation.
Are there any downsides? Or will this be the nail in the coffin of SSIS?
While this effectively allows SQL Server to become your one-stop shop for all your data needs as it can serve as your central Hub integrating all the data sources within your organisation, there are still many valid use-cases that will require data integration. Think of issues like latency for remote databases, the additional workload on the underlying source that comes from consistent live queries or the fact that external tables don’t support separate indexes meaning that you’re effectively relying on the indexing needs of the source which might be completely different from those in your central Hub.
At the same time, it does reduce the need for old-school ETL as we know it, in many cases, so it is more than just a big deal! It is also an excellent solution for real-time queries – and everyone who is working in the data integration field has been asked for specific data to be available in real or near real-time! This alone probably makes it an exciting solution for almost every SQL Server shop out there. Unfortunately, there is no word out yet on licensing – which might put that statement into a different perspective.
But either way, the need for classic ETL isn’t going anywhere soon…
Just leverage the new capabilities and take advantage of the best of both worlds!