
One of the most valuable tools I’ve seen added to my toolkit over the years is PowerShell. While I had gotten very adept at writing some pretty complex CMD files, PowerShell has opened up whole new possibilities. Often now when a client says, “hey, I need to do X” and X is not specifically a query, my first thought is to reach for PowerShell and use that to solve the problem.
A client recently asked for something that is a common request: “Can we BCP out the data from these tables, just in case we want to reload the data after the upgrade?”
This could be done with a cursor and some fancy T-SQL, but what’s the fun in that? Not much. So, I reached for PowerShell.
PowerShell to the Rescue
The first thing one has to keep in mind with PowerShell is that it deals with objects. If you’re used to writing pure SQL, this can be a bit hard to get your mind around at times, but once you get the concept, it’s quite useful.
I’m going to take the time to show you how I built up to my final goal of exporting all the tables in a database, and this should help you understand how PowerShell works and how my brain works. The following examples can be run in the PowerShell ISE, a lightweight PowerShell IDE (integrated development environment) that comes with Windows 10. Cut and paste each line into the text window and then press F5. If you want to run only part of a script, highlight the lines in question and press F8.
|
1 |
$bcpstring ="bcp Sales.Customer out c:\temp\customers_data.bcp -S MYSERVER -d adventureworks2016 -T -E -n" |
This is pretty straightforward: it’s a basic BCP command and it’s assigned to a string. Obviously, you should replace MYSERVER with the name of your server and replace the actual tables and databases you want to use.
Saving the command to a string is not that useful, so to do something with it, enter and run the next line:
|
1 |
Invoke-Expression $bcpstring |
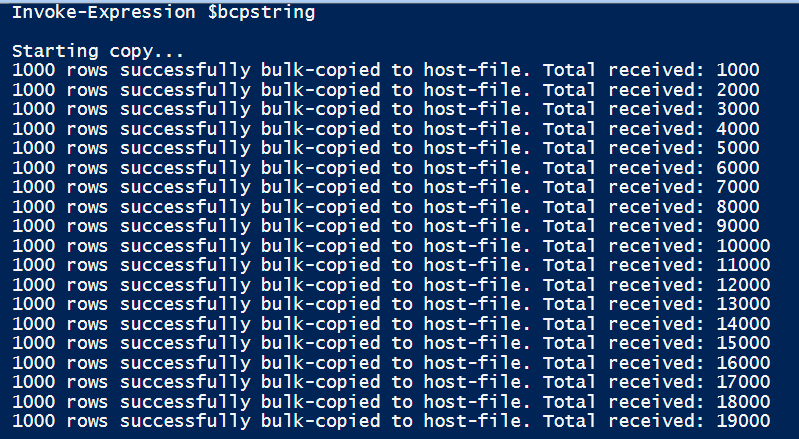
Assuming there are no errors, you’ll see something like this in the output window at the bottom of the app:
PowerShell cmdlets
PowerShell uses what are called cmdlets. They are in the form of verb-noun. This one, Invoke_Expression, should be self-explanatory: invoke (aka run) a particular expression. In this case, execution the previously constructed string. When this executes you should see it export over 19,000 rows.
If you want to simply see what the string $bcpstring contains, you can run Write-Host $bcpstring, and this will show you the string.

To make this useful, you will probably want to try a few more commands. This is where objects come in. To get a list of tables, try running this:
|
1 |
$tables = invoke-sqlcmd -server MYSERVER -Database AdventureWorks2016 "select ss.name as schema_name, so.name as table_name, ss.name+'.'+so.name as full_name from sysobjects so inner join sys.schemas ss on ss.schema_id=so.uid where type='u' order by ss.name, so.name" |
NOTE: If you do not have the Invoke-sqlcmd installed, you can install it with instructions from here
Take a close look at the code. The cmdlet here should be obvious, you’re going to run a SQL command. In this case, it’s a simple query that will return the schema name and table name of every user defined table. To be more complete, it also returns the dotted two part name of each table. The results of the query are stored in the $tables variable.
To see the list of tables, run this:
|
1 |
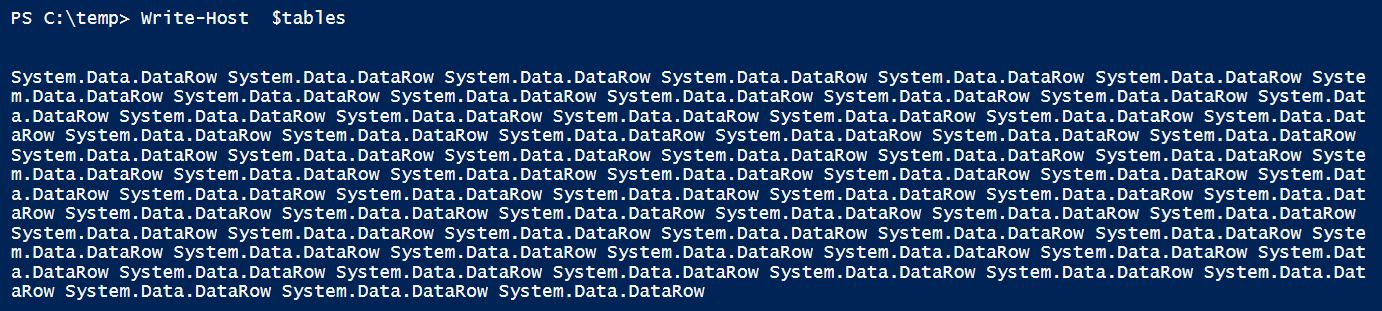
Write-Host $tables |
The output should look similar to this:
Working with Objects
You’ll find you don’t get what you expect at all; you don’t get a list of tables or schemas or anything useful. You get a series of lines that simply says System.Data.DataRow. This is your clue that something interesting is up. Remember how I mentioned that PowerShell works with objects. Well, $tables is not a string like $bcpstring. It’s an object. So, you need to treat it as an object. Try this command instead:
|
1 |
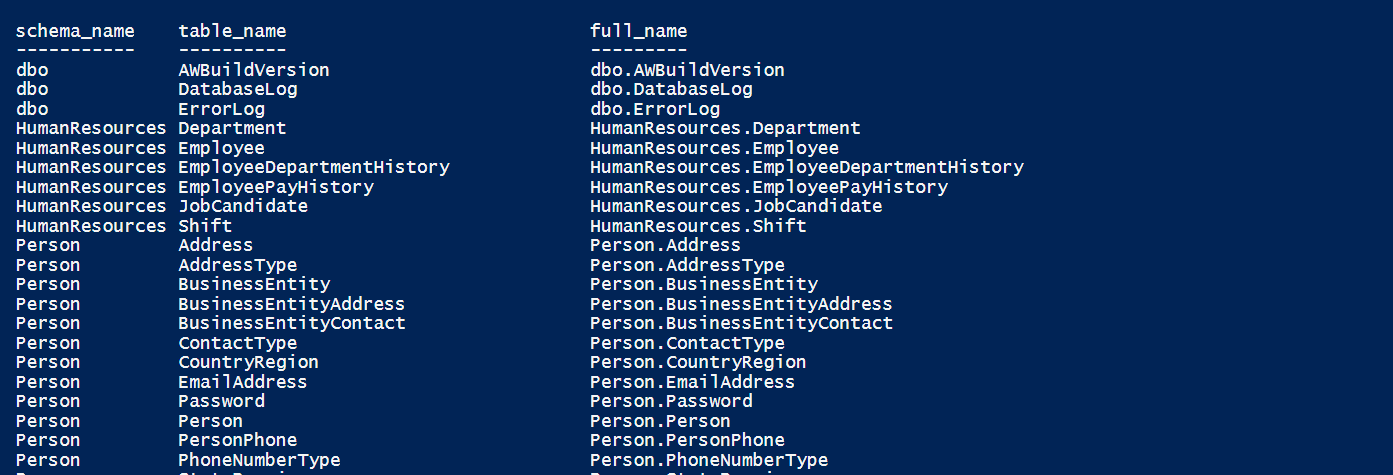
write-host ($tables | Format-Table | Out-String) |
Without delving too deep into this, the | symbols are pipes. So essentially the command is piping $tables to Format-Table which, in turn, is piped to Out-String. This is then written by write-host. Now strictly speaking in this case, Format-Table isn’t necessary in this situation, but it’s a good idea to get used to using it because it will be useful for other PowerShell objects.
Now if you execute that cmdlet you get a nice table showing you the results of your select.
If you’re curious and try to execute just the variable $tables with nothing else, you might notice you get the same format. This is true. I didn’t start here though because I wanted to focus on the fact that $tables is an object and that Write-Host operates on objects. Now that you know the secret, take things a step further and pass the output of $tables to a new cmdlet: Out-GridView.
If you execute:
|
1 |
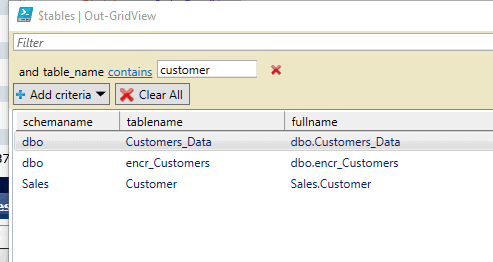
$tables | Out-GridView |
You’ll see a very nice GUI window pop up:

That Add criteria button looks interesting, doesn’t it?
Click on it, select tablename and then tell the window the table name must contain CUSTOMER because you want to know all the tables that may be a customer table. In this case, I have a couple of custom objects containing customer dat.
That can be pretty useful in many situations but doesn’t help meet the final goal – exporting all the tables. You can take advantage of the fact that it’s an object and build up a loop.
|
1 2 3 4 5 6 |
$tables = invoke-sqlcmd -server MYSERVER -Database AdventureWorks "select ss.name as schema_name, so.name as table_name, ss.name+'.'+so.name as full_name from sysobjects so inner join sys.schemas ss on ss.schema_id=so.uid where type='u' order by ss.name, so.name" foreach ($table in $tables) { $bcpstring ="bcp $($table.table_name) out c:\temp\$($table.table_name).bcp -S MYSERVER -d adventureworks2016 -T -E -n" write-host $bcpstring } |
The foreach keyword and {} form the loop. A new object is created, $table which contains a single table from $tables each time though the loop. Since a specific property of the object is needed, the code uses $table.table_name. PowerShell has a nice property that it can interpret values within strings. However, since this is an object within a string, you need to make sure PowerShell proper expands it. This is why the object is wrapped in $(). You’ll see when you run this, that you get a nice fully formatted BCP string.

For now, it’s using write-host $bcpstring so that you can see what you’re about to do, without actually writing out the data to files.
Fine-tuning the Command
But wait. There’s a problem. Remember, not all the tables belong to the dbo schema. The schema must be included.
|
1 2 3 4 5 6 |
$tables = invoke-sqlcmd -server MYSERVER -Database AdventureWorks "select ss.name as schema_name, so.name as table_name, ss.name+'.'+so.name as full_name from sysobjects so inner join sys.schemas ss on ss.schema_id=so.uid where type='u' order by ss.name, so.name" foreach ($table in $tables) { $bcpstring ="bcp $($table.schema_name).$($table.table_name) out c:\temp\$($table.schema_name).$($table.table_name).bcp -S MYSERVER -d adventureworks -T -E -n" write-host $bcpstring } |

Now, this will work, but what if there is a table with a space in its name or is a reserved word (such as PLAN, which came up in the database I tested this on)? You won’t see the problem when using write-host, but it will be a problem when passing $bcpstring to the Invoke-Expression cmdlet.
To correct this issue, try this:
|
1 2 3 4 5 6 |
$tables = invoke-sqlcmd -server MYSERVER -Database AdventureWorks "select ss.name as schema_name, so.name as table_name, ss.name+'.'+so.name as full_name from sysobjects so inner join sys.schemas ss on ss.schema_id=so.uid where type='u' order by ss.name, so.name" foreach ($table in $tables) { $bcpstring ="bcp [$($table.schema_name)].[$($table.table_name)] out c:\temp\[$($table.schema_name)].[$($table.table_name)].bcp -S MYSERVER -d adventureworks -T -E -n" write-host $bcpstring } |
The filenames may look a bit funky with brackets in them, but this works.
Getting Even More Dynamic
But wait, there’s more! Hopefully you’re already starting to see the power here. You have hardcoded the name of the server and database itself, but there’s really no reason to do that. You can loop through a list of databases. Since the list of databases is something SQL Server itself maintains, you can simply ask SQL Server for a list of databases.
|
1 2 |
$sourceserver = 'MYSERVER' $databases = invoke-sqlcmd -server $sourceserver 'select name from master.sys.databases where database_id > 4 order by name' |
This command ignores the system databases by only selecting databases with a database_id > 4. You could of course include them or use any other criteria you want in the WHERE clause.
Now you have a new object called $databases that contains a list of databases on the server. The next step should be obvious: build a loop based on that list.
|
1 2 3 4 5 6 7 8 9 10 11 12 |
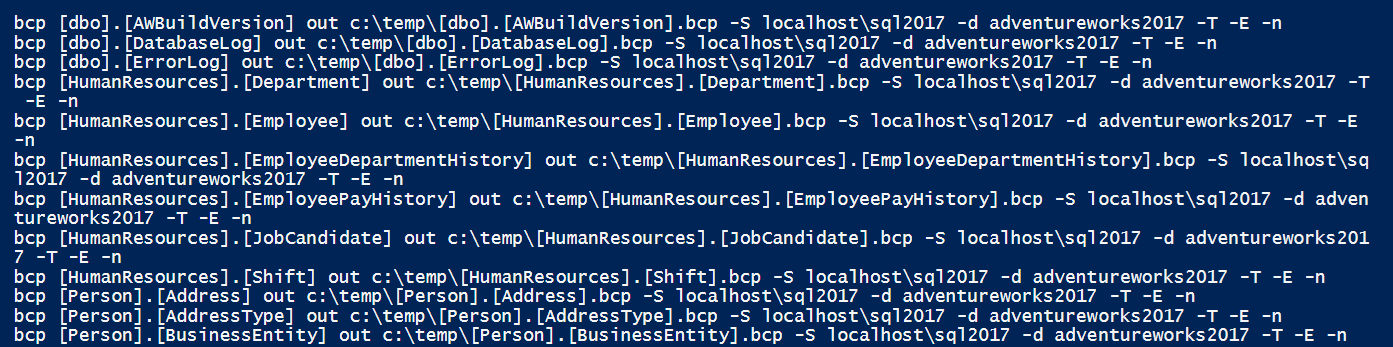
$sourceserver = 'MYSERVER' $databases = invoke-sqlcmd -server $sourceserver 'select name from master.sys.databases where database_id>4 order by name' foreach ($database in $databases) { $tables = invoke-sqlcmd –server $sourceserver -Database $database.name "select ss.name as schema_name, so.name as table_name, ss.name+'.'+so.name as full_name from sysobjects so inner join sys.schemas ss on ss.schema_id=so.uid where type='u' order by ss.name, so.name" foreach ($table in $tables) { $bcpstring ="bcp [$($table.schema_name)].[$($table.table_name)] out c:\temp\[$($table.schema_name)].[$($table.table_name)].bcp -S –d $sourceserver $($database.name) -T -E -n" write-host $bcpstring } } |
You should now see bcp statements for every table in every database!
If you’re paying close attention, you’ll see I snuck something extra in there. I also made the name of the server itself a variable. I’ll leave it as an exercise, but you should be able to see how you could save this script and call it with a parameter with the name of the server you want to get your bcp dump from. Also of course change the write-host $bcpstring command in the final example to Invoke-Expression $bcpstring. You should also be thinking about how you could change the location where the files are written to, and perhaps again use a parameter to handle that.
And there you have it a quick and easy way to bcp out all of your data across one or more databases in just a couple of lines of PowerShell.
Conclusion
I hope you enjoyed this first look at using PowerShell with SQL Server. In a future article, I will discuss how PowerShell can actually treat your entire SQL Server as an object.