This article is part of Robert Sheldon's continuing series on Learning MySQL. To see all of the items in the series, click here.
Up to this point in the series, I’ve focused primarily on creating schema objects in a MySQL database. The SQL statements used to create these objects are typically categorized as data definition language (DDL). They include statements such as CREATE TABLE, CREATE VIEW, and CREATE PROCEDURE.
Beginning with this article, I’m switching my attention to data manipulation language (DML), which includes statements used to query and modify data. Four of the most common DML statements are SELECT, INSERT, UPDATE, and DELETE. You can use the SELECT statement to retrieve data, the INSERT statement to add data, the UPDATE statement to modify data, and the DELETE statement to remove data.
In this article, I focus on the SELECT statement, which is used extensively when working with relational databases. You can use the SELECT statement to return data from one or more MySQL tables, as well as to retrieve information about the server and database environment. The SELECT statement is one of the most commonly used SQL statements in MySQL. It is also one of the most complex.
You got a taste of the SELECT statement in earlier articles in this series, but it was included only to support the DDL examples in those articles. This article focuses exclusively on the SELECT statement and the basic elements that go into building one. I’ll be covering other DML statements later in this series.
Preparing your MySQL environment
For the examples in this article, I used the same database (travel) that you saw in the previous articles and the same two tables (manufacturers and airplanes). However, I added a lot more data this time around. If you want to try out the examples for yourself, you can download the MySQL_06_setup file and run it against your MySQL instance. The SQL in the file creates the database, adds the two tables, and inserts data in both tables.
For your convenience, I’ve included the two table definitions here so you can reference them when trying out the SELECT statements in the examples later in the article:
|
1 2 3 4 5 6 7 8 9 10 11 12 13 14 15 16 17 18 19 20 21 22 23 24 25 26 |
CREATE TABLE manufacturers ( manufacturer_id INT UNSIGNED NOT NULL AUTO_INCREMENT, manufacturer VARCHAR(50) NOT NULL, create_date TIMESTAMP NOT NULL DEFAULT CURRENT_TIMESTAMP, last_update TIMESTAMP NOT NULL DEFAULT CURRENT_TIMESTAMP ON UPDATE CURRENT_TIMESTAMP, PRIMARY KEY (manufacturer_id) ) ENGINE=InnoDB AUTO_INCREMENT=1001; CREATE TABLE airplanes ( plane_id INT UNSIGNED NOT NULL AUTO_INCREMENT, plane VARCHAR(50) NOT NULL, manufacturer_id INT UNSIGNED NOT NULL, engine_type VARCHAR(50) NOT NULL, engine_count TINYINT NOT NULL, max_weight MEDIUMINT UNSIGNED NOT NULL, wingspan DECIMAL(5,2) NOT NULL, plane_length DECIMAL(5,2) NOT NULL, parking_area INT GENERATED ALWAYS AS ((wingspan * plane_length)) STORED, icao_code CHAR(4) NOT NULL, create_date TIMESTAMP NOT NULL DEFAULT CURRENT_TIMESTAMP, last_update TIMESTAMP NOT NULL DEFAULT CURRENT_TIMESTAMP ON UPDATE CURRENT_TIMESTAMP, PRIMARY KEY (plane_id), CONSTRAINT fk_manufacturer_id FOREIGN KEY (manufacturer_id) REFERENCES manufacturers (manufacturer_id) ) ENGINE=InnoDB AUTO_INCREMENT=101; |
If you already have the database and tables on your MySQL instance and don’t want to re-create them, you can run just the INSERT statements in the MySQL_06_setup.sql script. However, you should first delete any data in the table because the data being added to the airplanes table references specific values in the manufacturers table. Starting with empty tables will also ensure that you’re seeing the same results as in my examples. When you run the INSERT statements, be sure to execute them in the order specified in the file.
The SELECT statement syntax
A MySQL SELECT statement is typically used to retrieve data from a single table or from multiple tables. The statement is made up of one or more clauses that together provide the logic needed to retrieve the necessary data. The statement’s syntax is fairly elaborate, but to help you get started, I’ve narrowed it down to the most fundamental elements:
|
1 2 3 4 5 6 |
SELECT [ALL | DISTINCT] select_list [FROM table_ref] [WHERE where_condition] [GROUP BY group_list] [HAVING having_condition] [ORDER BY order_list] |
The five clauses shown in the syntax are highly versatile and can be used to build a wide range of statements:
- The
SELECTclause is the only required clause in aSELECTstatement. The clause typically specifies the columns from which to retrieve data from the target table or tables, but it can also be used to return the results of an expression, such as a system function or calculation. - The
FROMclause specifies the target table or tables from which to retrieve data. If you specify multiple tables, you are performing a join. - The
WHEREclause acts as a filter that limits the rows returned by the query. The clause defines one or more search conditions that must evaluate to true for a row to be returned. Multiple search conditions are linked together with logical operators that determine how to apply those conditions. - The
GROUPBYclause groups the data based on one or more specified expressions, which are typically columns in the target tables. - The
HAVINGclause is similar to theWHEREclause because it defines one or more search conditions that limit the results. However, theHAVINGclause is specific to grouped data and is processed after theGROUPbyclause. - The
ORDERBYclause sorts the data based on one or more specified expressions, which are typically the columns in the target tables.
There are a number of other clauses and options that I have not included here, and they are also important to understand, but for now, these five clauses provide a good starting point for learning how to use a SELECT statement to query a database.
The SELECT clause
At a minimum, the SELECT clause requires the SELECT keyword and the select list, which is made up of one or more expressions. An expression can be a column name, calculation, function, subquery, literal value, or other construction. The select list commonly includes columns from the tables referenced in the FROM clause (if one is included).
Unlike the other clauses in the SELECT statement, the SELECT clause can stand on its own to create a very simple statement. For example, the following SELECT statement includes only the SELECT clause, and the select list within that clause includes only one expression:
|
1 |
SELECT CURRENT_TIMESTAMP; |
The expression, in this case, is the CURRENT_TIMESTAMP function, which returns the current date and time. If you run this statement, MySQL returns a single value that contains both the date and time in a format that depends on your location and server settings. For example, when I ran the statement, I received the following results:
|
1 |
2022-06-03 15:03:13 |
As you can see, a SELECT statement can be fairly basic, as long as it includes the SELECT clause and a select list with at least one expression.
The FROM clause
The FROM clause references the table or tables that contain the source data. Although it is an optional clause, most SELECT statements include the FROM clause. If you are targeting only one table, you need only specify the FROM keyword, followed by the table name. For example, the following SELECT statement retrieves data only from the airplanes table:
|
1 |
SELECT * FROM airplanes; |
Notice that the SELECT clause specifies only an asterisk for the select list. In MySQL, like many relational database systems, you can use an asterisk to indicate that all columns should be returned from the table or tables referenced in the FROM clause, which in this case, points only to the airplanes table. Figure 1 shows part of the results returned by this statement. In all, the query should return 241 rows.
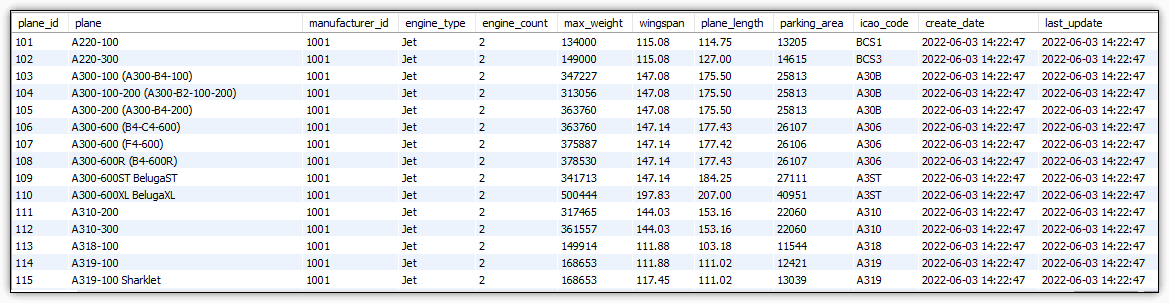 Figure 1. Retrieving all rows and columns from the
 airplanes table
The SELECT statement in the preceding example demonstrates the basic construction needed to return all rows and columns from a table. However, you can narrow down your SELECT clause by specifying the exact columns to return. For example, the following SELECT statement returns the plane, engine_type, and engine_count columns from the airplanes table:
|
1 2 |
SELECT plane, engine_type, engine_count FROM airplanes; |
Notice that the expressions (column names) in the select list are separated with commas, but there is no comma after the SELECT clause itself. The SELECT statement still returns 241 rows from the airplanes table; however, the results now include only these three columns, as shown in Figure 2.
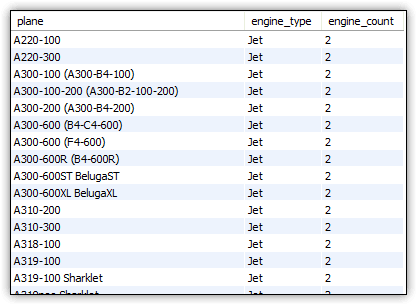
Figure 2. Retrieving specific columns from the airplanes table
You can refine your select list even further when retrieving data from the target table. For example, the select list in the following SELECT statement uses the ROUND system function to round the wingspan value to the nearest integer:
|
1 2 |
SELECT plane, ROUND(wingspan) AS wingspan_rnd FROM airplanes; |
The wingspan column is passed in as an argument to the ROUND function, which is followed by the AS keyword and then by the wingspan_rnd alias. The alias is assigned to the output column generated by the ROUND function, as shown in Figure 3. When assigning a column alias, you can omit the AS keyword, but it can be useful to retain for clarity.
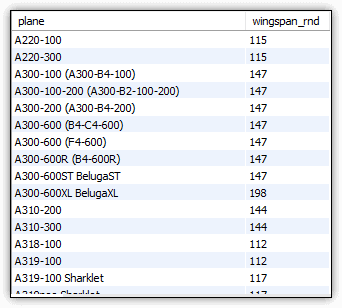
Figure 3. Using a system function in a select expression
The SELECT statement still returns 241 rows from the airplanes table, but now it includes only the plane and wingspan_rnd columns. As you can see from the examples in the section, the SELECT clause works hand-in-hand with the FROM clause in determining what column data to return. However, the FROM clause itself remained unchanged in all these examples. When a FROM clause is included in a SELECT statement, it serves as the foundation on which the rest of the SELECT statement is built.
The WHERE clause
In the previous section, you saw how the SELECT clause can be used to limit the columns returned from the table specified in the FROM clause. The WHERE clause is similar in this respect, except that it is used to limit the rows returned from the target table.
When defining the WHERE clause, you need to specify at least one search condition, which must evaluate to true for a row to be returned. For example, the following SELECT statement includes a WHERE clause that limits the returned rows to those with an engine_type value that equals turboprop:
|
1 2 3 |
SELECT plane, ROUND(wingspan) AS wingspan_rnd FROM airplanes WHERE engine_type = 'turboprop'; |
The WHERE clause search condition (engine_type = 'turboprop') states that the engine_type value must equal turboprop for a row to be returned. The expression uses the equal (=) comparison operator to compare the engine_type value to the turboprop string. If they are equal, the search condition evaluates to true, and the row is returned.
Figure 4 shows part of the results that the statement returns. The result set now includes only 26 rows because only those rows satisfy the search condition.

Figure 4. Using a WHERE clause to filter data
When you add a WHERE clause to your SELECT statement, you can define multiple search conditions. For example, the following SELECT statement again includes a WHERE clause, but this time it specifies that the engine_type value must equal turboprop and that the max_weight value must be greater than 10000:
|
1 2 3 |
SELECT plane, ROUND(wingspan) AS wingspan_rnd FROM airplanes WHERE engine_type = 'turboprop' AND max_weight > 10000; |
The second search condition uses the greater than (>) operator rather than equal, but the basic concept is the same in terms of filtering data. However, notice that the two search conditions are connected by the AND logical operator. This means that both search conditions must evaluate to true for a row to be returned. Figure 5 shows the results after running the SELECT statement, which now returns only 15 rows.
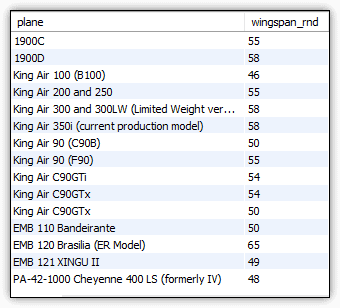
Figure 5. Defining multiple search conditions in a WHERE clause
MySQL supports several types of logical operators. Although the AND operator is commonly used, you might want to define different logic. For example, you can use an OR operator to indicate that either of the two search conditions must evaluate to true, but not necessarily both. You can also string together more than two search conditions, but you need to be sure to implement the logic correctly, or you risk incorrect results. For more information about using logical operators, check out the MySQL documentation.
The ORDER BY clause
The ORDER BY clause lets you sort the results returned by your SELECT statement. You can specify one or more expressions, which are typically columns. You can also define the sort order as either ASC (ascending) or DESC (descending). For example, the following SELECT statement is the same as the preceding one except that it now includes an ORDER BY clause that sorts the results by the wingspan_rnd column, in descending order:
|
1 2 3 4 |
SELECT plane, ROUND(wingspan) AS wingspan_rnd FROM airplanes WHERE engine_type = 'turboprop' AND max_weight > 10000 ORDER BY wingspan_rnd DESC; |
Figure 6 shows the results returned by this statement. As you can see, you can use a column alias defined in the select list within your ORDER BY clause.
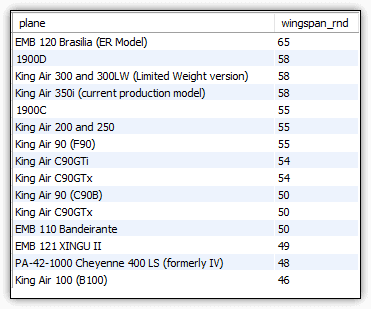
Figure 6. Sorting the results by the wingspan_rnd column
When using an ORDER BY clause, you might discover that some values are duplicated. For example, the above results show that several planes have a wingspan of 55 feet and several others are 50 feet. In some cases, you might want to return a single column so you can view its range of values, such as in the following example:
|
1 2 3 4 |
SELECT ROUND(wingspan) AS wingspan_rnd FROM airplanes WHERE engine_type = 'turboprop' AND max_weight > 10000 ORDER BY wingspan_rnd DESC; |
Now the SELECT statement returns only the wingspan_rnd column, as shown in Figure 7.
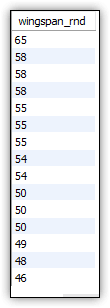
Figure 7. Returning a single column
If all you’re after is a range of values and don’t want the duplicate values, you can add the DISTINCT keyword to your SELECT clause. You might do this, for example, to populate an application’s drop-down list. The following SELECT statement uses DISTINCT to remove the duplicates in the wingspan_rnd column:
|
1 2 3 4 |
SELECT DISTINCT ROUND(wingspan) AS wingspan_rnd FROM airplanes WHERE engine_type = 'turboprop' AND max_weight > 10000 ORDER BY wingspan_rnd DESC; |
Figure 8 shows the results of running the SELECT statement with DISTINCT included. Now the statement returns only eight rows, and each row is unique.
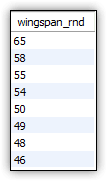
Figure 8. Removing duplicate rows
The SELECT clause supports both the DISTINCT and ALL options. As you have seen, the DISTINCT option species that all duplicate rows should be removed from the result set. The ALL option specifies that all rows should be returned. This is the default, so you do not need to include it.
Joining tables in the FROM clause
When retrieving data from a MySQL database, you might want to pull the data from multiple tables, in which case you can create a join that effectively merges the results from both tables together. MySQL, like other relational database systems, supports multiple ways to join tables, although they don’t necessarily approach joins in the same way.
When you’re first getting started with MySQL joins, it’s important to know that most joins fall into one of two basic categories:
- Inner joins. Matches one or more columns in two tables and returns all rows with matching values.
- Outer joins. Matches one or more columns in two tables and returns all rows with matching values, but also returns the non-matching rows from either the left table (left outer join) or the right table (right outer join).
The best way to understand how a join works is to see one in action. In the following example, I join the airplanes and manufacturers tables based on the manufacturer_id column in both tables:
|
1 2 3 4 5 6 |
SELECT m.manufacturer, a.plane, a.engine_type, a.engine_count, a.parking_area FROM airplanes a INNER JOIN manufacturers m ON a.manufacturer_id = m.manufacturer_id WHERE a.parking_area > 1000 AND max_weight > 10000 ORDER BY a.parking_area DESC, m.manufacturer, a.plane; |
This statement creates an inner join, as indicated by the INNER JOIN keywords in the FROM clause (in between the two table names). The FROM clause also includes the ON subclause, which specifies that the manufacturer_id value in the manufacturers table must equal the manufacturer_id value in the airplanes table.
Because this is an inner join, MySQL will find all the rows with matching manufacturer_id values. You must make sure that your column references in any of the SELECT statement clauses are not ambiguous in any way, which can occur if the two tables contain columns with the same name, as in manufacturer_id. This includes the FROM clause itself.
The easiest way to address any ambiguity is to assign aliases to the table names and then use those aliases when referencing the columns in the rest of the statement. For example, the FROM clause assigns the alias a to airplanes, so all column references are preceded by an a, followed by a period, and then followed by the column name.
Figure 9 shows part of the results returned by the SELECT statement, which includes 152 rows in all.
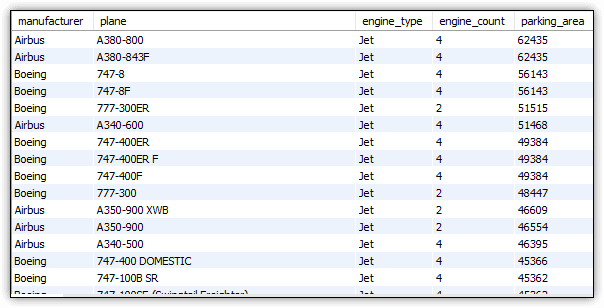
Figure 9. Creating an inner join between two tables
There is much more to joins than what I’ve shown you here, but this should at least give you a sense of how they work until we can spend more time on them. In the meantime, you might want to check out the MySQL documentation on joins. The information can be a little difficult to weed through, but it might help you better understand how they work.
The GROUP BY clause
Another important clause in the SELECT statement is GROUP BY, which makes it possible to group and aggregate data in the target tables. The clause requires at least one expression in addition to the GROUP BY keywords. The expression is usually one of the columns in the target tables. For example, the following SELECT statement includes a GROUP BY clause that groups the data based on the manufacturer_id column in the manufacturers table:
|
1 2 3 4 5 6 |
SELECT m.manufacturer, COUNT(*) AS plane_cnt FROM airplanes a INNER JOIN manufacturers m ON a.manufacturer_id = m.manufacturer_id WHERE max_weight < 1000000 GROUP BY m.manufacturer_id ORDER BY plane_cnt DESC; |
When using a GROUP BY clause, you typically limit the columns in the select list to those included in the GROUP BY clause or to those derived from aggregate expressions. This example does both.
The select list includes the manufacturer_id column, which is also referenced in the GROUP BY clause. The select list also includes the COUNT(*) aggregate function, which returns the total number of rows in each group. The COUNT function is a special type of function that takes an asterisk as its argument. The function provides a simple way to return the total number of rows (number of airplanes) for each manufacturer group. Figure 10 shows the statement’s results.
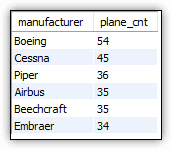
Figure 10. Grouping data
As you can see, the results show the total number of planes associated with each manufacturer. You can also group the data based on more than one column. For example, the GROUP BY clause in the following SELECT statement groups the data first by manufacturer_id and then by engine_type:
|
1 2 3 4 5 6 |
SELECT m.manufacturer, a.engine_type, COUNT(*) AS plane_cnt FROM airplanes a INNER JOIN manufacturers m ON a.manufacturer_id = m.manufacturer_id WHERE max_weight < 1000000 GROUP BY m.manufacturer_id, a.engine_type ORDER BY m.manufacturer ASC, a.engine_type ASC; |
The select list has also been updated to include the engine_type column, which is now in the GROUP BY clause. Figure 11 shows the results returned by the SELECT statement.
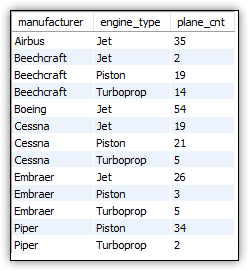
Figure 11. Grouping data by multiple columns
The results now show the total number of airplanes for each engine type from each manufacturer. However, this time the results are sorted first by the manufacturer values and then by the engine_type values.
Working with the SELECT statement
The five clauses I’ve covered here—SELECT, FROM, WHERE, ORDER BY, and GROUP BY—can provide you with a good foundation for getting started with SELECT statements. With these five clauses, you can build very precise queries that retrieve exactly the data you need from your MySQL databases.
That said, this article only skims the surface of the SELECT statement. There is much more to each clause, and there are additional clauses. In fact, a full discussion of the SELECT statement could easily fill an entire volume—if not more. But this information should at least provide you with a launching off point. Just know that there is much more to the MySQL SELECT statement than can be described in a single article.