
Installing Hyper-V
Hyper-V is a Server Role within Windows Server 2008. This means that you have to install Windows Server 2008 before installing Hyper-V. The hardware requirements for installing Hyper-V are:
- The processor needs to support hardware virtualization (AMD-V or Intel VT);
- Hardware enforced Data Execution Prevention (DEP). The Intel XD bit needs to be enabled or the AMD NX bit needs to be enabled;
- The processor needs to be an X64 processor.
Furthermore you need plenty of physical memory in the server. For testing purposes the absolute minimum is 4 GB of memory, the amount of memory needed in a production environment is dependant of the services you want to run.
Windows Server 2008 Hyper-V is a Server Role in the Standard Edition, Enterprise Edition and the Datacenter Edition. From a technical perspective there’s no difference, it’s a licensing issue:
- Install Standard Edition and you are allowed to run one Virtual Machine using the same license;
- Install Enterprise Edition and you are allowed to run four Virtual Machines using the same license;
- Install Datacenter Edition and you are allow to run as many Virtual Machines as the server can handle.
Note: There’s also a Hyper-V Server available. This is a very small Operating System (command-line based) that’s only capable of running the Hypervisor, nothing else. There are a few graphical UI’s, like the date and time applet, but it’s mainly command-line. Hyper-V Server is a free download, but when configuring Virtual Machines you need one license for each Virtual Machine!
Install Windows Server 2008 using your corporate standards and bring it up to date with the latest hotfixes or service packs. Windows Server 2008 is now running on “bare metal” and there’s no difference with any other Windows Server.
Logon to the server and open the Server Manager. In the left pane select “Roles” and in the right pane you’ll see “Roles: 0 of 18 installed”. Click on “Add Roles” and select “Hyper-V” in the Select Server Roles Window.
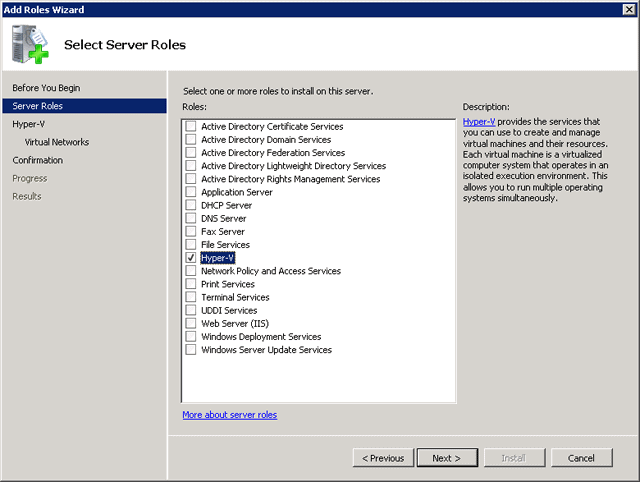
Figure 1. Need to create a new image
Click Next to install the Hyper-V Server role. The wizard also includes the possibility to create Virtual Networks. We’ll cover that later in this article so leave all options blank and click Next to continue.
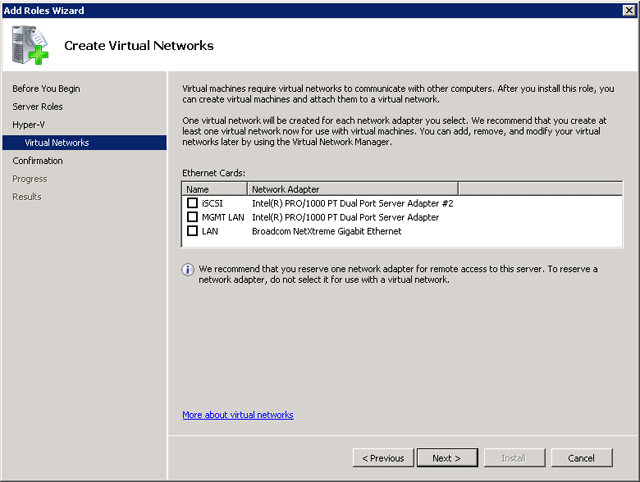
Figure 2. In the Add Roles wizard there’s the possibility to create Virtual Networks. You can create these later as well.
Right now the actual Hypervisor “slides” under the Operating System, making the original Windows Server 2008 instance a Virtual Machine. Also the VM Worker processes (responsible for emulating devices), some WMI interfaces, the VM Bus and the Virtual Storage Provider (VSP) are installed.
When finished the server needs to be rebooted. During the reboot process the Hypervisor will be started initially which will hand-over the boot process to Windows Server 2008, which is now the Parent Partition. The Parent Partition is also referred as the Root Partition.
When you logon after rebooting you’ll see nothing special, it just looks like Windows Server 2008, and it is…. The only new part is the Hyper-V Manager that can be found in the “Administrative Tools” menu.
The Hyper-V Manager is an MMC snap-in, with a server pane (left), a results pane (middle) and an actions pane (right). In the server pane you’ll see only the server that you’re logged on to, additional Hyper-V servers can be added later on.
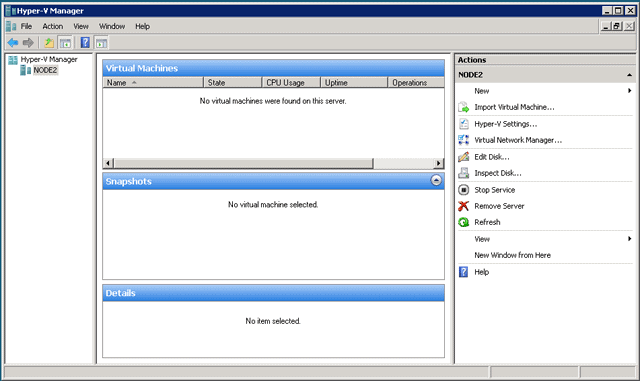
Figure 3. The Hyper-V Manager just after installing Hyper-V
One of the first things that has to be done is changing the settings. Click on “Hyper-V Settings…” in the actions pane and enter new paths for the Virtual Hard Disks and the Virtual Machine. By default these will be placed on the C:\ drive, but from a performance perspective these should be configured on a separate drive. This can be a physical disk in the server, a storage cabinet attached to the server or a SAN (iSCSI or Fiber).
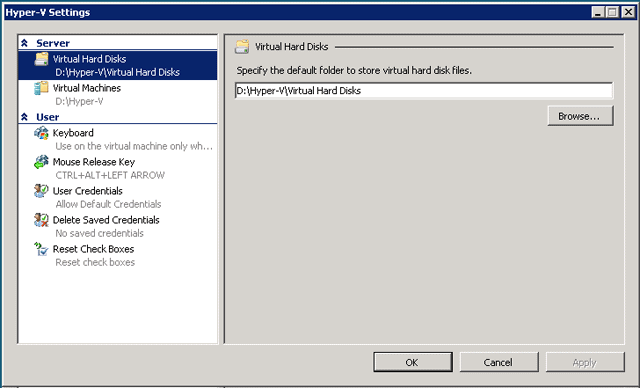
The Virtual Machines are using the D:\Hyper-V directory in this example. This means that the configuration files will be placed in this directory. But also snapshots will be placed in this directory. Therefore it is a best practice not to place the Virtual Machines on the C:\ drive. When using snapshots extensively this disk will fill up rapidly with snapshot information.
Virtual Hard Disks
Hyper-V uses Virtual Hard Disks for storing data. A Virtual Hard Disk is stored as a .VHD file on the disk of the Hyper-V server. There are three types of Virtual Hard Disks:
- Dynamically Expanding Disks – The dynamically expanding disk is a VHD file that’s initially very small (2 MB) and that grows on demand. When more space is needed Hyper-V will automatically assign more space to this VHD. A 50 GB disk will start as a 2 MB file, but the Virtual Machine will see it as a 50 GB disk. This is perfectly suited for test- and development environments.
- Fixed Size Disks – The fixed size disk is a VHD file that has the complete size allocated before it can be used. A 50GB disk also means a 50 GB VHD file. Pre-allocating 50 GB for a Virtual Disk can take a considerable amount of time. Microsoft recommends using fixed size disks for using Virtual Machine in a production environment since it does not have the overhead of growing the VHD file.
- Differencing Disks – Differencing disks consists of two virtual hard disks. One virtual hard disk is designated as a read-only disk, changes made by the Virtual Machine are written to the second disk. This will allow us to create a “master image” and use several Virtual Machines based on the master image. This is a perfect solution for creating a test environment within minutes.
There’s also a fourth type of disk, the pass-through or dedicated disk. This is a dedicated disk on the Parent Partition that’s connected to a disk controller of a Virtual Machine. The complete disk is used in this configuration without the VHD file. Therefore it has no overhead. Besides the fixed size disk Microsoft also recommends using this kind of disk in a production environment. Check the Technet site for more information.
The pass-through disk can be a physical hard disk in the Hyper-V host, but it can also be a LUN on an iSCSI or Fiber Channel SAN.
To create a new Virtual Hard Disk open the Hyper-V Manager, in the Actions Pane click New and select “Hard Disk…”. The New Virtual Hard Disk Wizards shows up with a welcome screen. Click Next to continue. In the Choose Disk Type window you can select what type of VHD needs to be created. Please be aware that creating a large fixed VHD file will take a considerable amount of time!
I will cover a dedicated or pass-through disk later in this article, after the creation of a Virtual Machine.
Virtual Networks
By default Virtual Machines are not connected to any network, so they are pretty useless actually. To connect Virtual Machine to each other, to the Parent Partition or to the network outside the Hyper-V host Virtual Networks need to be used.
Three types of Virtual Networks are available:
- Private Virtual Network – this is a virtual network that’s only available for Virtual Machines running on the Hyper-V server. There’s absolutely no possibility for the VM’s to connect to the outside world, or to the Hyper-V server.
- Internal Virtual Network – This is a virtual network that’s available for the Virtual Machines, but also for the Parent Partition. VM’s can connect to the Parent Partition using the Internal Virtual Network. When Internet Connection Sharing (ICS) is enabled on the Parent Partition the VM’s can connect to the outside world using this connection.
- External Virtual Network – this is a virtual network that’s connected to the network card on the Hyper-V server. Each Virtual Machine is capable using this network card to connect to the outside world. This also means that other computer on the network can “see” the Virtual Machines just as regular computers.
It is a Microsoft recommendation to use multiple network interfaces. One interface should be used for management purposes and be only available for the host. One network interface should be used for an External Virtual Network so that VM’s can access the physical network as well. If you’re using an iSCSI solution an additional network interface for this should be used as well. Check the following Technet article for more information: “7 Best Practices for Physical Servers Hosting Hyper-V Roles”
So, for having a Virtual Machine communicating with the outside world we have to create an External Virtual Network. Logon to the server and open the Hyper-V Manager. In the tasks pane select the Virtual Network Manager.
Click Add, enter a name like “Public Virtual Network” and select the network interface that needs to be used by this Virtual Network. In this example this is the first Broadcom that’s available.

Figure 4. During creation of an External Private Network you have to select the physical network interface.
When you click OK the new Virtual Network will be created. A warning message will pop-up indicating you may temporarily lose network connectivity with the Hyper-V host. If you’re connected via a Remote Desktop sessions you may have to re-establish the connection.
When the new Virtual Network is created and you check the Network Connections you’ll notice a new entry, this is the new Virtual Network.
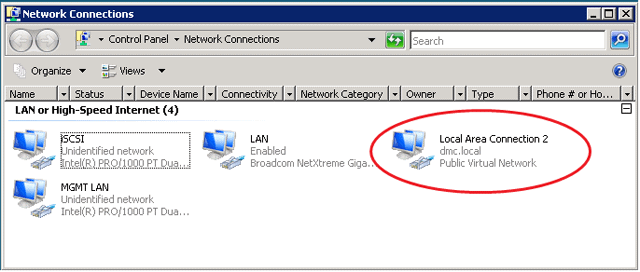
Figure 5. The new Network Connection after the creation of a External Virtual Network
When you create a Virtual Machine and connect it to this new Virtual Network the Virtual Machine will be able to access resource on the public network.
Virtual Machines
On Hyper-V there are two types of Virtual machines, Supported and Unsupported Guest Operating Systems. This has nothing to do with the ability to run in a Hyper-V Virtual Machine, but whether it is directly supported by Microsoft:
- Supported Guest Operating Systems – these are Guest Operating Systems that are fully supported running on a Hyper-V server where the Guest Operating System can fully utilize the Hyper-V Infrastructure like the VMBus. Examples of these Operating Systems are Windows Server 2008, Windows Server 2003 SP2, Windows 2000 Server with SP4, Windows Vista SP1, Windows XP Professional SP2 and SUSE Linux Enterprise Server 10 with Service Pack 2. For a complete list of all supported Operating Systems check the Microsoft site: http://support.microsoft.com/kb/954958 – Guest operating systems that are supported on a Hyper-V virtual machine
- Unsupported Guest Operating Systems – these are Guest Operating Systems that can run on a Hyper-V server but do not utilize the Hyper-V infrastructure. These are running in an emulated environment and cannot use the native Hyper-V architecture. This is the VM Worker process. An emulated environment is running in User Mode in the Parent Partition. When a VM makes a call to for example a disk or a network it goes through the VM, to the emulator and then to the actual hardware. This results in a serious I/O penalty, resulting in a slower performance.
Suse Linux Enterprise Server is a Supported Guest Operating System. This will run under Hyper-V and if you encounter an issue you can call Microsoft Product Support. SCO Unix is an Unsupported Guest Operating System. This will run perfectly under Hyper-V but it is not supported by Microsoft, but fully supported by SCO. For more information check the site of SCO:
Now we are going to create a Virtual Machine running Windows Sever 2003 SP2. You can use the Windows installation CD or you can use an ISO image. The latter is usually faster.
Logon to the Hyper-V server and start the Hyper-V Manager. In the Actions pane click New and select Virtual Machine. The New Virtual Machine Wizard will show up, click Next to continue. Enter a name for the new Virtual Machine, for example “Windows Server 2003 X64”:
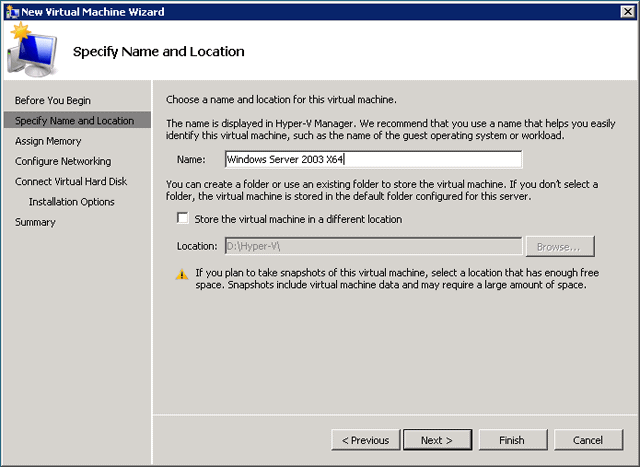
Figure 6. The New Virtual Machine Wizard when creating a new Virtual Machine
The location will be same as we configured in the Hyper-V settings earlier in this article. You can check the “Store the virtual machine in a different location” checkbox when you want to have the new Virtual Machine on another location (i.e. another disk). Click Next to continue.
Enter the amount of memory that you want to assign to the VM. Please not that there’s no real difference with a physical machine. If you fail to assign enough memory the new Virtual Machine will be slow and sluggish. Another thing to remember is that unlinke VMWare, there’s no way to overcommit memory. If you have 16 GB of RAM available, you can only assign 14 Virtual Machines 1 GB of RAM (assuming approximately 2 GB is used by the Parent Partition).The next stop is to connect the new Virtual Machine to a Virtual Network. Connect the Virtual Machine to the “Public Virtual Network” that we created earlier.
The new Virtual Machine needs a Virtual Hard Disk (VHD) to use. Since we did not create a VHD in advance use the default setting “Create a Virtual hard disk”:
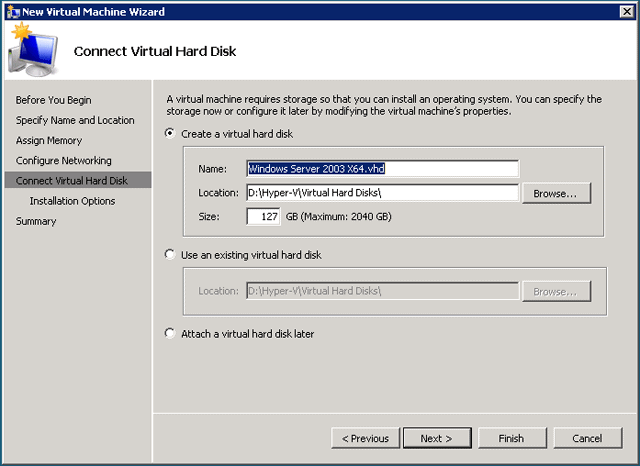
Figure 7. A new Virtual Hard Disk will be created
If we created a Virtual hard Disk in advance, for example a fixed size Virtual Hard disk you have to select “use an existing virtual hard disk” and select the Virtual Hard Disk in the Location field. If you’re using disk intensive applications like SQL Server, MySQL or Exchange Server fixed disks or pass-through disks should be used for best performance. Click Next to Continue.
Since we will be installing a new Operating System we have to select the installation media. This can either be a CD/DVD or an ISO image, whichever your prefer.
Click Finish to end the New Virtual Machine Wizard. The new Virtual Machine is now ready to be booted and we can continue to install the Operating System in the Virtual Machine.
Double click on the new Virtual Machine in the Hyper-V Manager and press the “Virtual Power button” to boot the new Virtual Machine. Install Windows Server 2003 as you are used to…
Note: If you are accessing the Hyper-V server using Remote Desktop then it’s not possible to use your mouse in the new Virtual Machine until you’ve installed the Integration Components. And Integration Components can only be installed after finalizing the setup of Windows, so the setup itself can be challenging. When you have access to the console itself then it’s no problem and the mouse works as expected.
Finishing the installation
When the setup of Windows Server 2003 in our example is finished you have a new Virtual Machine that cannot do anything. When you check the Windows installation for example you’ll notice that it doesn’t have a network interface. The Virtual Machine is running in an “isolated box” and cannot do anything. The first thing you have to do is install the Integration Components. Remember my previous article with the Virtual Storage Provider (VSP), the Virtual Storage Client (VSC) and the VM Bus? The Integration Components contain the software that’s needed for working natively with Hyper-V. Open the Virtual Machine, select Action in the Virtual Machine menu and select “Insert Integration Services Setup Disk”. The Integration Components wizard will be started and the software will be installed. When finished reboot the Virtual Machine and it will work just like a normal server!
Using a dedicated or pass-through disk
Creating a dedicated or pass-through disk requires a different approach. This is not really a Virtual Disk, but it is a physical disk connected to a virtual disk controller in a Virtual Machine. On the Hyper-V server, open the Server Manager and under storage select Disk Management. Make sure that the disk you want to use as a dedicated disk is Offline. This will ensure that the Parent Partition cannot access the disk. If it can access the disk, and write data on it, it will give unpredictable results in the Virtual Machine!
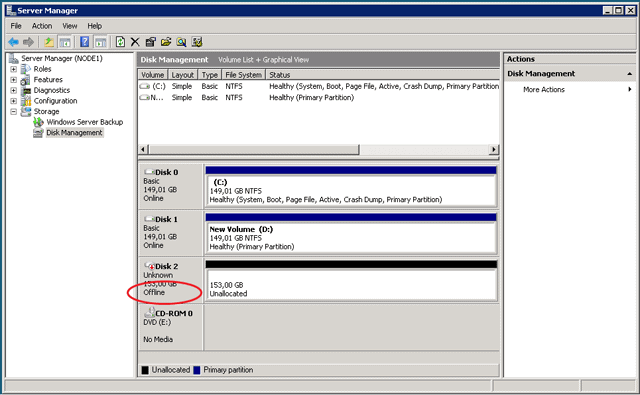
Figure 8. The dedicated disk needs to be offline in the Parent Partition!
In the Hyper-V Manager right-click the Virtual Machine and select Settings. Select the IDE Controller, select Hard Drive and click Add. Under Media select Physical Hard Disk and select the disk you want to assign to this controller.
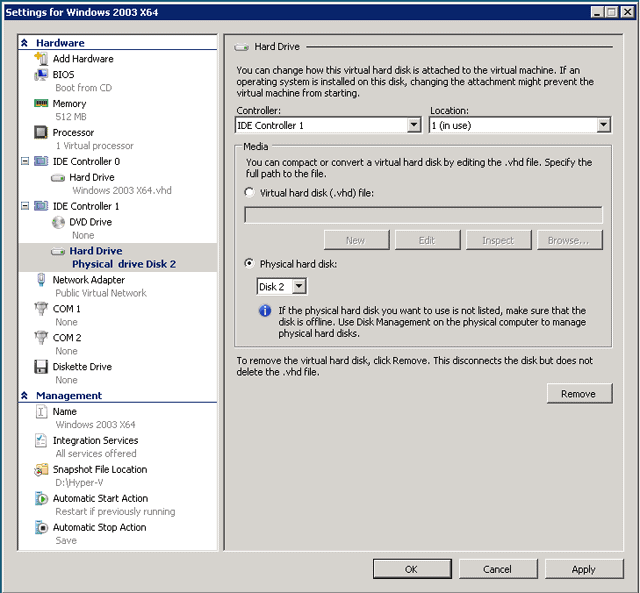
Figure 9. Add the physical disk to the disk controller. Note that this is the same disk as in Figure 8!
When you boot your Virtual Machine and open Disk Management the new disk will show up, ready to be partitioned and formatted.
Is is possible to boot from a pass-through disk? Yes, but only if assigned to the IDE controller. SCSI Controllers can be used for data disks. When creating a Virtual Machine that needs to boot from a pass-through disk you have to create the VM Configuration first, then add the pass-through disk to the IDE controller and then start up the VM.
Conclusion
In this second article I tried to give more information regarding the installation of Hyper-V, Hyper-V’s Virtual Networks, Virtual Hard disks and Virtual Machines running under Hyper-V. In my next article I’ll discuss the deployment of Virtual Machines and the use of System Center Virtual Machine Manager (VMM) 2008 in a Hyper-V environment.