
The series so far:
In Windows Server 2016, Microsoft implemented a strong security concept called Shielded VMs. Shielded VMs have been improved in the Windows Server 2019 release. In the second part of this series, Nicolas describes what Shielded Virtual Machines are and how to configure them using PowerShell.
One key investment area that Microsoft improves in every Windows Server release is security. Whether you work for a small company or a multinational company, security is essential. But sometimes, it can be hard to secure your machines. If you work with physical machines, then you simply put these machines in a secure datacenter with padlocks and provide access only to authorized administrators. On top of that you could have security guards in front of the datacenter. With Virtual Machines, you don’t have this security perimeter because many administrators can access these VMs, such as: Hyper-V administrators, backup administrators, storage administrators, or maybe network administrators. These administrators can access your virtual machines because they need access to VMs in order to do their jobs! Thus, they must be able to access the VHD disks.
What are the security risks?
The first risk that you can encounter is, for example, that your storage administrator with access to Hyper-V, will copy and paste one or many VHD disks to a USB device. The reason why Hyper-V presents such a huge risk has to do with Hyper-V anatomy. A virtual machine is a VHD disk which is nothing more than a file. Rather than booting the virtual machine, anyone could simply mount the VHD disk on a different Windows Server, thus giving the administrator access to the full contents of the VHD disk. In a better case, you will be notified that a copy has been made to an external drive; in the worst case you will have no awareness that your data has been compromised. Another risk is a malware attack. Imagine your Hyper-V host is compromised; all your VHD disks will be vulnerable and the malware will have full access to your Virtual Machines.
To reduce such risks, Microsoft has introduced Shielded Virtual Machines.
How Do Shielded Virtual Machines Work?
Shielded Virtual Machines are based on the following concepts:
- Code integrity: Code integrity checks whether the Hyper-V hosts meet the criteria to run Shielded Virtual Machines.
- Virtual Trusted Platform Module (TPM v2): vTPM will allow BitLocker encryption of the VM’s disks. A vTPM device is encrypted with a transport key. Thanks to vTPM, the TPM technology can be used even if the hardware Hyper-V host does not have a physical TPM.
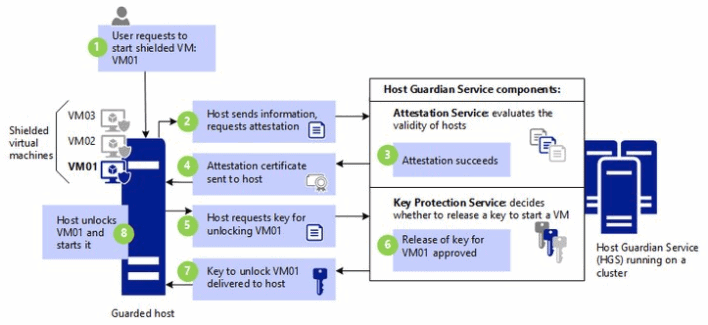
- Host Guardian Service (HGS): The Host Guardian Service exists in Windows Server 2016. The Host Guardian Service is a host level component that provides two services – attestation and key protection. When a Shielded Virtual Machine is turned on, HGS will check to see if the host is eligible to run the Shielded VM or not.
Shielded VMs offer protection for virtual machines and will ensure that your Hyper-V environment running your Virtual Machines (such as: Domain Controller, SharePoint, Exchange, SQL Server, and so on…) is safe. Moreover, Shielded VMs will only run on an infrastructure you designate.
A picture is worth more than a thousand words; this image from TechNet provides an overview of the full process:
Shielded Virtual Machines in Practice
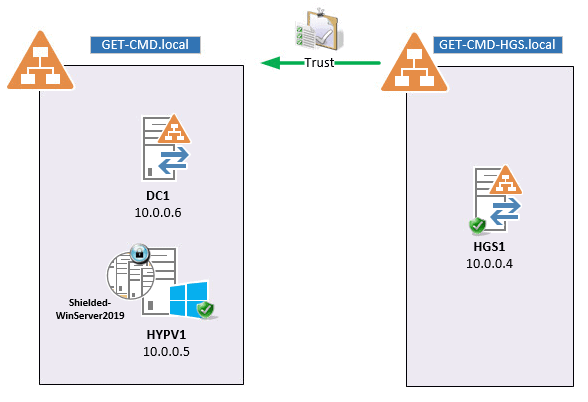
Let’s see how to implement Shielded VMs in a test environment. This is the environment used in the example explained in this article:
- DC1: This VM is the Domain Controller for the following AD Forest: GET-CMD.local. The IP Address is 10.0.0.6
- HYPV1: This is the Hyper-V host that will become a Guarded Host. The IP Address is 10.0.0.5
- HGS01: This is a standalone HGS Server that will be unclustered because this is a test environment. The IP Address is 10.0.0.4. HGS Will create a standalone Active Directory Forest. In my case, the forest will be named: GET-CMD-HGS.local.
- Shielded-WinServer2019: This is the Shielded VM based on Windows Server 2019 that will be deployed on the HYPV1 host.
The figure below explains the lab environment for this article.
If you lack sufficient resources to test on your laptop or your server, you can use your Azure subscription. That’s what I did to create my lab environment, and, thanks to Nested Virtualization, it works like a charm. Just remember to use at least Standard Ds_v3 VM size for your Hyper-V host.
Deploying Active Directory and a Guarded Host
Begin this deployment by installing DC1 with an Active Directory domain called GET-CMD.local. I will not provide the PowerShell commands because that is not the goal of this article, but you can easily retrieve the commands on the Internet. Once your AD forest has been successfully created, you must install the Hyper-V role on your Hyper-V host. On HYPV1, run the following command:
|
1 |
PS > Install-WindowsFeature Hyper-V -IncludeManagementTools –Restart |
If you need more information about PowerShell and Hyper-V, refer to the following article: https://www.red-gate.com/simple-talk/sysadmin/powershell/hyper-v-powershell-basics/
Next, join your Hyper-V host to your AD domain.
Deploying HGS Server
Connect to your HGS Server called HGS1 and install the Host Guardian Server role:
|
1 2 3 4 5 |
PS > Install-WindowsFeature HostGuardianServiceRole -IncludeManagementTools Success Restart Needed Exit Code Feature Result ------- -------------- --------- -------------- True No Success {Active Directory Domain Services, Failove... WARNING: You need to configure Host Guardian Service by calling Install-HgsServer & Initialize-HgsServer PowerShell commands. |
Install the Host Guardian Service by running the following commands. This cmdlet will create a standalone Active Directory Forest with your HGS Server as a primary Domain Controller. You can join this server to an existing AD Domain, but the best practice is to create a new one:
|
1 2 |
PS > $HGSPwd = ConvertTo-SecureString -AsPlainText 'xxxxxxxxxxx' -Force PS > Install-HgsServer -HgsDomainName 'get-cmd-hgs.local' -SafeModeAdministratorPassword $HGSPwd –Restart |
The machine will reboot. Log in with the domain account which is your local administrator account with the same password. Now, you need to generate some certificates in order to initialize the HGS node. In a test environment, consider generating self-signed certificates:
|
1 2 3 4 5 6 7 8 9 10 11 12 13 |
PS > $CertPwd = ConvertTo-SecureString -AsPlainText 'xxxxxxxxx' -Force PS > $Cert = New-SelfSignedCertificate -DnsName "hgs.get-cmd-hgs.local" PS > Export-PfxCertificate -Cert $Cert -Password $CertPwd -FilePath 'C:\HGSCert.pfx' Directory: C:\ Mode LastWriteTime Length Name ---- ------------- ------ ---- -a---- 3/30/2018 9:24 PM 2661 HGSCert.pfx PS > $encryptCert = New-SelfSignedCertificate -DnsName "hgs.get-cmd-hgs.local" PS > Export-PfxCertificate -Cert $encryptCert -Password $certPwd -FilePath 'C:\encryptCert.pfx' Directory: C:\ Mode LastWriteTime Length Name ---- ------------- ------ ---- -a---- 3/30/2018 9:24 PM 2661 encryptCert.pfx |
Two certificates have been generated:
- HGSCert.pfx: This is the certificate for signing
- encryptCert.pfx: This is the certificate for encryption
Initialize HGS Server
The next step is the initialization process. The Initialize-HGSServer cmdlet will check the status of the Active Directory domain controller and configure both certificates previously created:
|
1 2 |
PS > Initialize-HgsServer -HgsServiceName 'HGS' -SigningCertificatePath 'C:\HGSCert.pfx' -SigningCertificatePassword $certPwd -EncryptionCertificatePath 'C:\encryptCert.pfx' -EncryptionCertificatePassword $certPwd -TrustTpm LogPath: C:\Windows\Logs\HgsServer\180330212859\HyperVShielded |
You can check to see if the HGS server exists in your AD Domain:
|
1 2 3 4 5 6 7 8 9 10 |
PS > Get-ADComputer -Identity HGS1 DistinguishedName : CN=HGS1,OU=Domain Controllers,DC=get-cmd-hgs,DC=local DNSHostName : HGS1.get-cmd-hgs.local Enabled : True Name : HGS1 ObjectClass : computer ObjectGUID : 031528cd-27ff-4680-aa3a-5b7304ccaf6b SamAccountName : HGS1$ SID : S-1-5-21-87811353-1222259967-1591882773-1000 UserPrincipalName : |
Set the HGS server configuration by switching to the Active Directory Mode:
|
1 |
PS > Set-HgsServer –TrustActiveDirectory |
Note: You could also configure the HGS server to be accessible over HTTPS. You can now create a conditional forwarding that point to the first AD domain:
|
1 |
PS > Add-DnsServerConditionalForwarderZone -Name "get-cmd.local" -ReplicationScope "Forest" -MasterServers 10.0.0.6 |
Create a One-Way trust relationship from the HGS Domain to the Corporate AD Domain:
|
1 2 |
PS > netdom trust get-cmd-hgs.local /domain:get-cmd.local /userD:get-cmd.local\Nicolas /passwordD:xxxxxxxx /add The command completed successfully. |
Confirm that the outbound trust relationship has been created on HGS1:
|
1 2 3 4 |
PS > Get-ADTrust -Filter * | select Name, Direction, Source, Target Name Direction Source Target ---- --------- ------ ------ get-cmd.local Outbound DC=get-cmd-hgs,DC=local get-cmd.local |
As expected, the inbound trust relationship exists on DC1 as well.
Configure the Guarded Host – Part 1
Connect to DC1 and create a group called GuardedHosts with Global scope and a Security type. Then add the guarded host server to the newly created group:
|
1 |
PS > Add-ADGroupMember "GuardedHosts" –Members "HYPV1$" |
You must add conditional forwarding to the HGS domain name. The next task is to get the SID for this AD Group. Run the following command and copy/paste this SID in notepad:
|
1 |
PS > Get-ADGroup ‘GuardedHosts’ | Select-Object SID |
Configure HGS Server – Part 1
Switch back to HGS1 and run the Add-HgsAttestationHostGroup cmdlet:
|
1 2 |
PS > Add-HgsAttestationHostGroup -Name ‘GuardedHosts’ -Identifier "S-1-5-21-1700574040-1668240534-2077627731-1105" S-1-5-21-1700574040-1668240534-2077627731-1105:GuardedHosts |
This command adds the host group called GuardedHosts from the get-cmd.local Active Directory fabric to the Attestation service on HGS1. The Identifier parameter specifies the SID previously stored in notepad. After you run this command, the Attestation service trusts all hosts that belong to this group to host Shielded Virtual Machines. You can check the HGS Attestation Group:
|
1 2 3 4 |
PS > Get-HgsAttestationHostGroup Name Identifier ---- ---------- GuardedHosts S-1-5-21-1700574040-1668240534-2077627731-1105 |
Ok great! AD and HGS are configured. You can now connect to the guarded host.
Configure the Guarded Host – Part 2
You need to create the Code Integrity Policy. This policy will be applied to every machine with the same configuration and is used to prevent unauthorized software from running on the host. First, you need to scan a reference system to create an XML policy file. This should capture most files that Windows needs to boot and run. In my case, the Guarded Host is a fresh and clean install, so I will scan the whole system. Doing so may take a while. If you add or change something on the host, you must start a new scan to update the policy
Then, you will convert the XML file into a .p7b file. If you just want to scan and restrict to a single directory, remember to add the –ScanPath parameter. This command will create the XML file that you will convert into a Device Guard Policy using the the ConvertFrom-CIPolicy cmdlet:
|
1 2 3 4 |
PS > New-CIPolicy -Level FilePublisher -Fallback Hash -FilePath 'C:\CodeIntegrity.xml' "Scan completed successfully" PS > ConvertFrom-CIPolicy -XmlFilePath 'C:\CodeIntegrity.xml' -BinaryFilePath 'C:\CodeIntegrity.p7b' C:\CodeIntegrity.p7bPS C:\Users\nicolas> |
Note: If this cmdlet cannot generate a rule at the specified level, in my case at the FilePublisher level, then this cmdlet attempts to generate it at a fallback level (in my case at the hash level).
Once the binary has been created, copy this file to HGS1.
Configure HGS Server – Part2
On HGS1, run the following command to add the Code Integrity policy to the Attestation service, based on the specified .p7b file.
|
1 2 3 4 |
PS > Add-HgsAttestationCIPolicy -Path C:\CodeIntegrity.p7b -Name "Hyper-V Enforced CI Policy" Name PolicyType State ---- ---------- ----- Hyper-V Enforced CI Policy {CiPolicy} Enabled |
You must retrieve the AttestationUrl and KeyProtectionUrl to configure the Guarded Host:
|
1 2 3 4 5 6 |
PS > Get-HgsServer Name Value ---- ----- AttestationOperationMode AD AttestationUrl {http://hgs.get-cmd-hgs.local/Attestation} KeyProtectionUrl {http://hgs.get-cmd-hgs.local/KeyProtection} |
Configure the Guarded Host – Part3
Switch back to HYPV1 and configure it to use the Host Guardian Service. This command configures the URLs used by the attestation client and the key protection client:
|
1 2 3 4 5 6 7 8 9 10 11 12 13 14 15 16 |
PS > Get-HgsClientConfiguration IsHostGuarded : False Mode : Local KeyProtectionServerUrl : AttestationServerUrl : AttestationOperationMode : Unknown AttestationStatus : NotConfigured AttestationSubstatus : NoInformation PS > Set-HgsClientConfiguration -KeyProtectionServerUrl "http://hgs.get-cmd-hgs.local/KeyProtection" -AttestationServerUrl "http://hgs.get-cmd-hgs.local/Attestation" IsHostGuarded : True Mode : HostGuardianService KeyProtectionServerUrl : http://hgs.get-cmd-hgs.local/KeyProtection AttestationServerUrl : http://hgs.get-cmd-hgs.local/Attestation AttestationOperationMode : ActiveDirectory AttestationStatus : Passed AttestationSubstatus : NoInformation |
HYPV1 has switched from HostGuarded:False to HostGuarded:True. It means that you can create and run Shielded VMs on this host. To validate the HGS deployment, run the Get-HgsTrace cmdlet.
Deploy shielded VMs
To confirm that this works, deploy a simple Virtual Machine. Enable the Remote Desktop Protocol because after enabling Shielded Mode on this VM, you will not be able to access to this VM, except through RDP:
|
1 2 3 4 5 6 7 8 9 10 11 |
PS > # Rhe guardian metadata is available at http://<HGSCLUSTERNAME>/KeyProtection/service/metadata/2014-07/metadata.xml PS > Invoke-WebRequest "http://hgs.get-cmd-hgs.local/KeyProtection/service/metadata/2014-07/metadata.xml" -OutFile "C:\Guard PS > # Import the HGS guardian for each fabric you want to run your shielded VM PS > Import-HgsGuardian -path "C:\GuardianMetadata.xml" -Name "Get-CMD" -AllowUntrustedRoot Name HasPrivateSigningKey Signing Certificate Subject ---- -------------------- --------------------------- Get-CMD False CN=hgs.get-cmd-hgs.local PS > # The certificate is stored at Cert:\LocalMachine\Shielded VM Local Certificates PS > $Owner = New-HgsGuardian -Name "Owner" -GenerateCertificates PS > $Guardian = Get-HgsGuardian -Name "Get-CMD" PS > $HGSKeyProtector = New-HgsKeyProtector -Owner $Owner -Guardian $Guardian –AllowUntrustedRoot |
After creating a simple VM called Shielded-WinServer2019, confirm that Shielded Mode is disabled:
|
1 2 3 4 5 6 7 8 9 10 11 12 13 |
PS > Get-VM -Name Shielded-WinServer2019 Name State CPUUsage(%) MemoryAssigned(M) Uptime Status Version ---- ----- ----------- ----------------- ------ ------ ------- Shielded-WinServer2019 Running 0 546 00:48:15.5960000 Operating normally 8.0 PS > Get-VM -Name Shielded-WinServer2019 | Get-VMSecurity TpmEnabled : False KsdEnabled : False Shielded : False EncryptStateAndVmMigrationTraffic : False VirtualizationBasedSecurityOptOut : False CimSession : CimSession: . ComputerName : HGS IsDeleted : False |
Enable Shielded Mode on this Virtual Machine:
|
1 2 3 4 5 6 |
PS > $VMName = "Shielded-WinServer2019" PS > Get-VM -Name $VMName | Stop-VM -Force PS > Set-VMKeyProtector -VMName $VMName -keyprotector $HGSKeyProtector.RawData PS > Set-VMSecurityPolicy -VMName $VMName -Shielded $true PS > Enable-VMTPM -VMName $VMName PS > Start-VM -Name $VMName |
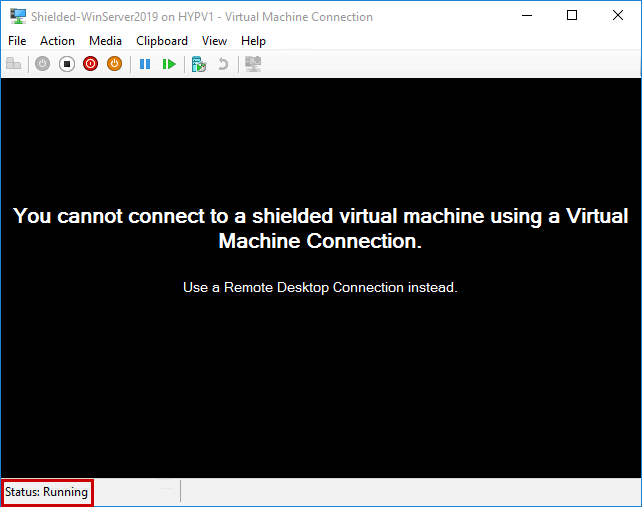
The VM has been started, and you can confirm that it can’t be accessed to through VMConnect:
|
1 2 3 4 5 6 7 8 9 10 11 12 13 |
PS > Get-VM -Name Shielded-WinServer2019 Name State CPUUsage(%) MemoryAssigned(M) Uptime Status Version ---- ----- ----------- ----------------- ------ ------ ------- Shielded-WinServer2019 Running 0 512 00:01:53.3890000 Operating normally 8.0 PS C:\Users\nicolas> Get-VM -Name Shielded-WinServer2019 | Get-VMSecurity TpmEnabled : True KsdEnabled : False Shielded : True EncryptStateAndVmMigrationTraffic : True VirtualizationBasedSecurityOptOut : False CimSession : CimSession: . ComputerName : HGS IsDeleted : False |
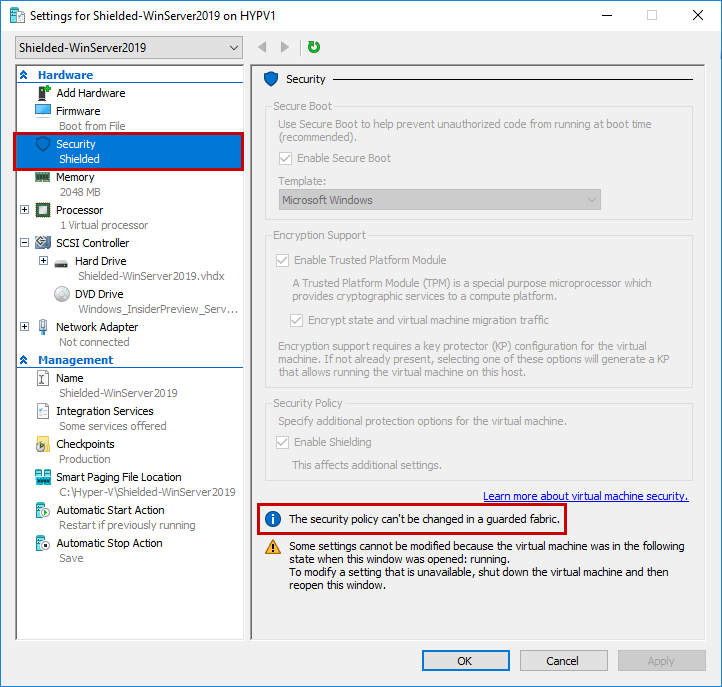
Open the settings for this Virtual Machine and confirm that Enable Shielding is selected. At this step, you cannot modify the security settings because the VM is running in a guarded fabric.
What’s new in Windows Server 2019?
Microsoft states that the Shielded VMs concept in Windows Server 2016 was well received by customers, so in Windows Server 2019, Microsoft has extended the Shielded Virtual Machine concept to encompass Linux Virtual Machines. Windows Server 2019 also includes the ability to encrypt network segments. Microsoft has improved troubleshooting of Shielded VMs for Windows Server and Linux. You can for example use PowerShell Direct to connect to Shielded VMs even if you’ve lost network connectivity to these VMs.
Conclusion
In my point of view, Shielded VMs are not very well documented. If you want to implement Shielded VMs in your environment, be sure that all the prerequisites are satisfied, and, if it’s possible, use a testing environment before implementing in production.
Even though it is possible to run the Host Guardian Service on a standalone server, I should advise you to only use Shielded VMs within Hyper-V clusters. Otherwise, in case of a host level failure, the Shielded Virtual Machines could be permanently inaccessible. For those of you who want to test Shielded VMs, you can use nested Hyper-V for testing but not in production. To finish, remember that a shielded VM can exist only on a guarded host, and a shielded VM cannot run on a normal Hyper-V Host. But a normal Virtual Machine, without encryption, can coexist with Shielded VMs on guarded Hyper-V Hosts.