
The series so far:
- Introduction to SQL Server sequence objects
- Using SQL Server sequence objects
- How to return multiple sequence numbers with sp_sequence_get_range
- How to replace an identity column with a sequence number
Microsoft introduced the sequence number objects starting with SQL Server 2012. A sequence object generates sequence numbers based on starting and increment values, similar to an identity column, but it has additional features. Over time, you might find that the additional benefits of a sequence number have you wanting to replace an identity column with a sequence number. This article demonstrates two options for replacing an identity column with a sequence number.
Why replace the identity column
An Identity column might not be flexible enough to support all business requirements an application might need around a series of identity values. When this occurs, you might find the sequence number object more flexible. Here are a few of the reasons why you might want to change an identity column to a sequence number:
- Need to know the sequence number prior to inserting a record.
- Need to share sequence numbers across tables.
- Need to cycle through a series of numbers, over and over again.
- Need to retrieve multiple sequence numbers at the same time without gaps.
- Need to be able to change the specification for the sequence number over time.
- Need to store a sequence number in a data type other than numeric.
- Need to allow a sequence number column to be nullable.
Converting identity column to sequence number
If you decide to change an identity column to a sequence number, there is more than one way to accomplish the conversion. This article demonstrates two different options. One option is to modify your table to add a sequence number column and then delete the identity column. Another option is to create another table that uses a sequence object and then use the ALTER TABLE SWITCH operation. This article explores both of these options and provides examples of how these options can be used to replace an identity column with a sequence number.
Option 1: Modify existing table to use sequence number
Replacing an identity column in an existing table using a column populated with a sequence number requires a few steps. To show you how this example works, first create a couple of sample tables.
The first sample table is named Sample and can be created using the script in Listing 1.
Listing 1: Code to create Sample table.
|
1 2 3 4 5 6 7 8 9 |
USE tempdb; GO CREATE TABLE Sample (ID int identity(1,1) NOT NULL, SampleName varchar(30) NOT NULL, CONSTRAINT PK_Sample_ID PRIMARY KEY CLUSTERED(ID ASC)); INSERT INTO Sample(SampleName) VALUES ('First'), ('Second'), ('Third'); SELECT * FROM Sample; |
Running the code from Listing 1 produces the rows shown in Report 1.
Report 1: Rows generated in the Sample table

The Sample table has the identity column that will be changed to use a sequence number.
When swapping out an identity column for a column populated with a sequence number, you need to be careful not to mess up the tables with foreign key references to the identity column of the table being modified. Therefore, this example has a second table named Sample2 created in Listing 2. Sample2 simulates a table with a foreign key reference to the primary key associated with the ID column in the first table.
Listing 2: Creating Sample2 table
|
1 2 3 4 |
USE tempdb; GO CREATE TABLE Sample2 (ID int, CONSTRAINT FK_Sample2_ID FOREIGN KEY (ID) REFERENCES Sample(ID)); |
Step 1: Creating sequence number column
The first step to replacing an identity column with a sequence number is to create a new column in the Sample table to store the sequence number column. For this example, the sequence number column has the same data type as the original identity column, an INT data type. The code in Listing 3 is used to add the new sequence number column to the Sample table.
Listing 3: Added sequence number column
|
1 2 3 4 |
USE tempdb; GO ALTER TABLE Sample ADD SequenceNumber int NULL; GO |
Step 2: Updating SequenceNumber column
Once the new sequence number column has been added to the Sample table, the next step is to update the new column with the appropriate value for all the existing records. The new SequenceNumber column will be populated with the same values as the ID column. Therefore to update the SequenceNumber column, run the code in Listing 4.
Listing 4: Updating the SequenceNumber column
|
1 2 3 4 5 |
USE tempdb; GO UPDATE Sample Set SequenceNumber = ID; SELECT * FROM Sample; |
The output in Report 2 is produced after running Listing 4.
Report 2: Sample table
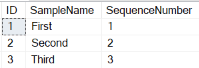
Step 3: Identifying and removing foreign key references
The identity column of the Sample table has a primary key named PK_Sample_ID associated with it. This primary key needs to be removed from the ID column and then moved to the new SequenceNumber column. Before this can be done, any foreign keys that reference this primary key need to be dropped. To find all the foreign keys that refer to the PK_Sample_ID primary key, run the code in Listing 5.
Listing 5: Finding all foreign keys
|
1 2 3 4 5 6 7 8 9 10 11 12 13 14 15 16 17 18 19 |
USE tempdb; GO SELECT FK.TABLE_NAME as ForeignKeyTable, C.CONSTRAINT_NAME as Constraint_Name FROM INFORMATION_SCHEMA.REFERENTIAL_CONSTRAINTS C INNER JOIN INFORMATION_SCHEMA.TABLE_CONSTRAINTS FK ON C.CONSTRAINT_NAME =Fk.CONSTRAINT_NAME INNER JOIN INFORMATION_SCHEMA.TABLE_CONSTRAINTS PK ON C.UNIQUE_CONSTRAINT_NAME=PK.CONSTRAINT_NAME INNER JOIN INFORMATION_SCHEMA.KEY_COLUMN_USAGE CU ON C.CONSTRAINT_NAME = CU.CONSTRAINT_NAME INNER JOIN ( SELECT i1.TABLE_NAME, i2.COLUMN_NAME FROM INFORMATION_SCHEMA.TABLE_CONSTRAINTS i1 INNER JOIN INFORMATION_SCHEMA.KEY_COLUMN_USAGE i2 ON i1.CONSTRAINT_NAME =i2.CONSTRAINT_NAME WHERE i1.CONSTRAINT_TYPE = 'PRIMARY KEY' ) PT ON PT.TABLE_NAME = PK.TABLE_NAME WHERE PK.TABLE_NAME = 'Sample' and PT.COLUMN_NAME = 'ID'; |
When the code in Listing 5 is run, the output in Report 3 is generated.
Report 3: Output created when Listing 5 is run.
![]()
To remove the only foreign key identified, the script in Listing 6 can be run.
Listing 6: Removing foreign key
|
1 2 3 |
USE tempdb; GO ALTER TABLE Sample2 DROP CONSTRAINT FK_Sample2_ID; |
Keep in mind any foreign keys dropped should be recreated, so consider retaining the foreign key information.
Step 4: Removing primary key from identity column
With all the foreign keys removed, the primary key on the Sample table can be dropped using the script in Listing 7.
Listing 7: Removing primary key
|
1 2 3 4 5 |
USE tempdb; GO ALTER TABLE Sample DROP CONSTRAINT PK_Sample_ID; GO |
Step 5: Dropping identity column
With the primary key removed, the identity column can be dropped using the code in Listing 8.
Listing 8: Removing identity column.
|
1 2 3 4 5 |
USE tempdb; GO ALTER TABLE Sample DROP COLUMN ID ; GO |
Step 6: Renaming SequenceNumber column
For the sequence number column to have the same name as the deleted identity column, it must be renamed. The script in Listing 9 performs this rename operation.
Listing 9: Renaming SequenceNumber column
|
1 2 3 4 5 |
USE tempdb; GO EXEC sp_rename 'Sample.SequenceNumber', 'ID', 'COLUMN'; GO |
Step 7: Adding NOT NULL requirement and primary key
Identity columns are defined to have a NOT NULL requirement. Therefore to make the new sequence number column mirror the original identity column properties, the NOT NULL requirement must be added to the sequence number column. The script in Listing 10 alters the ID column to not allow nulls and adds a new primary key constraint to replace the primary key deleted in step 4.
Listing 10: Adding NOT NULL requirement and primary key
|
1 2 3 4 5 6 7 |
USE tempdb; GO ALTER TABLE Sample ALTER COLUMN [ID] int NOT NULL; GO ALTER TABLE Sample ADD CONSTRAINT PK_Sample_ID PRIMARY KEY CLUSTERED (ID ASC) ; GO |
Step 8: Creating sequence number object
Because the Sample table already has some rows, the highest value for the new ID column needs to be determined. This value will be used to set the starting value for the new sequence number object. The starting value for the sequence number object will be the maximum value for the ID column in the Sample table plus the increment value for the sequence object (which in this example will be 1, the same as the original identity increment value). The dynamic TSQL code in Listing 11 can be used to identify the highest ID column value and create the new sequence number object with the correct START value.
Listing 11: Creating Sequence number object
|
1 2 3 4 5 6 7 8 9 10 11 |
USE tempdb; GO DECLARE @NewStartValue int; DECLARE @IncrementValue int = 1; DECLARE @CMD nvarchar(1000); SELECT @NewStartValue = MAX(ID) + @IncrementValue FROM Sample; SET @CMD = 'CREATE SEQUENCE Sample_SequenceNumber AS INT START WITH ' + RTRIM(CAST(@NewStartValue as CHAR)) + ' INCREMENT BY ' + RTRIM(CAST(@IncrementValue AS CHAR)); EXEC sp_executesql @CMD GO |
Care should be used when executing dynamic SQL to ensure you don’t cause a SQL injection issue. Therefore before executing any dynamic SQL, make sure you are not potentially opening the door for SQL injection issues.
Step 9: Setting a default value for the new ID column
When new rows are added to an identity column field, the value for the identity column is automatically populated with the next identity value by default. To get the new ID column to automatically populate with a sequence number value, a default constraint needs to be added to the new ID column. This constraint can be added by using the code in Listing 12.
Listing 12: Setting the ID column default value
|
1 2 3 4 5 6 |
USE tempdb; GO ALTER TABLE Sample ADD CONSTRAINT ID_Default DEFAULT (NEXT VALUE FOR Sample_SequenceNumber) FOR ID; GO |
Step 10: Restoring foreign keys
In Step 3, the one foreign key constraint that referenced the primary key on the Sample table was deleted. This step adds back that deleted foreign key reference, using the code in Listing 13.
Listing 13: Restoring foreign key
|
1 2 3 4 |
USE tempdb; GO ALTER TABLE Sample2 ADD CONSTRAINT FK_Sample2_ID FOREIGN KEY (ID) REFERENCES Sample(ID); |
Testing out inserting new rows
With the identity column swapped out with a column populated by the sequence number object, all that is left to do is test out the new schema definition. This testing verifies that the new ID column is populated with the next sequence number every time a new row is added. The testing can be done by running the code in Listing 14.
Listing 14: Inserting three new rows into the Sample table
|
1 2 3 4 5 6 7 |
USE tempdb; GO INSERT INTO Sample (SampleName) VALUES ('Fourth'), ('Fifth'), ('Sixth'); SELECT * FROM Sample; |
When the code in Listing 14 is run, the results in Report 4 are created.
Report 4: Output when Listing 14 is executed
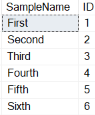
By reviewing the output in Report 4, you can see that the last three rows inserted got the next three sequential sequence numbers (4, 5, and 6). You might also notice that the position of the ID column is no longer in the first ordinal position in the table as the original ID column was.
Option 2: Replacing identity column using SWITCH operation
Another option to replace an identity column is to use the ALTER TABLE SWITCH operation. This technique is often used with table partitioning, which is out of scope for this article, but it is useful in this scenario. The SWITCH operation doesn’t move the data. Instead, it switches the partition between the source and target tables. This process simplifies the migration, but some requirements need to be followed. Below are those requirements as found in the Microsoft Documentation:
- Both tables must exist before the SWITCH operation. The table from which the partition is being moved (the source table) and the table that is receiving the partition (the target table) must exist in the database before you perform the switch operation.
- The receiving partition must exist and it must be empty. Whether you are adding a table as a partition to an already existing partitioned table, or moving a partition from one partitioned table to another, the partition that receives the new partition must exist and it must be an empty partition.
- The receiving nonpartitioned table must exist and it must be empty. If you are reassigning a partition to form one nonpartitioned table, the table that receives the new partition must exist and it must be an empty nonpartitioned table.
- Partitions must be on the same column. If you are switching a partition from one partitioned table to another, both tables must be partitioned on the same column.
- Source and target tables must share the same filegroup. The source and the target table of the ALTER TABLE…SWITCH statement must reside in the same filegroup, and their large-value columns must be stored in the same filegroup. Any corresponding indexes, index partitions, or indexed view partitions must also reside in the same filegroup. However, the filegroup can be different from that of the corresponding tables or other corresponding indexes.
Cleanup and recreating of artifacts from Option 1
Before learning how to use the SWITCH operation to replace an identity column with a column populated with a sequence number, clean the database artifacts created in Option 1 and recreate the sample tables and sequence object. To perform this cleanup and recreation of objects, execute the code in Listing 15.
Listing 15: Cleanup and recreation of sample tables
|
1 2 3 4 5 6 7 8 9 10 11 12 13 14 15 16 17 18 19 20 21 22 23 24 25 26 27 |
USE tempdb; GO DROP TABLE Sample2; DROP TABLE Sample; DROP SEQUENCE Sample_SequenceNumber; GO CREATE TABLE Sample (ID int identity(1,1) NOT NULL, SampleName varchar(30) NOT NULL, CONSTRAINT PK_Sample_ID PRIMARY KEY CLUSTERED(ID ASC)); INSERT INTO Sample(SampleName) VALUES ('First'), ('Second'), ('Third'); CREATE TABLE Sample2 (ID int, CONSTRAINT FK_Sample2_ID FOREIGN KEY (ID) REFERENCES Sample(ID)); GO USE tempdb; GO DECLARE @NewStartValue int; DECLARE @IncrementValue int = 1; DECLARE @CMD nvarchar(1000); SELECT @NewStartValue = MAX(ID) + @IncrementValue FROM Sample; SET @CMD = 'CREATE SEQUENCE Sample_SequenceNumber AS INT START WITH ' + RTRIM(CAST(@NewStartValue as CHAR)) + ' INCREMENT BY ' + RTRIM(CAST(@IncrementValue AS CHAR)); EXEC sp_executesql @CMD GO |
Step 1: Creating new table that uses sequence number
To use the SWITCH operation the target table needs to be created. Use the code in Listing 16 to create the new table that uses a sequence number to populate the ID column instead of an identity specification.
Listing 16: Create a new table
|
1 2 3 4 5 6 7 8 |
USE tempdb; GO CREATE TABLE Sample_New ( ID int NOT NULL DEFAULT NEXT VALUE FOR Sample_SequenceNumber, SampleName varchar(30) NOT NULL, CONSTRAINT PK_Sample_New_ID PRIMARY KEY CLUSTERED(ID ASC) ); GO |
Step 2: Removing foreign key references
The SWITCH operation will fail if the primary key on the table being switched is referenced by any foreign keys. Therefore all foreign keys to the Sample table need to be removed first. Sample2 has a foreign key reference to the primary key, which will be removed by running the code in Listing 6.
Step 3: Switching tables
Once all the foreign key constraints have been removed, the SWITCH operation can be performed. The code in Listing 17 will perform the SWITCH operation.
Listing 17: Switch tables
|
1 2 3 4 |
USE tempdb; GO ALTER TABLE Sample SWITCH TO Sample_New; SELECT * FROM Sample_New; |
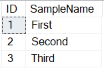
When the switch is performed, the partition between the source (Sample) and target (Sample_New) tables is switched. Only the metadata is changed; the data was not moved. The output of the SELECT statement in Listing 17 can be found in Report 5. This output verifies that rows from the Sample table are now associated with the Sample_New table.
Report 5: Rows in Sample_New table
Step 4: Drop old table and rename new tables
Once the SWITCH operation has been performed, the old Sample table does not contain any rows. Therefore it can be deleted, and the new table can be renamed. The delete and rename can be performed by executing the code in Listing 18.
Listing 18: Drop old and rename new
|
1 2 3 4 |
USE tempdb; GO DROP TABLE Sample EXEC sp_rename N'Sample_New',N'Sample'; |
Step 5: Recreating deleted foreign key references
The final step of the migration is to recreate the foreign key deleted earlier. This key can be recreated by running the code in Listing 13.
Verifying migration
To verify that this migration was successful, you can run the code in Listing 14. When this code is executed, it should produce the same results as shown in Report 4, with one exception. ID column is now in ordinal position 1. I’ll leave it up to you to run this code and to verify that the SWITCH operation was successful in migrating from an identity column to a column populated with a sequence number object.
Restricting sequence numbers from Being updated
Identity column values cannot be updated, whereas columns populated with sequence numbers can be updated. If you want to make sure sequence numbers cannot be updated, then an AFTER UPDATE trigger will need to be created. To verify that the existing Sample table allows updates to the ID column, run the code in Listing 19.
Listing 19: Updating ID column
|
1 2 3 4 5 6 7 8 |
USE tempdb; GO BEGIN TRAN UPDATE Sample SET ID = ID + 100; SELECT * FROM Sample; ROLLBACK TRAN; GO |
The code in Listing 19 runs successfully and produces the output in Report 6.
Report 6: Output when Listing 17 is run
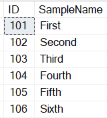
By reviewing Report 6, you can see that the ID values were all updated from their original values. The code in Listing 19 contains BEGIN TRAN and END TRAN statements to roll back these updates for the next test.
To make sure an UPDATE statement to the ID column in the Sample table cannot be performed, the AFTER UPDATE trigger in Listing 20 needs to be created.
Listing 20: UPDATE trigger
|
1 2 3 4 5 6 7 8 9 10 11 12 13 14 15 16 17 18 19 |
USE tempdb GO CREATE TRIGGER trg_UpdateSample ON Sample AFTER UPDATE AS BEGIN SET NOCOUNT ON; DECLARE @OriginalID int DECLARE @UpdatedID int SELECT @OriginalID =[ID] FROM deleted SELECT @UpdatedID =[ID] FROM inserted IF @OriginalID <> @UpdatedID BEGIN RAISERROR('Failed: Update performed on ID column', 16, 1); ROLLBACK TRANSACTION END END GO |
To test out if this trigger works, run the code in Listing 21.
Listing 21: Testing if trigger keeps ID column from being updated.
|
1 2 3 4 5 6 |
USE tempdb; GO UPDATE Sample SET ID = ID + 100 WHERE ID = 1; GO |
When the code in Listing 21 is run, the error message in Report 7 is produced
Report 7: Error when Listing 21 is executed

By creating the AFTER UPDATE trigger trg_UpdateSample, the code in Listing 21 could not update the ID column.
Replacing identity an column with a sequence number
Over time, you may find out that an identity column needs to be swapped out and replaced with a sequence number. This article provided a couple of examples of how to perform that swap. If you plan to replace an identity column with a column populated with a sequence number value, keep in mind sequence number columns can be updated. To restrict sequence columns from being updated, an AFTER UPDATE trigger needs to be defined to restrict the updates.