
Contents
- Go Unit Tests: Tip from the Trenches
- Mindset
- Unit tests as a Contract
- Write Tests for Humans
- Tests are Software, Too
- Working with Tests in Go
- Foundations of a Test
- Running tests
- Organizing Tests with Subtests
- Setup and Teardown
- Test Files and Test Packages
- Test Data: Constant, Fake, or Random?
- Fake Data in Practice
- Code Coverage
- Test Quality
- Putting Coverage All Together
- The Awesome Sauce
- Summary
- References
Go Unit Tests: Tips from the Trenches
Unit tests are crucial to long-term success of a project yet almost never taught formally. We are expected to learn by osmosis, but often we end up dooming ourselves from the start, due to misconceptions or gaps in knowledge. I hope to fill in some of those gaps and provide a broad swath of ideas to tackle unit tests in Go, the language I am currently using on a daily basis. What you will find within are both concepts and practices, drawing from my experience across several languages, showing how to enrich your Go unit tests.
Why write unit tests? Conventional wisdom says so you can refactor or otherwise modify your code with a safety net. While true, that just scratches the surface. Here are some key benefits of unit tests:
- Provide a safety net when refactoring
- Can help identify dead code
- Provide a measure of confidence for management
- Can sometimes find missed use cases
- Define a contract
- Helps produce higher quality code
Of course, there are costs associated with writing unit tests as well:
- Time/effort to write
- Time/effort to maintain
- False sense of security (poor coverage, duplicate tests, testing the wrong thing, poorly written tests)
I submit that when done well, unit tests save time rather than cost time. You get higher quality code by several measures: tighter code, cleaner code, and easier to maintain code. Here are some of the key concepts and practices you will learn from this article:
- Unit tests as a contract: your requirements written in code.
- How both breadth (for coverage) and depth (for protection against fragility) of test coverage are equally vital for ensuring robustness.
- Crafting unit tests is as much about the tests you don’t need as those you do: test just enough but no more.
- Concise and effective patterns for writing Go unit tests.
- Interactive and just-in-time testing.
- Perspective on SOLID principles with regards to unit tests.
- What’s in a name? How to communicate well with test names.
- Parameterizing unit tests; making effective use of DRY principles.
- How Go helps you test behavior, not implementation—but only if you opt-in!
Mindset
What is more important than your code? Unit tests! Lose your code (for whatever reason) and you can recreate it from your unit tests (not saying it is trivial, but it’s possible). But lose your unit tests and you are left with fragile, difficult to maintain, and immediately questionable code as soon as you make a change.
Go, being a newer language, has surprisingly good support for unit tests. Tests are both (a) vital and (b) practical in Go. Some might add (c) easy to that list but, as in any language, writing good unit tests is hard. It is more of an art than a science.
And, of course, writing unit tests takes time, a very finite resource given the fast pace demanded by today’s market. You don’t have infinite time to write tests or, for that matter, to run tests. After all, to test all possible inputs takes an unrealistically large amount of time for any but the most trivial function.
Unit tests as a Contract
When reviewing code, where do you start?
The code? No.
The tests? No.
The test names.
Test names alone can reveal a lot about the quality of the code. Test names should correspond to the low-level requirements. You may or may not be an advocate of TDD (test-driven development). If you are I submit that you want to start the same way: write out the names of the necessary tests as you tackle each requirement. Consider this example requirement:
|
1 |
Extraneous whitespace around the category name should be ignored. |
Corresponding unit test names might be:
|
1 2 3 |
HandleCategory trims LEADING spaces HandleCategory trims TRAILING spaces HandleCategory trims LEADING and TRAILING spaces |
How do you know if these represent the correct set of unit tests?
- every requirement is covered by one or more unit tests;
- the unit tests for a given requirement exhaustively cover that requirement; and
- every unit test is present to meet a requirement.
In the above example, (1) and (3) are satisfied. Point (2) is more interesting. Any code coverage tool would report 100% coverage for that particular functionality. But point (2) above does not ask for 100% coverage; it asks for exhaustive coverage, which means it is asking for more than 100% coverage! This touches upon broad coverage vs. deep coverage, discussed later.
Unit Test Names are Important
The style of test name I like is:
|
1 |
<ItemUnderTest> <expected behavior> <under what state or condition> |
Mapping these to the first test name in the previous example:
|
1 2 3 |
<ItemUnderTest> => "HandleCategory" <expected behavior> "trims LEADING spaces" <under what state or condition> ?? |
I see a lot of Go unit tests without the condition, just a list of expectations (or contrariwise, just a list of states without expectations). Either way, it can easily lead to blind spots, things you are not testing that you should be. Let’s revise the three tests above to include both condition and expectation:
|
1 2 3 |
HandleCategory trims LEADING spaces from valid category HandleCategory trims TRAILING spaces from valid category HandleCategory trims LEADING and TRAILING spaces from valid category |
Immediately upon reading those, I bet you noticed we are missing some tests (and/or requirements!). What happens if we give an empty category? Or an invalid category? What constitutes a valid category?
Write Tests for Humans
A large portion of code we write does not have performance requirements down to microseconds. Write for humans not for computers. Computers will understand your code no matter how convoluted you make it. Humans, not so much. In the immediate context, write tests to make them as clear and obvious as possible. Two things to look at here: the test name and the test body.
You have already seen what I like to do with test names: highlight (via ALL_CAPS) what is unique or important about a test. Looking at the three test names above, it is immediately clear what distinguishes each test from the others.
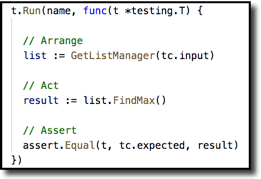
As to the body, here is an example you will see again a bit later. This test uses the Arrange-Act-Assert design pattern. Organize your test into three sections of code separated by a blank line to add visual separation. Arrange what you need in the first section to be able to test your function. Act upon that function in the second section. And in the final section Assert one or more conditions that you expect to be true.
When first getting started, I encourage developers to literally include the comments with those labels, but once you and your teammates get acclimated to the pattern those can be omitted. But do not omit the blank lines between sections–those make it easier for the eye to separate the pieces.
Tests are Software, Too
Tests are software, too, so apply software principles in a test-meaningful way.
The Single Responsibility Principle (SRP) says that a class or a function should be focused, not doing unrelated tasks. Similarly, a given test should only test one thing. Note that that does not always mean just a single assertion. It is fine to use multiple assertions if that is what it takes to validate that something occurred.
The Don’t Repeat Yourself principle (DRY) says that if you repeat the same lines of code over and over, extract them into a function, then just call that function in each place instead. Of course, that applies ‘as is’ in test code as well. But there is more in the realm of tests: do not test the same thing in multiple tests. Ideally when something breaks in your system you want exactly one test to fail. That lets you find the source of the problem much quicker. If 5 or 20 or 100 tests fail at the same time, you have a lot more hunting to do.
Working with Tests in Go
Let’s start with the basics. You may already know much of this, but I know in my own experience it is important to make sure you have a good foundation before launching into more complex topics, so bear with me. And you may find a few things to surprise you here!
The first step is (a) knowing what constitutes a valid test file and (b) how to know if you’ve got one. (OK, you could argue that is two steps!)
This looks like a perfectly valid Go test file–but it is invalid.
This is almost identical–but this one is valid. The reason I know that is because my IDE (integrated development environment) tells me so, in the guise of the active controls I have indicated with the arrows. (I use VSCode with the aptly named “Go” plugin from Microsoft.)
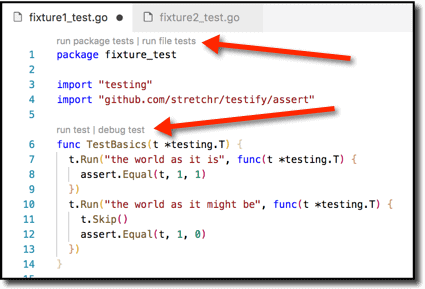
The requirements for a valid test file in Go are just these:
- File name ends in _test.go.
- Include a package declaration in the file.
That’s it! So if I create a correctly named file with just a package declaration, VSCode materializes the controls above line 1 here:
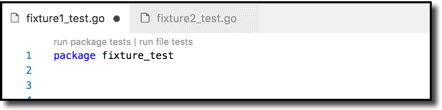
Now that you know the rules, it is easy to determine the subtle difference between the two files above: the filename in the first ends in _tst.go, so it fails rule 1!
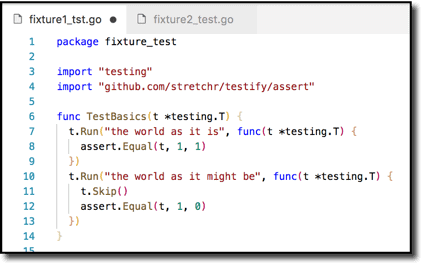
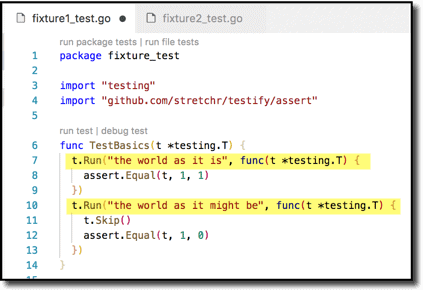
Of course, the one-line file above, while valid, won’t do much–it has no tests to run! So the minimally useful test file is something more akin to this:
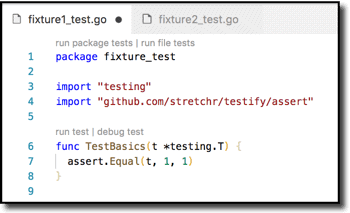
The requirements for a useful test file:
- File name ends in _test.go.
- Include a package declaration in the file.
- Include one or more test functions (e.g. line 6) with a name of the form TestSomething. Something must start with an uppercase character.
- Include a single argument of type *testing.T in each such function.
- Do some stuff and assert that things match your expectations with the assert function.
Foundations of a Test
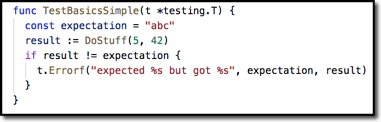
Strip a unit test down to its core and what you have left are one or more assertions you wish to validate. You can do this with “raw” code, for example, like this:
But then you would likely want to extract that t.ErrorF into a separate function so that all your tests could call it, producing uniformly styled error messages. Then you will likely find other patterns in your test code that are common. Like many things in programming, there is no need to ‘reinvent the wheel.’ A good library that provides support for these kinds of fundamental assertions is testify. Testify provides assert and require packages, which should be your lingua franca of testing. Almost every test or subtest should be using them. Use assert to accomplish the objective of a test–verify that something is as you expect it to be. Use require to make sure everything is in a reasonable state before asserting your test objectives. They look and act much the same, except assert reports failure and continues while require reports failure and stops.
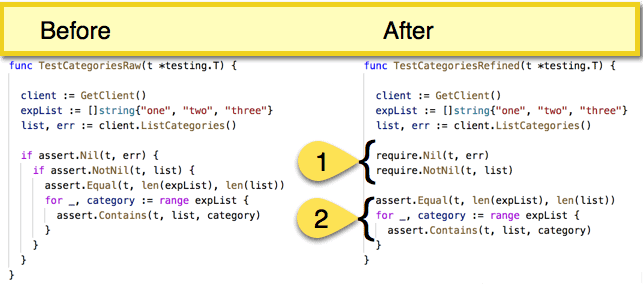
That does not sound like much of a difference, but require makes your code much more streamlined, shown below. At left is a common pattern I had seen throughout a large code base. Converting that to use require obviates the need for messy nested conditionals (1 below) and makes clearer the objective of the test–where the actual result data is examined for shape and content (2 below).
Running tests
You can run tests within VSCode or from the command-line. Both have their place.
Running tests in VSCode
When you are writing code in VSCode, it is valuable that you can just execute tests right from the editor window; you do not have to switch to a separate external console or even VSCode’s built-in console. Just click on any of the active controls embedded in your file by the Go plugin, which you saw above:
- run package tests
- run file tests
- run test
- debug test
Test results from these appear in VSCode’s Output panel. Personally, I favor the ability to do continuous testing in an IDE. This is available for some IDEs and some languages. The best I have used is NCrunch in Visual Studio .NET-land when I worked in that realm. Currently I use Wallaby.js for front-end development, which also does a fine job. Both of those provide test-on-type, i.e. as you type your affected unit tests are re-run automatically. The Go plugin does not support test-on-type but it does support the next best thing, test-on-save. So each time you save your file, it re-executes tests automatically. This is turned off by default; just edit your user settings and set go.testOnSave to true.
One curious artifact about the Go plugin: The Go test engine does not execute a test file if its name begins with underscore or dot. However, the Go plugin still displays the run file tests and run test controls in those files.
Running tests on the Command Line
On the command line, the simplest command executes all test files in your current directory (excluding any file name beginning with underscore or dot):
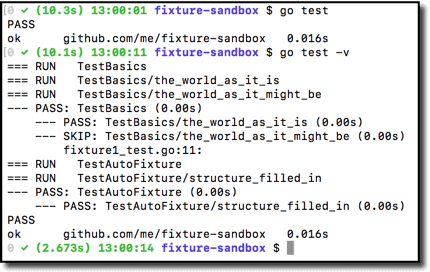
go test shows just failure details plus a final result.
go test -v shows all test details plus a final result.
Here is a simple example:
The above, no-argument form of go test has two characteristics to note: it executes test files in your current directory, and it always runs all the tests found. This is called local directory mode. For any but the most trivial project you probably will want to use package list mode instead. Package list mode provides two benefits:
- It executes just test files in the package(s) specified in the argument.
- It caches results, only re-running tests affected by code you have changed.
You can give as simple an argument as a single dot, signifying the current directory,
and then only test files in the current directory that have changed will be retested.
|
1 |
go test . |
But even better: use the triple-dot wildcard (…) to test everything in your file tree at or below a specified directory. This canonical form starts with a single dot to root it at the current directory:
|
1 |
go test ./... |
As to the caching aspect, Go is not just watching for changes to know whether to run tests in a given file. It is watching for changes it has not seen before, like a true cache. So if you test a file with contents x, then change it slightly to have x’, go test ./… will re-test. But change it back to x and then go test ./… will not re-test—it reports results from the cache. This can be quite a time saver!
Even with Go’s test cache, if you know which tests you care about at a particular time, you can apply filtering to make testing go even faster. You can apply filtering by file name or filtering by test name.
To filter by file name, just specify a single file or, with file globbing, multiple file as arguments to go test:
|
1 |
go test subdir/fixture3_test.go -v |
To filter by test name, use the -run flag followed by a regular expression. Keep in mind that you are matching test function names, not file names. For illustration, say you had functions TestBasic1, TestBasic2, etc., up to 10. You could run a subset of those like this:
|
1 |
go test -run Basic[3-5] –v |
To see what tests your regex will match without actually running the tests use the -list flag instead of the -run flag:
|
1 |
go test -list Basic[3-5] |
You can combine filtering and caching for even more peppy execution, e.g.
|
1 |
go test ./... -run Basic –v |
Note that as of Go 1.9 (https://golang.org/doc/go1.9#vendor-dotdotdot), go test automatically skips vendor directories. You used to have to manually filter those out with something like the code shown below, but it is no longer necessary.
|
1 2 3 |
for f in $(go list ./... | grep -v vendor); do go test $f done |
Debugging tests
From VSCode, with the Go plugin and the delve debugger, debugging is easy. You have seen the debug test control right alongside the run test control provided in the editor. Just set some breakpoints and use the debug test button to step into your code, where you can examine variables, the call stack, etc.
You can also use the delve debugger from the command-line, if command-line is your preference. See its user guide for commands.
Important note on delve and MacOS: As of this writing, delve has an incompatibility with version 9.3 and 9.4 of Xcode command line tools. The remedy for some time was to downgrade your Xcode version to 9.1 or 9.2. But as of a couple weeks ago (June 2018), a beta for version 10 has been released and that seems to have fixed the issue. The symptom for the problem is that delve reports ‘could not launch process: EOF.’ If you encounter that, check your XCode version. Plentiful details on the issue are available at https://github.com/derekparker/delve/issues/1015.
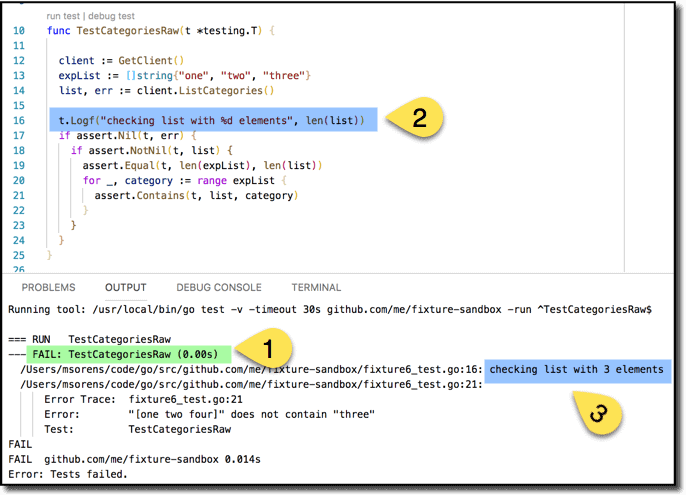
Finally, the test runner also supports good ol’ console logging, in the guise of t.Log and t.Logf functions with which you can instrument your code. Say you have a test failure (as in 1 below). Go back and instrument your code with a logging statement (2). The f on the end of Logf is supposed to signal to you that this version uses sprintf-style formatting codes, like the %d you see included. When you run your test, your logging output will be interspersed with test results (3). Note that Log and Logf only display output if the test containing them fails or the –v flag has been passed to go test.
Organizing Tests with Subtests
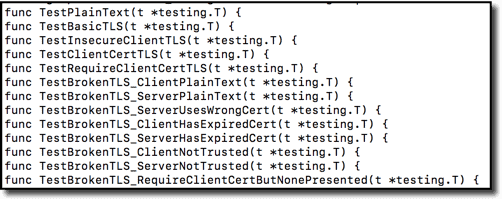
You can certainly get by with all your tests as top-level tests. Some shops do this. For instance, I grabbed this from one random, real project (grpcurl):
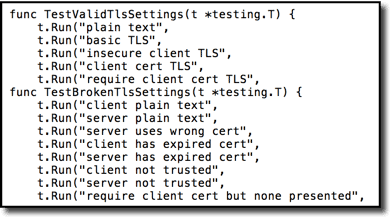
But subtests can often provide more useful organization. Here is the same set of tests re-organized with subtests.
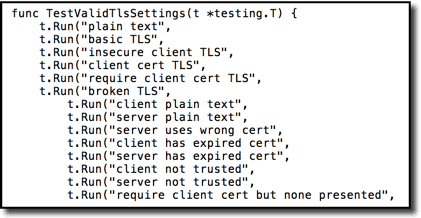
And yet another variation adding further hierarchy:
Use subtests to:
- share common setup/teardown,
- create hierarchical test structure, and
- give more useful names to tests.
Here is a full example of how to define subtests under TestBasics. The t.Run method takes 2 arguments, a test name and a test function. For brevity I have shown just a single assertion in each subtest but, of course, you can put as much as you need in each.
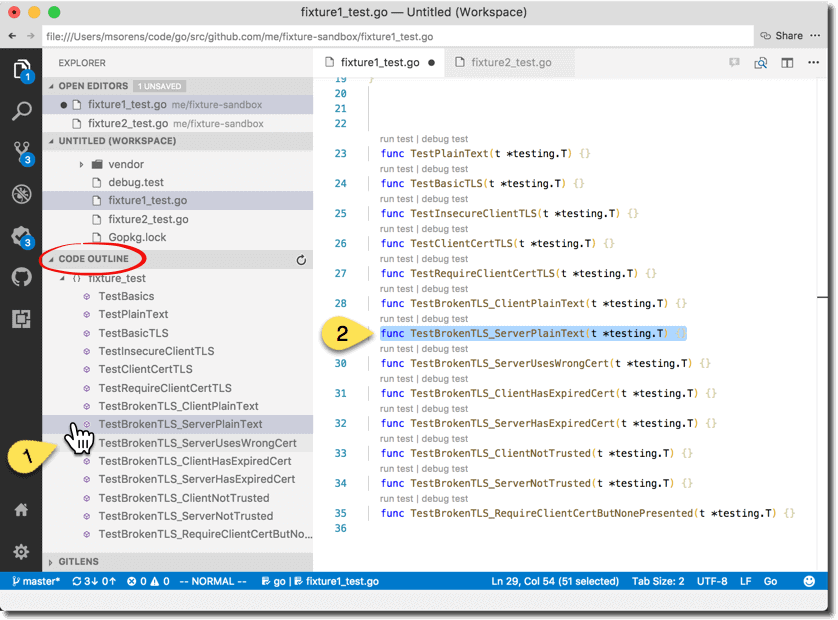
Consider a more practical, larger set of tests. Without subtests, you get a handy list in VSCode’s outline-view to instantly navigate to any of your tests. Clicking on any test in the outline view (1 below) brings that test into view in the editor (2 below). You can then run that test with the run test or debug test controls just above it. However, you are only able to run one test at a time that way. Your only other option is to run all the tests in the file or in the package (either with the controls at the top of the file or via a VSCode command).
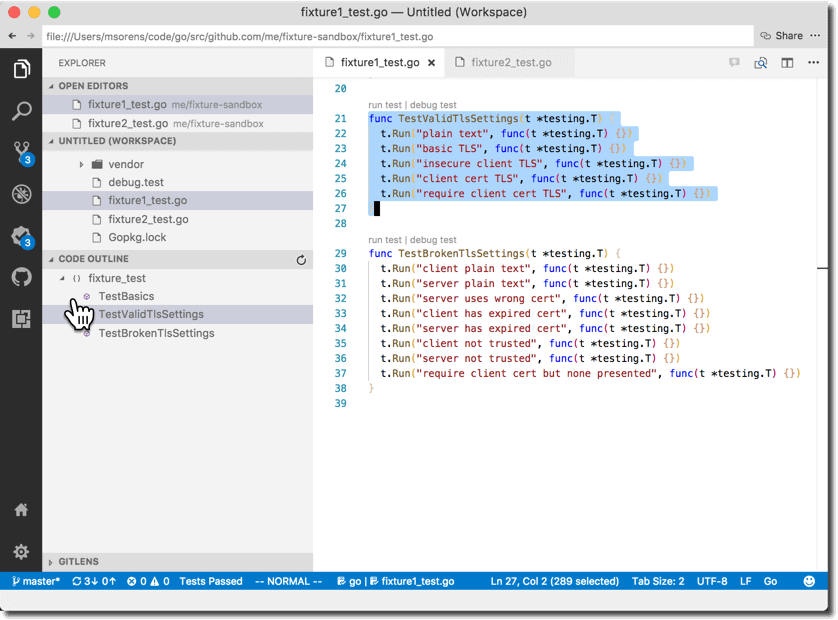
If, on the other hand, you organize your test file with subtests you can now act on groups of tests as one. So not only do you get a shorter list in the code outline, but in the editor the run test and debug test controls apply to the whole group of subtests–one click runs the group.
Setup and Teardown
One more benefit to using subtests segues into this next topic of setup and teardown. Some languages support Setup or BeforeEach functions that run before each test, group of test, or package of tests. Most commonly seen:
- Setup code before each suite/package/group of tests
- Setup code before each test
- Teardown code after each test
- Teardown code after each suite/package/group of tests
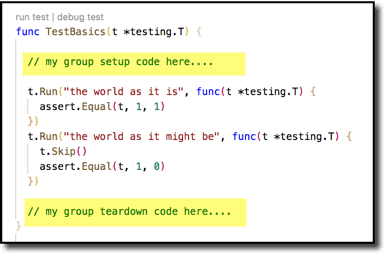
Subtests provide an easy way to do (1) and (4) for a group of tests. (But read on; don’t do it this way!)
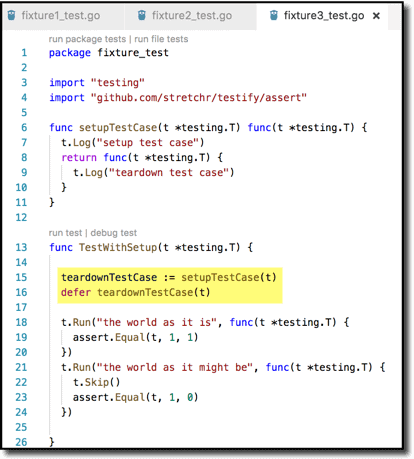
A more robust and Go-flavored way to do this (with thanks to Kare Nuorteva at https://stackoverflow.com/a/40748810 ) is shown next. This has several advantages.
- It keeps the setup and teardown definitions very intimately tied (L7-L9), helping to ensure you do teardown what you setup.
- It keeps the setup and teardown calls together (L15-16), helping ensure you don’t forget to invoke the teardown.
- It guarantees (via defer) to run the teardown, even if a panic occurs.
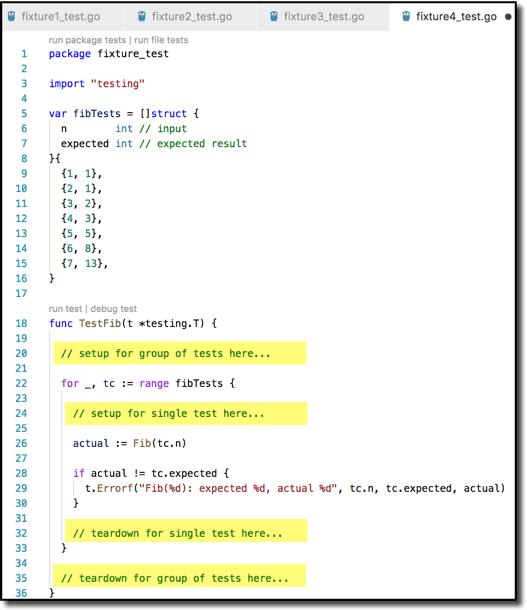
Another way to do setup/teardown for a group of tests is via table-driven (or data-driven) tests. This also is quite amenable to doing setup/teardown for each test–that is (2) and (3) from the above list. You define multiple tests in a data set but with only a single test body, so any code you within that body is–by definition–setup or teardown If it is outside the for loop, it is the group setup/teardown. Inside the for loop is the individual setup/teardown. ( Example from https://medium.com/@matryer/5-simple-tips-and-tricks-for-writing-unit-tests-in-golang-619653f90742 )
Looking at the package level next, Go 1.4 introduced the TestMain hook, which lets you do setup and teardown at the package level ( https://golang.org/pkg/testing/#hdr-Main ). If a test files contains a TestMain function, that function will be called rather than executing your tests directly. TestMain then needs to invoke m.Run() to run the tests within the package, and return its result to os.Exit(). Here is a basic structure for a TestMain function. Create the packageSetup and packageTeardown functions to do whatever you need. More info on TestMain is available at http://cs-guy.com/blog/2015/01/test-main/ .
|
1 2 3 4 5 6 |
func TestMain(m *testing.M) { packageSetup() resultCode := m.Run() packageTeardown() os.Exit(resultCode) } |
That technique — including both setup and teardown — is great when you need to be thoughtful about resources (setting up then cleaning up a database, for example). But sometimes you just need to setup some conditions, states, or the like, and do not need a complementary teardown. The init function provides this and is simpler than TestMain ( https://golang.org/doc/effective_go.html#init ). The only thing you need to do is add a niladic init function in your test file. If this function is present, it is automatically run before any of the tests in that file
|
1 2 3 |
func init() { // do your package setup here } |
Take heed, though, what Peter Bourgon advocates (https://peter.bourgon.org/blog/2017/06/09/theory-of-modern-go.html) : no package level variables and no init function. I think it is more useful to adhere to that advice in mainline (non-test code); I find it somewhat less ‘sinful’ to include init in test code.
Test Files and Test Packages
Within a single folder, all Go files must be in the same package. The one exception is test files: those with a _test.go suffix.
There is a really good reason for that: your test files should always be in a different package. (So for package xyz, put your test files in package xyz_test.) Why do this? Because it forces you to test behavior rather than implementation, as good unit tests do. If you are in a different package, you only have access to the API of the package; you do not have access to internal state. So you are forced to treat the package as a black box, which is a good thing. That way, you are free to change internals without breaking tests as long as the API does not change.
By the way, don’t always believe everything you hear/read! One spot in the go docs advises to use a separate package for test code while another portion of the docs suggests not using a separate package.
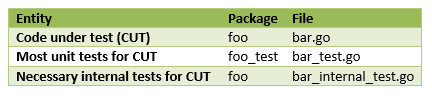
In reality, though, there are situations where you cannot unit test everything just from the external API. So when you really need to test package internals, use the same package as the code under test (e.g. xyz) but name your test file with the _internal_test.go suffix (so xyz_internal_test.go) to make it explicit and clear that you know these tests are more brittle. (Not sure if Mat Ryer originated this idea, as I have seen it used in several projects, but he wrote about it at https://medium.com/@matryer/5-simple-tips-and-tricks-for-writing-unit-tests-in-golang-619653f90742.)
Test Data: Constant, Fake, or Random?
Here is a test with constant data–what is wrong with this test?
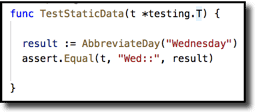
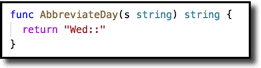
The shortest answer–this function makes the test pass:
If you practice TDD, writing the above test, followed by the above function, might actually be what you do first. And all is good to that point. But your function needs to evolve to handle other values, too. You could write a few more tests that supply different constants to satisfy yourself that the function actually acts on the input. How many would give you a good confidence level in the underlying code? Well, you could enumerate all seven valid values, plus an invalid one and an empty one, so perhaps nine would do. And do that with a table-driven test, even better. Easy. But what if the function takes a second argument–is it practical to do all combinations? Or what if the enumerated set is a lot larger, say days of the month? If just a single variable, do you do 31 tests? Maybe. How about time zone names? Not sure if there is a global standard, but one list I saw has almost 600 entries. Do you test each of those? Do you need to? I hope not!
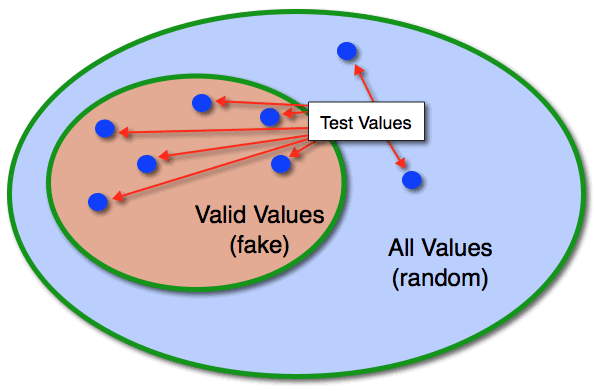
What if you could do one test that covers all valid days of the week? Or all valid time zones? How? The test just picks one at random. You don’t care which one. Or perhaps it picks a few at random. Let it pick a different one each time you run the test so hard-coding an answer, as shown earlier, would not pass the test. Unless you hard-code a giant switch statement; but then you have problems beyond the scope of this article to worry about! Now this value could be fake or it could be random. My distinction is that fake data provides a value from a valid set of choices, while random data, on the other hand, provides a value from an unconstrained set.
Random has its uses. It is good to make sure routines that accept user input do not blow up no matter what you feed them. I have seen web pages aplenty that choke if you happen to type an ampersand in a sentence! It is the job of those routines on the front line to untaint the data before passing it along to all your other routines. That should give all those other routines some level of comfort that they will only receive valid inputs, a much more constrained set of values to worry about. Interesting commentary on monkey testing / fuzz testing: https://stackoverflow.com/questions/32458/random-data-in-unit-tests .
Certainly you should test invalid values for user-facing routines, but randomly picking invalid values is not the best approach. (More at Test Quality below.) However, testing valid values (with arbitrary fake data) does make sense. If you can let your test roam over a wide range of valid values without you having to code that explicitly, that gives a much better confidence level in your code correctness.
But with non-user-facing routines–those receiving untainted data from the front lines and typically comprising the bulk of one’s code base–your main focus should be valid, yet arbitrary, inputs.
Many languages have libraries to generate fake data, at different levels of maturity. The one I have found useful in Go is fairly new, but it provides a good foundation for improving your unit tests.
Fake Data in Practice
Let’s return to the example above, now with fake data generation.
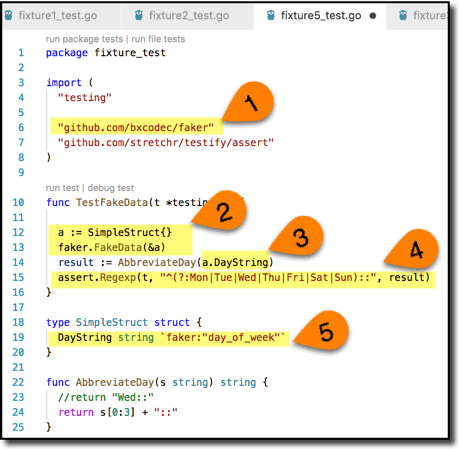
Here we:
- Bring in the library.
- Create an empty struct containing slots for data we want to fake (in this case a DayString) and fill it up.
- Slight change to the call to our code under test to reference the target property.
- And now a generalized test assertion that can be satisfied for any valid value; we do not know or care which one we actually got.
- The coolest thing about this library from Iman Tumorang is that it knows a nice selection of standard data types, including what a day of the week is. And all you have to do to leverage that is tag your structure field as shown here.
The faker library also supports email address, mac addresses, IP addresses, credit card types & numbers, phone numbers, time zones, sentences, and more!
Here is a more elaborate example–I’ve copied this structure from the library author’s page:

And here’s a test I wrote to demonstrate the validity of some of its content. This shows that the library nicely handles arbitrarily nested data structures.
The above faker library is, of course, just one way to approach feeding data to tests. Another approach might be a QuickCheck-style library, which derives a set of test cases for you from a set of assertions you write about a given function. Gopter (the GOlang Property TestER) is one such package for use in the Go ecosystem.
Code Coverage
So you’ve done all these unit tests. How’s your coverage? Go gives you some easy tools to find out.
Report code coverage summary to the console:
|
1 |
go test ./... –cover |
OR: generate code coverage profile…
|
1 |
go test ./... -coverprofile=cover.out |
… so you can view graphical details in your browser:
|
1 |
go tool cover -html=cover.out |
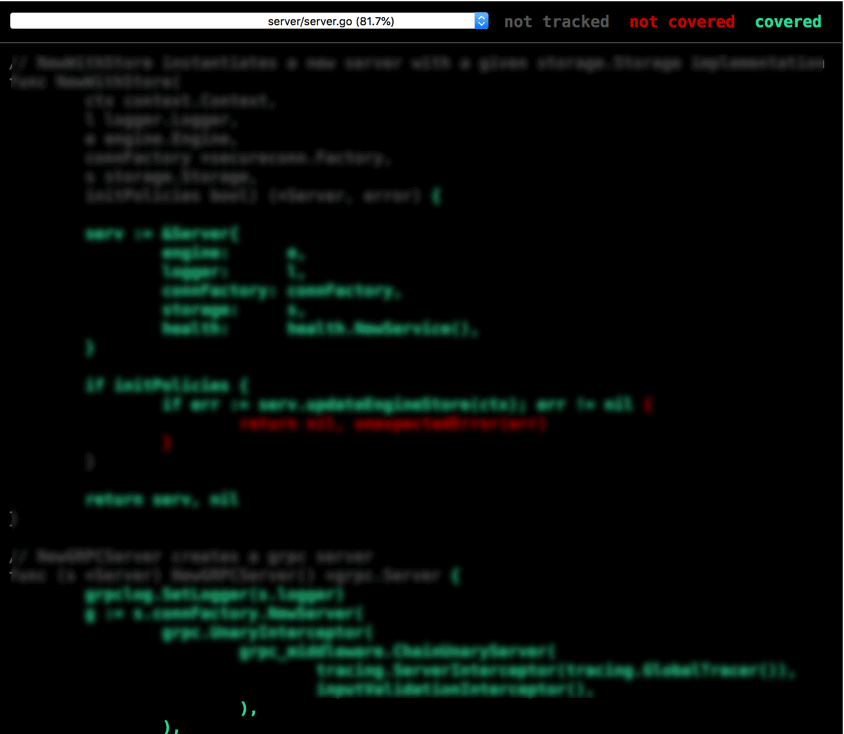
That gives you a nice color-coded visual as to what is covered or not I’ve blurred the text here to focus just on the colors-note the color key at the top of the image:
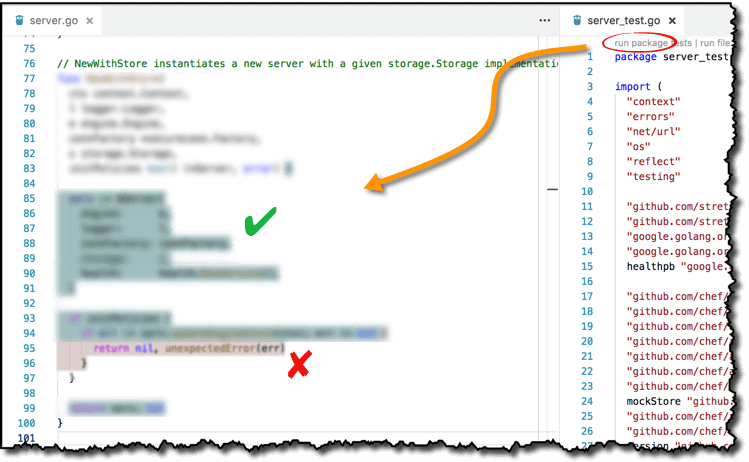
That end result is somewhat nice… but three steps removed from your editor. Fear not, for with VSCode, you can actually get coverage highlighting in situ! With the Go plugin for VSCode installed, enable coverage highlighting with Go: Toggle Test Coverage in Current Package.
Then run tests–at the package level–to trigger coverage highlighting in the code under test. Note that any other way to run tests–individual test functions, test files, or run-tests-on-save–will not trigger highlighting.
Test Quality
Code coverage on my last picture was about 97%. Great, right? Well, the answer to that is not “yes”. Nor is it “no”. It is, in fact, “I do not know.” Most people–and most code coverage tools–think about unit tests in terms of breadth of coverage–how many lines of code do your tests touch? But depth of coverage is just as important. My definition of depth is: how meaningfully are you touching a line? As you might guess, that is hard to programmatically measure. But I know it when I see it. How? Equivalence class partitioning & boundary-value analysis.
Equivalence class partitioning is a $2 word for a 5-cent concept. An equivalence class is nothing more than a set of values that you could potentially pass into a test all of which answer the same question, which means that you only need to pass in one of them to get the benefit for all of them! Say we have a function that takes a list of integers and returns the largest value numerically. For our first test, we pass a list of five elements. Would it make a difference if the list had six elements, or if it had 17 elements? In particular cases, perhaps, but in the vast majority, no; you do not gain any more or any less confidence in the code’s correctness by varying that list size a bit, so all of those values (5, 6, and 17) are in the same equivalence class. Furthermore, this also implies that you do not have to test every value in the equivalence class; just pick one representative and you’ve covered the equivalence class.
Another example: consider a function that transforms lowercase ASCII characters to uppercase characters. Other characters should undergo an identity transformation, i.e. remain unchanged. Here is one possible breakdown into equivalence classes:
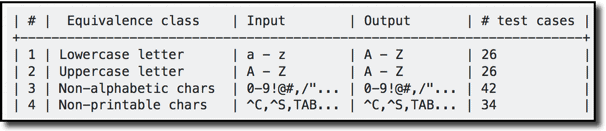
Pick one from each class: that gives you 4 tests instead of 128 (sum of the last column)
Boundary value analysis recommends a slight refinement: essentially it suggests that not every member of an equivalence class is, well, equivalent. That is, values at boundaries should also be considered worthy of a test case in their own right. (One easy justification for this is the infamous off-by-one error!) Thus, for each equivalence class you could have 3 test inputs. Looking at the input domain above–and with some knowledge of ASCII values–I might come up with these test case inputs:
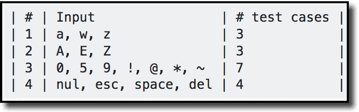
(As soon as you get more than 3 boundary values that suggests you might want to rethink your original equivalence class delineations, but this was simple enough that I did not go back to revise them.)
So that is 17 cases giving deep(er) coverage, compared to the full set of 128–quite a savings!
Putting Coverage All Together
The best way to get deep test coverage is with data driven tests. You saw a simple example above for Fibonacci numbers. In practice, though, most code is not just pure mathematical functions. So data-driven tests should include a test name along with test parameters and test expectations.
Here is a simple, canonical example.
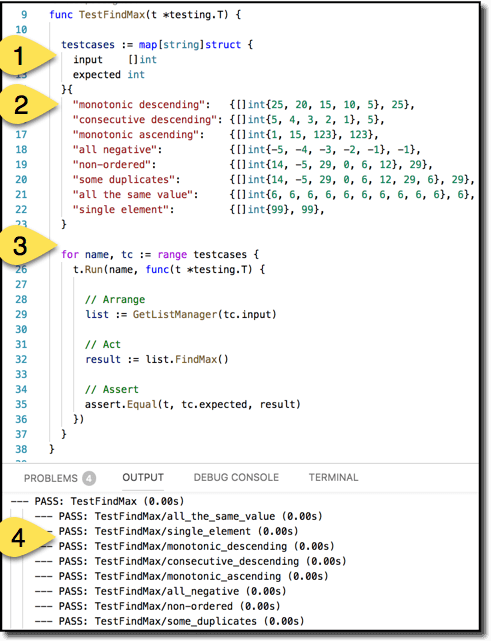
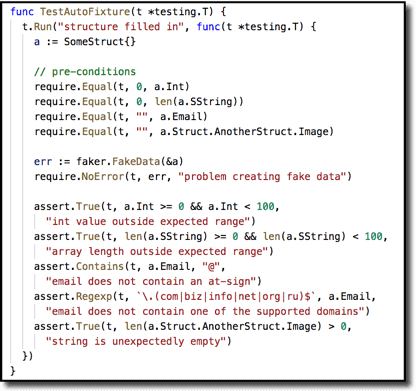
Create a set of test cases in a map (1) to enumerate your equivalence classes. The key of each map entry is the test name; the value is a structure containing parameters for the test along with an expected output. For brevity, I put each test case (2) on a single line but normally I would spread them out vertically to show proper structure. The body of the test (3) runs all the test cases. The test body is organized with the Arrange-Act-Assert pattern, making the test easy to follow. Running the tests (4) cleanly and clearly shows what is being tested for this function.
The Awesome Sauce
So far, we have seen these keys techniques to improve test quality:
- Deep Coverage:

- Data Driven Tests:
- Include test descriptions in your data driven tests:
Let’s consider one more technique to provide even more expressive power and clarity in your tests: make your expectations functions rather than constants.
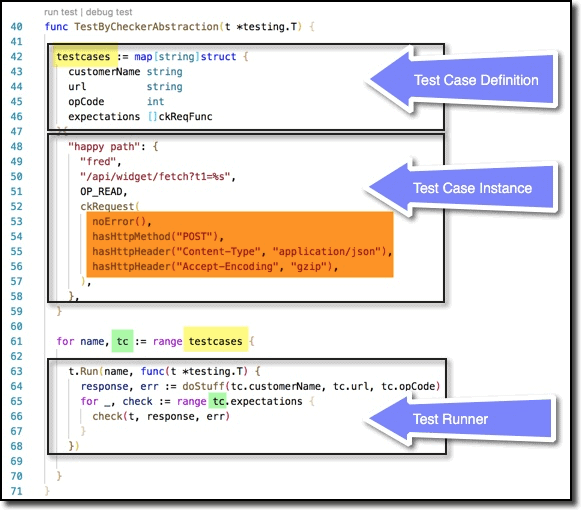
First, here is an example of the test proper. (There are a few helper functions that make this work, which we’ll see next.) Just as in the basic example, you first specify a single test case definition, specifying the parameters for each test case and the expected result. Next you specify the test case instances (just showing one here for brevity) in the form of a map whose key is the name or description of the test and whose value is the filled out parameters and expectations object. Finally, the test runner is the engine that iterates through each of the test cases via the tc variable (L61).
The inner loop in the test runner then iterates over each of the expectations in a test case. Here, though, these expectations are functions rather than constants, so each expectation function is invoked on L66.
Those expectations come from the list shown in orange right in the middle. This sample test is testing a function that generates HTTP requests. There are a lot of different use cases to test (here you are just seeing one test for the happy path). And for each use case there are a variety of things we need to check, but not expressible by simple constants. So this technique provides a way to test a variable number of data-dependent expectations in a very clear and concise way.
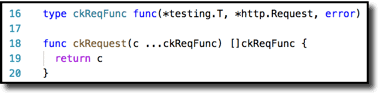
There are a couple pieces of support code behind this. First, the boilerplate. L16 shows the signature of an individual test function. We’re essentially passing it two arguments, the HTTP request and the associated possible error. You’ll see this in action in L66 above. First, in L64 we run the code under test to get the response and err values. Then we loop through the list of expectations and invoke each one–which has the signature from L16–with those arguments. The list of expectations is arguably the most important piece, which is why it is highlighted in L53-56. Note that it is wrapped in L52 by the ckRequest function. That is just syntactic sugar to be just a wee bit more concise, as you can see here in L18-20. So L52 could have been []ckReqFunc { but that requires 3 lexical tokens (or 4 depending on how you count) vs. just 2 tokens for ckRequest(.
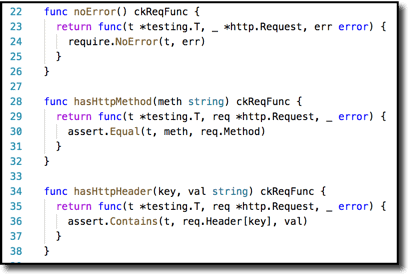
And finally, there is the list of things you want to test. These samples are quite simple–just one-liners. In practice they could be much more elaborate, as needed. But even with just one liners it behooves using this mechanism because we’re giving a semantically meaningful name to each individual assert and require here.
Kudos to my colleague at Chef Software, Stephan Renatus, for introducing this testing technique into our team’s codebase!
Summary
Software development is not black and white. (Which is to say, it is not just ones and zeroes!) There are layers upon abstractions upon principles upon techniques. And personal preference certainly comes into play. This article has presented you with a collection of techniques and approaches to assist you in some of that effort. You may not find everything useful. You may not agree with every approach. But at a minimum it should get you thinking about your testing approach. Unit tests are a but a small part of your realm of responsibility in that regard, but I would argue they provide the foundation upon which much else rests, so creating an extensive and meaningful body of tests is vital to your project’s success. I provide a list of reference material for further reading below. But a good next step is my previous article on code reviews—it further emphasizes how critical unit tests are, in not just writing code, but in reviewing it. See The Zen of Code Reviews: The Reviewer’s Tale.
Final note: Working at Chef Software was my first exposure to working with Go (after working with another couple dozen languages over the years). A big thanks to all my colleagues at Chef for helping bring Go alive for me.
References
Go Language:
- https://golang.org/pkg/testing/
- https://golang.org/cmd/go/#hdr-Test_packages
- https://golang.org/cmd/go/#hdr-Package_lists
- https://golang.org/cmd/go/#hdr-Testing_flags
- https://golang.org/cmd/go/#hdr-Testing_functions
- https://github.com/golang/go/wiki/TableDrivenTests
The faker library: