
The series so far:
Today, Git is a widely accepted product as far as source code control systems are concerned and sets the canonical way of tracking changes to nearly any sort of files. A file put under the control of Git can easily be versioned the history of changes, the author(s) of changes and possibly some notes about the changes can be accessed in a straightforward way at any time.
In this article, I’ll delve through the essential operations of Git and illustrate core concepts such as repositories and commits and the steps that make up a typical user workflow.
Git at a glance
Git is a software program and, as such, it needs to be installed on a computer, if not already there as part of the operating system or other installed frameworks. The place to go to install Git manually is https://git-scm.com/downloads. Once there, you follow the link to the version of it that matches your favorite operating system. The picture below shows the setup screen for the Windows version of Git.
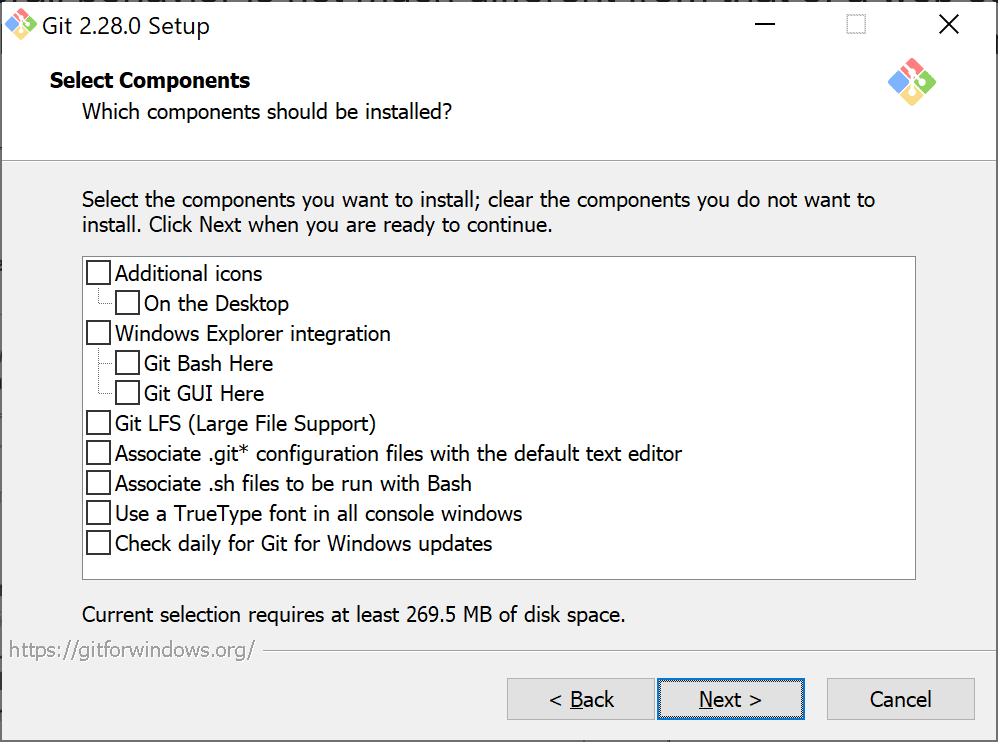
As you can see, the setup offers several optional components related to some native features of the Windows platform, such as the integration with the Windows Explorer. Once installed, Git is just an invisible piece of code available around the system through a command-line interface (CLI). You use the CLI to send requests and have the Git engine handle them in a way that conceptually resembles the typical behavior of a web server.
With reference to the figure, note the large file support (LFS) option. It refers to a Git extension aimed at replacing large files (i.e., blobs, images, datasets) with text pointers. The actual (large) files stay stored on a remote server while locally you handle them through shorter and simpler monikers. You can select the types of files you want to handle via LFS on each repository. Essentially, LFS allows downloading large files in a lazy way, thus reducing the performance hit of such files on your repository.
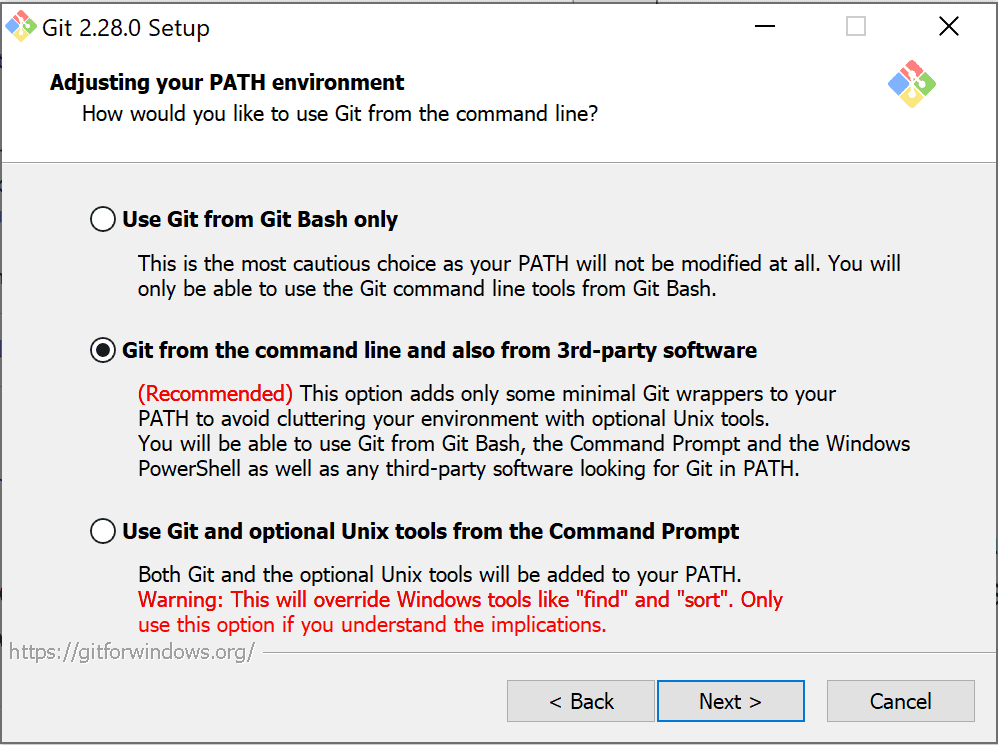
By installing the package from the link mentioned above, all you get is the core Git engine that you that can interact with in a few different ways. The screenshot below, also taken from a subsequent step of the Windows setup, illustrates the options available.
Bash is a Unix-inspired command-line interpreter available on OS X and most Linux distributions. It is conceptually equivalent to the Windows Command Line prompt although the two are quite different for the overall syntax of commands they can understand. In a nutshell, on non-Windows systems, Git Bash is the console window from which you would run Git commands as well as other operating system commands according to the syntax supported by Bash (pipelining, wildcards, etc.) On Windows, Git Bash is just an additional console program that emulates the behavior of Bash for those used to that syntax.
In Windows, using Git only through the Bash emulator is the least impactful option as it doesn’t cause any changes to the PATH environment variable. This is because Git Bash is just an independent program that must be manually run to perform Git operations and has no dependencies on the internals of the hosting platform. In Windows, you can see Git Bash as a dedicated Git command-line shell. At the same time, though, at setup time you can choose to integrate Git commands with the Windows command prompt subsystem, including the CMD prompt and Powershell. As in the figure, this is the recommended choice, although it requires some limited edits to the PATH environment variable. The net effect of this choice is that any Windows shell is augmented with the ability to run Git commands only, and no other Unix-like tool (typical of Bash) is added to the Windows environment. Needless to say, the third option in the figure above also adds Unix tools to the Windows command prompt.
Finally, if you’re just the kind of developer who doesn’t like black terminal screens, then you can opt for a built-in or third-party GUI tool for both committing and browsing. The list of options for the various operating systems is available at https://git-scm.com/downloads/guis. A popular choice for the Windows and Mac platforms is GitHub Desktop.
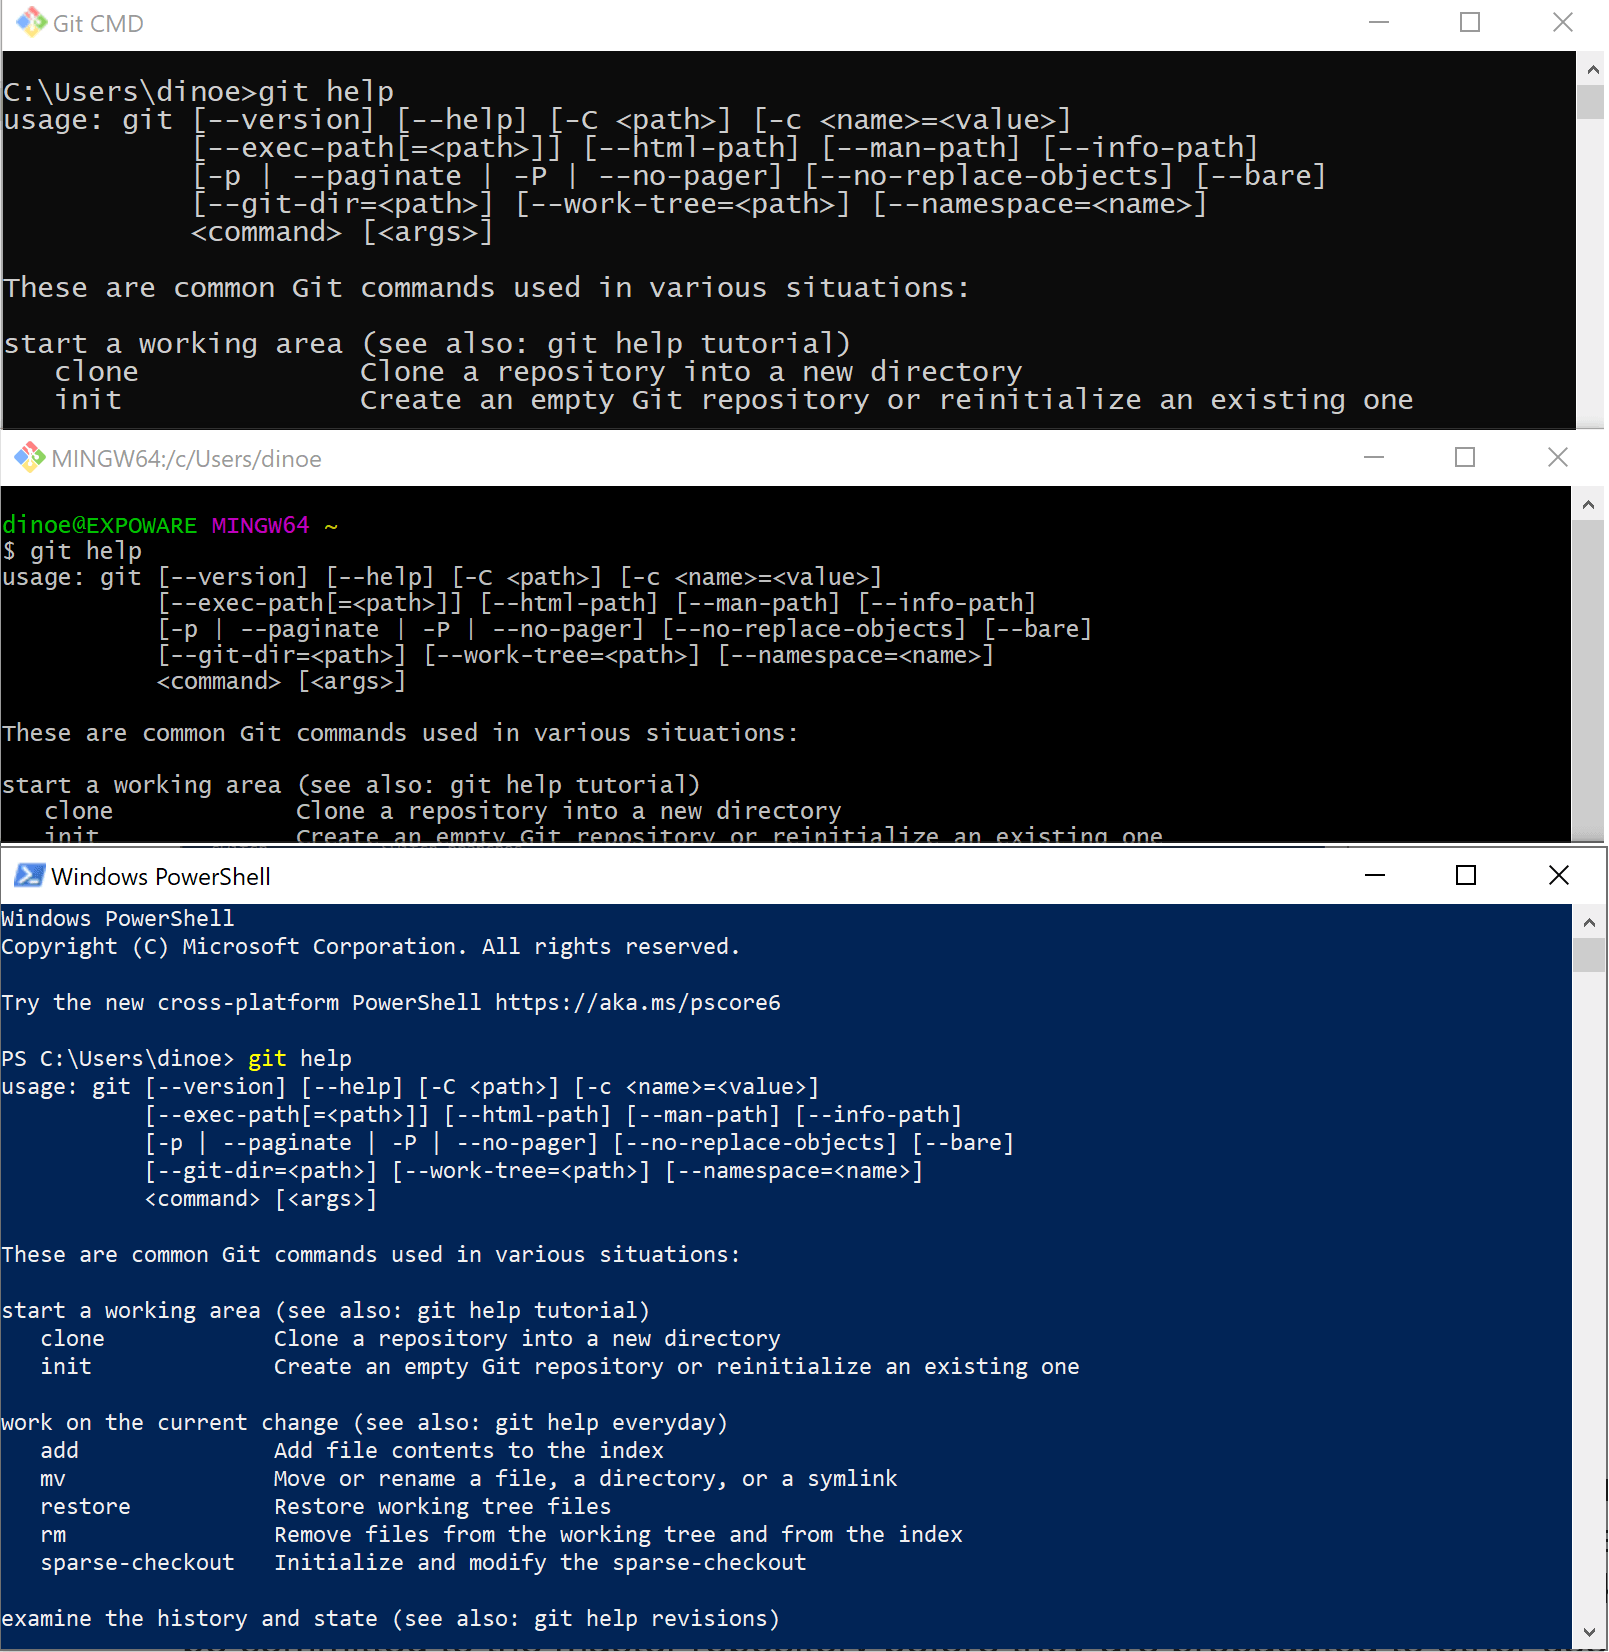
Once Git is installed, and you accepted all default settings, you can interchangeably use Git Bash, Git CMD, Powershell or the default Windows prompt (cmd.exe) to run Git commands. There’s no difference at all with either of the above when it comes to the effectiveness of operations. The figure below shows the output of the command git help on Git CMD, Git Bash and Powershell.
What is a repository?
In the Git space, the key asset is the repository. You can see a Git repository as the logical container of a project of yours. It is remarkable to note here that the definition of “project” is not limited at all at software projects. You can use Git to track multiple versions of your code, but you can do the same with any other related group of files such as the text and figures that make up a book or an article, the sketches of graphic work, and so on. A more general definition of a Git repository then can be the following: the logical container of all the digital items that make up a piece of computer-based work.
As a first thing, a Git repository must be initialized with the git init command. Initializing a Git repository consists in letting the Git engine take control over the changes taking place in the file system tree rooted in a given folder. You can create a new repository on a newly created file system folder or an existing one already filled with files. As a single user, not interacting and sharing files with other users, all the work you do remains on the machine, and Git only allows you to go through the history of changes made over time to the project items. However, the power of Git is in that it also lets you share your repositories with other users. In other words, each user owns a local working copy of the repository that is continuously tracked for changes while being able to connect to other remote repositories. As a user you can have a list of remote connections to other repositories whether managed by you on a central server or by your peers working in, or interested in, the same project.
The Git distributed repository model is opposed to the centralized, client/server model used by other source code control systems. In a client-server scenario, all users are given access to a master repository commonly located on a remote server. Users connect to the master, get a working copy and made their changes locally. However, all local changes must first be committed to the master before they can be made available to other users. In a client-server scenario, there’s no direct, peer-to-peer connection between distinct users, but any sync is proxied through the master repository. Git instead was specifically devised by Linus Torvalds to enable peer-to-peer collaboration.
Generally speaking, another aspect of a code repository is the internal concurrency model, namely how changes to the working copy are managed to prevent simultaneous edits ending in corrupted data. Git doesn’t need to work concurrently, per se. When you use it via the command line, all operations execute sequentially with no overlapping. It’s a different story when changes are pushed towards a different repository. In this case, there are two possible ways to handle potential conflicts. One is the lock model in which exclusive access to the target repository is allowed. The other is the merge model—used by Git—according to which new files are uploaded side by side with older versions and differences are highlighted.
What is a commit?
Once the content of a file system folder has been put under the control of Git, as a user, you work on those files freely. However, all the changes you make to the project files are not tracked by Git until you add their changes to the list of updates to be physically saved to the repository. In general, you can distinguish three distinct levels of “saving changes”.
The first level is when you save the changes made to a file using a dedicated editor, such as Word, Visual Studio, Photoshop and the like. These changes are detected by Git but have no practical effect. In particular, the command git status reports the current status of the repository. The figure below shows the output of the command before and after the file hello.txt in the monitored folder was updated using a plain text editor.
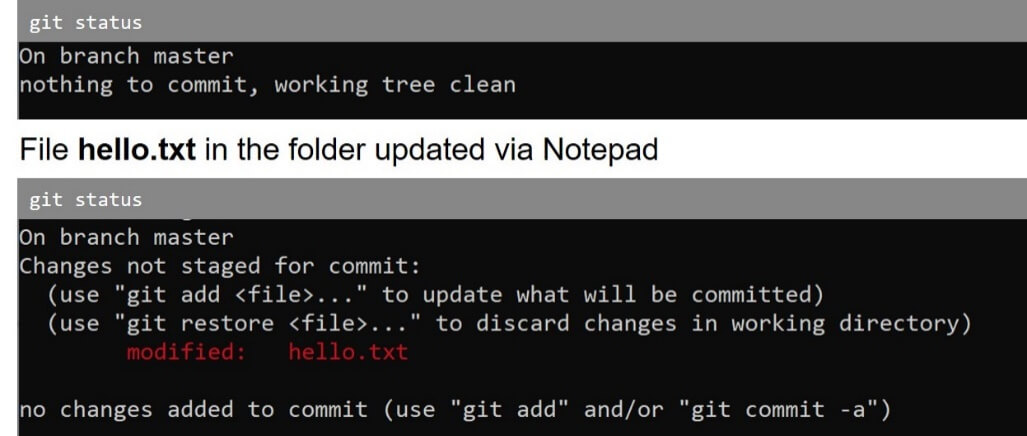
Git detects that the originally stored file has now been modified. However, this is not sufficient to have the new version stored in the repositories. The output of the command refers to changes not staged for commit. This is just the second level of saving changes of which you must be aware.
Changes that occur to tracked files must be explicitly added to the Git staging area. Only changes in the staging area will ultimately be saved to the repository becoming part of the project history. Put another way, you should add to the staging area only the changes you want to be tracked as versions of a given file. There’s a dedicated Git command to add files (or an entire directory) to the staging area. The command is git add. To add one file, use git add <filename> . To add the directory, use git add . (that’s git add followed by a dot).
Finally, the third level of saving changes is when you commit the pending changes in the staging area to the repository. When this happens, changes are made part of the project history. The command for this is git commit. Note that the commit operation only saves to the local repository. You need another command (push) to sync with an external repository.
What is a branch?
Branches are another core concept of Git, particularly useful in case of teamwork but also applicable to single-user scenarios. A branch is a pointer to a snapshot of your project files. Let’s say you have a stable version of your project in the master repository that you may still need to maintain. At some point, you’re asked to consider a new, fairly intrusive, feature. By creating a branch, you can take a snapshot of the current project solid enough to build the new feature on while maintaining the master intact in case bugs are reported, or minor changes prove necessary. In other words, a branch can be seen as a temporary line of development that is destined to merge in some way, at some point, in the master repository.
The interesting thing is that Git stores a branch as a reference to a previous commit and doesn’t copy files to a separate directory.
The reverse operation of a branch is called merge and consists of taking an independent line of development and bringing it back into the mainstream. A merge operation is the combination of two distinct histories of changes. Git attempts to fuse the two, and it usually succeeds except when a file has been modified in both lines of development. This is known as a version control conflict, and human intervention is required to continue. This mostly means that the same file has two blocks of changes and the developer has to create manually a new version that combines both. It’s not an operation that can be done automatically.
Summary
In this article, I went through the core concepts of Git and touched on the fundamental operations such as commit and merge. I also touched on the repository asset and its local and remote location. In Git, though, there’s a lot more than just commits, branches and merges and these concepts alone, however, deserve a lot more attention. In the next article of this series, I’ll start delving deep into the specific commands of Git.