This article is part of Robert Sheldon's continuing series on Learning MySQL. To see all of the items in the series, click here.
MySQL is a popular relational database management system developed and distributed by the Oracle Corporation. It provides a multi-user, multithreaded platform that can support a wide range of mission-critical workloads. As with other relational database management systems, such as SQL Server and PostgreSQL, MySQL is based on the Structured Query Language (SQL), a standardized programming language used to create database objects such as tables and views as well as build queries for accessing data through those objects. This article explains geting started with MySQL.
First released in 1995, MySQL has its roots in the open-source community and continues to operate as an open-source project, despite now being owned by Oracle, which took over MySQL as part of its acquisition of Sun Microsystems in 2010. At the heart of the MySQL platform is MySQL Server, which provides the core database capabilities. You can access and download the source code for MySQL Server through GitHub.
However, you don’t need the source code to get started with MySQL. Oracle offers the MySQL Community edition as a free download available under the GNU General Public License (GPL). Oracle also offers commercial editions that include additional features, but they require licensing and are not free to use. Fortunately, the Community edition is all you need to learn about MySQL.
In this article, I demonstrate how to set up the MySQL Community edition on a Windows computer and how to use MySQL Workbench to access the MySQL environment. I also show how to create a database, add a table to the database, insert data into the table, and then query that data. The examples I provide are fairly straightforward and should be easy to try out for yourself, even if you’re relatively new to relational databases. That said, you should still have a basic understanding of how relational databases work and how they use SQL before you dive into MySQL.
Installing MySQL on Windows
You can install MySQL on many operating systems, including Windows, macOS, Oracle Solaris, and Linux distributions such as Ubuntu, Debian, Fedora, SUSE Linux Enterprise Server, and Red Hat Enterprise Linux.
MySQL comes in several editions: Community, Standard, Enterprise, and Cluster Carrier Grade Edition. Because the Community edition is free and available under the GPL license, it’s a great choice for learning about MySQL and creating test databases. For this article, I installed the MySQL Community edition on Windows 10 Pro, but you might choose to install it on one of the other supported platforms.
The approach you take to installing MySQL will depend on the operating system and your preferences. The easiest way to install MySQL on Windows is to use MySQL Installer, a downloadable tool that walks you through the steps of installing and setting up a MySQL instance. I also installed MySQL on macOS to test it out. For this, I used Homebrew and the Bash command shell, which made it relatively straightforward to set up MySQL Community Server and start running SQL commands.
To install the MySQL Community edition on Windows, take the following steps:
- Download MySQL Installer’s .msi file from the MySQL site. (At the time of this article, the most recent installer file was mysql-installer-community-8.0.27.1.msi.)
- Once downloaded, double-click the .msi file and follow the prompts to set up the installer.
- Launch the installer and follow the wizard’s prompts as it steps you through the process of installing and configuring MySQL Server and any other components you want to install.
When you run MySQL Installer, you’ll need to choose which products to install. For this article, I selected the most recent version of each of the following:
- MySQL Server. The primary MySQL Community instance.
- MySQL Workbench. A user interface for connecting to and working with a MySQL Server instance. Workbench is similar to using SQL Server Management Studio to access SQL Server.
- MySQL Documentation. A set of local help files that can be accessed locally through MySQL Workbench.
You can install other components, but the three listed here are all you need to follow along with the examples in this article.
When installing MySQL Server, you’re also given the option to configure the server environment. When I configured the server on my instance, I used the following settings:
- Type and Networking. I selected Development Computer from the Config Type drop-down list and left all other settings with their default values.
- Authentication Method. I selected the Use Strong Password Encryption for Authentication option.
- Accounts and Roles. I provided a password for the root account but defined no other accounts at this time. However, you can create additional accounts as needed and assign them the necessary roles, depending on the environment in which you work and your specific needs.
- Windows Service. I selected the Configure MySQL Server as a Windows Service option and kept the default service name, MySQL80. I also stuck with the default settings for all other options.
When you’re finished installing and configuring MySQL, the installer will display the products you installed, as shown in Figure 1. You can then close the installer and start working with MySQL. However, you can relaunch the installer at any time to add, upgrade, or remove products, as well as modify product components and reconfigure MySQL Server.
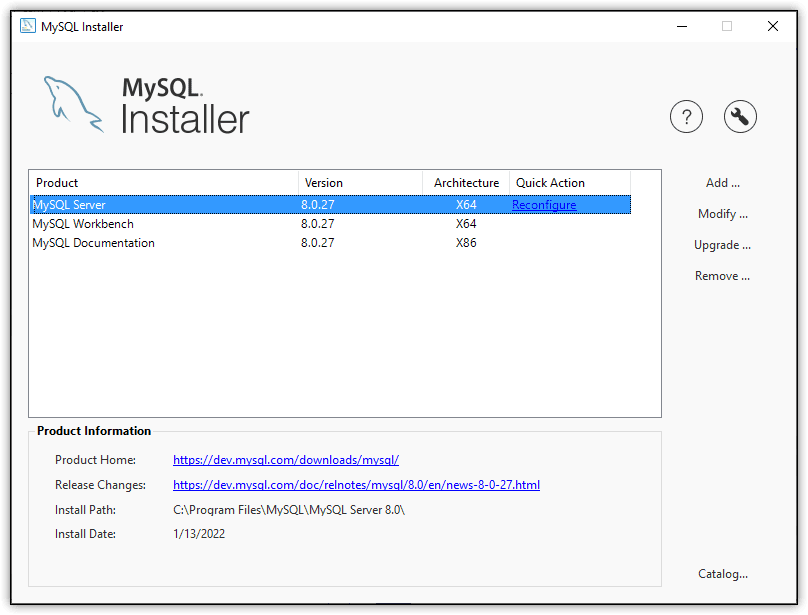
Figure 1. Using MySQL Installer to set up the server and tools
After completing your installation, you can launch MySQL Workbench, which provides a graphical tool for working with MySQL servers and databases. You can use Workbench for SQL development, data modeling and design, server administration, and data migration. If you’re running the MySQL Enterprise edition, you can also use Workbench to manage advanced features such as MySQL Enterprise Backup, MySQL Firewall, and MySQL Audit.
When you launch MySQL Workbench, it opens to the home page, displaying the Welcome tab. From this page, you can also access the Models tab and the Migration wizard, which we’ll cover later in this series.
The Welcome tab should include a link to the local MySQL Server instance that you just created. On my system, the MySQL Connections section includes a link to Local instance MySQL80, as shown in Figure 2.

Figure 2. Launching MySQL Workbench
When you click the connection, Workbench opens a connection tab that displays information about the server instance. The tab also includes its own query tab, which you can use to issue SQL commands directly against the MySQL Server instance. Figure 3 shows the connection tab, which is labeled Local instance MySQL80, and the embedded query tab, which is labeled Query 1. Additional query tabs are numbered incrementally.
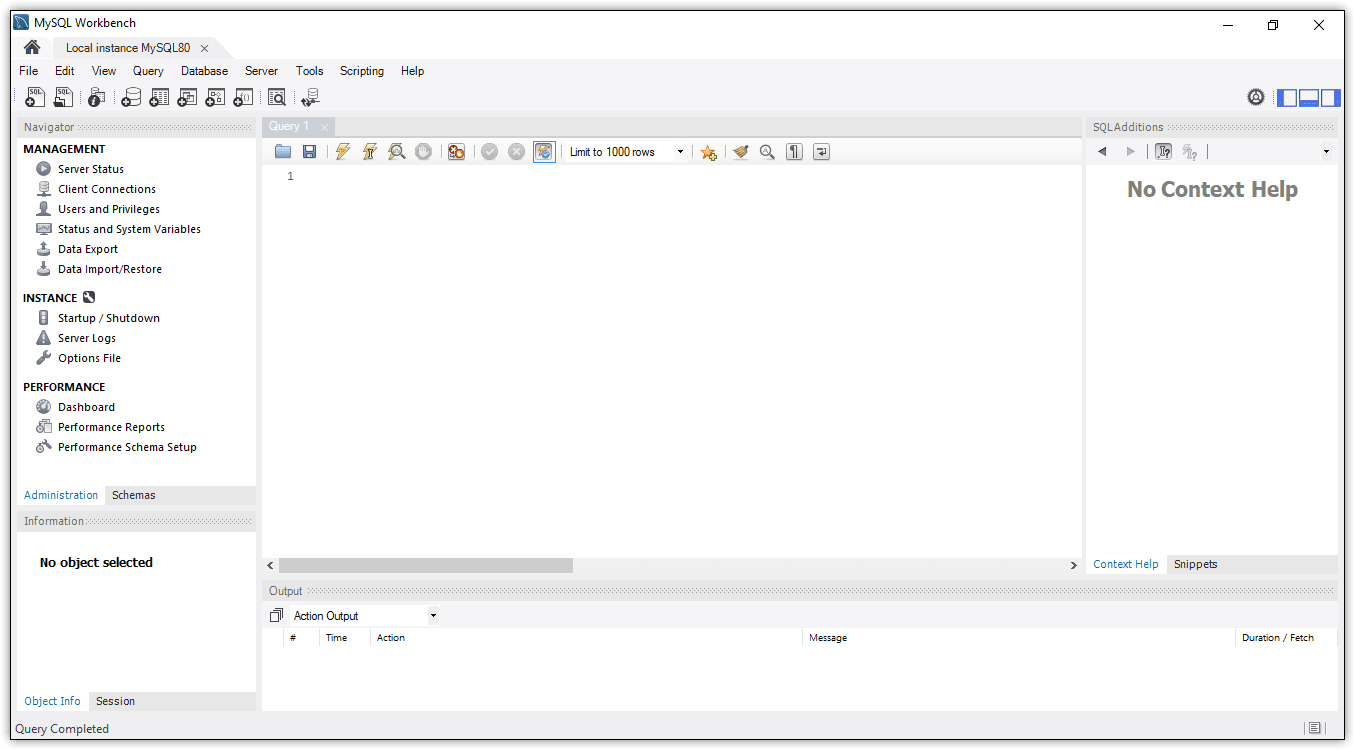
Figure 3. Connecting to a MySQL instance
The connection tab contains three smaller panels that surround the query tab:
- The left panel provides access to management, instance, and performance information, as well as to schema, object, and session information.
- The right panel displays context help when building SQL statements. Nothing is currently displayed because no SQL elements are selected on the query tab. The panel also provides a mechanism for working with code snippets.
- The bottom panel displays the message output when running SQL statements.
You can open or close any of these panels by clicking the toggles near the top right corner of the connection tab.
There is much more to MySQL Workbench than I can cover here, and I recommend that you review the Workbench documentation to get a better sense of the tool’s capabilities and the many features it provides. In addition, MySQL Workbench, like MySQL Community Server, has a wide user base and is supported by an active community, so you can also find information on community forums.
Creating a MySQL database
Once you get MySQL Server and MySQL Workbench up and running, you’ll likely do much of your work on the query tab, where you can run SQL statements against the target MySQL instance. Because MySQL is based on the SQL standard, most of the statements you run will be similar to those used for other relational database systems.
For example, you can create a database by issuing a CREATE DATABASE statement that specifies the name of the new database, as shown in the following example:
|
1 |
CREATE DATABASE IF NOT EXISTS travel; |
In this case, I’m creating a database named travel. I also included an IF NOT EXISTS clause to ensure that the statement runs only if the database does not already exist.
After you create an SQL statement, you can then execute it against the target instance. The query tab toolbar includes two execute buttons (lightning bolts) for running SQL statements:
- The first execute button (the one on the left) runs the portion of the script that you’ve selected. If no script is selected, Workbench executes all script on the query tab.
- The second execute button runs only the statement where the cursor is located. You have to be careful with this option because it will also execute the statement that directly precedes the cursor, even if the cursor is on an empty line.
Because the query tab includes only one statement, you can click either of the two buttons. Figure 4 shows the CREATE DATABASE statement after I ran it in Workbench. The bottom panel displays a message about the statement’s execution. The white-on-green checkmark to the left of the message indicates that the statement ran successfully. If the statement had instead generated an error, the bottom pane would display the error message, along with a white-on-red X.
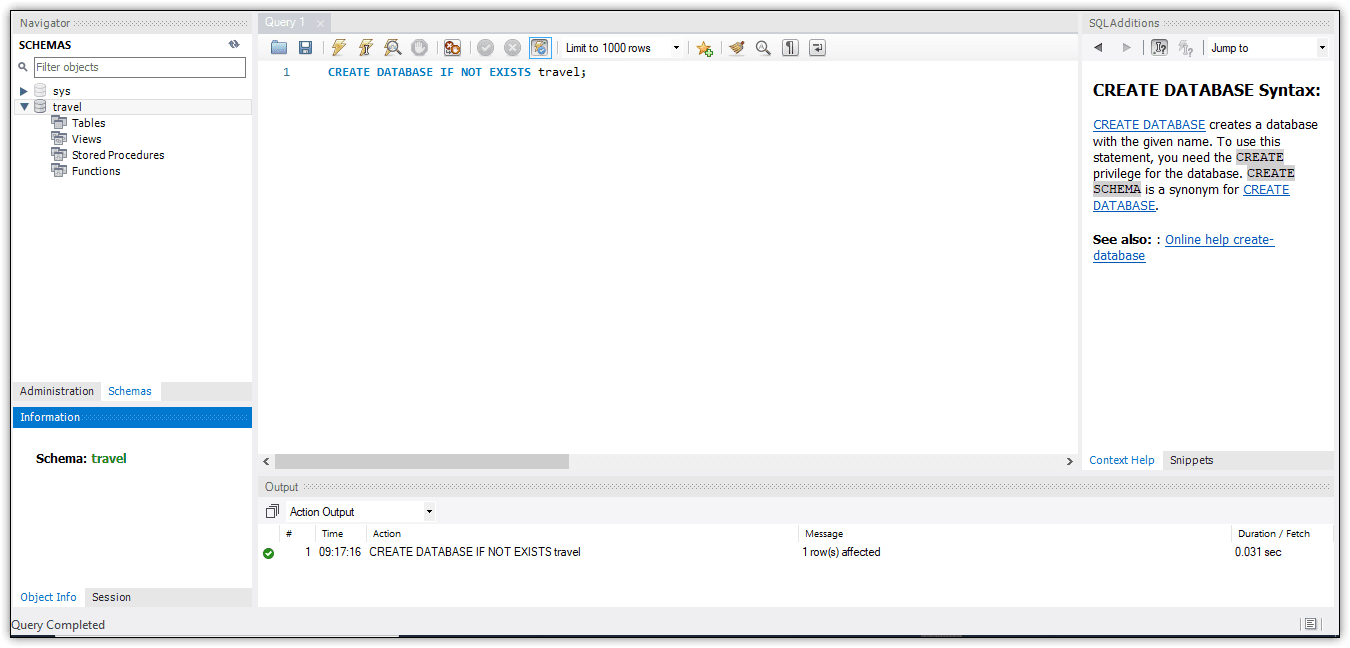
Figure 4. Creating a database in MySQL
You might have noticed that the right panel displayed information about the CREATE DATABASE statement as you started to write that statement. When your cursor is positioned over certain SQL keywords, such as CREATE DATABASE, Workbench automatically provides information about that language element, along with a link to additional information.
After you create the database, you can view it on the Schemas tab in the left panel. You might have to click the refresh button near the top of the panel to get the new database to display. Workbench automatically adds four nodes to the database listing: Tables, Views, Stored Procedures, and Functions. However, because you have not created any of these types of objects, no objects will be listed under these nodes.
It might seem odd that Workbench lists the travel database as a schema rather than a database. This is because MySQL, for all practical purposes, treats databases and schemas as one and the same, which is much different from other relational database systems. In fact, the MySQL documentation states that “CREATE SCHEMA is a synonym for CREATE DATABASE.”
Adding a table to a MySQL database
After you create a database, you can issue a USE statement to select the new database and then add a table to the database. For example, the following code switches to the travel database and then uses a CREATE TABLE statement to define the airplanes table:
|
1 2 3 4 5 6 7 8 9 10 11 12 13 14 15 16 |
USE travel; CREATE TABLE IF NOT EXISTS airplanes ( plane_id INT UNSIGNED NOT NULL AUTO_INCREMENT, manufacturer VARCHAR(50) NOT NULL, model VARCHAR(50) NOT NULL, engine_type VARCHAR(50) NOT NULL, engine_count TINYINT NOT NULL, wingspan DECIMAL(5,2) NOT NULL, plane_length DECIMAL(5,2) NOT NULL, max_weight MEDIUMINT UNSIGNED NOT NULL, icao_code CHAR(4) NOT NULL, create_date timestamp NOT NULL DEFAULT CURRENT_TIMESTAMP, last_update timestamp NOT NULL DEFAULT CURRENT_TIMESTAMP ON UPDATE CURRENT_TIMESTAMP, PRIMARY KEY (plane_id) ) ENGINE=InnoDB AUTO_INCREMENT=101; |
If you’re already familiar with SQL, much of this script will look familiar to you, although some of the elements might be new. For example, MySQL lets you specify whether an integer data type is signed or unsigned. If signed, a column’s values can include negative numbers. If unsigned, the values cannot include negative numbers. Integer data types are signed by default.
We’ll be discussing the CREATE TABLE statement in more depth later in the series.
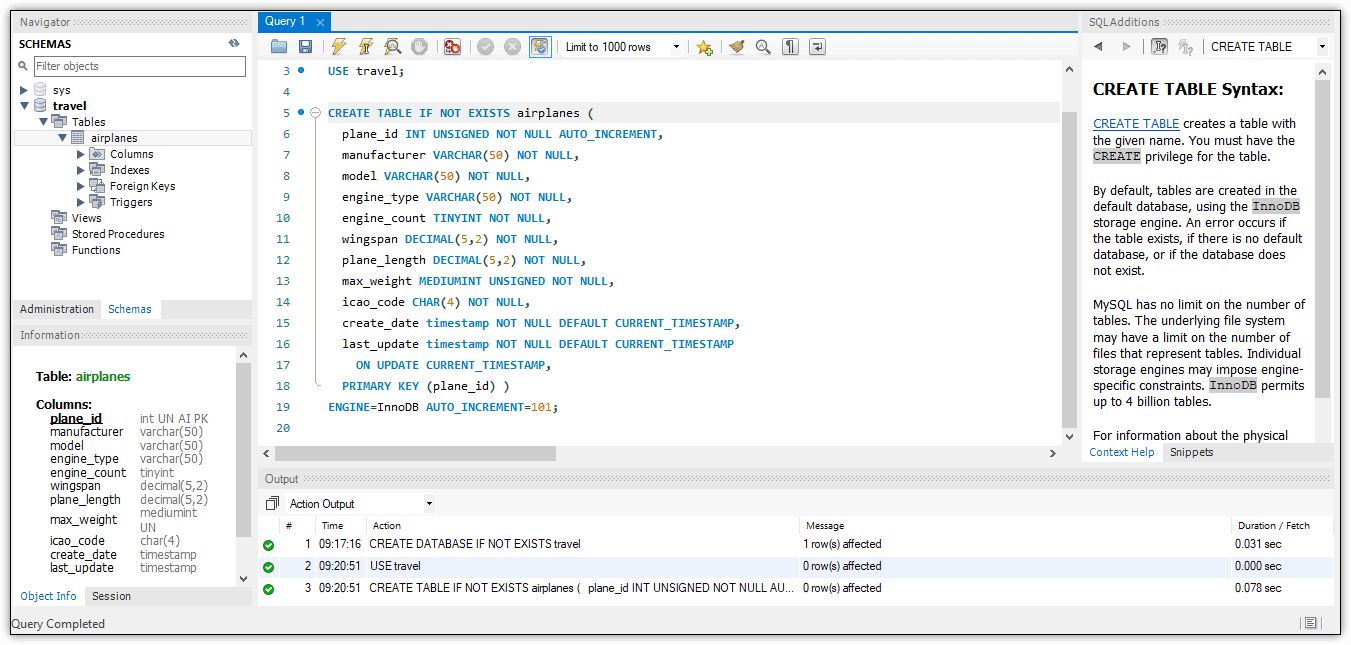
Figure 5. Adding a table to a MySQL database
The Schemas tab in the left panel now shows the airplanes table. Because the table is selected on that tab, the Object Info tab at the bottom of the left panel displays information about the table.
Inserting data into a MySQL table
After you create a table, you can use the INSERT statement to add data to that table. As you’ve seen with other database products, you need only specify the target columns and their values, as shown in the following example:
|
1 2 3 4 5 |
INSERT INTO airplanes (manufacturer, model, engine_type, engine_count, wingspan, plane_length, max_weight, icao_code) VALUES ('Airbus', 'A380-800', 'jet', '4', 261.65, 238.62, 1267658, 'A388'); |
The statement’s format should be familiar to anyone who’s worked with SQL, regardless of the database system. After the INSERT clause, the statement lists the target columns in parentheses. The statement then includes a VALUES clause, which lists the values to be inserted into the new row, also in parentheses.
Retrieving data is also much the same as other relational databases. For instance, the following SELECT statement returns all of the table’s data:
|
1 |
SELECT * FROM airplanes; |
In this case, the SELECT clause uses the asterisk (*) wildcard to indicate that all columns should be returned. Of course, you would not want to do this within a production environment, but for
Figure 6 shows the INSERT and SELECT statements, along with the results returned by the SELECT statement. I closed the right and lower panels to reduce the clutter.
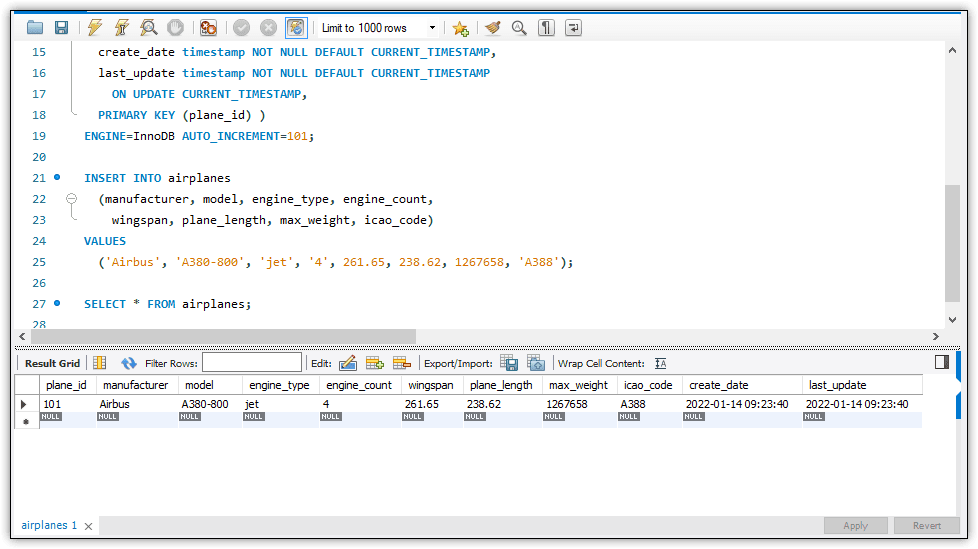
Figure 6. Inserting data into a MySQL table
When you return all columns in a table, Workbench adds a row to the results that show a null value for each column. You can use this row to add data directly to the table, as long as the values conform to the configured data types. In addition, Workbench lets you edit the values in the returned results. We’ll be covering the result grid in more detail in a later article in this series.
As with other database systems, you can also use a single INSERT statement to add multiple rows, as shown in the following example:
|
1 2 3 4 5 6 |
INSERT INTO airplanes (manufacturer, model, engine_type, engine_count, wingspan, plane_length, max_weight, icao_code) VALUES ('Piper', 'J-3 Cub', 'piston', '1', 38.00, 22.42, 1220, 'J3'), ('Beechcraft', '1900C', 'turboprop', '2', 54.50, 57.83, 16600, 'B190'); |
To add multiple rows, you need only separate the value sets with a comma. You can then run the same SELECT statement to return all the rows and columns:
|
1 |
SELECT * FROM airplanes; |
Figure 7 shows the INSERT and SELECT statements, along with the query results.
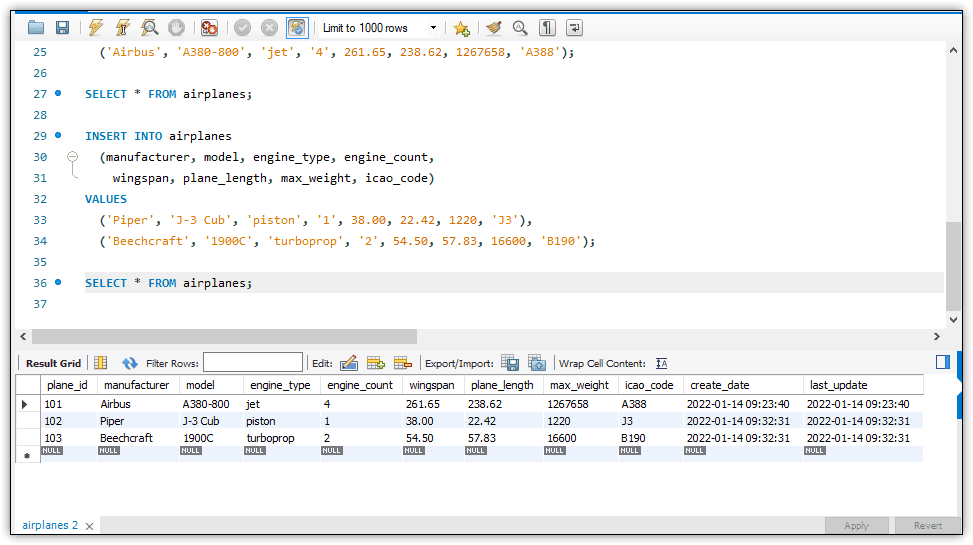
Figure 7. Inserting multiple rows into a MySQL table
As you can see, the table includes all three rows, along with a row of null values for adding more data. You can, of course, be more specific in your queries, as in the following SELECT statement, which limits the columns and rows:
|
1 2 3 |
SELECT model, engine_type, engine_count FROM Airplanes WHERE manufacturer = 'Airbus'; |
In this case, the SELECT clause specifies only three columns (model, engine_type, and engine_count) rather than all columns. In addition, the statement includes a WHERE clause that limits the results to rows with a manufacturer value of Airbus. Figure 8 shows the SELECT statement and its results, which include only one row with three columns.
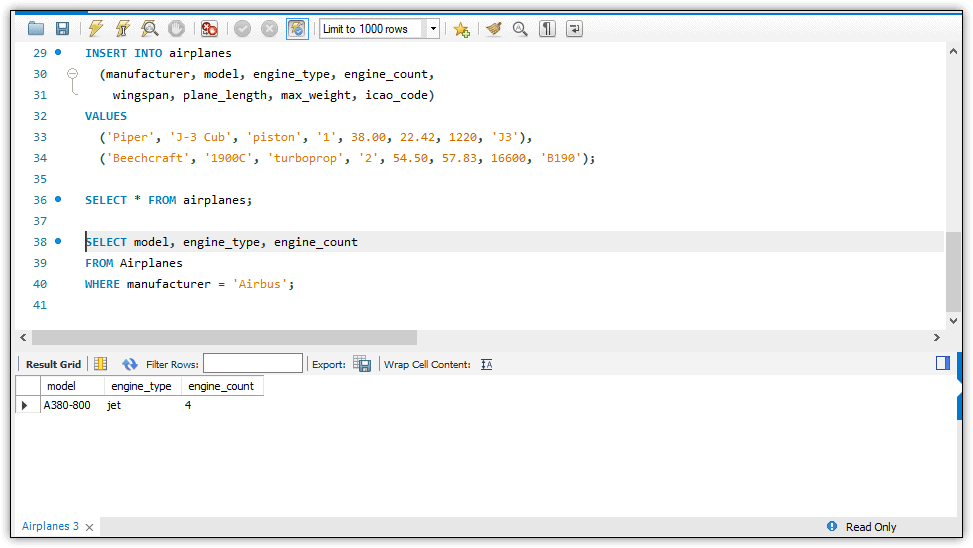
Figure 8. Retrieving data from a MySQL table
There should be no surprises here. The main thing to note is that the result grid no longer includes a row of nulls for inserting new data, which is to be expected because you’re viewing only a subset of the table’s columns.
Getting started with MySQL
Once you know how to install MySQL and use MySQL Workbench, you can experiment with various features, create different types of database objects, and start building SQL queries. MySQL is a versatile database system that can accommodate a wide range of workloads. The better you understand how it works, the greater your ability to take advantage of its capabilities. Even if you’re new to relational databases, MySQL Installer makes it easy to set up your environment, and Workbench makes it easy to interface with that environment and work with MySQL and its data. You can then build on this foundation to become more proficient at creating databases and querying the data so you can better support your data-driven applications.