
Chances are that you already work with Git as your default versioning system, and it’s even more likely if you’re an experienced developer. The importance of this technology to the global software community is undeniable, regardless of what programming language you use, your preferences and your experience. Massive open source communities like the ones inhabiting GitHub are possible today thanks to Git.
However, even with all the power Git brings up to enable parallel contributions among dozens (sometimes hundreds) of users over the same repositories, it’s still hard to embrace all the different team behavioral compositions out there.
Models and standards were born trying to address these situations. As there are so many distinct forms and conditions, there’s no silver bullet to solve all realities at once. You’ll have to analyze your project/team context and, together, decide what’s best.
This article takes a closer look at the GitFlow workflow. It demonstrates how to create a new GitHub repository and play around with the workflow so you can check it out in practice.
The GitFlow Model
In 2010, Vincent Driessen proposed a Git model based on branching. It was innovative because it proposed a smooth solution for things like:
- Parallel development, where many developers can work simultaneously in different tasks using feature branches for each one of them. Even the same developer can work in more than one task at a time, which means more than one feature branch at a time. When the work is done and passed all the team’s validation phases, it can be merged into the central development branch (the develop).
- Team’s Collaboration, by allowing different developers to work at the same time in the same task (so in the same branch). Only commits related to that task are allowed, the developers take turns to validate each other’s commits through Pull Requests, and you keep track of changes via commit history.
- Release Staging Phase, when a bulk of features have been finished, they must all be merged into one single branch, your develop branch. This is not yet the final production release, but the starting point in which the team decides on the health of all the features and goes for a new releasing process.
- Emergency Fixes. This is also particularly important, the so-called hotfix branches. You can create hotfix branches from the master and urgently change something for production.
GitFlow, however, is not the perfect choice for every scenario. Vincent himself states that it was thought to help with building software that is explicitly versioned, i.e., that needs multiple versions to exist (or coexist) at the same time in the world.
If you work with web applications (which is basically the highest percentage of developers nowadays), for example, where the deliveries are continuous, where there is no need to roll back nor to keep different versions alive at the same time, then GitFlow is not the best option for you and your team.
How Does It Really Work?
For you to understand the flow better, I’ll make use of the git-flow toolset. It is an auxiliary tool that facilitates the job of working with GitFlow by providing some useful commands.
To install it, run the following command (on macOS):
|
1 |
brew install git-flow |
If you have a Windows, just download and install Git SCM. GitFlow commands come with it.
For Linux users, depending on your version, check this link out.
Don’t worry; this tool won’t mess up anything in your current Git flow. It’s just a helper that creates and deletes branches, etc.
The first step is to understand the roles of the develop and master branches and how they communicate with the versions of your code. These branches are the most important ones and the key to GitFlow.
Take a look at the following diagram:

Figure 1. Simple example of branches flow.
GitFlow works primarily with two main branches:
- The master branch (in blue) stores all the released features until the date, receives the incoming new features from the develop (and only from it), as well as the hotfix changes (you’ll see more in a minute).
- The develop branch (in orange), which has as the only role receiving the changes from the feature branches and centralizing them before any further merge. It’s here where the teams usually customize the agile process with steps like validations, code review, definitions of done, etc.
Creating the GitHub Example Repo
Start with the creation of a new GitHub repo to hold the workflow example. For this, go to your GitHub account, create a new repo, and fill it with the following options:
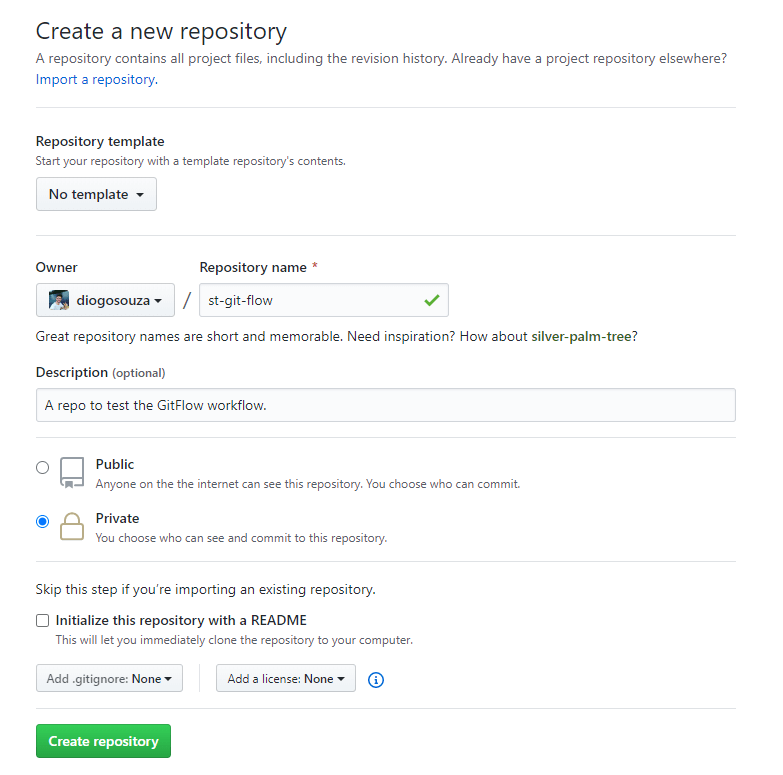
Figure 2. Creating a new GitHub repository.
Next, create a new folder on your local computer with the same repository name (st-git-flow) and then navigate to the folder via the command line.
Then, run the following commands, substituting your repository URL:
|
1 2 3 4 5 6 |
echo # Hello World, GitFlow! >> index.md git init git add . git commit -m "first commit" git remote add origin https://github.com/diogosouza/st-git-flow.git git push -u origin master |
The first command creates a new Markdown file, with a hello world message. You’ll make use of a .md file because it’s universal and helpful to track the historical changes. After that, you initialize the Git repo, adding all the files as Git files, and committing.
The two last commands take care of adding the remote origin and pushing the master branch to the remote repo. The remote origin can be seen right after the repo creation in GitHub:

Figure 3. Checking out the Git origin value.
Now’s time to run the git flow init command.
|
1 |
$ git flow init |
When it finishes, this is the output you may see:
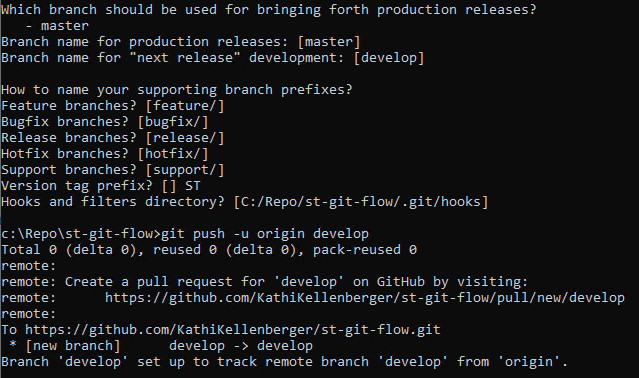
It’s a very straightforward command. It creates the master and develop branches, and asks for the respective names of each feature, release, hotfix, and support branches. You can leave them as they are, and press enter until the end except for the version tag prefix.
(In order to compare Git Flow to Git, I’ll provide the equivalent Git commands throughout the article.) The equivalent Git command to achieve this is:
|
1 |
git checkout -b develop master |
Whenever a developer is going to start a new feature, the feature branch must be created from the develop. This is the branch that hosts the “next release” development.
Some team’s Git administrators even block the possibility of generating new branches from the master branch for security reasons. However, git-flow doesn’t push the develop branch to the remote origin. This is something you must do manually:
|
1 |
git push -u origin develop |
The Feature Branches
Pay attention to the two new feature branches below:
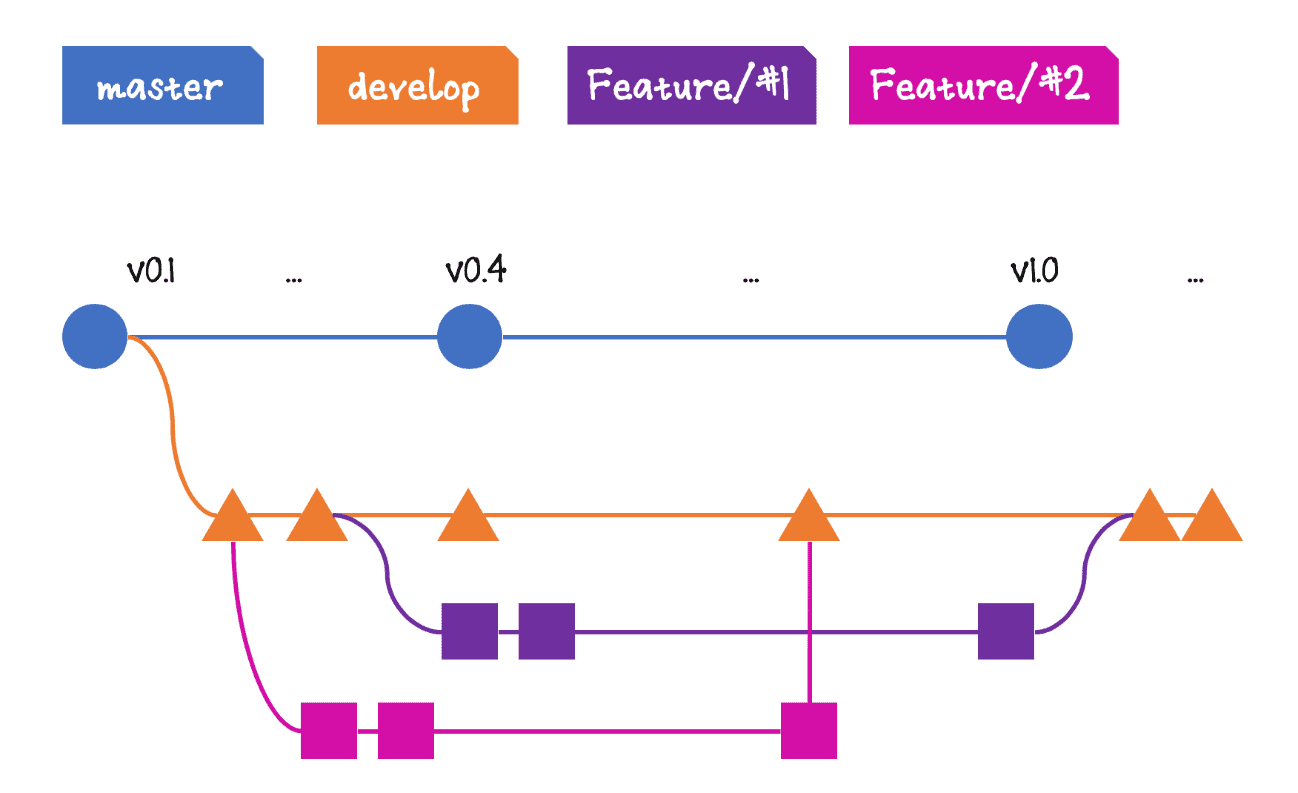
Figure 4. Diagram with two new feature branches.
There’s no right due date for a task; it can take one day or two months to complete. It’s up to the team to decide the maximum time they’re going to need for any feature.
Feature #2, for example, was started before #1, and finished first, too. Not just this, it has finished in the middle of task #1. For GitFlow, it doesn’t matter how many features you’re developing at the same time; the flow guarantees that they’ll get to the develop and, in the next release, to the master.
If you merge feature #2, for example, and some breaking changes were introduced (i.e., if it adds code that conflicts with the code being developed in feature #1), then feature #1’s merge will fail.
In this type of situation, which is very common by the way, it’s normal to have the developers talking to each other when merge fixing, to analyze if what one has done is going to break the code of the other.
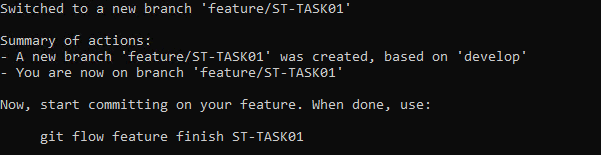
Create your first feature branch with this command:
|
1 |
git flow feature start ST-TASK01 |
And this is the result:
Without git-flow, this would be the command to achieve the same:
|
1 |
git checkout -b feature/ST-TASK01 develop |
It’s also a best practice to use tag prefixes in your feature branch names, in order to identify them among the others. Some tracking tools, like Confluent Jira, use that information to keep track of the correlated branches of your repositories.
Since you’re on the branch, you may perform all the needed code changes, and commit them.
Update the index.md file, for example, to the following:
|
1 2 |
# Hello World, GitFlow! - This is my `task-01` commit. |
The feature changes are within a new list in which each bullet point contains the respective task id. This way, it’s going to be easier to track the changes history.
Commit the changes:
|
1 2 |
git add . git commit -m "Updating my feature branch st-task01" |
Remember, however, that your commits are only local. You must explicitly tell git-flow to publish the branch to the remote origin. For this, you just run the command:
|
1 |
git flow feature publish ST-TASK01 |
Without git-flow, you’d have to run the following:
|
1 2 |
git checkout feature/ST-TASK01 git push origin feature/ST-TASK01 |
Now, your branch is live. You can check it going directly to the GitHub repo:
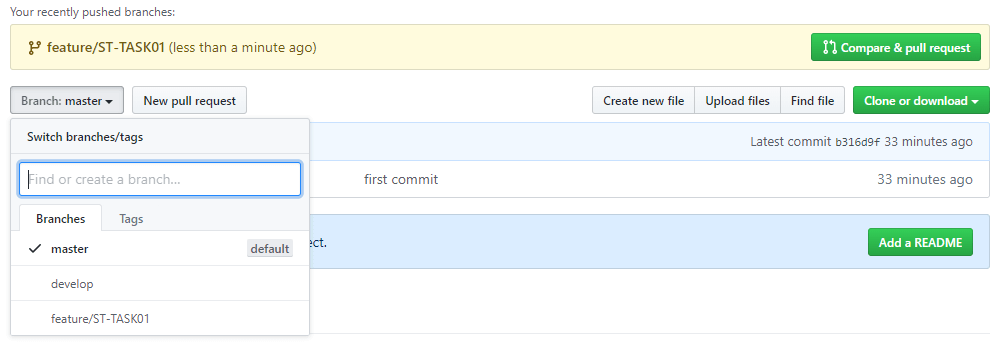
Figure 5. Your GitHub remote branches.
You can even see a GitHub warning at the top of the page stating that a new branch was recently pushed. It also enables the option to create a new pull request, which is not necessary.
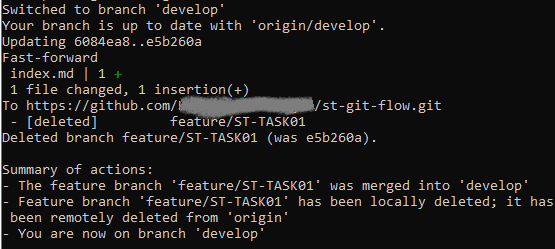
Once you’re done with the feature development, you might merge it to the develop branch, or do it via git-flow:
|
1 |
git flow feature finish ST-TASK01 |
These are the list of actions taken by this command:
And these are the equivalent vanilla Git commands to achieve the same result:
|
1 2 3 |
git checkout develop git merge --no-ff feature/MYFEATURE git branch -d feature/MYFEATURE |
The –no-ff flag prevents the git merge command from performing a fast-forward if Git detects that your HEAD falls short of the commit being merged for security reasons.
Great, now you have the code merged onto the develop branch. This, however, is not remote yet. GitFlow works basically at a local level; all the decisions to send the changes over the remote repositories depend on you.
Run the command to push things up:
|
1 |
git push origin --all |
This command pushes everything that changed locally (branches, tags, etc.) to the remote origin. You’ll make use of it a bit in order to guarantee the git-flow changes are always in sync with the remote.
You may now go to GitHub and check the develop contents.
The Release Branches
The release branch is the branch you’ll create from the develop when you and your team are ready to publish a release.
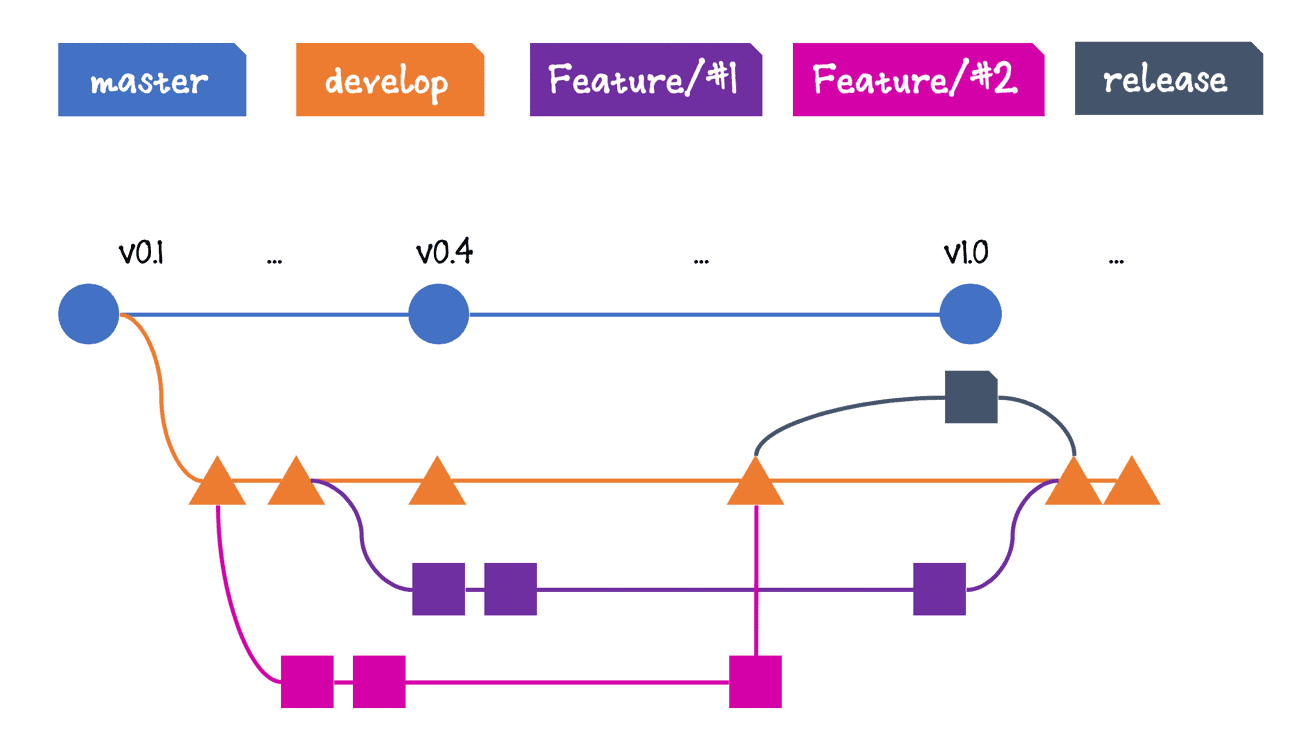
Figure 6. Creating a new release branch.
After a release branch is created, no more features can be added to it (and this must be a rigorous policy within your team). Of course, things like bug and hot fixes, docs and urgent changes can be discussed and carefully added. It’s up to the team defining the boundaries.
When everything’s ready, the branch is merged into the master, and a tag is generated. Usually, this process is automated to avoid human errors. The numbering you’re using for the versions also takes place here.
After that, the develop should also receive the release contents, because some important changes (like bug and hot fixes) may be needed by the feature branches. Again, automation would be useful here.
This is an important step of the workflow because many factors can delay the release process, for example, if your company depends on a shipping calendar or the approval of another team. This way, you release (the name speaks for itself) the develop branch so the developers may continue to work in the features, while the release code is safe.
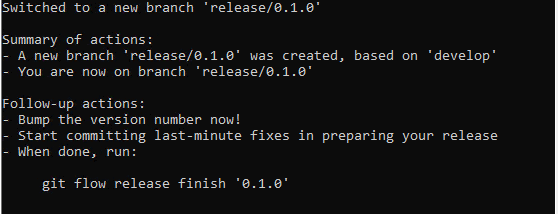
This code creates the first release branch:
|
1 |
git flow release start 0.1.0 |
And here’s the result:
Without git-flow, you’d have to run the following command to create the same release branch:
|
1 |
git checkout -b release/0.1.0 develop |
Next, update the Markdown file with the following:
|
1 2 3 |
# Hello World, GitFlow! - This is my `task-01` commit. - Our project is going to be released. Version 0.1.0 |
Then, commit the changes:
|
1 2 |
git add . git commit -m "Adding release version" |
And publish the branch to the remote origin:
|
1 |
git flow release publish '0.1.0' |
Here are the equivalent commands for vanilla Git:
|
1 2 |
git checkout release/0.1.0 git push origin release/0.1.0 |
This remotely updates the list of branches as well as the warning messages:
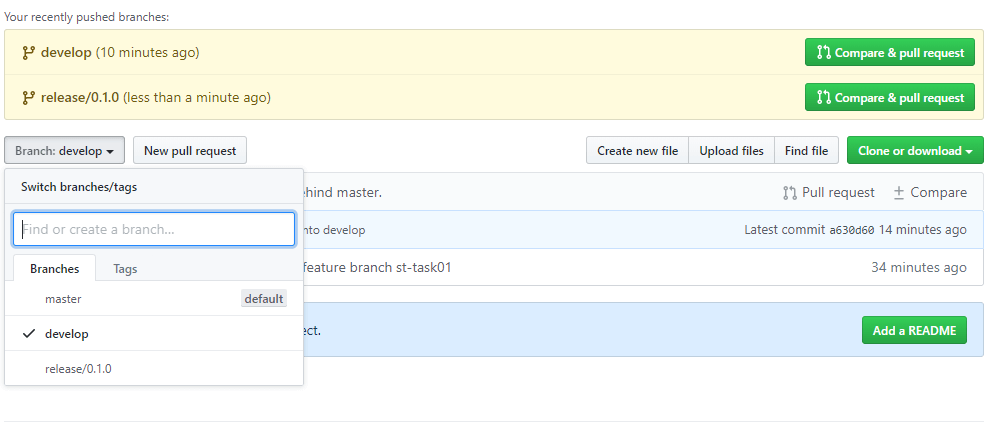
Figure 7. Remote branches, including the release one.
Finally, release it with the following command:
|
1 |
git flow release finish '0.1.0' |
This command does a lot. Without the power of git-flow, you’d have to go through all these Git commands to get to the same result:
|
1 2 3 4 5 6 |
git checkout master git merge --no-ff release/0.1.0 git tag -a 0.1.0 git checkout develop git merge --no-ff release/0.1.0 git branch -d release/0.1.0 |
The git-flow release command prompts a cmd window for you to add a releasing message. Fill it with the following and save it through the shortcut :x! + Enter (be aware that you first need to press Esc to lose focus on the typing before entering the shortcut).
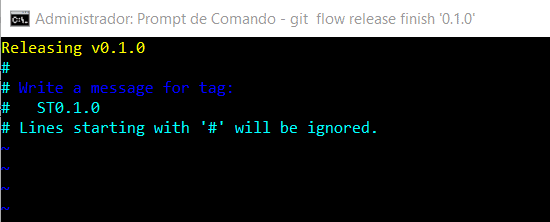
Figure 8. Leaving a release message.
This would be the output:
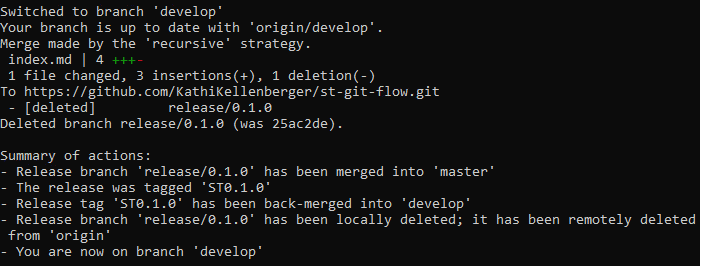
Here, some interesting things are happening. First, due to git-flow’s local nature, you must push the changes manually to the remote.
The release branch had changes that were merged onto the master; git-flow also back-merges the same commits against the develop branch. Plus, a new tag was generated: ST0.1.0. You must push all these updates through the following command:
|
1 2 |
git push origin –-all git push origin –-tags |
This way, when you revisit GitHub, you’d see the following:
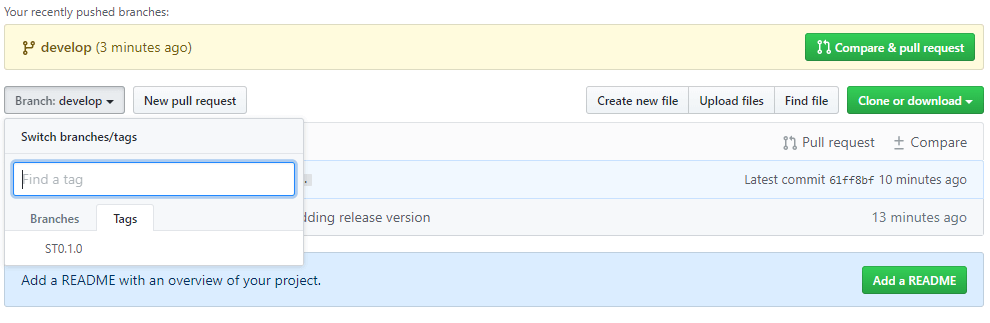
Figure 9. New tag remotely created.
The tags work as snapshots of your code repo. Whenever you want to consult for a specific spot in time, check the respective tag out.
Another tip would be about the GitHub commits history. If you enter the develop branch, for example, and click in the link with the number of commits above the warning’s box, you can refer to all the changes until now:

Figure 10. Develop’s commits history.
Enter each commit, and you may see the change’s diff.
The Hotfix Branches
Every big company can have emergencies and need urgent fixes. With a bunch of people working in the same code while others try to fix a code snippet to ship to production quickly, the whole scenario can get messy.
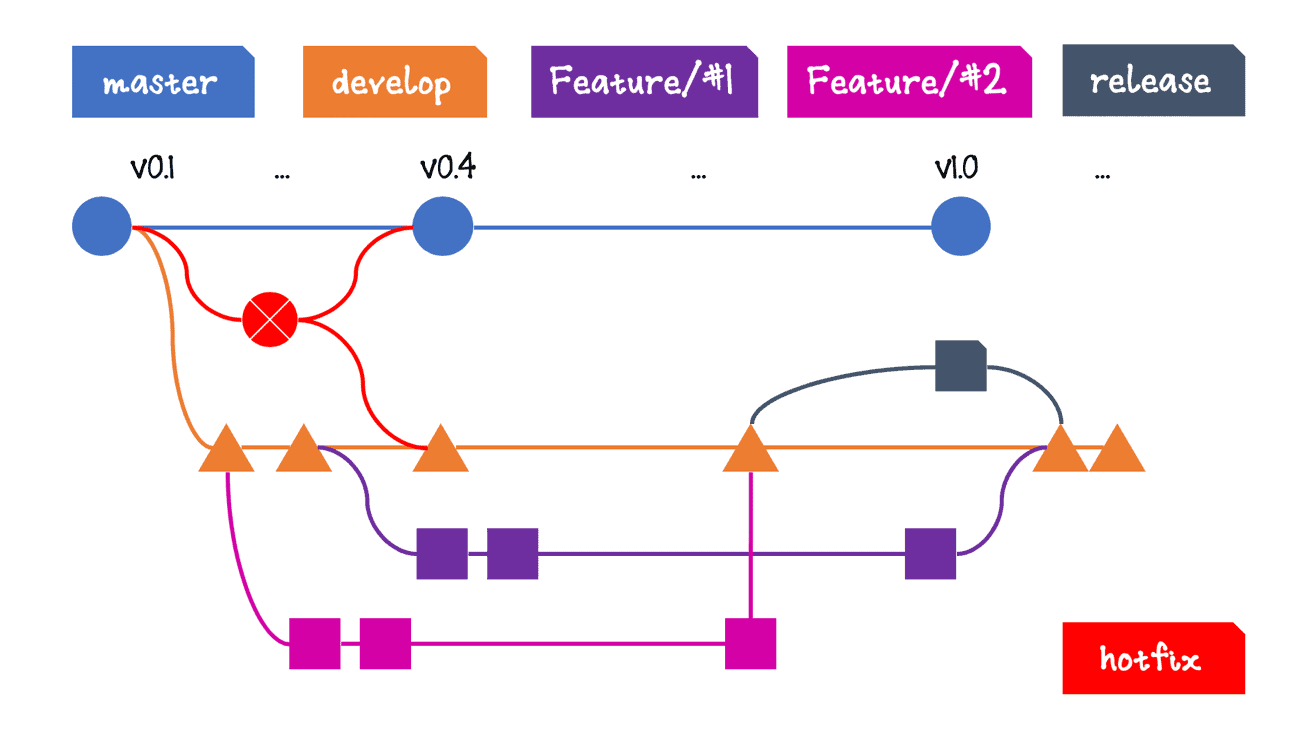
Figure 11. Creating a new hotfix branch.
Hotfix branches come to the rescue by allowing the teams to create a new temporary branch upon the master. When done with fixes, you must merge the branch into master again, the develop branch, and the release branch (if there is any).
That’s why it’s important to always merge a release branch into the develop, because you can’t track all the changes, especially if you’re working with many and large teams.
This is the command to create the first hotfix branch:
|
1 |
git flow hotfix start ST-TASK01 |
And here you have the output:
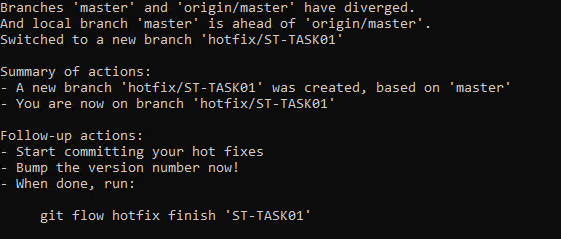
The equivalent non-git-flow command would be:
|
1 |
git checkout -b hotfix/ST-TASK01 master |
Now, change something in the Markdown file:
|
1 2 3 4 |
# Hello World, GitFlow! - This is my `task-01` commit. - Our project is going to be released. - This is my `hotfix` commit. |
And, again, commit the changes:
|
1 2 |
git add . git commit -m "hotfix changes" |
Then, send it to the remote origin by running:
|
1 |
git flow hotfix publish ST-TASK01 |
Notice that it’s not necessary to inform the full name of a branch. If it is a hotfix branch, git-flow understands that by the current command you’re issuing.
With Git only, you’d need to run the following:
|
1 2 |
git checkout hotfix/ST-TASK01 git push origin hotfix/ST-TASK01 |
You may see in GitHub that the new branch was pushed:

Figure 12. Published hotfix branch.
Also, since you’ve committed the changes before pushing the branch, these same changes are sent over to the remote origin too — no need for a further push here.
To finish it, issue the following command:
|
1 |
git flow hotfix finish 'ST-TASK01' |
The git-flow’s hotfix command is another example of a great shortcut command. It does a lot. These are the Git equivalent commands:
|
1 2 3 4 5 6 |
git checkout master git merge --no-ff hotfix/ST-TASK01 git tag -a ST-TASK01 git checkout develop git merge --no-ff hotfix/ST-TASK01 git branch -d hotfix/ST-TASK01 |
Once again, you will be prompted to write a message. Write it and finish with the shortcut :x! + Enter.
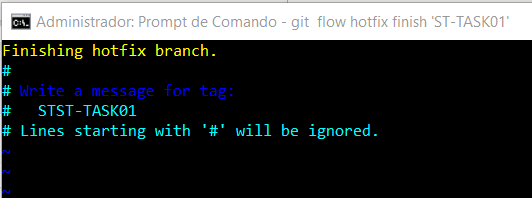
Figure 13. Writing a hotfix message.
Again, push the master, develop and the tags to the remote origin:
|
1 2 |
git push origin --all git push origin --tags |
There you can see the new generated tag: STST-TASK01. This is how the final index.md will look:
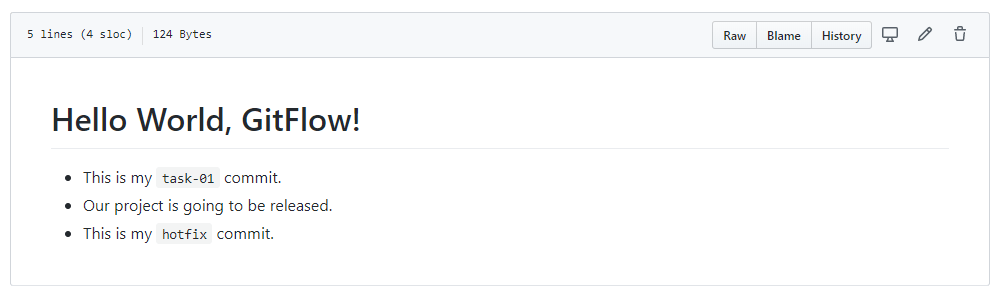
Figure 14. index.md final look.
Conclusion
You can find the original post which started it all here. It has more details over the principles and thinking behind GitFlow. Again, GitFlow is not a religion, nor a panacea. It’s a style, a paradigm. It works well for others; it doesn’t fit the reality of other types of projects.
There are other workflows too, like the GitHub flow, the GitLab flow, the One flow, among others.