
The corruption monster can be a silent and deceptive job killer. It can strike at once or lay in wait for weeks before launching an attack. No, I am not talking about a developer; I am talking about database corruption.
If you have been a DBA for long enough, you will have encountered the data corruption monster in at least one of its many forms. Often corruption occurs when there is a power failure and the server, rather than shutting down gracefully, simply dies in the middle of processing data. As a result of this, or some other hardware malfunction, data or indexes become corrupt on disk and can no longer be used by SQL Server, until repaired.
Fortunately, there are several steps you can take to protect your data, and equally important your job, in the event of data corruption. First and foremost, it should go without saying that not having a good backup strategy is equivalent to playing Solitary Russian Roulette. However, I’ll also demonstrate a few other techniques, based around the various DBCC commands, and a script that will make sure corruption issues are discovered and reported as soon as they occur, before they propagate through your data infrastructure. Hopefully, suitably armed, the DBA can limit the damage caused by this much-less-friendly version of the monster at the end of the book.
P.S. If you are unfortunate enough never to have read The Monster at the End of This Book (by Jon Stone, illustrated by Michael Smollin. Golden Books), starring the lovable Grover Monster from Sesame Street, you have firstly my sympathy and secondly my apologies, because the previous references will have meant little to you. I can only suggest you buy it immediately, along with The Zombie Survival Guide (by Max Brooks, Three Rivers Press), and add them both to your required reading list for all new DBAs.
Causes of corruption
There are many ways that a database can become “corrupt”. Predominantly it happens when a hardware malfunction occurs, typically in the disk subsystem that is responsible for ensuring that the data written to disk is the exact same data that SQL Server expected to be written to disk when it passed along this responsibility to the operating system, and subsequently the disk controller driver and disk itself. For example, I have seen this sort of data corruption caused by a power outage in the middle of a transaction.
However, it is not just disk subsystem failures that cause data corruption. If you upgrade a database from SQL Server 2000 to SQL Server 2005 or 2008, and then interrogate it using the corruption-seeking script provided in this article, you may be surprised to find that you will receive what can be construed as errors in the database files. However, fortunately these are just warnings regarding space usage between versions, and there are recommended steps to address the issue, such as running DBCC UPDATEUSAGE.
Whatever the cause, the DBA does not want to live in ignorant bliss of possible corruption for any length of time. Unfortunately, the corruption monster is often adept at hiding, and will not rear its head until you interact with the corrupt data. By this time, the corruption may have worked its way into your backup files and, when falling through to your last resort of restoring the database, you may simply restore the same corruption. The importance of a solid, regular backup strategy cannot be overstated (so I will state it quite often). On top of that, you need a script or tool that will regularly check, and report on any corruption issues, before it’s too late. I’ll provide just such a script in this article.
Consequences of corruption
As noted in the previous section, most of the time corruption occurs due to failure in an external hardware source, like a hard disk controller or power supply. SQL Server 2005, and later, uses a feature called Page Checksum to detect potential problems that might arise from this. This feature creates a checksum value during writes of pages to, and subsequent reads from, disk. Essentially, if the checksum value read for a page does not match what was originally written, then SQL Server knows that the data was modified outside of the database engine. Prior to SQL Server 2005, but still included as an option, is Torn Page Detection, which performs similar checks.
If SQL Server detects a corruption issue, it’s response to the situation will vary depending on the scale of the damage. If the damage is such that the database is unreadable by SQL Server then it would be unable to initialize and load that database. This would require a complete restore of the database in almost all cases.
If the damage is more contained, perhaps with only one or two data pages being affected, then SQL Server should still be able to read and open the database, and at that stage we can use tools such as DBCC to assess and hopefully repair the damage. Bear in mind, too, that as part of your overall backup and restore procedure, you have the ability to perform a page level restore, if perhaps you only need to restore 1 or more data pages. For additional information on restoring pages from database backups, please see: http://msdn.microsoft.com/en-us/library/ms175168.aspx
Before moving on, I should note that, while I typically leave these options enabled for all instances, both Torn Page Detection and Page Checksum incur overhead and it is possible to disable them. The idea is that if you trust your disk subsystem and power environment then you may not need to have these options turned on, if performance is the highest concern. Most disk subsystems today have battery backup to ensure write activity completes successfully.
You can use sp_dboption for SQL 2000 to enable or disable Torn Page Detection. For SQL Server 2005, and above, you can use the ALTER DATABASE command to enable either torn page detection or checksum (you are not permitted to have both on at the same time), or you can use none to disable them both.
Fighting corruption
Aside from having frequent and tested backups, so that you can at least return to a version of the data from the recent past, if the absolute worst happens, the well-prepared DBA will have some tools in his tacklebox that he can use to pinpoint the location of, and hopefully repair, any corrupt data.
However, before I dive in with the equivalent of a machete in a bayou, I should let you know that I am by no means an expert in database corruption. Like you, I am a just a day-to-day DBA hoping with all hope that I do not encounter corrupt databases, but wanting to be as well-prepared as I can be in case it happens.
As such, I’m going to maintain my focus on the practicalities of the tools and scripts that a DBA can use to fight corruption, mainly revolving around the use of the DBCC family of commands.
I will not dive too deeply into the bowels of the SQL Server storage engine, where one is likely to encounter all manner of esoteric terms that refer to how SQL Server allocates or maps data in the physical file, such as GAM pages (Global Allocation Map), SGAM, pages (Shared GAM), PFS pages (Page Free Space), IAM chains (Index Allocation Map), and more. For this level of detail I can do no better than to point you towards the work of Paul Randal:
https://www.sqlskills.com/blogs/paul/category/Corruption/
He has done a lot of work on the DBCC tool, is a true expert on the topic of data corruption, and is certainly the man with the most oxygen in the tank for the required dive.
DBCC CHECKDB
DBCC CHECKDB is the main command the DBA will use to test and fix consistency errors in SQL Server databases. DBCC has been around for many years, through most versions of SQL Server. Depending on who you ask, it stands for either Database Consistency Checks or Database Console Commands, the latter of which is more accurate since DBCC includes commands that fall outside the scope of just checking the consistency of a database.
For our purpose, though, we are concerned only with consistency and integrity of our databases. DBCC CHECKDB is actually an amalgamation of other DBCC commands, DBCC CHECKCATALOG, DBCC CHECKALLOC and DBCC CHECKTABLE. Running DBCC CHECKDB includes these other commands so negates the need to run them separately.
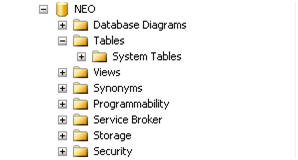
Figure 1: New database NEO with no objects.
In order to demonstrate how to use this, and other tools, to seek out and repair data corruption, I’m first going to need to create a database, and then perform the evil deed of despoiling the data within it. If we start from scratch, it will make it easier to find and subsequently corrupt data and/or index pages, so let’s create a brand new, unsullied database, aptly named “Neo”. As you can see in Figure 1, there are no objects created in this new database. It is pristine.
Just to prove that NEO is not yet corrupt, we can run the DBCC CHECKDB command, the output of which is shown in Figure 2.
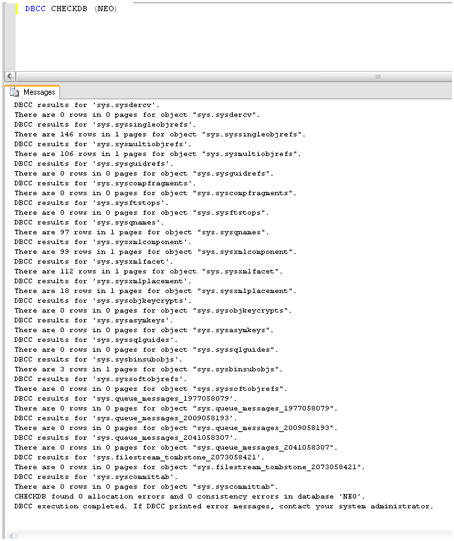
Figure 2: No reported errors with database NEO.
As expected, there are no reported consistency or allocation errors, but that will all change very shortly. I had mentioned that there is a monster at the end of this book and it is not lovable old Grover from Sesame Street.
Please do not go on to the next page!
DBCC PAGE
Aha, you are still reading I see. Well, before we unleash the monster, I want to show you one more very important DBCC command, of which you may not be aware, namely DBCC PAGE. It’s “officially” undocumented, in that Microsoft does not support it, but in reality I have found piles of information on this command from well known and respected sources, like Paul Randal, so I no longer consider it undocumented.
The syntax is simple:
|
1 |
dbcc page ( {'dbname' | dbid}, filenum, pagenum [, printopt={0|1|2|3} ]) |
However, the output of the command can be quite daunting to the uninitiated DBA. So before we introduce the monster that corrupts databases, I want to run DBCC PAGE against the NEO database. The command is as follows:
|
1 |
DBCC PAGE (NEO,1,1,3) |
The first “1” is the file number of the data file, the second “1” is the page number, and the final “3” is the print option which, depending on value chosen (0-3) returns differing levels of information. A value of “3” indicates that we want to see both page header information, as well as details. The not-very-exciting results are shown in Figure 3.
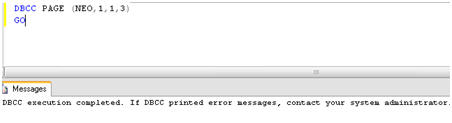
Figure 3: DBCC PAGE default results.
The reason that they are not very exciting is that we forgot to turn on an important trace flag (3604). If you are a SQL Server and not familiar with trace flags then please give me a call and we can talk over a beer or two. Really, I do not mind and I would welcome the camaraderie and chance to be pedantic.
For now, though, I’ll simply note that in order to see output of the DBCC PAGE command, we need to run another DBCC command called DBCC TRACEON. Specifically:
|
1 |
DBCC TRACEON (3604) |
Figure 4 shows the output from rerunning DBCC PAGE, with this trace flag turned on.
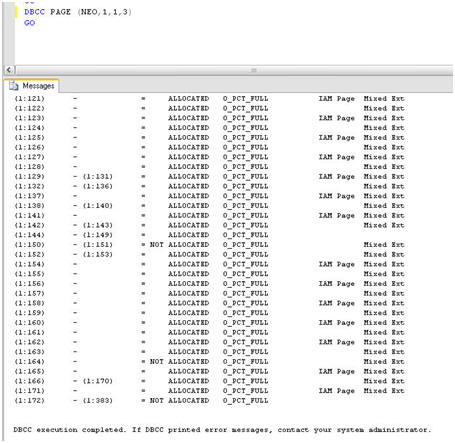
Figure 4: DBCC PAGE with trace flag 3604 turned on.
At the bottom of the output I can see that pages 1:172 – 1:383 are not allocated, and all pages are 0% full. Recall, this is a database with no tables or any other objects created and with no data inserted.
So, let’s now create a simple table and insert some data into it. The script to do this in is shown in Listing 1. It creates a table in the NEO database, called ONE, and inserts into it 1000 records (well, 999 really). Simple stuff, but the important point in the context of this example is that this data load will cause additional pages to be allocated to the database and be filled with data, and I’ll be able to home in on these new pages.
|
1 2 3 4 5 6 7 8 9 10 11 12 13 14 15 16 17 18 19 20 21 22 23 24 25 26 27 28 29 30 31 32 33 34 35 |
USE [NEO] GO IF EXISTS (SELECT * FROM sys.objects WHERE object_id = OBJECT_ID(N'[dbo].[ONE]') AND type in (N'U')) DROP TABLE [dbo].[ONE] GO CREATE TABLE [dbo].[ONE]( [NEOID] [int] NULL, [NEOTEXT] [nchar](50) NULL ) ON [PRIMARY] GO BEGIN Tran T_Time DECLARE @SQL_Alphabet varchar(26) SET @SQL_Alphabet = 'ABCDEFGHIJKLMNOPQRSTUVWXYZ' DECLARE @rnd_seed int SET @rnd_seed = 26 DECLARE @counter int = 1 WHILE @counter < 1000 BEGIN Insert Into ONE Values ( @counter, (select SUBSTRING (@SQl_alphabet, Cast(RAND() * @rnd_seed as int) + 1, CAST(RAND() * @rnd_seed as int) + 1) ) ) SET @counter = @counter + 1 END Commit Tran T_Time |
Listing 1. Creating and populating the ONE table.
Figure 5 shows the sample data that was inserted.
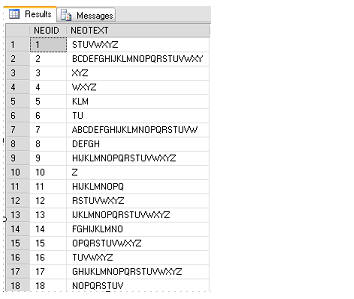
Figure 5: Sample data in the ONE table.
From Figure 4, I already know that, for our empty database, pages 1:172 – 1:383 were unallocated. Re-running DBCC PAGE should reveal that more pages have been allocated to accommodate this data, and that those pages have different percentages of fullness. Figure 6 shows the new results.

Figure 6: New Pages added to NEO database after loading data.
I can see that pages 1:184 – 1:189, for example, are now allocated and are 100 percent full. Having identified one of the new pages (1:184) that contains the data that I just loaded, I can run DBCC PAGE again for that specific page and return a basket full of information, as shown in Figure 7.
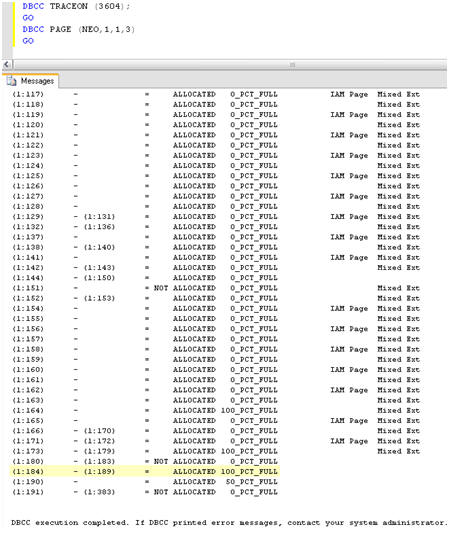
Figure 7. Individual records from page 1:184.
I can see, for example, that it returns the actual value for both NEOID and NEOTEXT, 553 and UVWXYZ respectively. It also returns a hex dump (10006c00 29020000...) that specifies the specific location in the data file where the record with NEOID 533 is stored.
If you are not an expert in reading hexadecimal then fear not; neither am I at this point. I do know, however, that using this information I will be able to find this exact same record and modify it outside of SQL Server, which will really wreak some havoc. For that however, I will need my trusty hexadecimal editor, which I will discuss shortly.
Corruption on data pages
We know that our ONE table, in the NEO database, is a heap, so any corruption we induce is going to be directly on the data pages, rather than on any non-clustered index.
The latter case is actually more favorable as the data in the index is a “duplicate” and so it is relatively easy to repair the damage. We’ll cover this latter case after we’ve looked at inducing, and hopefully recovering from, corruption of the data in our heap table.
Putting a Hex on the data
There are many hexadecimal editors out there in the world, many of them free or at least free to try out. For this article, I downloaded a trial version of one called, ironically, Hex Editor Neo, by HHD Software.
What a Hexadecimal editor allows the DBA to do is simply open and view the contents of a file, in this case the data file. While it is an interesting exercise, I would only recommend it for testing or training purposes as it is a very dangerous tool in inexperienced hands.
What I want to do here is use this hexadecimal editor to “zero out” data in a single database file, in fact in a single data page. This will cause the required corruption, mimicking a hardware problem that has caused inconsistent information to be written to disk, without making the database unreadable by SQL Server.
And though I have not stated it heretofore …
Do not go any further without first backing up the database!
The data that I am fixing (that is a Southern expression) to zero out resides on the data page revealed in Figure 7, namely 1:184. In order to corrupt the data on this page, I first need to shutdown SQL Server, so that the parent data file, C:\Program Files\Microsoft SQL Server\MSSQL.1\MSSQL\Data\NEO.mdf, is not in use.
Next, I simply open Hex Editor Neo and find the location of the one record with NEOID= 553 and NEOTEXT ="UVWXYZ", that we identified using the DBCC PAGE previously.
Most hexadecimal editors, Hex Editor Neo included, have the ability to search for values within the data file. Here, referring back to the DBCC PAGE information for page 1:184, I simply search for the value 10006c00 29020000 to find record 553. As you can see in Figure 8, the record in the Hex editor looks almost identical to the output of the previous DBCC PAGE command.
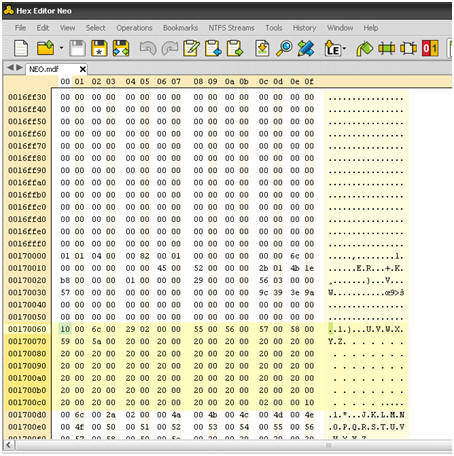
Figure 8: Opening the database file in Hex Editor Neo.
Next, I am simply going to make just one small change to the data, zeroing out “U” in the record, by changing 55 to 00. That is it. Figure 9 shows the change.
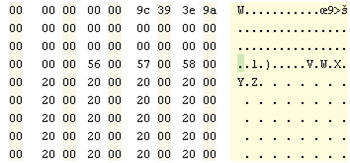
Figure 9: Zeroing out a valid data value.
Next I save the file, and close the Hex editor, which you have to do otherwise the date file will be in use and you will be unable to initialize the database, and start SQL Server. Now, at last, we are about to unleash the monster …
Confronting the Corruption Monster
At first glance all appears fine. The NEO database is up and available, and no errors were reported in the Event Log. In Management studio, I can drill into the objects of the database, including the ONE table, without issue. However, if I try to query the table with SELECT * FROM ONE, something frightening happens, as shown in Listing 2.
|
1 2 3 4 5 |
Msg 824, Level 24, State 2, Line 1 SQL Server detected a logical consistency-based I/O error: incorrect checksum (expected: 0x9a3e399c; actual: 0x9a14b99c). It occurred during a read of page (1:184) in database ID 23 at offset 0x00000000170000 in file 'C:\Program Files\Microsoft SQL Server\MSSQL.1\MSSQL\DATA\NEO.mdf'. Additional messages in the SQL Server error log or system event log may provide more detail. This is a severe error condition that threatens database integrity and must be corrected immediately. Complete a full database consistency check (DBCC CHECKDB). This error can be caused by many factors; for more information, see SQL Server Books Online. |
Listing 2: Corruption strikes the ONE table.
This is indeed the horror show that DBAs do not want to see. It is obviously a very severe error and major corruption. This error will be thrown each time record 553 is included in the query results, and so any table scan will reveal the problem.
This has to be fixed quickly. Fortunately, we took a backup of the database prior to corrupting the data file so if all else fails I can resort to that backup file to restore the data. It is critical, when dealing with corruption issues, that you have known good backups. Unfortunately, in the real world, it’s possible this corruption could have gone undetected for many days, which will mean that your backups will also carry the corruption.
If this is the case then, at some point you may be faced with accepting the very worst possible scenario, namely data loss. Before accepting that fate, however, I am going to ace down the monster, and see if I can fix the problem using DBCC CHECKDB.
There are many options for DBCC CHECKDB and I’ll touch on only a few of them here. DBCC CHECKDB has been enhanced many times in its life and received major re-writes for SQL Server 2005 and above. One of the best enhancements for the lone DBA, working to resolve corruption issues, is the generous proliferation of more helpful error messages.
So, let’s jump in and see how bad the situation is and what, if anything, can be done about it. To begin, I will perform a limited check of the physical consistency of the database, with the following command:
|
1 2 |
DBCC CHECKDB('neo') WITH PHYSICAL_ONLY; GO |
Figure 10 shows the results which are, as expected, not great.
The worst outcome is the penultimate line, which tells me that REPAIR_ALLOW_DATA_LOSS is the minimal repair level for the errors that were encountered. This means that we can repair the damage by running DBCC CHECKDB with the REPAIR_ALLOW_DATA_LOSS option but, as the name suggests, it will result in data loss.
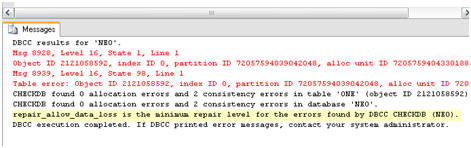
Figure 10: The DBCC report on the corruption.
There are two other repair levels that we would have preferred to see: REPAIR_FAST or REPAIR_REBUILD. The former is included for backward compatibility and does not perform repairs of 2005 database. If the minimal repair option had been REPAIR_REBUILD, it would have indicated that the damage was limited to, for example, a non-clustered index. Such damage can be repaired by rebuilding the index, with no chance of data loss.
In general, it is recommended that you use the repair options of DBCC CHECKDB that may cause data loss only as a last resort, a restore from backup being the obvious preferable choice, so that the data will remain intact. This, of course, requires that the backup itself be uncorrupt.
For this exercise, however, I am going to act on the information provided by DBCC CHECKDB and run the minimal repair option, REPAIR_ALLOW_DATA_LOSS. The database will need to be in single user mode to perform the repair, so the syntax will be:
|
1 2 3 4 |
ALTER DATABASE NEO SET SINGLE_USER WITH ROLLBACK IMMEDIATE GO DBCC CHECKDB('neo', REPAIR_ALLOW_DATA_LOSS) GO |
The results of running the DBCC CHECKDB command are as shown in Listing 3.
|
1 2 3 4 5 6 7 8 9 |
DBCC results for 'ONE'. Repair: The page (1:184) has been deallocated from object ID 2121058592, index ID 0, partition ID 72057594039042048, alloc unit ID 72057594043301888 (type In-row data). Msg 8928, Level 16, State 1, Line 1 Object ID 2121058592, index ID 0, partition ID 72057594039042048, alloc unit ID 72057594043301888 (type In-row data): Page (1:184) could not be processed. See other errors for details. The error has been repaired. Msg 8939, Level 16, State 98, Line 1 Table error: Object ID 2121058592, index ID 0, partition ID 72057594039042048, alloc unit ID 72057594043301888 (type In-row data), page (1:184). Test (IS_OFF (BUF_IOERR, pBUF->bstat)) failed. Values are 29362185 and -4. The error has been repaired. There are 930 rows in 14 pages for object "ONE". |
Listing 3: The error is repaired, but data is lost.
The good news is that the errors have now been repaired. The bad news is that it took the data with it, deallocating the entire data page from the file. Notice, in passing, that the output shows an object ID for the table on which the corruption occurred, and also an index ID, which in this case is 0 as there are no indexes on the table.
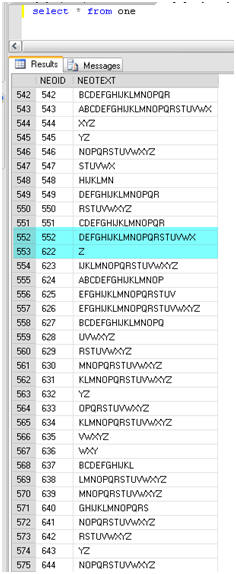
Figure 11: Missing data After
DBCC CHECKDB Repair_Allow_Data_Loss.
So, at this point, I know that I’ve lost data, and it was for a data page, but only one page; but how much data exactly? A simple SELECT statement reveals that not only have I lost the row I tampered with (NEOID 553), but also another 68 rows, up to row 621. Figure 11 rubs it in my face.
These rows should be easily recovered if you have a good backup. You have a good backup, right? Right? Assuming you do, then you are faced with the task of restoring from backup to another database, like NEO2, and syncing the two tables for the missing rows. Syncing the two tables can be accomplished with a simple INSERT INTO statement, like that shown in Listing 4.
|
1 2 3 4 5 6 |
INSERT INTO NEO..ONE ( NEOID, NEOTEXT ) SELECT NEOID, NEOTEXT FROM NEO2..ONE WHERE NEOID NOT IN ( SELECT NEOID FROM NEO..ONE ) |
Listing 4: Syncing two tables to recover lost data rows.
In this “controlled example”, the fix is fairly simple. Other scenarios, with much higher levels of corruption, may require you to turn to other measures to get the data back, after repairing with data loss. These means will almost always involve a restore of the database from backup, which is why I impress again the importance of a solid, verified and well documented database backup policy.
Corruption on non-clustered indexes
I noted earlier that corruption of a non-clustered index is much easier to deal with than corruption of an actual data page, as these indexes are just “redundancies” of the actual data and can be easily rebuilt. However, it would be interesting to prove this point. I’ll use the same Hexadecimal editor technique to corrupt the non-clustered index, and not the data, and see what the outcome would be.
One indicator of whether the corruption is on an index or a table is the IndexID provided with the DBCC output. For our ONE heap table, I noted (in Listing 3) that the IndexID was 0 as there were no indexes defined for the table. An IndexID of 1 means a clustered index and a value of 2-250 indicates a non-clustered index.
For the sake of brevity, let’s assume that I have performed the necessary repair on the NEOID column and created a non-clustered index on the ONE table, for the NEOID column.
First, I need to find out the page value of the index I defined for the ONE table. I will then plug this page of the non-clustered index into DBCC PAGE so that I know, again, exactly what data to modify to simulate index corruption, instead of data page corruption of the heap.
To retrieve the page value of the index, I can use another DBCC command, call it undocumented again, DBCC INDID. The syntax for this command is:
|
1 |
DBCC INDID (DBID, TABLEID,-1) |
So, to execute this for my newly-indexed ONE table, the command will be:
|
1 |
DBCC ind(23, 2121058592, -1) |
The results reveal several IndexIDs, mostly zero, along with several IndexID values of 2, indicating a non-clustered index. Notice in Figure 11 the IndexID of 2 and the associated page of that index, 180.
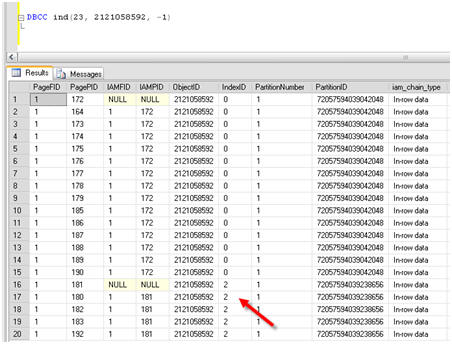
Figure 12: Finding the page of the new non-clustered index.
I can now run DBCC PAGE again, plugging in this page information:
|
1 2 3 4 |
DBCC TRACEON (3604); GO DBCC PAGE (NEO,1,180,3) GO |
The results look a lot different than when looking at a data page. I see returned the Hexadecimal value (HEAP RID) that represents each row in the index for the page interrogated, as shown in Figure 12.
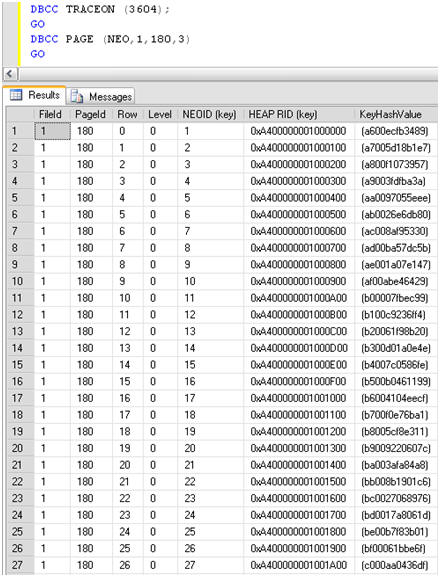
Figure 13: Looking at the non-clustered index for the ONE table with DBCC PAGE.
I used the Hex editor again to modify, or zero out, the HEAP RID, and once again this does indeed corrupt the database in much the same way as changing an actual data page. However, there is one major difference: this time, when I run DBCC CHECKDB('neo') WITH PHYSICAL_ONLY, the IndexID of the corrupt object is reported as “2” i.e. a non-clustered index.
Armed with this knowledge, I have open to me options for repairing the damage, other than restoring from backup, or running DBCC CHECKDB with REPAIR_ALLOW_DATA_LOSS, with the potential loss of data that this entails.
I can simply drop and recreate the non-clustered index using the code in Listing 5.
|
1 2 3 4 5 6 7 8 9 10 11 12 13 14 15 16 17 18 |
USE [NEO] GO IF EXISTS (SELECT * FROM sys.indexes WHERE object_id = OBJECT_ID(N'[dbo].[ONE]') AND name = N'NEO_ID_NC') DROP INDEX [NEO_ID_NC] ON [dbo].[ONE] WITH ( ONLINE = OFF ) GO USE [NEO] GO CREATE NONCLUSTERED INDEX [NEO_ID_NC] ON [dbo].[ONE] ( [NEOID] ASC )WITH (PAD_INDEX = OFF, STATISTICS_NORECOMPUTE = OFF, SORT_IN_TEMPDB = OFF, IGNORE_DUP_KEY = OFF, DROP_EXISTING = OFF, ONLINE = OFF, ALLOW_ROW_LOCKS = ON, ALLOW_PAGE_LOCKS = ON) ON [PRIMARY] GO |
Listing 5: Drop and recreate corrupt non-clustered index.
Now that I have delved somewhat into corrupting, finding and fixing some problems, let’s turn now to the discovery process.
Seeking out corruption
What is the best way for you to find out that you have corruption on your databases, before it propagates through numerous backups and causes bigger issues than it need do?
One option is to set up regular integrity checks using Maintenance Plans, which are useful, and certainly better than not having any integrity checks at all. However, I enjoy the level of control and flexibility I have when building custom scripts to perform the same functions as the maintenance plans. As such, rather than delve into maintenance plans, I will instead share with you a script that I use to iterate through each database, including system databases, and report on any errors returned by DBCC CHECKDB.
With this code, and an easy way to read the error logs where the DBCC CHECKDB results will be written (which I cover in Chapter 7 of my book), you will be comforted by the knowledge that you will not let corruption seep into your data infrastructure and go unnoticed. And that you can act thoughtfully to resolve the issue, once discovered.
The custom query, in Listing 6, will iterate through all databases on a SQL Server instance, capture errors and mail the top error to you so that you can look further into the matter.
|
1 2 3 4 5 6 7 8 9 10 11 12 13 14 15 16 17 18 19 20 21 22 23 24 25 26 27 28 29 30 31 32 33 34 35 36 37 38 39 40 41 42 43 44 45 46 47 48 49 50 51 52 53 54 55 56 57 58 59 60 61 62 63 64 65 66 67 68 69 70 71 72 73 74 75 76 77 78 79 80 81 82 83 84 85 86 87 88 |
CREATE TABLE #CheckDBTemp ( Error INT , [Level] INT , [State] INT , MessageText NVARCHAR(1000) , RepairLevel NVARCHAR(1000) , [Status] INT , [DBID] INT , ObjectID INT , IndexID INT , PartitionID BIGINT , AllocUnitID BIGINT , [File] INT , Page INT , Slot INT , RefFile INT , RefPage INT , RefSlot INT , Allocation INT ) -- Needed variables DECLARE @TSQL NVARCHAR(1000) DECLARE @dbName NVARCHAR(100) DECLARE @dbErrorList NVARCHAR(1000) DECLARE @dbID INT DECLARE @ErrorCount INT DECLARE @EmailSubject NVARCHAR(255) DECLARE @ProfileName VARCHAR(100) DECLARE @EmailRecipient VARCHAR(255) -- Init variables SET @dbID = 0 SET @dbErrorList = '' SET @EmailSubject = 'Integrity Check Failure on ' + CAST(COALESCE(@@SERVERNAME, 'Server Name Not Available') AS NVARCHAR) SET @ProfileName = 'Notifications' SET @EmailRecipient = 'rlandrum13@cox.net' -- CYCLE THROUGH DATABASES WHILE(@@ROWCOUNT > 0) BEGIN IF( @dbID > 0 ) BEGIN SET @TSQL = 'DBCC CHECKDB(''' + @dbName + ''') WITH TABLERESULTS, PHYSICAL_ONLY, NO_INFOMSGS' INSERT INTO #CheckDBTemp EXEC(@TSQL) SELECT @ErrorCount = COUNT(*) FROM #CheckDBTemp IF( @ErrorCount > 0 ) BEGIN SET @dbErrorList = @dbErrorList + CHAR(10) + CHAR(13) + 'Issue found on database : ' + @dbName SET @dbErrorList = @dbErrorList + CHAR(10) + CHAR(13) + (Select Top 1 MessageText from #CheckDBTemp) END TRUNCATE TABLE #CheckDBTemp END IF SUBSTRING(CONVERT(varchar(50), SERVERPROPERTY('ProductVersion')),1,1) = '8' BEGIN SELECT TOP 1 @dbName = name, @dbID = dbid FROM sysdatabases WHERE dbid > @dbID AND name NOT IN ('tempdb') AND DATABASEPROPERTYEX(name, 'Status') = 'Online' ORDER by dbid END ELSE BEGIN SELECT TOP 1 @dbName = name, @dbID = database_ID FROM sys.databases WHERE database_ID > @dbID AND name NOT IN ('tempdb') AND DATABASEPROPERTYEX(name, 'Status') = 'Online' ORDER by database_ID END END -- If errors were found IF( @dbErrorList <> '' ) BEGIN IF SUBSTRING(CONVERT(varchar(50), SERVERPROPERTY('ProductVersion')),1,1) = '8' BEGIN EXEC master..xp_sendmail @recipients = @EmailRecipient, @subject = @EmailSubject, @message = @dbErrorList END ELSE BEGIN EXEC msdb..sp_send_dbmail @profile_name = @ProfileName, @recipients = @EmailRecipient, @subject = @EmailSubject, @body = @dbErrorList, @importance = 'High' END END DROP TABLE #CheckDBTemp |
Listing 6: A script for seeking out and reporting database corruption.
You will notice that the code uses a DBCC CHECKDB option that I’ve not previously covered, and that is WITH TABLERESULTS. As the name suggests, it causes the results to be returned in table format. This option is not covered in Books Online, but is highly useful for automating error checking via SQL Agent Jobs or custom code.
This code can easily be modified to return an email reporting that all databases except NEO are in good shape. It might soften the blow somewhat to know that of 20 databases only one is corrupt. I know it would help me somewhat. In any event, when corruption occurs you are going to receive the mail, seen in Figure 14, which is truly the monster that wakes you up in the middle of the night in a cold sweat.
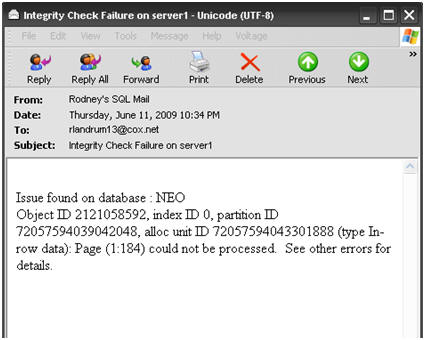
Figure 14: The monster in email form.
In this mail, I can see the ObjectID, the IndexID and the corrupted page, as well as the database name. This should be enough to go on for further investigation with the newfound tools, DBCC PAGE, DBCC INDID and DBCC CHECKDB, with repair options. Or, it should be a wakeup call to the fact that you might have to restore from a good backup.
Summary
In this article, I have discussed how to corrupt a database and delved into several undocumented DBCC options that will assist you when corruption happens to your data. Notice I said “when”. I have only touched the surface of the topic here by showing, at a very high level, how to translate pages to hexadecimal values and understand how to correlate the results of various DBCC commands, while troubleshooting corruption issues.
I cannot stress enough that having a good backup plan is the most important task for the DBA. While I did not cover backups and restores in great depth in this article (an entire book can be written on this topic alone), I have at least shown the best reason to have such a good backup as part of your overall high availability and disaster recovery plan. A corrupt database will indeed be a disaster and could incur much downtime. You do not want to have to go to your boss, or your bosses’ boss, and tell them that you have lost data irrevocably. If you do, you might as well pull your resume out from whatever disk drive it may be on (assuming that’s not corrupt as well) and update it.
There is often panic when discovering any level of corruption in your databases. Without verified backups and some basic troubleshooting tips, there is no safe place to hide when the monster rears up. All you can do is perform a repair, potentially allowing data loss for hundreds of data pages, and then duck away into the nearest cubicle, which if it was yours will soon be empty.
If you do have good backups and can repair the damage without data loss, then that cubicle may one day turn into an executive office with wall-to-wall tinted windows that reveal the flowing brook outside, where no monsters live.
This article is taken from Chapter 8 of his new book, SQL Server Tacklebox. You can buy a hard copy of the book from Amazon.com, or download a free e-copy from Simple-Talk