Virtualization has become a great boon to the IT world. Organizations can now quickly set up and tear down new servers. Azure has taken this to the next level, making it easy to spin up a new Azure VM (Virtual Machine) for your needs, then just as easily turn it off, or even delete it.
Automation is key to the success of a good virtual machine strategy. Naturally PowerShell is the tool of choice for automating Azure tasks. In this, the first of a two-part series, you’ll learn how to use PowerShell to automate the creation of virtual machines in Azure.
Configuring Your Computer
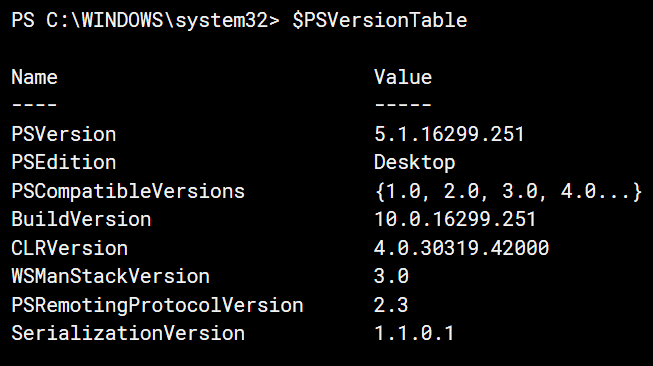
First, you’ll need to make sure your computer is configured correctly. The module was developed under PowerShell 5.1, using the AzureRM module version 5.7.0. To determine your current version of PowerShell, simply run the command $PSVersionTable. It will return the current version on your machine, here is the output from my computer:
It is possible to upgrade your version of PowerShell to the latest version. See the instructions if you are not currently on version 5.1. It’s a free install although you will need administrator rights on your computer.
To interact with Azure, PowerShell has a module named AzureRM. It’s not installed by default however, so first you need to verify if you have the AzureRM module installed, and if so what version. To do so you can use the Get-Module cmdlet in PowerShell.
|
1 |
Get-Module AzureRM -ListAvailable |
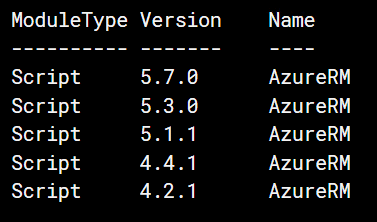
As you can see there are multiple versions installed on this computer, by default PowerShell will take the latest version, here 5.7.0. If it doesn’t return any data, you can use the PackageManagement module introduced in PowerShell 5. You can import the module manually using:
|
1 |
Import-Module PackageManagement |
It’s not necessary though, a feature introduced with PowerShell 4 is the autoloading of modules. The first time you call a command from it, it will import the module automatically.
If the Get-Module cmdlet did not return any versions of AzureRM, you can use PackageManagement’s Install-Module cmdlet. It will download, then install the module for you from the internet.
|
1 |
Install-Module AzureRM -Force -AllowClobber |
There is an older version of the Azure module (Azure vs AzureRM) that may be installed in your system. It has similar names, so the AllowClobber switch is necessary to let them co-exist on the same computer. It’s heavily suggested that you uninstall the older Azure module as Microsoft is deprecating its features in favour of AzureRM.
If you have previously installed the AzureRM module through PackageManagement but are not on the current version (5.7.0 as this is written), you can use the following cmdlet to update:
|
1 |
Update-Module AzureRM -Force |
After updating you should reboot your computer to ensure everything gets set correctly. Additionally, always test carefully after updating; in the past Microsoft has released breaking changes in the AzureRM module.
Many of the concepts in the PSAzure module are based on my first article, PowerShell Functions for Reusablity and Restartability in Azure. I suggest you read it before proceeding with the rest of this article.
Installing PSAzure Module
Because I’ve been doing so much in Azure, I’ve created a module to aid in that work. The module is named PSAzure, and you can find the full module, along with documentation and examples on GitHub.
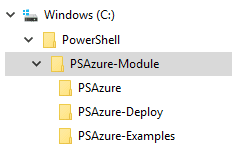
To get the most from this article, you will want to download the files and install the module. While the files are loaded individually in GitHub, where you can view them without the need to download and install, there is also a ZIP file with everything in it. You can just download and unzip the file to your local machine. The examples assume you have downloaded to a folder called C:\PowerShell, although a variable will let you change this easily. Your folder structure should look like this:
We need to detour here just a moment to cover security policies. PowerShell has different policies that dictate whether scripts can run or not. To see what your policy is, use the cmdlet Get-ExecutionPolicy.
There are several values that may be returned. The most common setting is RemoteSigned. With this setting, scripts you develop locally are considered ‘safe’ and will run. However, if PowerShell sees you have a script downloaded from the internet, such as the ones in the PSAzure module, it would require them to be signed. To sign a script means using a security certificate which creates a cryptographic hash that is appended to a script. If any change is made to the script, the hash will no longer match the script and PowerShell will refuse to run it.
This presents a problem for us though, as this project was intended not just as a helpful tool but a learning exercise. You must to be able to change the code as you experiment and learn. To solve this, you’ll need to unlock the files. The Unblock-File cmdlet can achieve this, it changes the settings on the downloaded files to mark them as ‘local’ so PowerShell will now be able to execute them under the RemoteSigned setting. There is a script in the PSAzure-Deploy folder called Unblock-PSAzureModule.ps1 that has instructions on how to unblock, in brief you would simply copy the code below into a new ps1 file and run it. Since it’s a new file, PowerShell will understand it to be local and run it. Alternatively, you could just copy these lines, one at a time, into the command window at the bottom of the ISE and run.
|
1 2 3 4 |
$powershellScripts = 'C:\PowerShell' Unblock-File -Path "$powershellScripts\PSAzure-Module\PSAzure\*.*" Unblock-File -Path "$powershellScripts\PSAzure-Module\PSAzure-Deploy\*.*" Unblock-File -Path "$powershellScripts\PSAzure-Module\PSAzure-Examples\*.*" |
There are a few other security settings you may encounter. Unrestricted and Bypass will execute a downloaded script but will constantly prompt you. Thus, you’d still want to unblock as described above.
The other two settings are AllSigned and Restricted. As the name implies, AllSigned requires all scripts to be signed. This setting would be more commonly found on a corporate server than on a home computer. Restricted means scripts won’t run, period. To change the setting, you can use the Set-ExecutionPolicy cmdlet, like so.
|
1 |
Set-ExecutionPolicy -ExecutionPolicy RemoteSigned |
Note that you will have to run the PowerShell ISE in administrator mode, and you must have administrator rights on your computer. Some corporations may have group policies that prevent changing this setting, if this is your situation you will need to contact your system administrator for more help.
For more information on PowerShell’s execution policies and how to change them, see the online help for Set-ExecutionPolicy. It explains the various policies and how you can view and change your policy.
Once you have the correct version of PowerShell, installed the AzureRm module, configured security, and downloaded the module, you are ready to install. To make installation of the module quick and easy, in the PSAzure-Deploy folder is a script, Install-PSAzureModule.ps1. It will install the module for you in your C:\Users\<user-name-here>\Documents\WindowsPowerShell\Modules folder. By placing them here, PowerShell will be able to find and automatically load the PSAzure module when you call any of the functions in it.
Before we go on, I want to say one thing: Don’t trust me.
Seriously.
Before executing any PowerShell code you’ve downloaded from the internet, be sure to review it completely before running it. Sure, I’m harmless and lovable, but the next sample code you download my have hidden surprises. Since I’m only human (mostly), I can’t guarantee a bug or two might have crept in that might affect you. Always take the time to review any code you download, whether the samples here or anywhere else.
Making Azure Login Quick and Easy
When developing in Azure, constantly having to log in over and over can get annoying. Azure has the ability to save your login information in a context file, then you can just import it using the Import-AzureRmContext function which will prompt you for a profile context file.
To make this easier, you can use a function found in the PSAzure module, Connect-PSToAzure, that automates this process, but first you have to create the context file itself. How do you do it? Well a sample script supplied with the module, Create-ProfileContext.ps1, illustrates this process.
|
1 2 3 4 5 6 7 8 |
# Path to demos - Set this to where you want to store your code $dir = ’C:\PowerShell\PSAzure-Module\PSAzure-Examples’ Set-Location $dir # First login manually Connect-AzureRmAccount # Now save your context locally (Force will overwrite if there) $path = "$dir\ProfileContext.ctx" Save-AzureRmContext -Path $path -Force |
The first thing I do in every script is to set my current location, i.e. where the scripts will be executing from. As stated in the previous section, the samples assume you have a folder named C:\PowerShell and put the module in a subfolder called PSAzure-Module. You can of course alter this, just be aware that each script in the PSAzure-Demo as well as PSAzure-Examples has a directory variable at the top you’ll need to update this to reflect your install location.
With that in place, the next step is to login to Azure, if you aren’t already. That’s where the Connect-AzureRMAccount cmdlet comes in. This is part of the AzureRM module, and, if not logged in, it will bring up a web form and ask for your credentials.
Once logged in, you then set up the location to save your credentials to. The example above uses ProfileContext.ctx, the default filename in the PSAzure module. You can of course override. Finally, the Save-AzureRmContext cmdlet writes your credentials out to disk. You should save the context file in the same folder with the scripts you want to execute. For this article, that would be the PSAzure-Examples folder.
NOTE: You need to be very careful with this method. If someone were to access your machine with your file, they could use your credentials to access your Azure account. For a learner working with their own MSDN account, for example, it should work fine.
From here on, prior to running any Azure related code, you’ll just need to run the function Connect-PSToAzure as long as your current path is the directory where the context file is saved, and it will log you in using the context file you just created. See the help for this function for more information on valid locations to store the file and how to override both the folder and file name it can use for auto login.
Discovering Your VM Options
In order to create your VM in Azure, you must first gather information about what you want to create. There are two basic things you need to provide: what image you want and how big you want the VM to be. You can think of the image as if it were an ISO or DVD used to install an operating system and software. You provide a combination of information to Azure that it can use to retrieve the virtual ISO that you want. The second item you must specify is the virtual hardware configuration. How much RAM, disk space, etc. The script Get-AzureVMOptions.ps1, found in the examples folder of the PSAzure module, demonstrates how to retrieve this information.
As the options vary by region, you need to begin by determining the location. For making code reusable, this is generally put in a variable.
|
1 |
$location = 'southcentralus' |
You then get a list of publishers. Publishers are the various companies who put images on Azure that are the basis for virtual machines.
|
1 |
Get-AzureRmVMImagePublisher -Location $location |
This winds up being a huge list. It’s great so many companies have embraced the Azure platform! You will want to limit the list a bit to make it easier to find what you want.
|
1 2 3 |
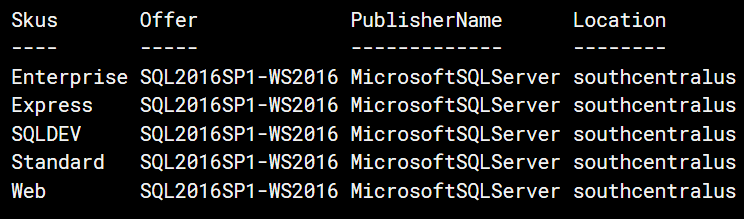
Get-AzureRmVMImagePublisher -Location $location | Select-Object PublisherName | Where-Object PublisherName -Like 'Microsoft*' |
Great, a nice short list — of about 90 entries. Here are the last few items in the list:
MicrosoftRServer MicrosoftSharePoint MicrosoftSQLServer MicrosoftVisualStudio MicrosoftWindowsDesktop MicrosoftWindowsServer MicrosoftWindowsServerHPCPack
For this example, select SQL Server as the publisher.
|
1 |
$publisher = 'MicrosoftSQLServer' |
With the publisher determined, you need to see all the various images that are available for this publisher.
|
1 |
Get-AzureRmVMImageOffer -Location $location -PublisherName $publisher |
For brevity a few columns have been excluded from the result set recreated here.
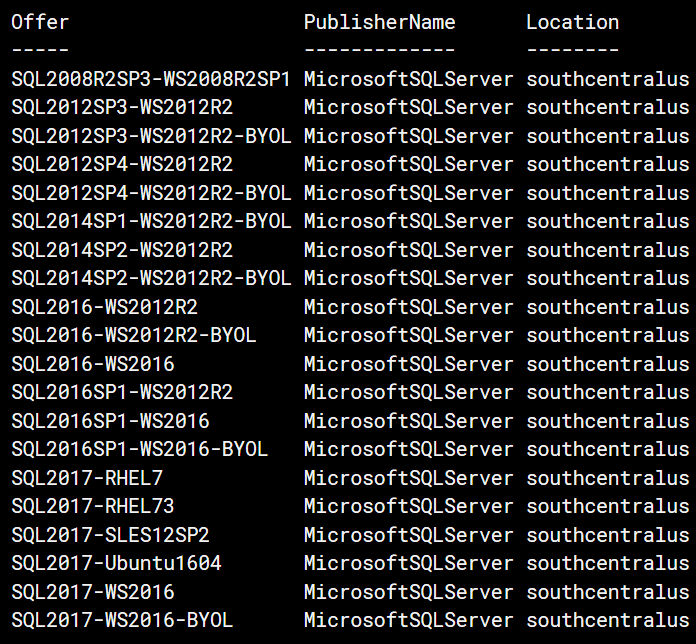
This presents a list with a variety of SQL Servers, such as 2012, 2014, 2016, and so on. In addition, the offer includes the platform, such as Windows Server 2012 or 2016. For this example, pick SQL Server 2016, Service Pack 1, on a Windows Server 2016 platform.
|
1 |
$offer = 'SQL2016SP1-WS2016' |
The next step is to indicate specifically which product in the SQL Server offering you want, i.e., Enterprise, Standard, or Development. To get a list, you can retrieve the SKUs available for this offer.
|
1 2 3 |
Get-AzureRmVMImageSku -Location $location ` -PublisherName $publisher ` -Offer $offer |
Most of these entries should seem familiar to you if you work in the SQL Server world.
For the purposes of this article, use the SQLDEV SKU.
|
1 |
$sku = 'SQLDEV' |
You need one more piece of information to finalize the exact version of SQL Server Developer, and that is the version number.
|
1 2 3 4 |
Get-AzureRmVMImage -Location $location ` -PublisherName $publisher ` -Offer $offer ` -Sku $sku |
This will return a list of versions (again a few columns were trimmed for space purposes).
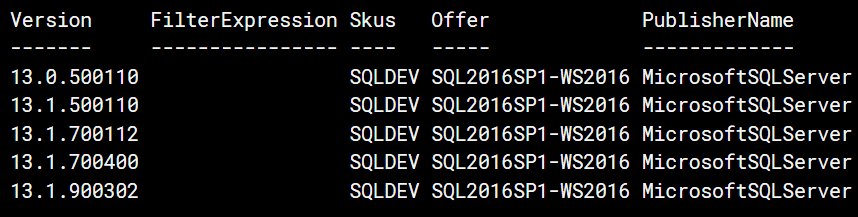
For example, 13.0.500110 is one of the versions available for SQL Server 2016 Developer. You could also choose to use ‘latest’ and Azure will use the most recent version of the image. In general, using the latest option is generally the method to use, unless you have reasons for a specific version.
At this point, you have all the information you need to get the image, in other words that ‘virtual ISO’, but not to create the VM. Now that you know the software for the VM, you must choose the virtual hardware.
|
1 |
Get-AzureRmVMSize -Location $location |
Since the list has over 150 options, just the first few rows are shown below.
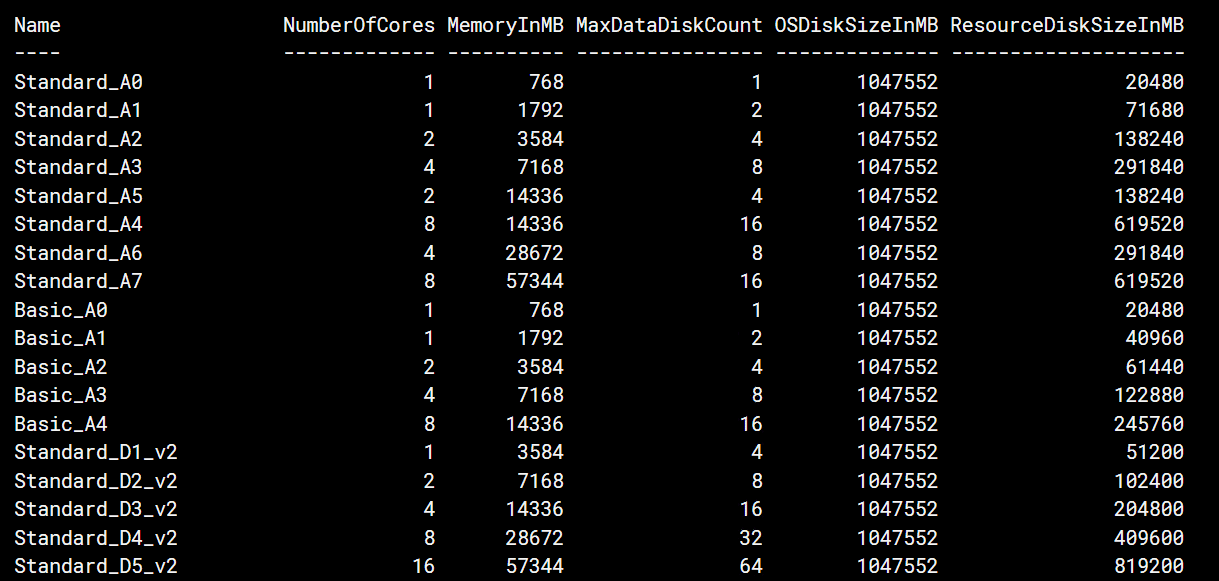
The cmdlet above returns a list of configuration names, and for each one the number of cores, amount of memory, and more. Look over the list to find a size that works for you. For our example, we’ll use a small size.
|
1 |
$vmSize = 'Basic_A3' |
With that you now have the information you need to create your VM. While you could garner this information through the Azure user website, using PowerShell ensures you get the exact strings you need to pass into the PSAzure module.
Laying the Base
The sample file Create-AzureVM.ps1, located in the PSAzure-Examples folder, contains the example code that calls the necessary functions within the PSAzure module to create a virtual machine. Recreating each line of code here would make this article far too long. I will instead call out key highlights. You should open the file in the PowerShell ISE or another editor, so you can follow along. Be aware that the script does have some extra code just for demonstration purposes. If you decide to adapt this script for creating your own VM’s, you’ll want to strip this out. Additionally, there are some variables to set things like resource and account names that you should customize for your environment.
You can create the Azure objects by running the code in the remaining sections, but you will need to change some variable values. Note that also that I’ll show code here that demonstrates how the functions within the module works. These code snippets will each have a comment, so you will know not to copy and run them.
The sample starts by setting a few variables. All the objects created in the samples use AzurePSTest at the beginning of their name. As just mentioned, you will want to update these for your purposes. If you are a student, perhaps change the AzurePSTest text to YourNameHerePSTest, or in a corporate environment use a variation on your company name.
After setting the variables, a new resource group is created. Except for a slight name change, the code is the same as the new resource group routine from the article mentioned above, PowerShell Functions for Reusablity and Restartability in Azure.
|
1 2 3 4 |
$resourceGroup = 'AzurePSTestRG' $location = 'southcentralus' $storageAccount = 'azurepsteststorageacct' New-PSResourceGroup -ResourceGroupName $resourceGroup -Location $location |
All virtual machines need to be stored somewhere in Azure. The logical place is in Azure storage. Before you go creating new that new storage account, there are some rules that need to be followed with naming storage accounts. Fortunately, the PSAzure module has some functions to aid you. The first concerns naming; storage account names must be between 3 and 24 characters in length, be numbers or lowercase letters only, with no punctuation or other characters.
You can use the PSAzure function Test-PSAzureValidStorageAccountName to validate that the name is correct. The function returns an object with two properties. The first is Valid, a Boolean that indicates true for a valid name, or false for invalid. The second is Reason, a text string which contains which rules the name violated.
In the example below, there is a hard coded a valid name, so for the Create-AzureVM.ps1 script this isn’t really needed. However, you may wish to adapt the example script to accept parameters. Should that be the case, the ability to test for a valid name will be valuable.
|
1 2 3 4 5 |
$storageAccount = 'azurepsteststorageacct' $isValid = Test-PSAzureValidStorageAccountName ` -StorageAccountName $storageAccount "Valid Storage Account = $($isValid.Valid)" "Reason: $($isValid.Reason)" |
Behind the scenes, the function is very straightforward. It calls no functions related to Azure from the AzureRM module. It is just a series of checks using string properties and methods such as Length and ToLower(). Even if you’ve only done basic PowerShell coding, you should find the code easy to understand, so I’ll leave it to you to dive in deeper.
The next concern is storage account name availability. Storage account names must be unique across all of Azure. You read that correctly! Across all the Azure storage accounts all around the world, the name you choose must be unique. There are many suggestions for creating unique names. You could use some combination of company, department, application, and a number. Alternatively, you could include a GUID in the name (PowerShell’s New-Guid cmdlet could help you here).
Whatever naming convention you arrive at, you’ll want to ensure the name is available. Within PSAzure, there is a function named Test-PSStorageAccountNameAvailability that will return a true if the name is available or false if someone else is already using the name.
|
1 2 3 |
$saAvailable = Test-PSStorageAccountNameAvailability ` -StorageAccountName $storageAccount Write-Host "Is the name available? $saAvailable" |
Within the function, the AzureRM cmdlet Get-AzureRmStorageAccountNameAvailability is called. The cmdlet returns an object with several properties, so the function Test-PSStorageAccountNameAvailability takes care of accessing the correct property and returning true if the storage account name is available, or false if someone else has taken it already. Be warned, this function can take a long time to run. It needs to check across all of Azure, so it can take several minutes to execute.
What if your naming convention is such that you are certain the name won’t be in use elsewhere? You may just wish to test to see if the storage account name already exists within the confines of your resource group. PSAzure can help here, too, with the function Test-PSStorageAccount.
|
1 2 3 4 5 |
$saExists = Test-PSStorageAccount ` -StorageAccountName $storageAccount ` -ResourceGroupName $resourceGroup ` -Location $location Write-Host "Does the account already exist in our environment? $saExists" |
This function uses the AzureRM cmdlet Get-AzureRMStorageAccount to return a list of the storage accounts that match the name, resource group, and location passed in as parameters. If anything is found it will return a value of true, otherwise false.
Once you have verified you have a storage account name that is valid, not in use, and not already in your resource group, you are ready to create it. PSAzure has a function New-PSStorageAccount to create an account to store VM. You could of course use a storage account that already exists, but for this example you’ll create a new one.
|
1 2 3 4 |
New-PSStorageAccount -StorageAccountName $storageAccount ` -ResourceGroupName $resourceGroup ` -Location $location ` -Verbose |
Behind the scenes, the function first checks to see if a storage account by the name passed in, in this case azurepsteststoreageacct, already exists. It does so by calling the Test-PSStorageAccount function that was just discussed. This value is returned into a variable, $saExists. If the storage account doesn’t exist, the variable will be false. The next bit of code found inside the function checks this, and, if it is false, creates the storage account.
|
1 2 3 4 5 6 7 8 9 |
# function code, do not run if ($saExists -eq $false) { Write-Verbose "$fn Creating Storage Account $StorageAccountName" New-AzureRmStorageAccount -ResourceGroupName $ResourceGroupName ` -Name $StorageAccountName ` -Location $Location ` -Type Standard_LRS } |
Virtual Networking
Creating a virtual machine is great, but it won’t be of much use unless it can communicate outside of itself. That’s where virtual networking comes in. To setup a virtual network, often abbreviated vnet, you need to accomplish three things. First is the creation of the virtual network itself. After the network is created, you need to define a security group for it. In essence, the security group defines a firewall. In the process of creating it, the PSAzure module automatically creates firewall rules that allow HTTP and RDP (Remote Desktop Protocol) traffic through the firewall. There are functions in PSAzure to create security groups at a lower level, allowing one to create alternate rules. This example will demonstrate the most common options.
The final step is to create a virtual NIC, or Network Interface Card. The NIC will form the bridge between the virtual network and the virtual machine, much like a physical network card allows a physical computer to connect to a real network. First off, a few variables are assigned. These will hold names for the security group, network and subnet names. The network addresses for the main network and subnet are also placed into into variables. Finally, a name is assigned to the NIC.
|
1 2 3 4 5 6 |
$networkSecurityGroup = 'AzurePSTestSecurityGroup' $networkName = 'AzurePSTestNetwork' $networkAddress = '192.168.0.0/16' $subnetName = 'AzurePSTestNetworkSubnet' $subnetAddress = '192.168.1.0/24' $nicName = 'ArcanePSTestNIC' |
With variables created, it’s time for the first step: creating the virtual network. The PSAzure module has a function, New-PSAzureVirtualNetwork, to handle this.
|
1 2 3 4 5 6 7 |
New-PSAzureVirtualNetwork -ResourceGroupName $resourceGroup ` -VirtualNetworkName $networkName ` -VirtualSubnetName $subnetName ` -VirtualNetworkAddress $networkAddress ` -VirtualSubnetAddress $subnetAddress ` -Location $location ` -Verbose |
Like other functions, this one checks to see if the virtual network already exists. If not, the logic flows into an if statement to create the new virtual network.
|
1 2 3 4 5 6 7 |
# function code, do not run $vNetExists = Test-PSAzureVirtualNetwork ` -ResourceGroupName $ResourceGroupName ` -Name $VirtualNetworkName if ($vNetExists -eq $false) { … |
Next, the subnet is created inside the function. To be more accurate, it’s a subnet configuration. At this point nothing has been created on Azure. Instead a subnet configuration object has been created and stored in the $subnetConfig variable.
|
1 2 3 4 |
# function code, do not run $subnetConfig = New-AzureRmVirtualNetworkSubnetConfig ` -Name $VirtualSubnetName ` -AddressPrefix $VirtualSubnetAddress |
With this configuration now created, the virtual network can be generated on Azure. The network name and address are passed in, along with the subnet configuration object that was just created.
|
1 2 3 4 5 6 |
# function code, do not run New-AzureRmVirtualNetwork -ResourceGroupName $ResourceGroupName <span style="display: inline !important; float: none; background-color: transparent; color: #333333; cursor: text; font-family: Georgia,'Times New Roman','Bitstream Charter',Times,serif; font-size: 16px; font-style: normal; font-variant: normal; font-weight: 400; letter-spacing: normal; orphans: 2; text-align: left; text-decoration: none; text-indent: 0px; text-transform: none; -webkit-text-stroke-width: 0px; white-space: normal; word-spacing: 0px;">`</span> -Name $VirtualNetworkName ` -AddressPrefix $VirtualNetworkAddress ` -Subnet $subnetConfig ` -Location $Location |
The next step is to create the security group. The PSAzure module has a function to do just that.
|
1 2 3 4 |
New-PSAzureNetworkSecurityGroup -ResourceGroupName $resourceGroup ` -NetworkSecurityGroupName $networkSecurityGroup ` -Location $location ` -Verbose |
Within the function, the code checks to see if the security group already exists. To do so, it uses another function within the module, Test-PSAzureNetworkSecurityGroup. The code inside is much like the others, it checks to see if the object exists, then returns true or false.
|
1 2 3 4 |
# function code, do not run $exists = Test-PSAzureNetworkSecurityGroup ` -ResourceGroupName $ResourceGroupName ` -NetworkSecurityGroupName $NetworkSecurityGroupName |
If the security group is not present, the function goes into an if statement. The first thing that happens is the creation of some security rule objects.
|
1 2 |
# function code, do not run $rdpRule = New-PSAzureRdpSecurityRule$httpRule = New-PSAzureHttpSecurityRule |
Note it has created the rules as objects and placed them into variables. Much like the creation of the subnet configuration, these objects will be used later. Because the RDP and HTTP rules are used so much, PSAzure has specific functions to create them. They are similar, so just review the one for generating the RDP rule.
|
1 2 3 4 5 |
# function code, do not run $rdpRule = New-PSAzureSecurityRule -RuleName 'rdp-rule' ` -RuleDescription 'Allow RDP' ` -Priority 100 ` -Port 3389return $rdpRule |
Similar, and simple. This creates a new security rule, with the appropriate settings. RDP uses port 3389; in the HTTP version of the function, port 80 is used. The new rule object is returned to be stored in the variables you saw a moment ago. With that complete, the function can now create the actual security group in Azure.
|
1 2 3 4 5 6 |
# function code, do not run New-AzureRmNetworkSecurityGroup ` -ResourceGroupName $ResourceGroupName ` -Location $Location ` -Name $NetworkSecurityGroupName ` -SecurityRules $rdpRule, $httpRule |
With the security group created, two of the three steps to create the virtual network setup for the VM are completed. The final step is to create the virtual network card. The function within the PSAzure module to do this is New-PSAzureVirtualNIC.
|
1 2 3 4 5 6 |
New-PSAzureVirtualNIC -ResourceGroupName $resourceGroup ` -NICName $nicName ` -VirtualNetworkName $networkName ` -NetworkSecurityGroupName $networkSecurityGroup ` -Location $location ` -Verbose |
Following the pattern of the other functions, it calls a test function to see if the NIC already exists.
|
1 2 3 |
# function code, do not run $exists = Test-PSAzureVirtualNIC -ResourceGroupName $ResourceGroupName ` -NICName $NICName |
If not, it then calls an AzureRM function to create the network interface card.
|
1 2 3 4 |
# function code, do not run $result = Get-AzureRmNetworkInterface ` -ResourceGroupName $ResourceGroupName ` -Name $NICName |
Summary
In this article you laid the foundation for creating Azure Virtual Machines. You saw how to make the login process easier, followed by how to determine what virtual machine images are available. More importantly, the code returned the exact values that must be used in order to generate a virtual machine with that image.
Several fundamental steps came next: creating a resource group and storage account to hold the VM; the creation of the network components; a virtual network was generated; a security group laid on it that defined firewall rules; and, finally, a virtual NIC was created, which will act as a bridge between the virtual network and the virtual machine.
In the next article you’ll actually create the virtual machine. Additionally, you’ll see how to automate the generation of an RDP file to make remoting into the virtual machine easy. The next article will also show the stop and start functions built into the PSAzure module, so the machine can be set to only run when it needs to, saving you and your company money. As a final step, you’ll see how to remove everything that was created.

Load comments