Have you ever been around someone who thinks all the computers in the world will somehow gain awareness and wipe humanity off the planet? If you have not, then your social circle is far more pleasant than others. But pretend for a moment you have someone like that. Have you ever thought about pulling a prank to make them think a simple game they’re playing is actually aware of who they are and some of the things they’re doing? Now that would be funny, if a bit cruel. Usually, breaking the fourth wall in any medium is a matter of smart writing more than anything else. This isn’t to say the programmers can’t get involved. A well-known example of breaking the fourth wall comes from Metal Gear Solid where a certain boss character would comment on some of the games you’ve been playing based off what data was in your memory card.
Even now, it’s always fun seeing those things despite how creepy it admittedly is. While writers certainly do most of the legwork with this kind of thing, it was a team of programmers that ultimately made the above example possible. If it can be done back in the 1990s, it can certainly be done now. Here, the aim is to create a Unity project that will pull files from a user’s computer to change items like images on the screen or simple text. And of course, this will be done in such a way to trick the user into thinking the game knows more about them than they would probably like.
Setup
Every prank begins with a little preparation. Start by creating a new project in Unity as shown in Figure 1.

Figure 1: Creating a new project.
Of course, the project can be named whatever you wish. This example will name the project 4thWall. It will be a 3D project, though you can just as easily apply the same ideas in a 2D project. Decide on a location for your project then click the Create Project button, Figure 2, at the bottom right of the window.
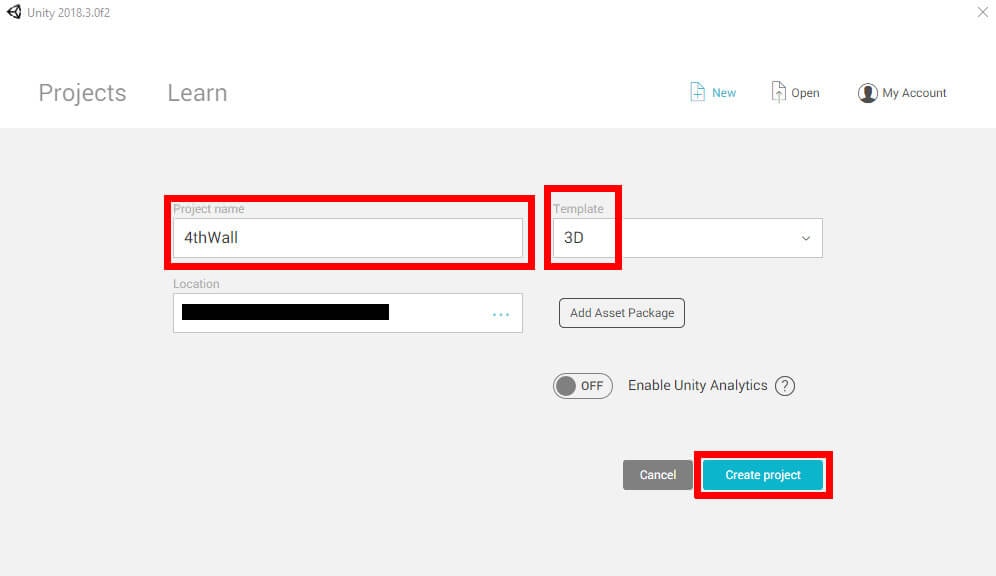
Figure 2: Project settings.
Several objects will be needed to make this project function. In total, you will need a text object, an empty game object that will hold your script, an object that can play back a video from your computer, and four sprite objects that will be used to display images collected from your computer. Begin with what will be referred to as the GameManager. Create a new empty object by navigating to the Hierarchy window and selecting Create->Create Empty. You’ll find the menu item in Figure 3.
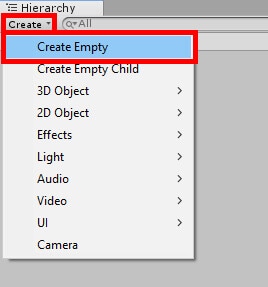
Figure 3: Creating an empty game object.
Next up are the sprite objects. These are as simple as clicking that same Create button in the Hierarchy and selecting 2D Object->Sprite. After creating the object you’ll want to give it a default image to use. Select the object in the Hierarchy, then navigate to the Inspector window. Under the Sprite Renderer component, press the button at the far right of the Sprite field as shown in Figure 4.
Figure 4: Setting a placeholder sprite.
In the window that appears, select any of the images you wish to use as a placeholder image. In Figure 5, the example is selecting UISprite as the placeholder. After this, you should be able to see your sprite object in the center of the screen. Be aware that the image is a small by default.

Figure 5: List of sprites you can use as placeholders.
You can duplicate this object by selecting it in the Hierarchy and pressing Ctrl + D. Make sure there are four sprite objects by the time you are finished. For the sake of knowing what each object is, go ahead and name these four sprite objects Pic1, Pic2, Pic3, and Pic4 as shown in Figure 6.

Figure 6: The Hierarchy so far.
Though small, it is advised to leave the Pic objects at their default scale. This is because the images being pulled from the computer will most likely be large in size, much larger than the sprite you’re currently using. Once loaded, the images appear at an appropriate size. However, they still need to be moved to different locations. Pulling multiple images from a user’s computer is less impressive when you can only see one of them at any given moment. By editing the Position values in each object’s Transform component, you can set exact locations for each object. The table below gives the recommended positions of each Pic object.
|
Object |
Position X |
Position Y |
|
Pic1 |
-9 |
4 |
|
Pic2 |
9 |
-2 |
|
Pic3 |
-9 |
-2 |
|
Pic4 |
9 |
4 |
Table 1: Position of all Pic objects.
With the Pic objects set up, you now need a video player created. This object, as you might have guessed, will play whatever video file it’s given. During runtime, your upcoming script will select a video from the user’s computer to play automatically. Like with the GameManager object you’ll want to create an empty game object. Once again, a name will be assigned to this object. Simply naming it Video should do.
Once that’s been done, a new component will be attached to Video. In the Inspector window you’ll want to press the Add Component button as shown in Figure 7.
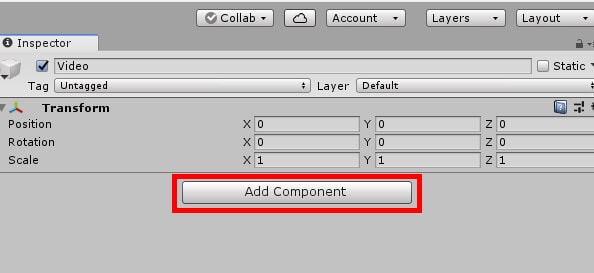
Figure 7: Adding a new component.
Search video to find the Video Player component. Once found, select the component to attach it to your new object. Figure 8 shows you where to do this.
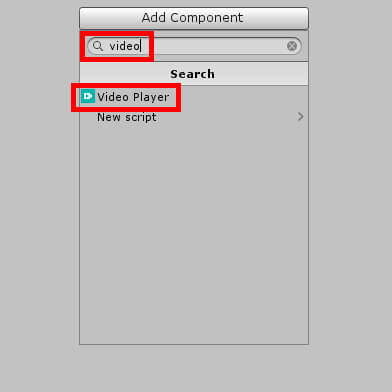
Figure 8: Selecting the Video Player component.
Ordinarily, the Video Player component might be used to play a cutscene in a game. Here it will be used for the purpose of shattering the fourth wall. After attaching the component there’s a handful of items that need changing. For starters, set the Loop checkbox to true. Then, change the Render Mode to Camera Far Plane. This allows the video to be played wherever the camera is currently facing and will be placed behind other objects. Click and drag Main Camera into the Camera field, then set the alpha to 0.25. Finally, change the Aspect Ratio to No Scaling as scaling will most likely not be needed.
When you’ve done all this, the component should look like the one in Figure 9.
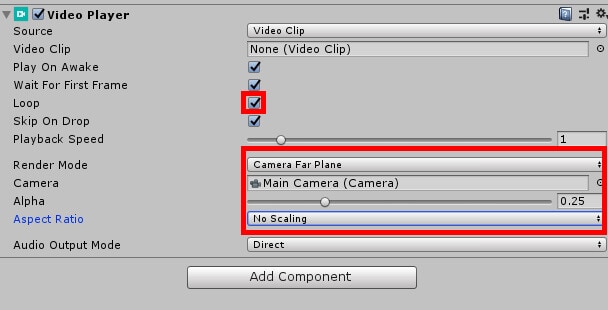
Figure 9: Video Player settings.
The final object to create is the Text object. Using the same Create button as before, navigate to UI->Text to create your Text object. You may leave the object with its default name if you wish. Be sure you also set the position of Text to ten for Position X and fifty for Position Y. Then adjust the width and height of the object to five hundred and three hundred respectively.
By default, the Text object will simply have New Text as the default text, but you can change that if you’d prefer it to be something else. However, you will want to set the Font Size to twenty-five to make the text more readable. You will also want to set the alignment to the center of the screen. Figure 10 shows the settings.
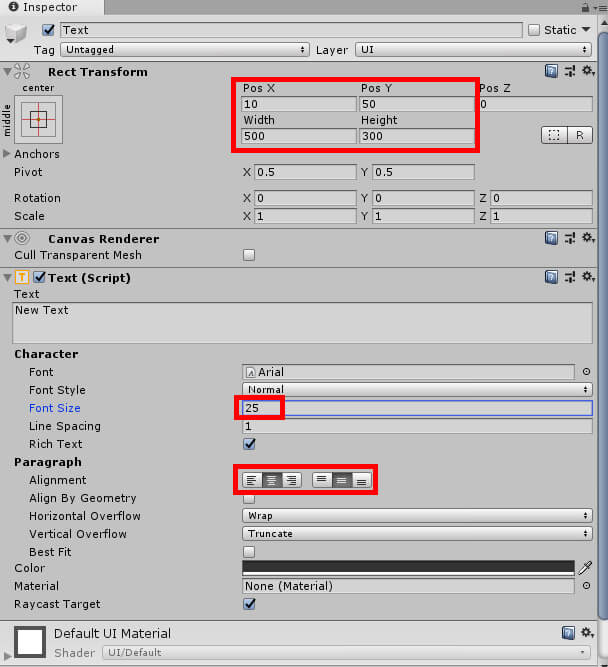
Figure 10: The complete Text object.
The stage is now set. Four sprite objects dot the world, some text is on the screen, and a video player is awaiting input. All you need to do now is gather a few files from your computer and load them into Unity. Typically, this is done by simply clicking and dragging assets into the Unity editor, but for your purposes, this is going to go a step further. A C# script will be used to randomly pull some files from a computer and feed them into Unity.
To create this script, navigate to your Assets window, right click, then navigate to Create->C# Script as shown in Figure 11.
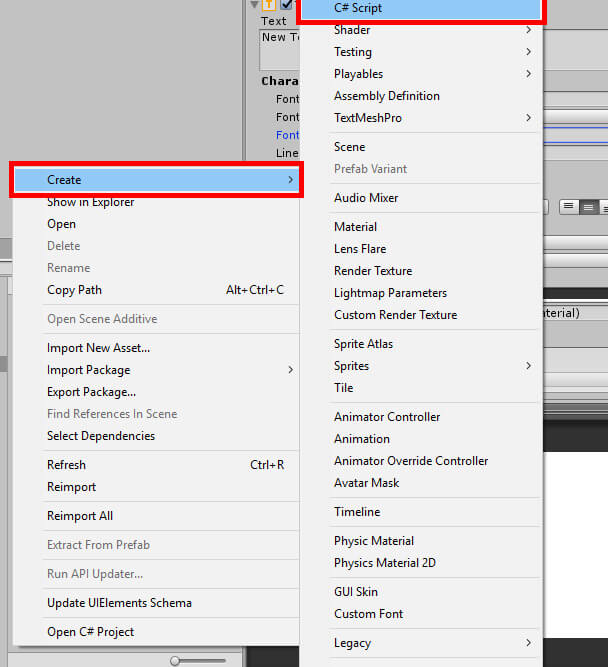
Figure 11: Creating a new script.
Name this script NewScript, then double click it to open Visual Studio and begin coding.
The Code
Right off the bat, you’ll need to make sure you have the following using statements:
|
1 2 3 4 5 6 |
using UnityEngine; using UnityEngine.UI; using UnityEngine.Video; using System; using System.IO; using System.Collections.Generic; |
Of these statements, only UnityEngine.Video is new to this series. As you may have guessed, it allows you to perform video related tasks from within your code. These tasks can include assigning and playing a video clip. With these statements included, you’ll now want to declare two variables and an array.
|
1 2 3 |
public Text uiText; public SpriteRenderer[] pictures; public VideoPlayer vidPlayer; |
Later on, you’ll assign many of the objects you created to these variables. In the case of pictures, you’ll write the code in a way that will allow you, the creator of this program, to pull more pictures if you desire. Of course, this would require placing more sprite objects within the world. The code should resemble Figure 12.
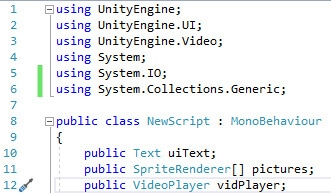
Figure 12: All using statements and variable declarations.
The Update function can be deleted or commented out, as it will not be needed in this example. Before moving on to the Start function, create a method that will be used later. This method will return a Sprite when called, which will be useful when assigning images to the Pic objects.
|
1 2 3 4 5 6 7 8 9 10 11 12 |
Sprite LoadImage(Vector2 size, string filepath) { byte[] bytes = File.ReadAllBytes(filepath); Texture2D pic = new Texture2D((int)size.x, (int)size.y, TextureFormat.RGB24, false); pic.filterMode = FilterMode.Trilinear; pic.LoadImage(bytes); Sprite sp = Sprite.Create(pic, new Rect(0, 0, pic.width, pic.height), new Vector2(0.5f, 0.5f)); return sp; } |
First, the method reads all the bytes from a file. It gets this file based on a filepath that is provided. Then it creates a Texture2D variable named pic from that file. But of course, Texture2D is not the same as a Sprite. Fortunately, there’s a useful method that allows you create a new sprite from a Texture2D file. A new sprite, simply called sp, is created using pic. Then sp gets returned, which then results in a pic object receiving its assigned image. The new function should look like Figure 13.
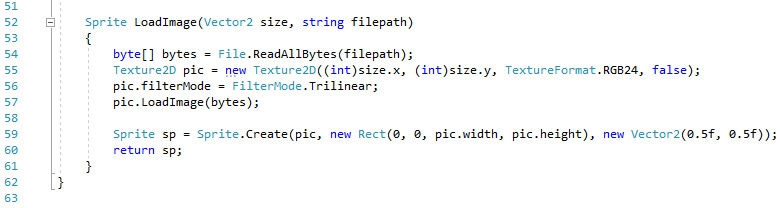
Figure 13: The LoadImage method.
Now the Start method can be completed. One thing you’ll want the onscreen text to do is address the user by their name. Oftentimes a player will be asked to input their name in game, but this project is once again going a step further. Operating systems still require that a user be created in order to use the computer. You’re going to get the username associated with the account being used as the first thing you do.
|
1 |
string username = Environment.UserName; |
Simply filling in some text isn’t the only thing this string variable will be useful for. It will also be used when navigating to certain directories to acquire files. The next several lines will gather files in certain directories and fill arrays with them. You’ll also be setting up the arrays that will be used to fill in images and some of the text that will appear on the screen.
|
1 2 3 4 5 6 7 8 9 10 11 12 13 |
string docPath = "C:\\Users\\" + username + "\\Documents\\"; List<string> documents = new List<string>(Directory.GetFiles(docPath, "*.docx")); string[] docFiles = new string[documents.Count]; string imagePath = "C:\\Users\\" + username + "\\Pictures\\"; List<string> images = new List<string>(Directory.GetFiles(imagePath, "*.jpg")); Sprite[] imageFiles = new Sprite[images.Count]; string vidPath = "C:\\Users\\" + username + "\\Videos\\"; string[] videos = Directory.GetFiles(vidPath, "*.mp4"); if (videos.Length != 0) vidPlayer.url = videos[UnityEngine.Random.Range(0, videos.Length)]; |
All three blocks of code do essentially the same thing with some minor differences between each section. First, a string variable is created. This string contains a file path that corresponds with the type of files you wish to pull. Then the Directory.GetFiles method gathers all files within a path and of a certain type that you specify. For example, the first block of code relates to finding some docx files within the user’s Documents folder.
The one part of this code that mixes it up the most is the section involving the video player. It starts off the same, but the final two lines are completely different. First, it checks to see if a video was found at all. Assuming it does, then instead of creating a new array, it tells Unity to assign a video clip to vidPlayer. This is done by giving vidPlayer a url to get a file from. UnityEngine‘s Random method is called upon to select a url (or video clip, to put it simply), assuming there’s more than one to choose from. The Start function should look like Figure 14.
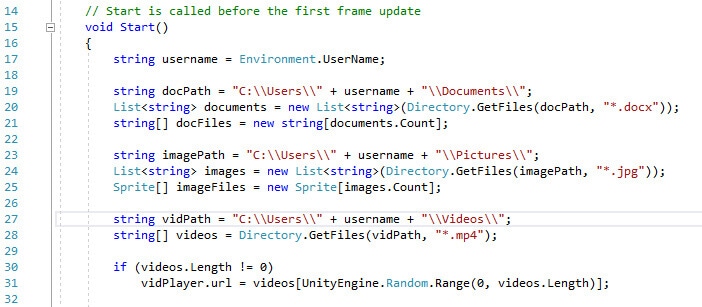
Figure 14: The Start function so far.
Now comes the time for the program to pick which files it wants to use. A combination of if statements and for loops will be used to accomplish this. Starting with the document reading, the code goes like this:
|
1 2 3 4 5 6 7 8 9 10 11 12 13 14 15 16 17 18 19 20 21 22 23 24 25 |
if (docFiles.Length == 0) { docFiles = new string[3]; docFiles[0] = "Hang on..."; docFiles[1] = "Do you not create documents?"; docFiles[2] = "It seems you don't."; } else if (docFiles.Length > 0 && docFiles.Length < 3) { for (int i = 0; i < docFiles.Length; i++) { int file = UnityEngine.Random.Range(0, documents.Count); docFiles[i] = Path.GetFileName(documents[file]); documents.RemoveAt(file); } } else { for (int i = 0; i < 3; i++) { int file = UnityEngine.Random.Range(0, documents.Count); docFiles[i] = Path.GetFileName(documents[file]); documents.RemoveAt(file); } } |
Depending on the situation, a different set of tasks is performed. If there were no documents found, then you simply fill the emptiness by asking the user if they’ve not created any documents. Next, a check is performed to see if more than zero but fewer than three files were found. So long as this condition is met, a for loop will be executed as many times as there are files. During this loop, an integer is assigned by picking a random number between zero and however many documents were located. You then assign an item in the docFiles array to the name of the document. At the end, the item selected is removed from the list of the documents to avoid duplicates. The code should look like Figure 15.

Figure 15: Document selection.
Finally, if there’s more than three documents to display, a for loop is executed. This for loop is much like the last except it only executes a maximum of three times. You can of course change this if you’d like, but you may need to change some other parts of the code to accommodate such a change. Now that the documents have been selected it’s time to pick out some photos from the computer.
|
1 2 3 4 5 6 7 8 9 10 11 12 13 14 15 16 17 18 19 20 21 22 23 24 25 |
if (imageFiles.Length < 4) { int newPics = imageFiles.Length; for (int i = newPics; i < 4; i++) pictures[i].gameObject.SetActive(false); for (int i = 0; i < newPics; i++) { int file = UnityEngine.Random.Range(0, images.Count); imageFiles[i] = LoadImage(new Vector2(25, 25), images[file]); pictures[i].sprite = imageFiles[i]; images.RemoveAt(file); } } else { for (int i = 0; i < pictures.Length; i++) { int file = UnityEngine.Random.Range(0, images.Count); imageFiles[i] = LoadImage(new Vector2(25, 25), images[file]); pictures[i].sprite = imageFiles[i]; images.RemoveAt(file); } } |
Much like with the document selection, the photo selection process begins by checking the length of imageFiles. If it’s less than four, then some of the pic objects will need to be disabled. Once this is done, a for loop is executed to fill in any remaining sprite objects with a picture. The for loop in question is much like the one used in the documents section but with one extra step involved. Your LoadImage method is put to use here. When using it, you specify the Vector2 size as well as the file path to pull the image from.
If there are four or more images to use, then the for loop simply executes without the need to disable any pic objects. Apart from the variable used to specify the number of loops to make, the for loop is exactly the same as the one before. At this point the only thing left to do now is to change the on screen text and begin the video playback. Of course, video playback only begins if a video file was found in the first place.
|
1 2 3 4 5 6 |
uiText.text = "You are " + username + ". \n \n You have these documents: \n" + docFiles[0] + "\n" + docFiles[1] + "\n" + docFiles[2] + "\n \n I see who you are. I know you."; if (videos.Length != 0) vidPlayer.Play(); |
NewScript is now finished as shown in Figure 16 and ready to test. Save your work and return to the Unity editor to complete the project.
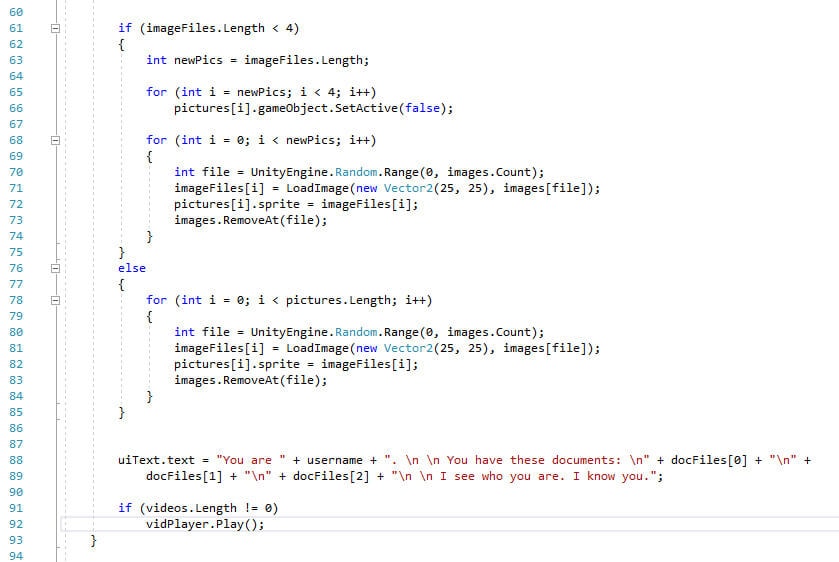
Figure 16: Photo selection, changing text, and starting the video.
Finishing the Project
Find the GameManager object in the Hierarchy. Once found, click and drag NewScript into the Inspector window. Figure 17 shows how to do this.
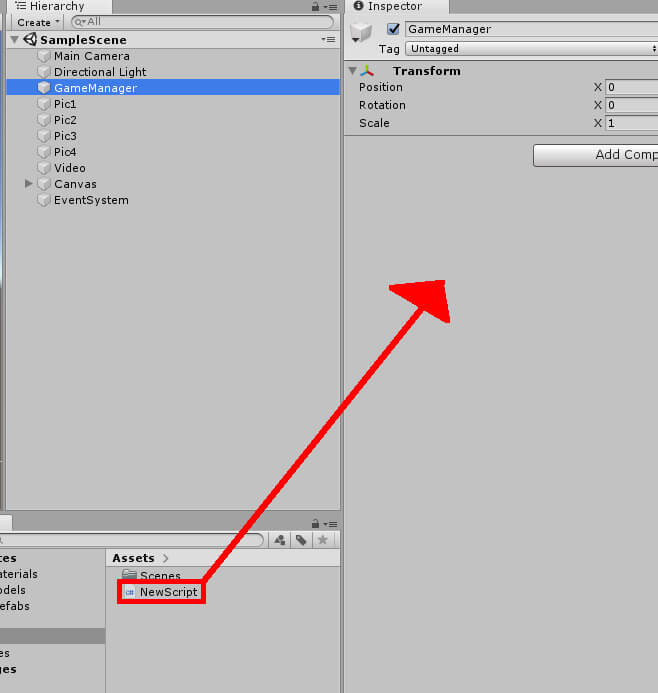
Figure 17: Adding the NewScript script component.
Next, locate the Text, Video, and Pic objects in the Hierarchy. Click and drag those to the corresponding fields in the NewScript component. For the Pic objects, you can lock the Inspector window, select all four objects, and drag them to the Pictures text to set all four of those to the Pictures array with ease as shown in Figure 18.
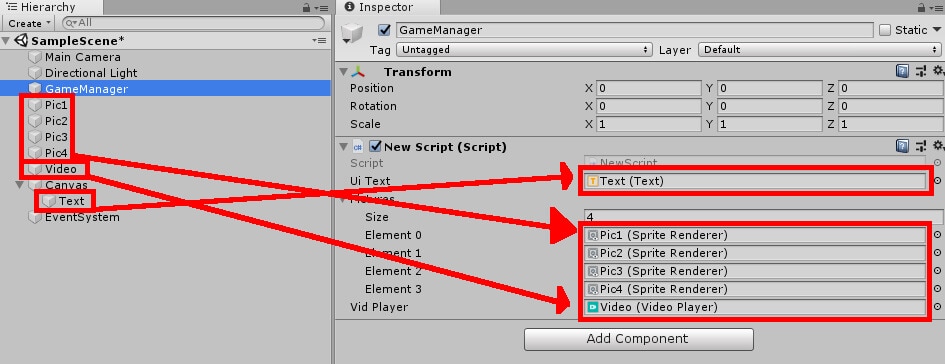
Figure 18: Setting all the variables.
Now you’ll need to set up some files within the various folders to test out your program. A few docx files should be placed in your computers Documents folder, at least four jpg files in your Pictures folder, and an mp4 file in your Videos folder. Once you’ve prepared all this, you are ready to test the project. Note that you may need to adjust the scale of the Pic objects so they don’t bleed into each other. The example set forth in this article sets the scale to 0.3 for all four Pic objects. Figure 19 shows the screen on my machine.
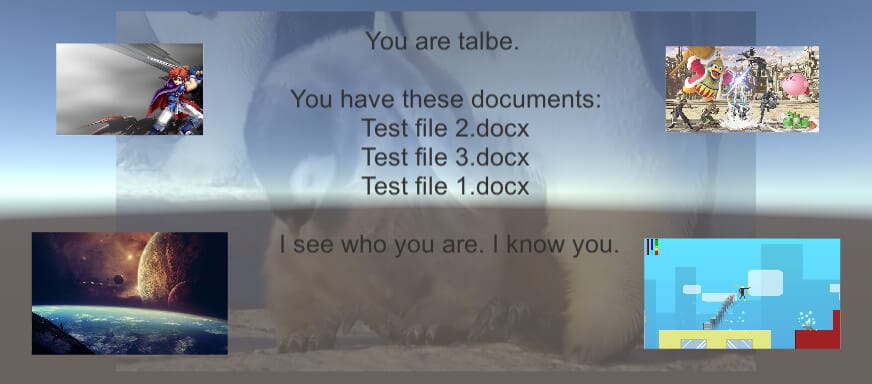
Figure 19: The project in action.
Conclusion
Breaking the fourth wall is just one tool a game developer can use to pull the player into the world they have created. And there’s really no better way to convince the player that the game knows them than by pointing out little things on their device. In this case you allowed your Unity game to rummage through the user’s computer and pull out a few items to display to the user. How one would execute on this knowledge remains up to the developer. In this case, it was to destroy the fourth wall between player and program. But there could be other uses for pulling files from a computer. What might that be? That’s a question only you can answer.
Load comments