
In a previous article, I covered the first step toward building a minimal but effective vanilla-JS framework for dealing with HTML forms. The sample framework (named ybq-forms.js) was based on only a couple of files—a JavaScript file and a companion CSS file. In this article, I’ll just take the code one step further adding the undo capability, field validation and Ajax posting to the server. As emphatic as it may sound, it is not much different from what you get out of the Angular ad hoc modules and from other far larger and popular frameworks. The sample pages are built using ASP.NET Core but that’s not a requirement at all as the core of the solution is made of pure JavaScript and Bootstrap 4 native styles.
A brief recap of the previous article is in order only to give a bit of context. The FORM element is decorated with a custom CSS style that has no other purpose in life than making the FORM easily selectable via code.
|
1 |
<<strong>form</strong> class="ybq-form" action="..." method="post"> |
The JavaScript file bound to the host page will hook up all form elements decorated with the matching class and perform some work on contained elements.
|
1 2 3 |
$(".ybq-form").each(function () { ... }); |
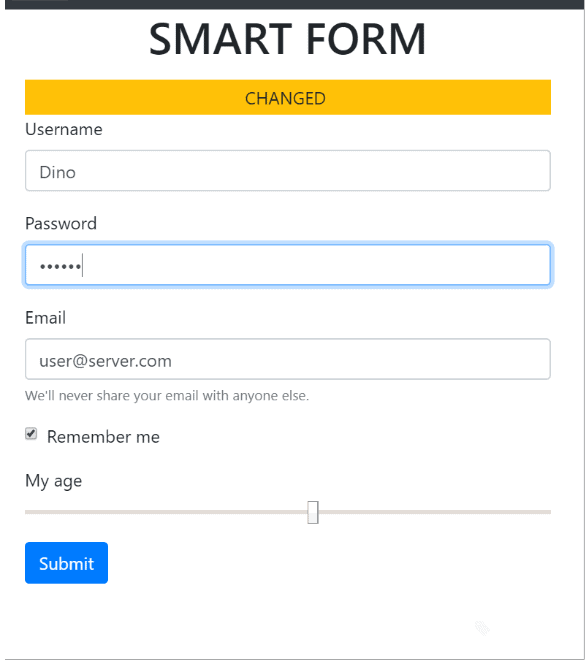
In particular, the code will save to a newly created data-orig attribute the original value of each field. Original values are used to detect if the form has changed values and, in this article, will also be the foundation to enable the undo functionality. Aside from the automatic detection of pending changes and injection of some ad hoc user interface to give feedback to users, the code coming with the previous article didn’t perform other significant tasks. (See figure.)
Let’s add some more power!
Extending the User Interface
To enable the UNDO functionality, you need a button to click, and the framework can create one for you. Most of the graphical settings are hardcoded, but the source code is available for you to make all the changes you may desire.
|
1 2 3 4 5 6 |
$(".ybq-form").each(function() { // Some existing code here ... // Add UNDO button }) |
The UNDO button consists of some static markup as below.
|
1 2 3 4 |
<button onclick='__undo(this)' type='button' class='btn btn-secondary'> <i class='fa fa-undo'></i> </button> |
The __undo function, instead, is a new addition to the framework. Here’s the related code.
|
1 2 3 4 5 6 7 8 |
function __undo(elem) { var form = $(elem).parents('form:first'); form.find("input").each(function () { var orig = $(this).data("orig"); $(this).val(orig); }); $(elem).blur(); } |
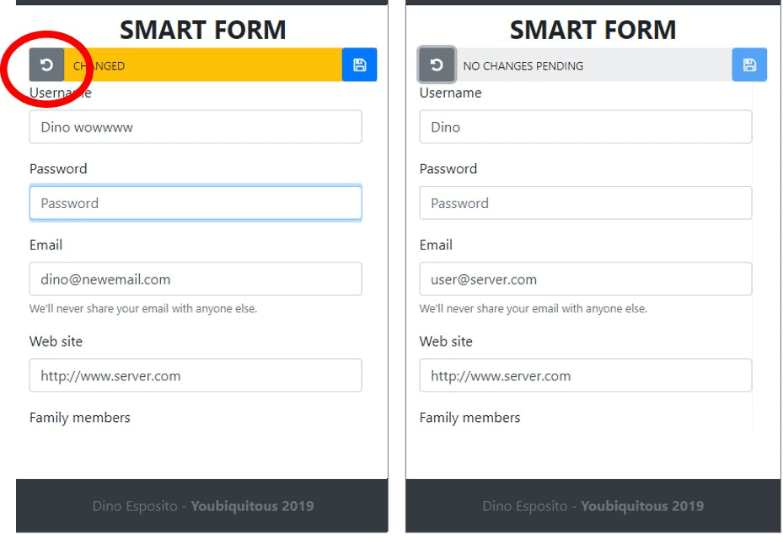
The code loops through the input fields of the form, and for each field, it restores the value previously saved in the data-orig attribute. The figure below shows the effect of the dynamically created UNDO button.
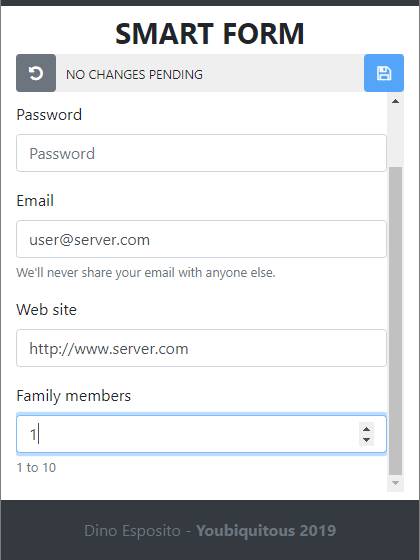
As you may see in the user interface, the JavaScript framework also added a submit button. It does that at the same time it adds the UNDO button. It may look like a weird behavior that a framework adds a submit button to a form. The rationale for such a choice is twofold. One reason is automating all repetitive and boilerplate tasks as much as possible and, at the same time, achieving a consistent design across all forms of the application. Second, having a control bar at the top of the form will let you wrap the rest of the form in a scrollable area of the desired height. This will guarantee that users can scroll the input fields while having the operational buttons easily reachable and visible all the time. (See Figure.)
To make the body of the form scrollable, you need to wrap the list of input fields with an additional DIV element of the desired fixed height.
|
1 2 3 4 |
<div class="col-12" style="height: 400px; padding: 0; overflow-y: auto;"> <!-- List of the form input fields --> </div> |
The next step is finding a way to automate the validation of input fields.
Input Field Validation
There are thousands of different approaches to validate the content of an input field before and after it is posted to the server. All possible solutions have pros and cons, no one is perfect, and no one is patently out of place. In the ASP.NET space, some love data annotations to unify as much as possible the validation experience on the client and the server. Also jquery.validation is fairly popular and Angular has its own components. Last but not least, vanilla JavaScript is still an option, and probably the most flexible of all and the most verbose.
The purpose of the code discussed in this article is to keep every aspect of the code to a minimum level of complexity and a good level of abstraction. Here’s an idea to write as little code and markup as possible while covering at least the most common validation scenarios.
|
1 2 3 4 5 6 |
<input type="text" class="form-control" id="username" name="username" data-rule="{val}.length > 0" placeholder="User name" value="Dino" /> |
Most of the time, validation consists in checking that a given field is not left empty, that the entered value falls in a given range of numbers or dates and that the typed text matches some patterns, such as telephone numbers, emails, and URLs. Another relatively common situation is when two or more fields must be validated together, for example, to ensure that pickup and drop-off locations of a transportation request do not match or that the new password is repeated correctly in the second input field.
The sample INPUT element above features a custom data-rule attribute set to string expression. Although a bit cryptic, the validation rule indicates that the value of the username field is expected to not null. It goes without saying that the data rule is not executable code and that some built-in JavaScript library will take care of that. At the same time, for a developer, indicating a text-based rule is much faster than linking a distinct JavaScript file or populating some inline SCRIPT tag. The data-rule attribute doesn’t handle complex validation scenarios but works just fine for simple and most common cases. On the other hand, also bear in mind that ASP.NET data annotations are not that easy to handle if you want to do cross-field validation. Have a look at how the ybq-forms library handles validation rules expressed through the data-rule attribute.
Validation of the inline rules takes place on the blur event so that users can have immediate feedback as they tab out of each field. Note that this approach doesn’t prevent you from applying some further overall client-side validation upon submission of the form. Performing validation on individual blur events also maintains the validity state of the form constantly updated. The next step, therefore, is using the valid-state information to enable or disable the submit button. Why should you ever attempt to post a form that is patently violating the rules? Have a look at the source code for data-rule processing.
|
1 2 3 4 5 6 7 8 9 10 11 12 13 14 15 16 |
function __attachValidationHandler(input) { var rule = input.data("rule"); if (typeof rule !== 'undefined' && rule.length > 0) { input.on("blur", function () { var current = __getCurrentValue($(this)); var code = rule.replace("{val}", "'" + current + "'"); var result = __eval(code); if (result) $(this).removeClass("is-invalid"); else $(this).addClass("is-invalid"); }); } } |
The previous chunk of JavaScript code attaches an onblur event handler to every input field within the form. The structure of the code is easy to figure out. If the rule expression is defined, then a handler is created for the blur event that expands the {val} placeholder of the rule to the current value of the input field and executes the expression. For example, if the username field contains Dino, then the expression evaluated by the blur event is the following:
|
1 |
"Dino".length > 0 |
Some further explanation deserves the __eval internal function. As you may know, JavaScript features the embedded eval function whose purpose is exactly to take a string of text and treat it as if it were executable code. In other words, if the string passed to eval is made of executable code, the interpreter can understand then the code executes. This is a potential security issue especially when the code has no control over the string that could be passed. The following code is a more secure way to execute dynamic JavaScript code.
|
1 2 3 |
function __eval(code) { return Function('"use strict";return (' + code + ')')(); } |
The next problem to face is how to let users know about the outcome of the validation. If the validation succeeded, there might be no need to show anything (some forms, however, presents a nice green checkmark to confirm). For sure, instead, there will be the need to show feedback if the validation fails. Here’s where Bootstrap 4 makes the difference.
|
1 2 3 4 5 |
var result = __eval(code); if (result) $(this).removeClass("is-invalid"); else $(this).addClass("is-invalid"); |
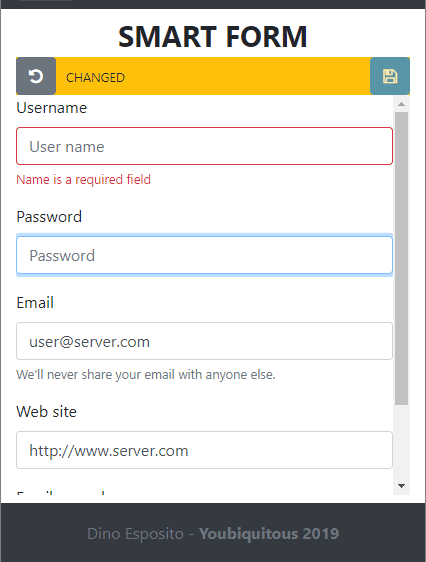
By simply adding to the input field the new style is-invalid (or is-valid) you instruct the Bootstrap library to visually mark the control with a red border. Also, if you have a sibling DIV marked with the class invalid-feedback, then that content is automatically displayed. (See figure.)
|
1 2 3 4 5 6 7 8 9 10 |
<div class="form-group"> <label for="username">Username</label> <input type="text" class="form-control" id="username" name="username" data-rule="{val>}.length > 0" placeholder="User name" value="Dino"> <div class="invalid-feedback"> Name is a required field </div> </div> |
To clear the visual state of the element, it is sufficient that you remove the is-invalid CSS class programmatically. If you intend to confirm that the value typed is acceptable, you can also have a DIV flagged with the valid-feedback CSS style.
Submitting the Form
The final step is automating the upload of the form to the extent that it is possible. The JavaScript library that comes with the article adds a free submit button and gives it a standard CSS class that makes it easier to hide or delete it programmatically. The button doesn’t have any click handler but, being a submit button, it triggers a form-level submit event. The library adds a default submit handler.
|
1 2 3 4 5 6 7 8 9 10 11 12 13 14 15 16 17 18 19 20 21 22 |
form.on("submit", function () { var valid = (form.find("input.is-invalid").length === 0); if (!valid) { return false; } var formData = new FormData(form); $.ajax({ cache: false, url: form.attr("action"), type: form.attr("method"), dataType: "html", data: formData, success: function (data) { (__eval(successCallback))(data); }, error: function (data) { (__eval(errorCallback))(data); } }); return false; }); |
As you can see, the code uses Ajax and jQuery to post the content of the form to the server. Debugging any ASP.NET server-side code works as expected and, at the end of the day, the library saves you a lot of boilerplate code. The only exception is the behavior expected once the content of the form has been processed on the server. This code is specific of each form and can hardly be automated and generalized by any framework.
|
1 2 3 4 5 6 |
<<strong>form</strong> action="/demo/form2" method="post" class="ybq-form" data-successcallback="__successForm" data-errorcallback="__errorForm"> ... <<strong>/form</strong>> |
By adding a couple of ad hoc attributes, however, you can limit the writing of this handling code to the absolute minimum. The data-successcallback attribute points to the name of the JavaScript that will handle the success of the submission. The data-errorcallback attribute, instead, takes the name of the function to invoke in case of a status code different from 200. As in the code snippet above, the __eval helper function is used again to transform a plain string into runnable JavaScript code. The view that defines the form can handle the post form operation as below.
|
1 2 3 4 5 6 7 8 9 10 |
<script> function __successForm(data) { alert("RESULT IS: " + data); } </script> <script> function __errorForm(data) { alert("DIDN'T WORK"); } </script> |
The success callback function receives the value returned by the controller method; the error callback function, instead, takes a value that refers to the exception occurred. Finally, if you need to do some form-wide, cross-field validation, you can add your own submit button and do your checks.
|
1 2 3 4 5 6 7 8 |
<script> $("#submitBtn").click(function() { if ($("#password").val().length < 5) { $("#password").addClass("is-invalid"); return false; } }); </script> |
Alternatively, if you don’t want to have an additional submit button then you can hook up the form’s submit event and perform the script-based validation.
Summary
The purpose of this article and the previous on automatic management of HTML forms was to significantly minimize the amount of code to be written for such a common task like posting a form. Validation, detection of changes, submission and display of feedback are all tasks that can be largely automated. Angular, for example, does just that. Now you have a starting point for a lightweight vanilla-JS library. The full source of ybq-forms can be found at https://bit.ly/2znGhVP.