
The five-part series is designed to jump-start any IT professional’s journey in the fascinating world of Data Science with Azure Machine Learning (Azure ML). Readers don’t need prior knowledge of Data Science, Machine Learning, Statistics, or Azure to begin this adventure.
All you will need is an Azure subscription and I will show you how to get a free one that you can use to explore some of Azure’s features before I show you how to set up the Azure ML environment.
- Part 1 introduces readers to Azure ML and walks through the prep work of setting up an Azure ML workspace.
- Part 2 demonstrates the vital steps of data ingestion, data cleaning, and exploratory data analysis with Azure Machine Learning Studio.
- Part 3 walks readers through the core Machine Learning steps of training and scoring models.
- Part 4 demonstrates Azure ML capabilities for deploying trained models.
- Part 5 familiarizes readers with the easy-to-use Automated Machine Learning feature in Azure ML.
Azure Machine Learning (Azure ML), part of Microsoft’s public cloud offerings, is a set of managed cloud services and tools to help Data Science and Machine Learning professionals build, test, deploy and share machine learning solutions.
This first article in the Azure Machine Learning series covers the fundamentals of Azure Machine Learning, walks readers through setting up their Azure ML workspace, and gets them familiar with Azure ML studio, Azure ML Datastores, and Data assets.
Overview of Azure Machine Learning
Azure ML is a cloud service intended for Machine Learning professionals, data scientists, and engineers to train and deploy machine learning models, manage Machine Learning Operations (MLOps) and enhance their daily workflows. It’s designed to help accelerate and manage machine learning project lifecycles with collaboration, automation, deployment, scaling, integration, and security tools. Azure Machine Learning enables professionals to create models natively, or use models built from open-source platforms like Pytorch, TensorFlow, scikit-learn, etc., and monitor, retrain and redeploy models using its MLOps tools.
The typical flow for a machine learning process is shown in Figure 1.
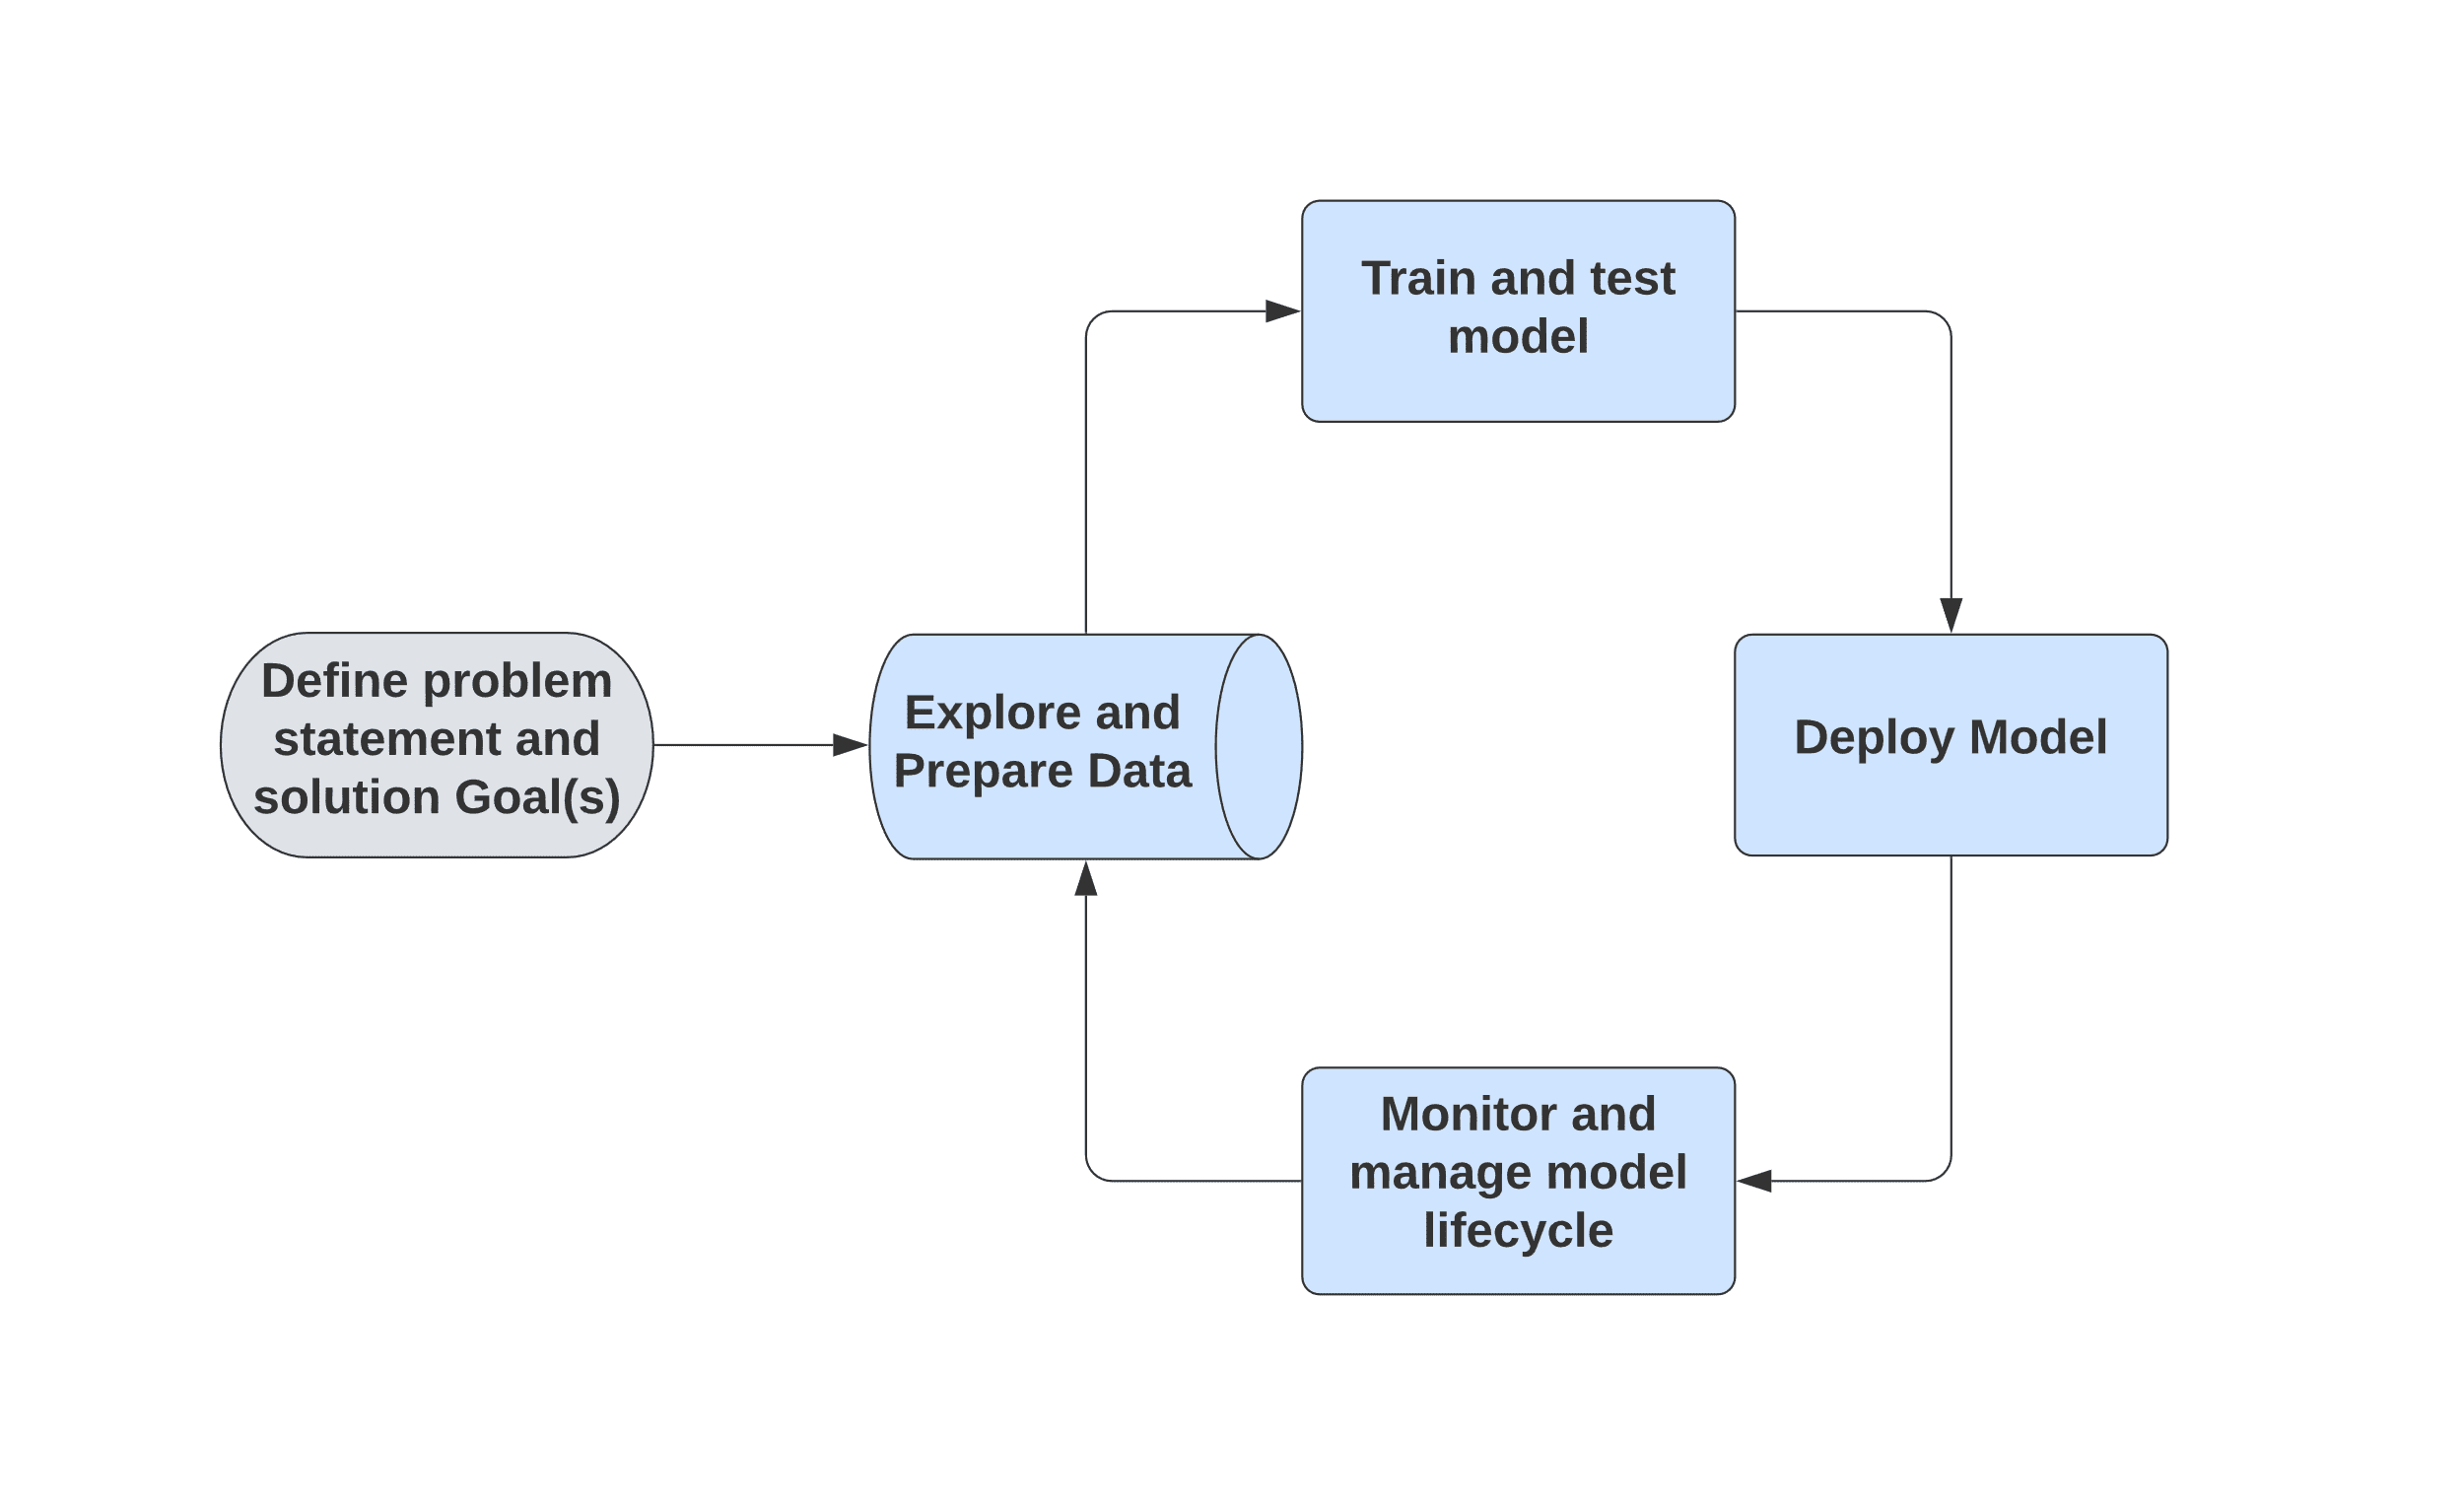
Figure 1. Typical Machine Learning project lifecycle
The Azure Machine Learning Studio (Azure ML Studio) facilitates quick model creation and deployment, with an easy-to-use graphical user interface (GUI). The automated Machine Learning (AutoML) feature in Azure ML speeds up the repetitive and time-consuming process of feature and algorithm selection.
While Azure ML comes with a large selection of pre-built Machine Learning algorithms and modules, it also allows for extending your models with custom R and Python scripts. Azure ML facilitates easy deployment of models as web services, to be consumed by applications in real-time as well as batch processing modes. All these tasks can be done using Azure ML Studio Graphical User Interface (GUI) or Python SDK.
Azure Machine Learning Architecture Overview
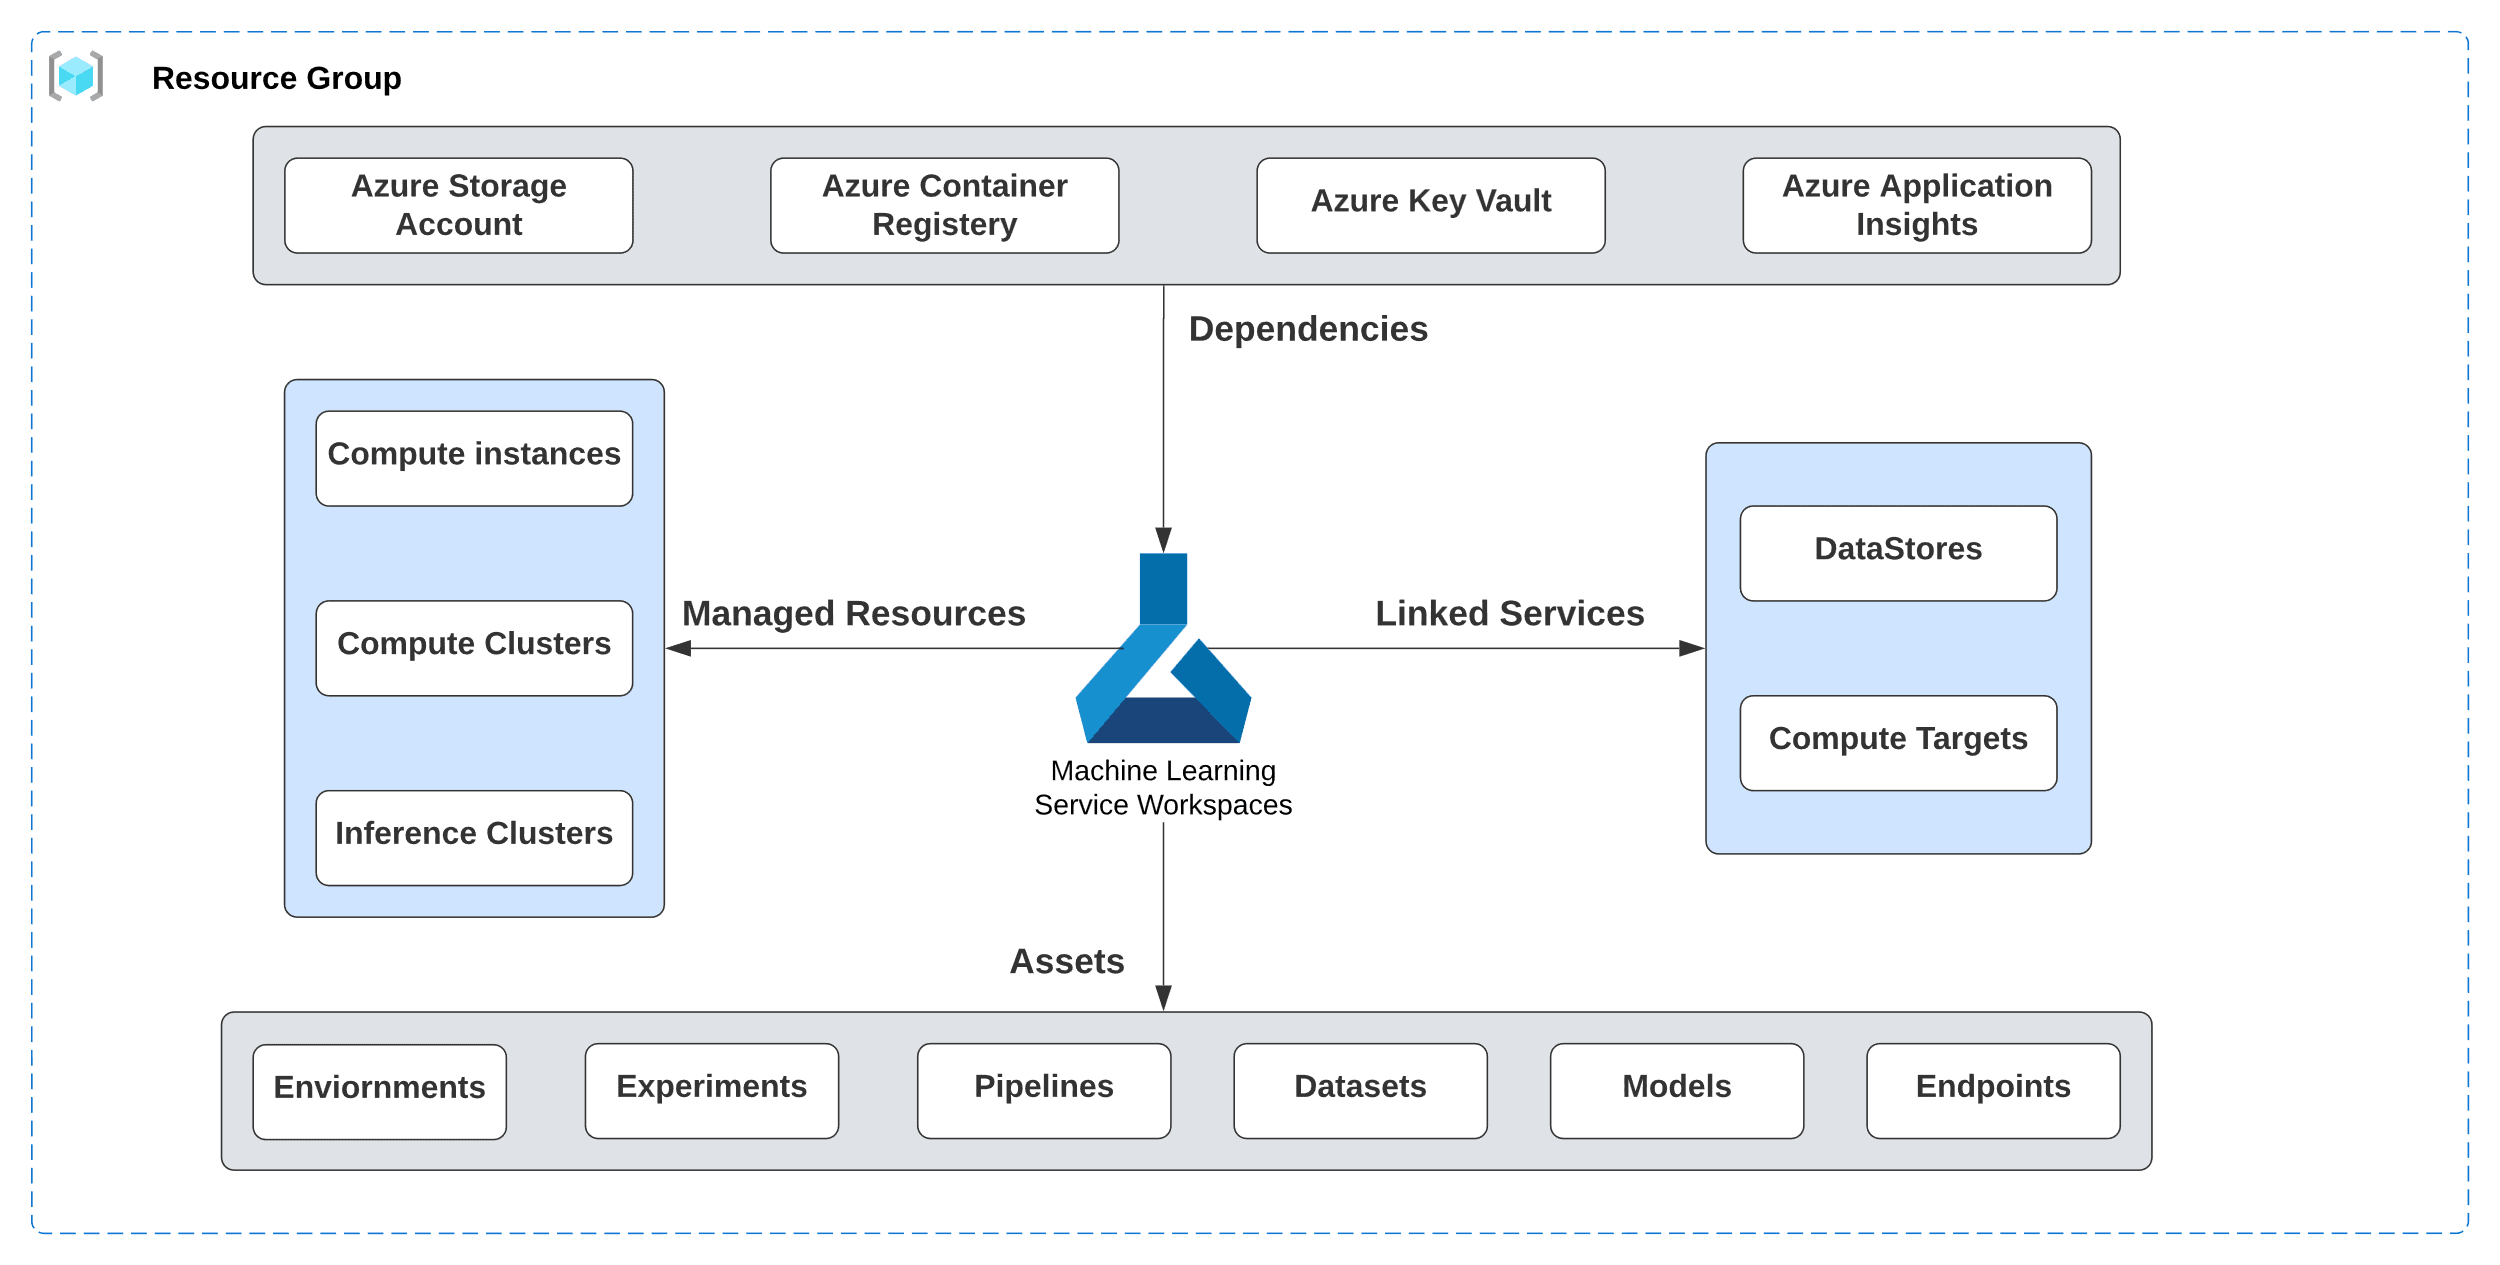
Figure 2. Azure Machine Learning high-level architecture
A high-level architecture overview of Azure ML will familiarize readers with its
various components and how they work together.
Note: There are a lot of terms and concepts, but throughout the series, it should become clearer as I make user of these concepts to build out examples.
An Azure “Resource group” is a container of related resources for a solution, that typically share the same solution lifecycle. It stores metadata about your resources and is tied to a geographical region.
- Azure “Machine Learning workspace” is a top-level resource for Azure ML and is the centralized place to manage resources used to train and deploy models.
- Azure ML “Assets” like Environments, Experiments, Pipelines, Datasets, Models, and Endpoints are created while using Azure ML.
- An “Environment” is a collection of Python or R packages and libraries, environment variables, and various settings that encapsulate the needs of the machine learning model’s training and scoring scripts
- A single execution of a training script, along with the record of its metadata, metrics, and output, is called a “Run”. An “Experiment” is a collection of multiple runs of a particular training script.
- Machine Learning “Pipelines” are used to create and manage workflows that orchestrate various phases of machine learning like data preparation, model training, model deployment, scoring, etc.
- An Azure ML “Dataset” is a reference to the data source location and a copy of its metadata. It is also known as a “Data Asset”.
- Creating a Machine Learning model involves choosing an algorithm, training it with data, and hyperparameter tuning. A trained “Model” can accept input and produce (infer) the output, which is commonly referred to as a prediction.
- Machine learning models are registered in the Azure Machine Learning workspace and deployed from the registry as a service “endpoint”, which is simply an instance of the model hosted in the cloud as a web service. It can be a “Real-time” or “batch-processing” endpoint
- An Azure ML “Datastore” is a reference to an existing storage account on Azure and secures the connection information without risking the authentication credentials and integrity of the source of data. It is used by Data Assets (also known as datasets) to securely connect to Azure storage services.
- “Dependencies” are the other Azure Resources like “Azure Storage Account(s)”, “Azure Container Registry”, “Azure Key Vault” and “Azure Application Insights”, used by Azure ML workspace.
- A “Compute target” is a designated compute resource of the environment where the ML model training script is run, or inference service is deployed to and hosted. It’s called a “Linked Service” when its location is the Machine Learning professional’s local machine, on-premises resources, or cloud-based resources not hosted on Azure. When the compute target is hosted in and fully managed by Azure Machine Learning, it’s called a “Managed Resource”. Azure Machine Learning offers two fully managed cloud-based Virtual Machines (VM) for machine learning development tasks.
- “Compute instance” is intended to serve as the Machine Learning professional’s development workstation. It’s a VM with multiple tools and environments pre-installed for common machine-learning tasks
- “Compute cluster” is a set of VMs capable of scaling to multiple nodes when needed for large workloads. It scales up automatically when a job is submitted and is well-suited for dev/test deployments
When the compute target used to host production deployment of an ML model for performing inference is fully managed by Azure Machine learning, it’s called an “inference cluster”. This currently includes “Azure Machine Learning endpoints” and “Azure Machine Learning Kubernetes”. Both can be used for Real-time and Batch inference.
Azure Machine Learning Workflow Design
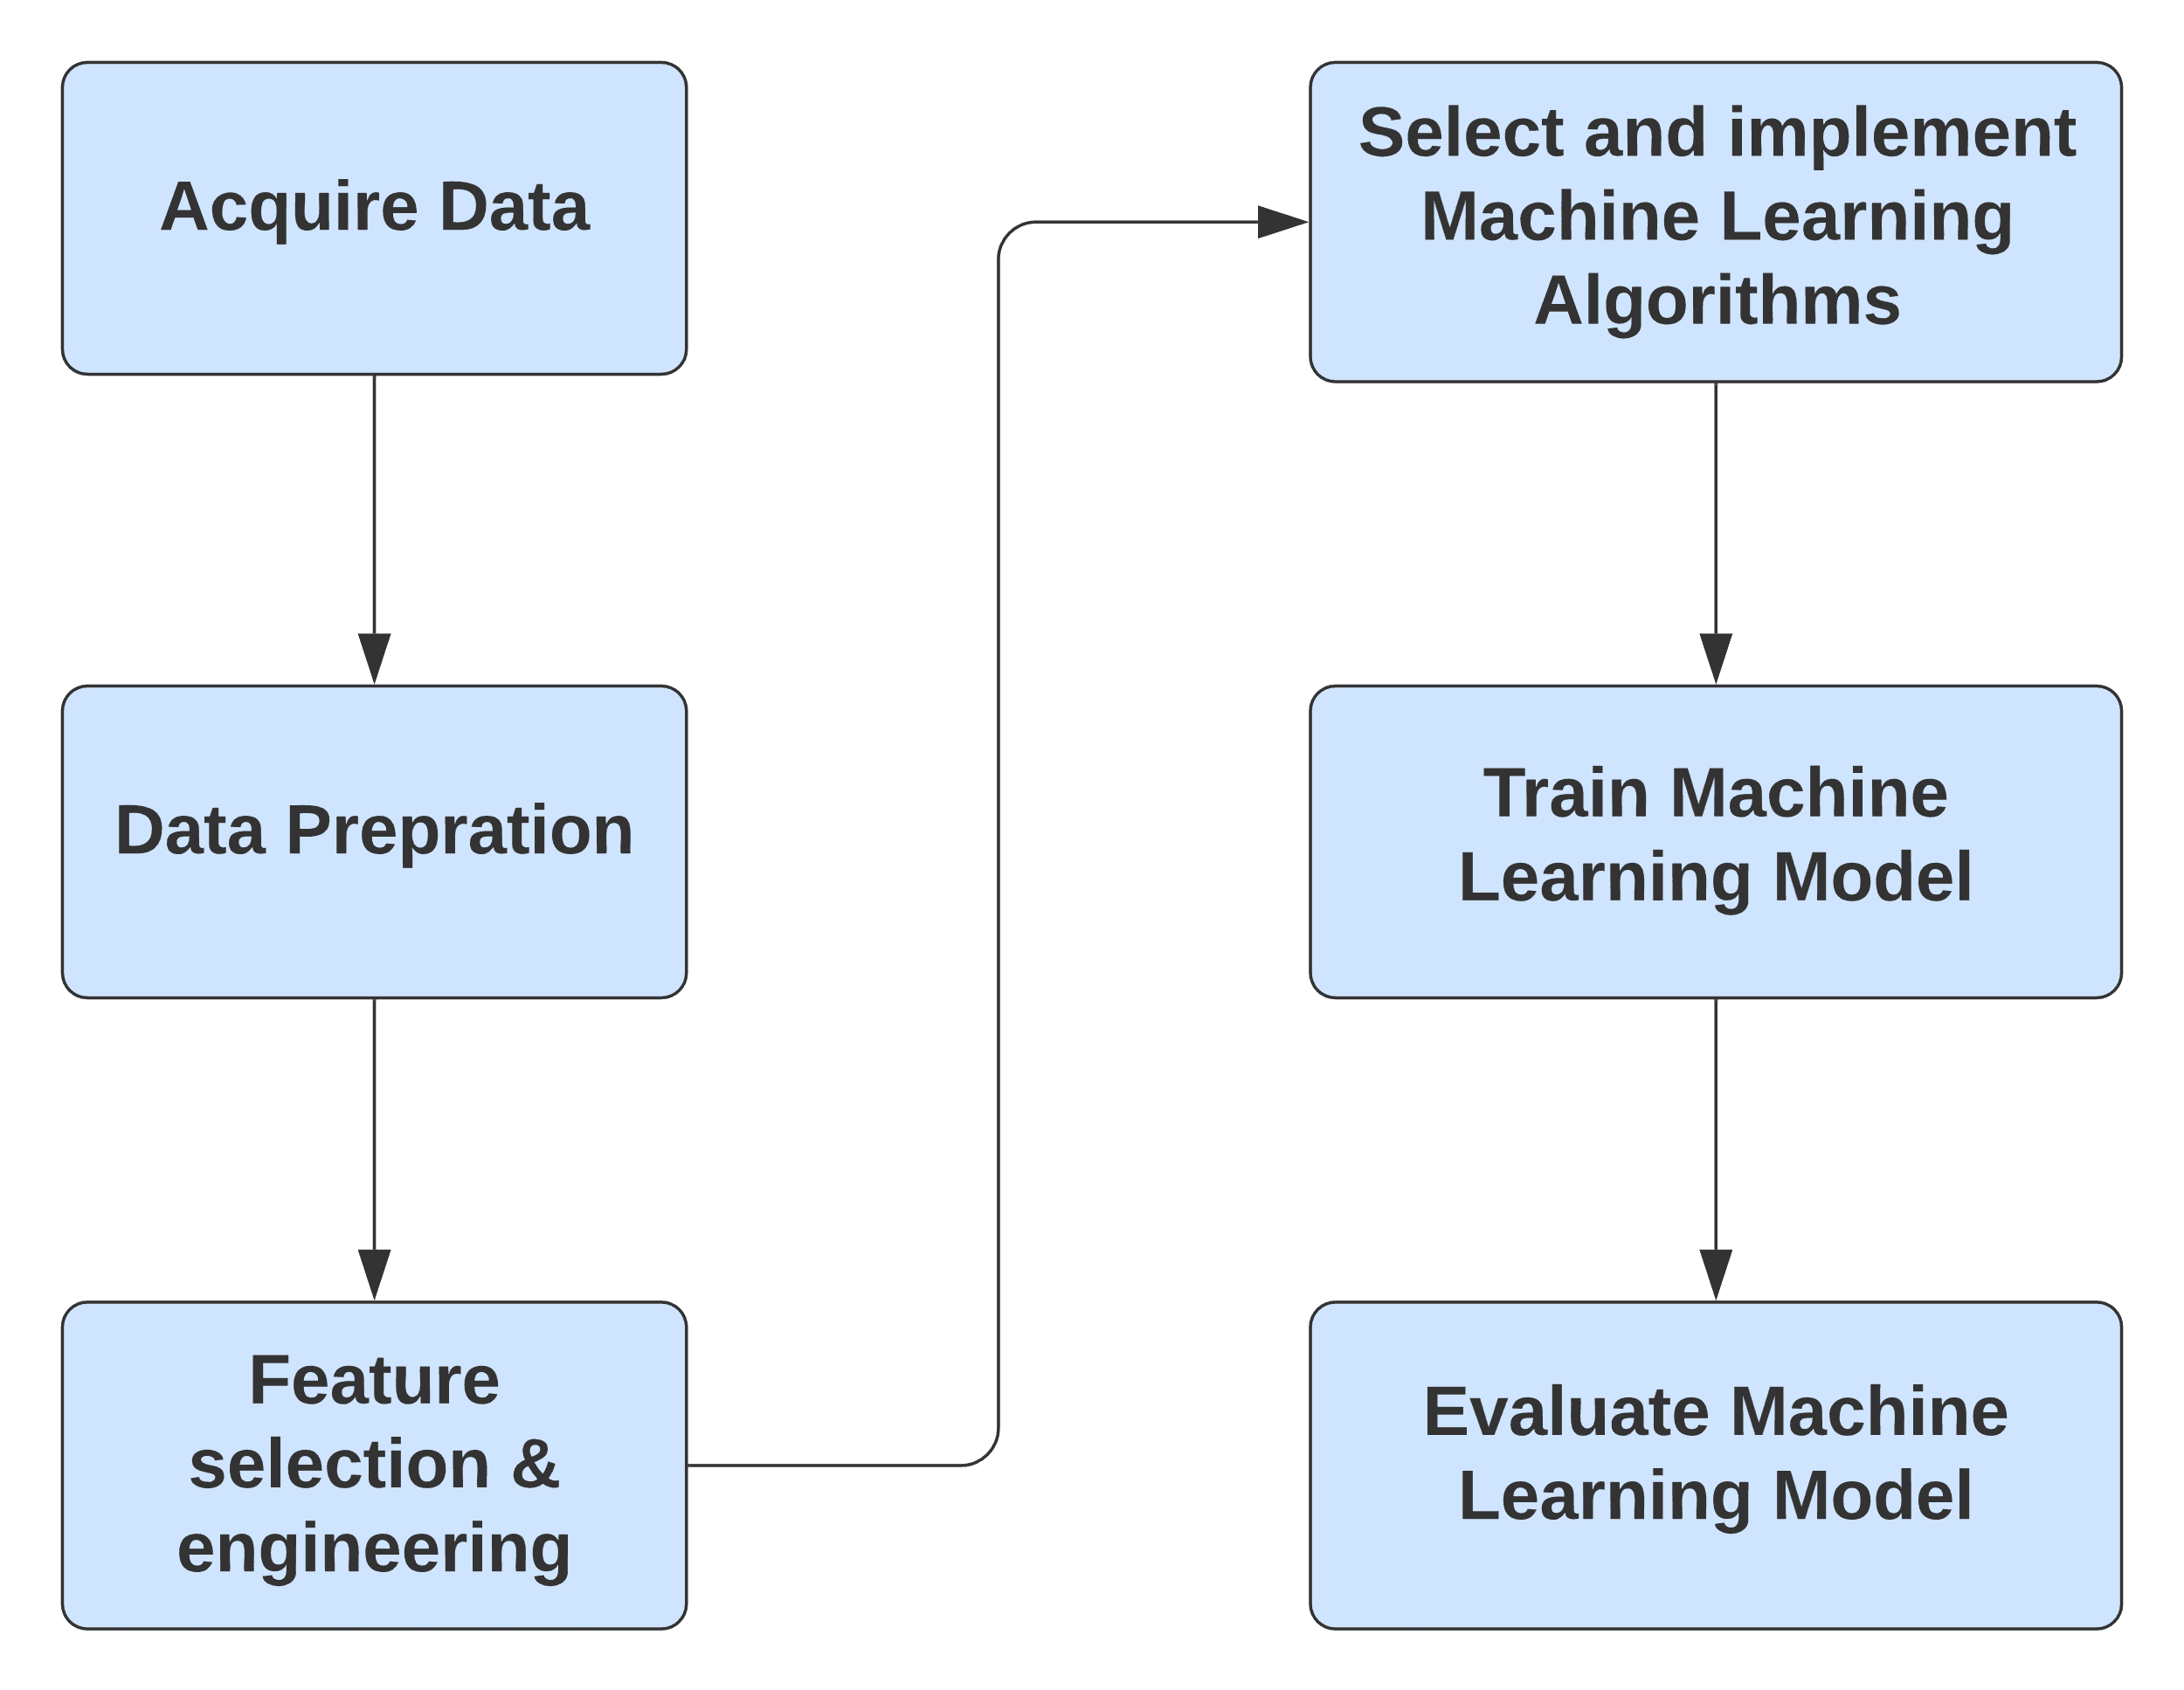
Figure 3. High-Level steps of typical Azure Machine Learning Workflow
The typical high-level design of an Azure Machine Learning Workflow involves the following steps:
- Acquire Data – This is typically the first step for any Machine Learning workflow and involves making the raw data available to the Azure Machine experiment. Azure ML offers several options to gather data including manual data entry, Azure Blob storage, Azure SQL Database, Web URLs, compressed files, etc.
- Data Preparation – Azure ML offers numerous modules to prepare and transform data. It includes tools for filtering, cleaning missing values, adding rows and columns, changing data types, splitting the data set for training and testing, etc.
- Feature Engineering – Azure ML provides various methods for Feature engineering like Filter-based feature selection, Fisher Linear Discriminant Analysis, Permutation Feature Importance, etc.
- Select and implement Machine Learning Algorithms – Azure ML comes with a wide array of built-in Machine Learning Algorithms and options to tune their parameters.
- Train Machine Learning Model – Azure ML provides modules to quickly train and score Machine Learning Models
- Evaluate Machine Learning Models – Azure ML provides modules to easily evaluate the performance of a trained model using industry-standard metrics.
In the rest of this article, we are going to start the process of building an Azure ML example.
Azure Machine Learning workspace setup
Azure Machine Learning workspace is the central hub for all Azure ML artifacts and the repository for storing experiments, logs, etc. This section walks you through the steps of setting up their Azure Machine Learning workspace and upload a demo file in their storage account.
Note: An Azure account with access to the Azure Portal is needed to perform these steps. Please follow this link to learn more about creating your free account with Microsoft Azure.
This first step is designed to help you understand the process of setting up your workspace and upload data to be processed.
- Log into the Azure Portal and click on “Create a resource” > select the “AI + Machine Learning” category > Type “Azure Machine Learning” in the search bar as shown in Figure 5, then select “Azure Machine Learning” from the list of results:
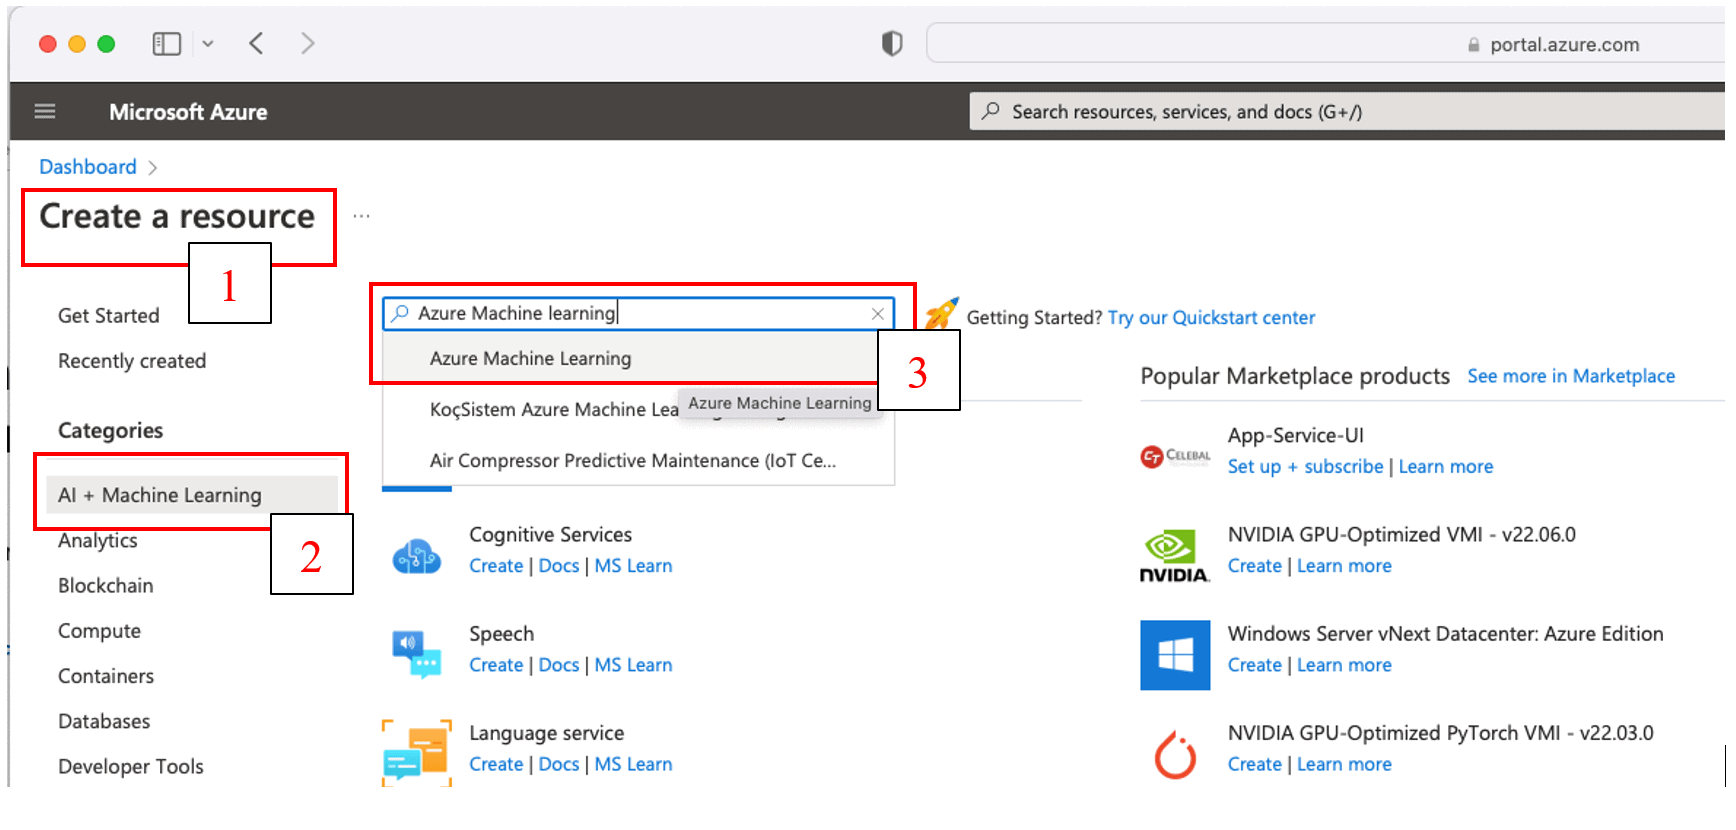
Figure 4. Create the Azure Machine Learning Resource
- This brings up the “Azure Machine Learning” product page with a product overview and tabs for additional details about Plans, Usage Information, Support, and product reviews. Click the ‘Create’ button to launch the machine learning creation wizard, as shown in Figure 5.
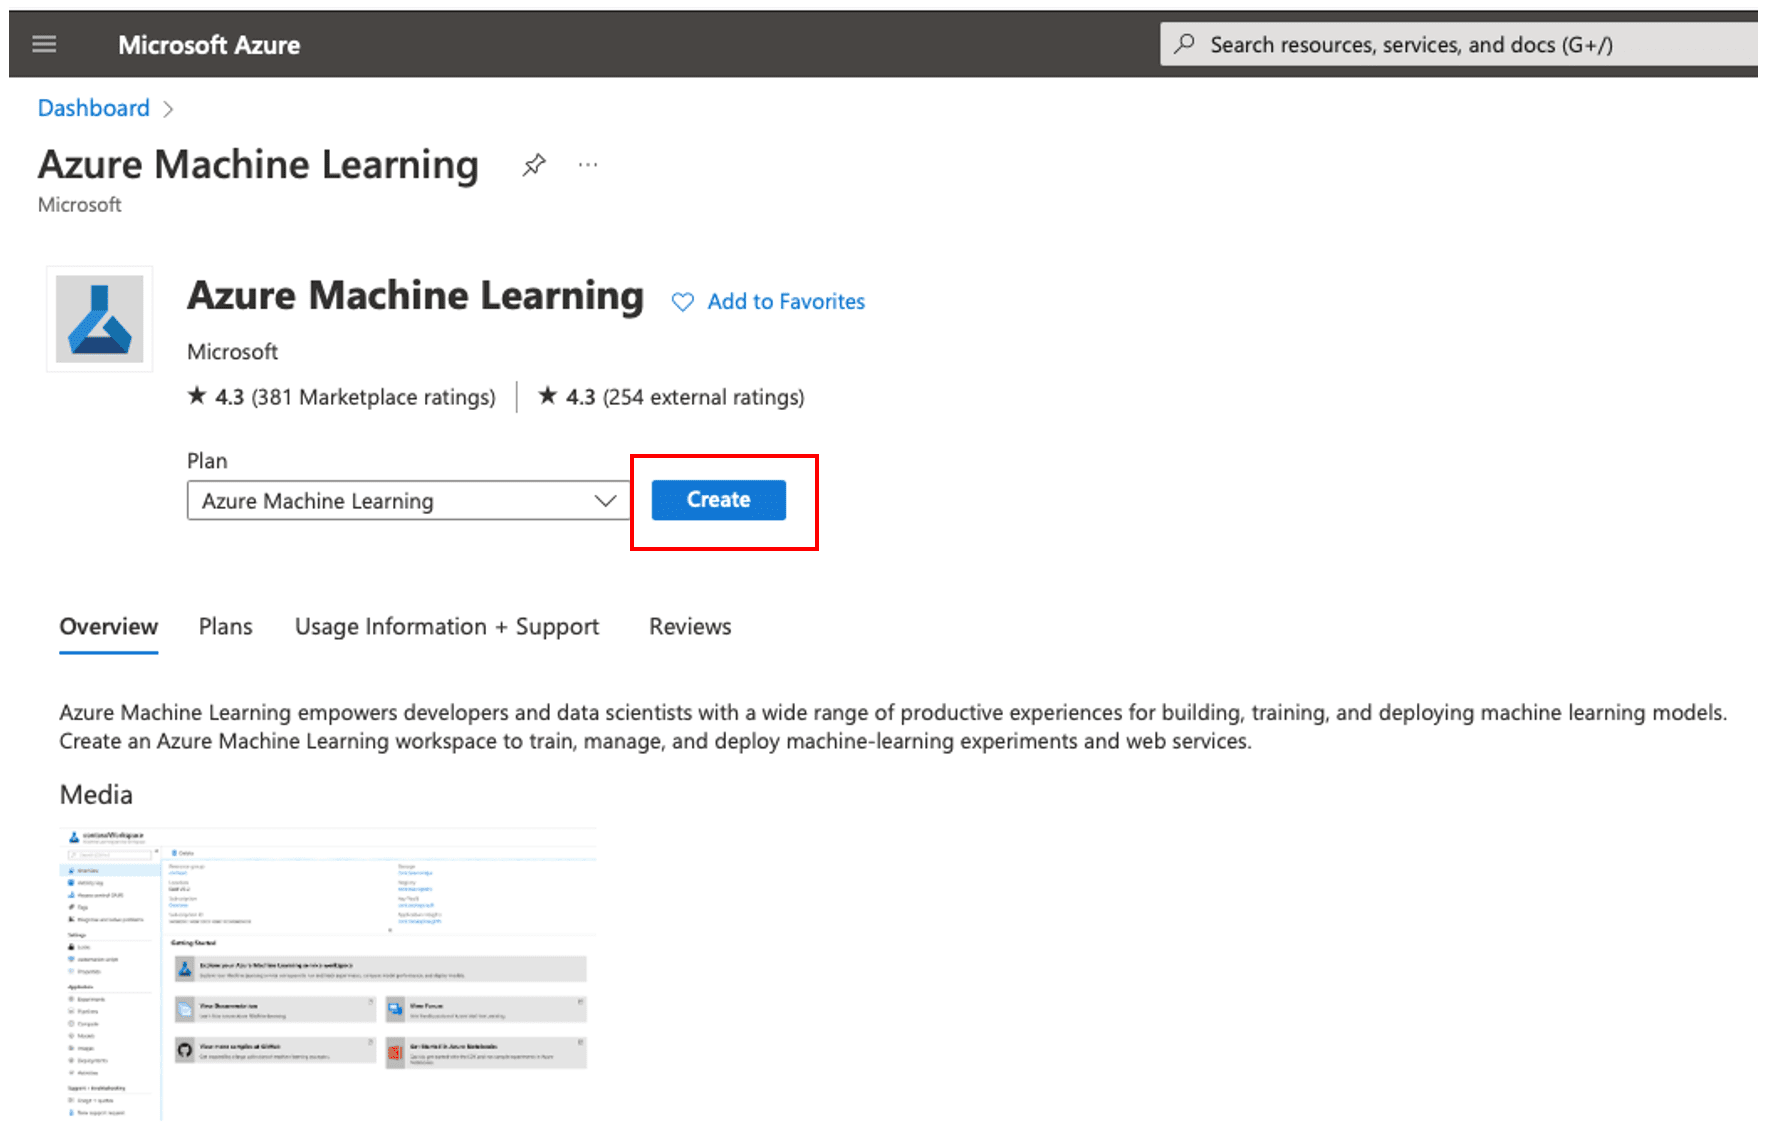
Figure 5. Azure Machine Learning product page
- On the “Basics” tab for the machine learning workspace creation wizard. You can see my choices in Figure 6, but your values will likely vary some. Names are not important if they work. Many of the names will give you a default that will work for the example, especially if you plan to delete everything after following along with the article.
- Select your “Subscription” from the dropdown list.
- Select your “Resource group” from the dropdown list (You can also opt to create a new resource group using the “create new” option under this field)
- Enter the “Workspace name” you like to create (Please follow the prompts for naming rules)
- Select “Region” for your workspace from the dropdown list.
- Enter the name for your “Storage account” (or create a new one. Please follow prompts for naming rules)
- Enter the name for your “Key vault” (or create a new one. Please follow the prompts for naming rules)
- Enter the name for your “Application insights” (or create a new one. Please follow the prompts for naming rules)
- Enter the name for your “Container registry” (or create a new one. Please follow the prompts for naming rules)
- Then click the ‘Review + create’ button, which runs validation on your entries.
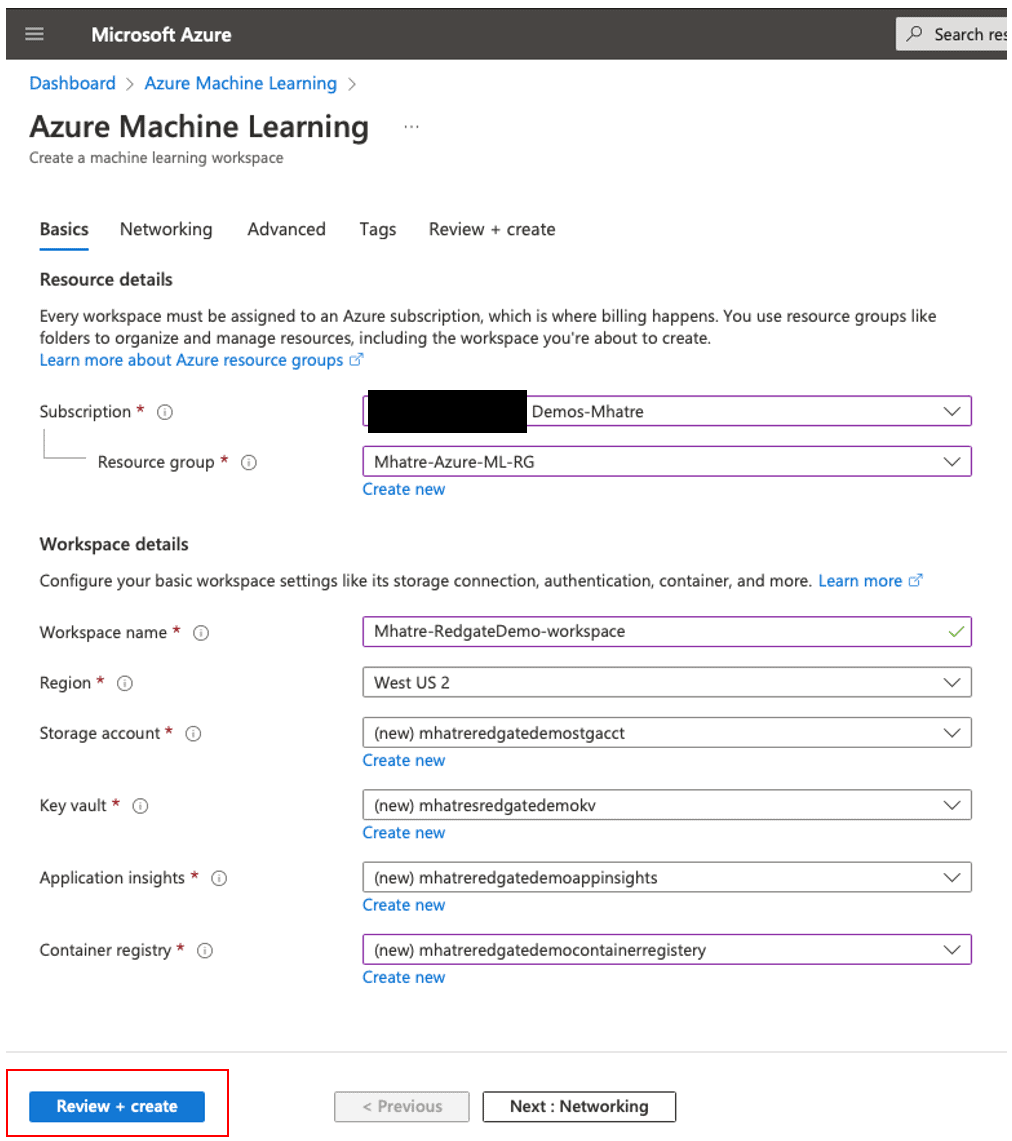
Figure 6. Create Machine Learning workspace
- In Figure 7, after validation has passed, you will be presented with a summary of your entries for review. Click the ‘Create’ button.
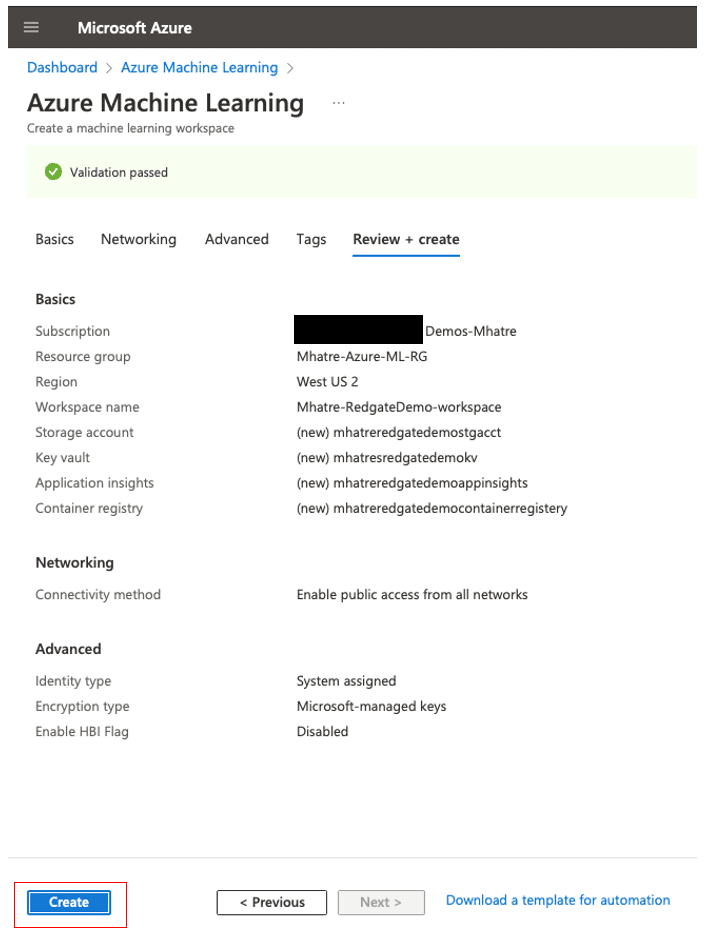
Figure 7. Review entries and create machine learning workspace
- This initiates a deployment to create your machine-learning workspace. Once your deployment is complete (typical run time is under one minute, but it may take a few minutes), Azure will take you to the deployment overview screen, as shown in Figure 8.
Please review this page to confirm the green check mark against all Resources and the Status “OK”
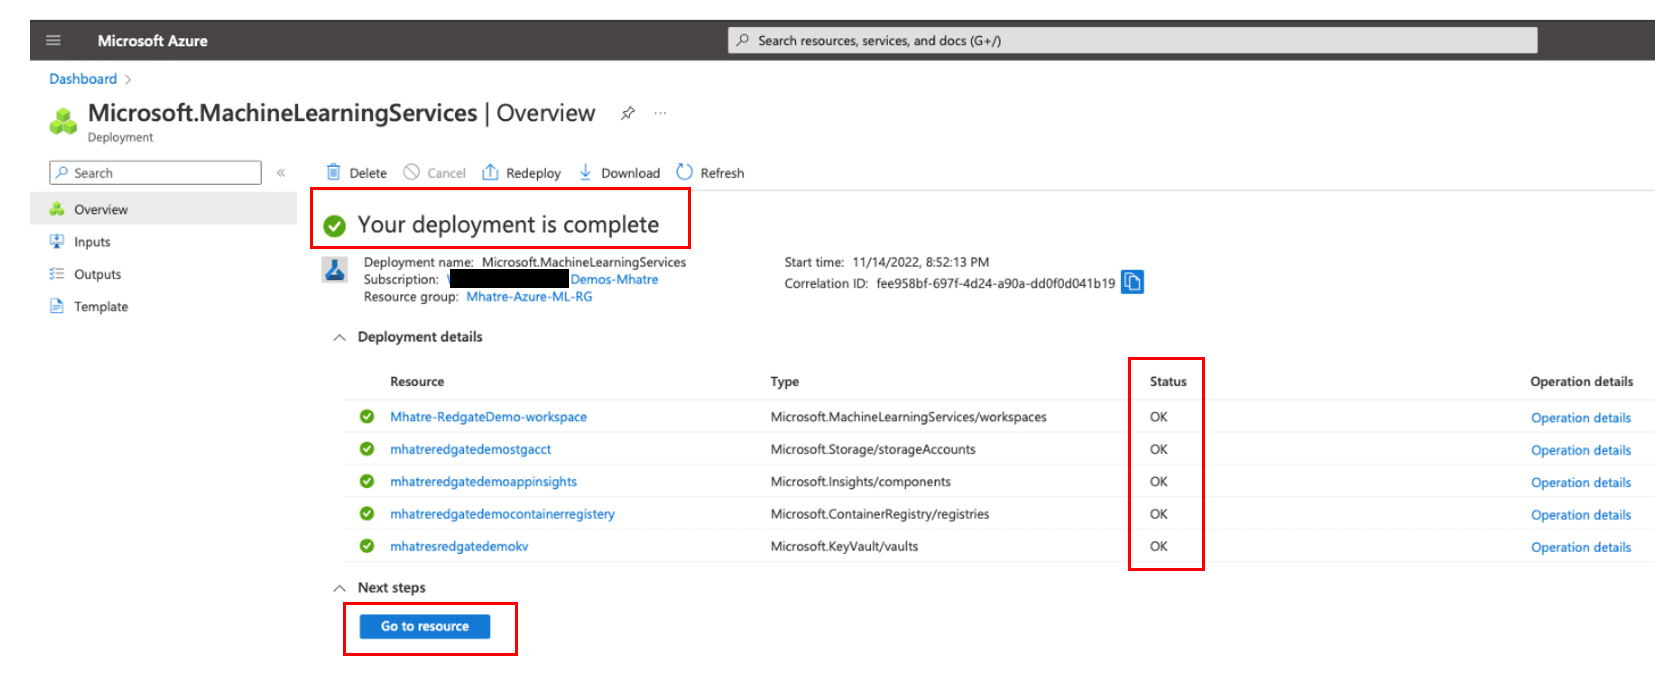
Figure 8. Azure Machine Learning workspace deployment status
Click on the “Go to resource” button to navigate to your newly created machine learning workspace. This section will familiarize readers with the newly created machine-learning workspace. Figure 9 shows the screen that should follow, with the values that match your choices.
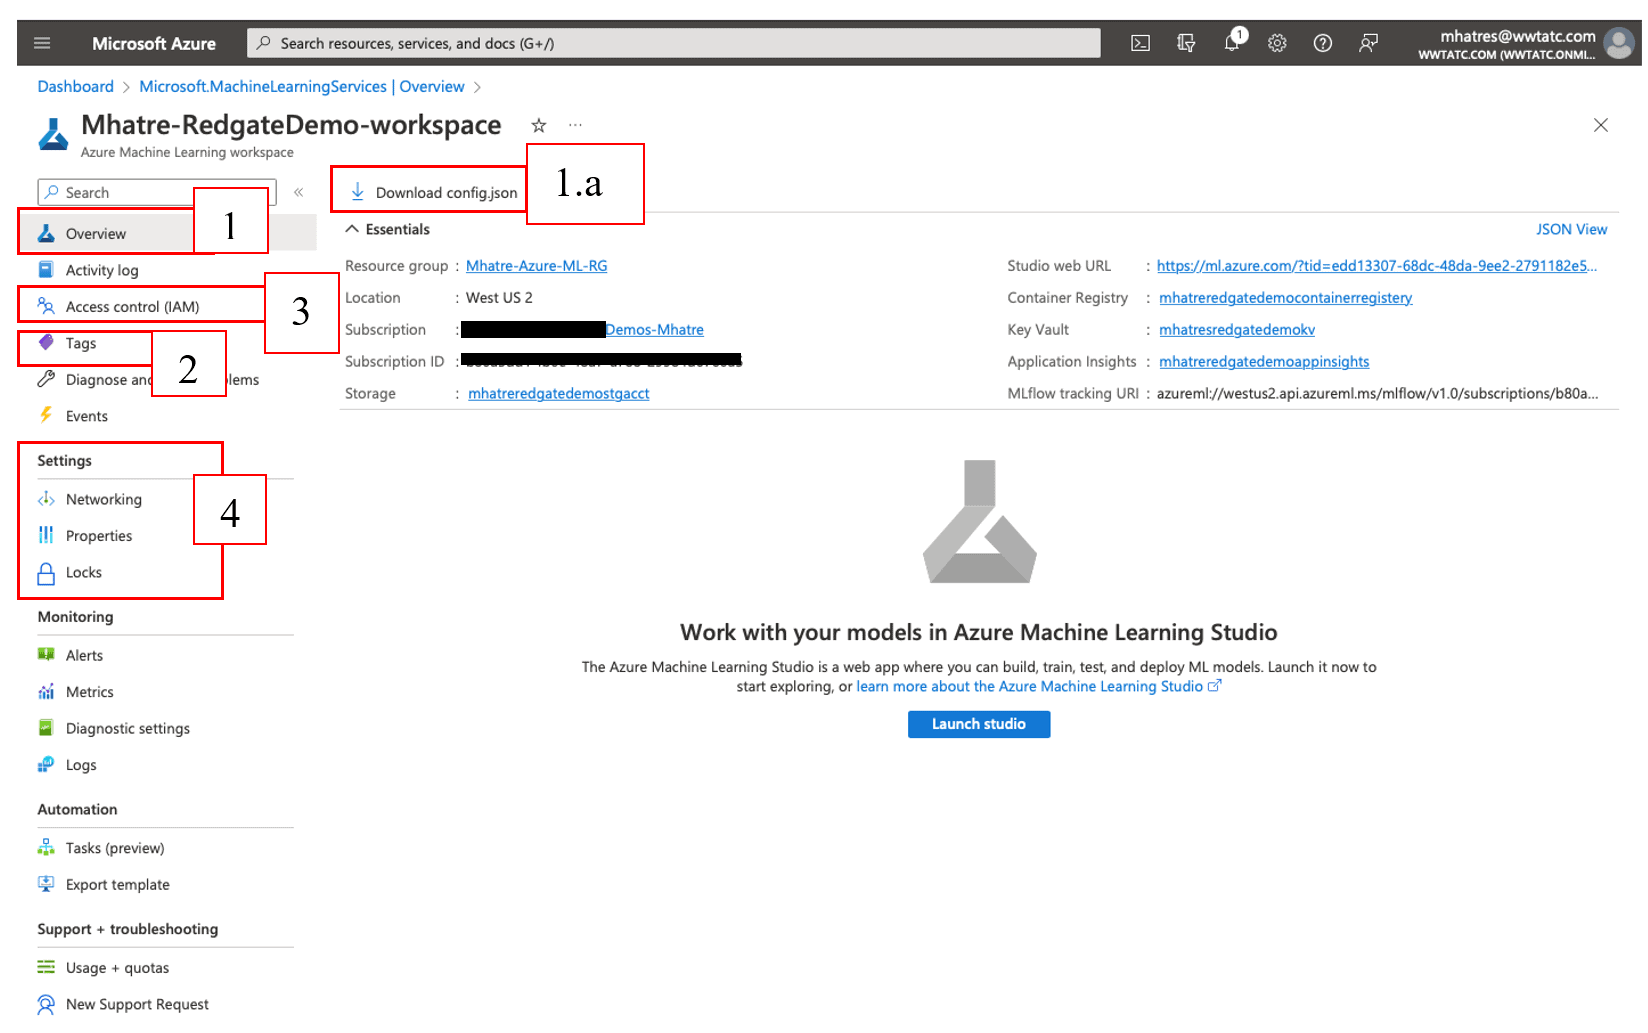
Figure 9. Azure Machine Learning workspace overview
- The “Overview” section gives basic details of the Machine Learning workspace. The “Studio web URL” or “Launch studio” button is used to launch the Azure ML Studio
- The “Download config.json” button downloads a file containing workspace configuration details, for use in Python scripts or Azure ML SDK notebooks that are outside of your workspace. This is used to connect to the workspace from any laptop or desktop.
- The “Tags” menu is used to create, update, and delete tags associated with your workspace. Tags help organize, identify, and maintain azure resources based on your company’s needs like grouping by department, application, functionality, purpose, etc.
- “Access Control (IAM)” has options to manage access for other users/groups to the workspace, defining various access levels via roles and assigning roles to users/groups. In addition to granting access to users/groups, you can block individual users or entire groups from accessing your workspace with “Deny”. Such fine-grain access controls help implement complex scenarios like “all members of the team except the quality assurance tester, should have direct access to the team’s workspace”.
- The “Settings” menu has
- “Networking” option for enabling/disabling public network access to your workspace, and configuring “private endpoint connections”
- The “Properties” option listing out all details of the workspace.
- “Locks” option to configure workspace as “Read-only” or blocking users from “Delete” action
- The remaining menu options include “Monitoring and alerts”, “Automation” and “Support and troubleshooting”.
Let’s upload a test data file into the storage account (I will use it to create a Datastore). Navigate to the Azure Portal’s left side Main menu > Storage accounts > mhatreredgatedemostgacct > Containers, to review the list of existing blob storage containers.
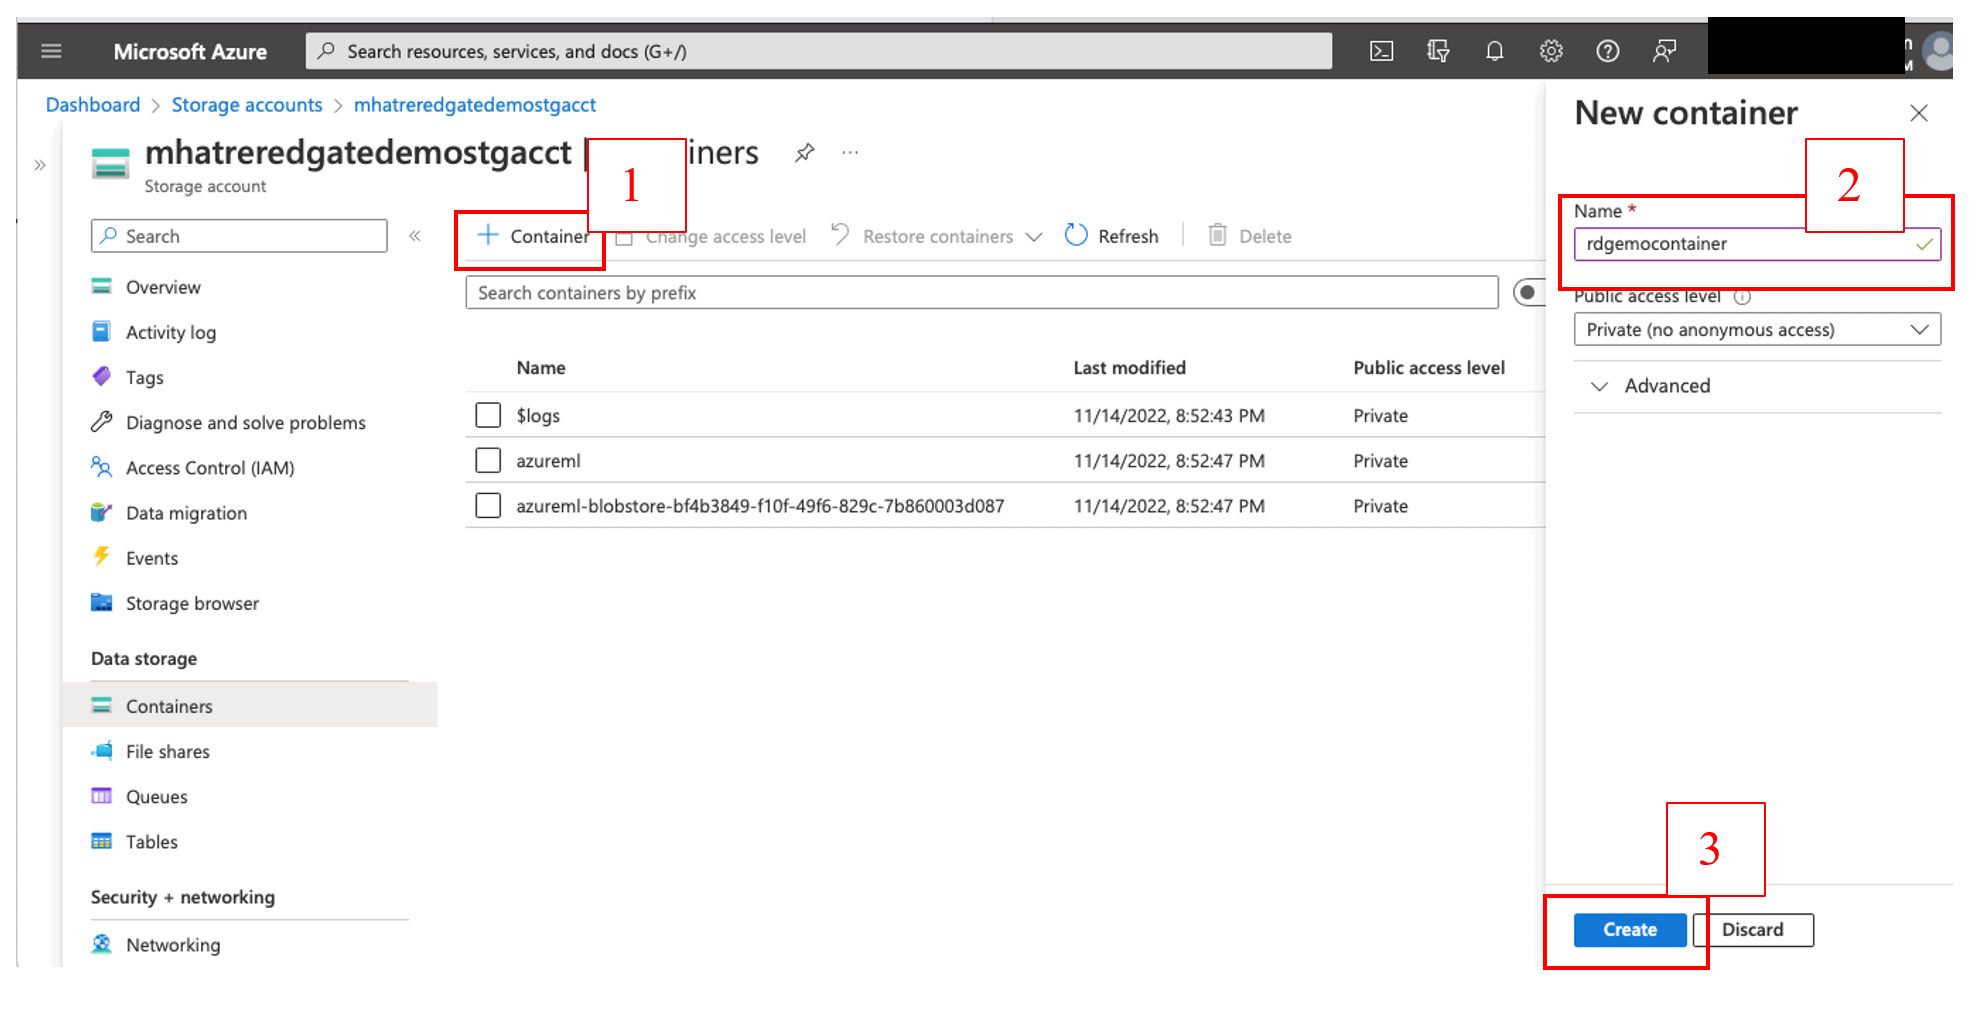
Figure 10. Create a new Blob storage container
As shown in Figure 10, click the ‘+ Container’ button on the top left > Enter a unique name in the Name text box for the new container > click the ‘Create’ button. Once the new container is created and shows up under the container list, click to open it.
Download the “datastore_text.txt” file from my GitHub repository using this URL and upload it to this container as shown in Figure 11. Note that the file is very small and just contains one record.

Figure 11. Upload text file to the Azure blob storage container
After the file upload completes, navigate back to the storage account (I will use this file in a subsequent step to create the data asset).
Navigate the left side menu of the storage account, to “Access keys” under the “Security +” networking section as shown in Figure 12. Access keys can be used to authenticate your application’s requests to this storage account. Copy one of the keys, to use in the subsequent step to create the Datastore.
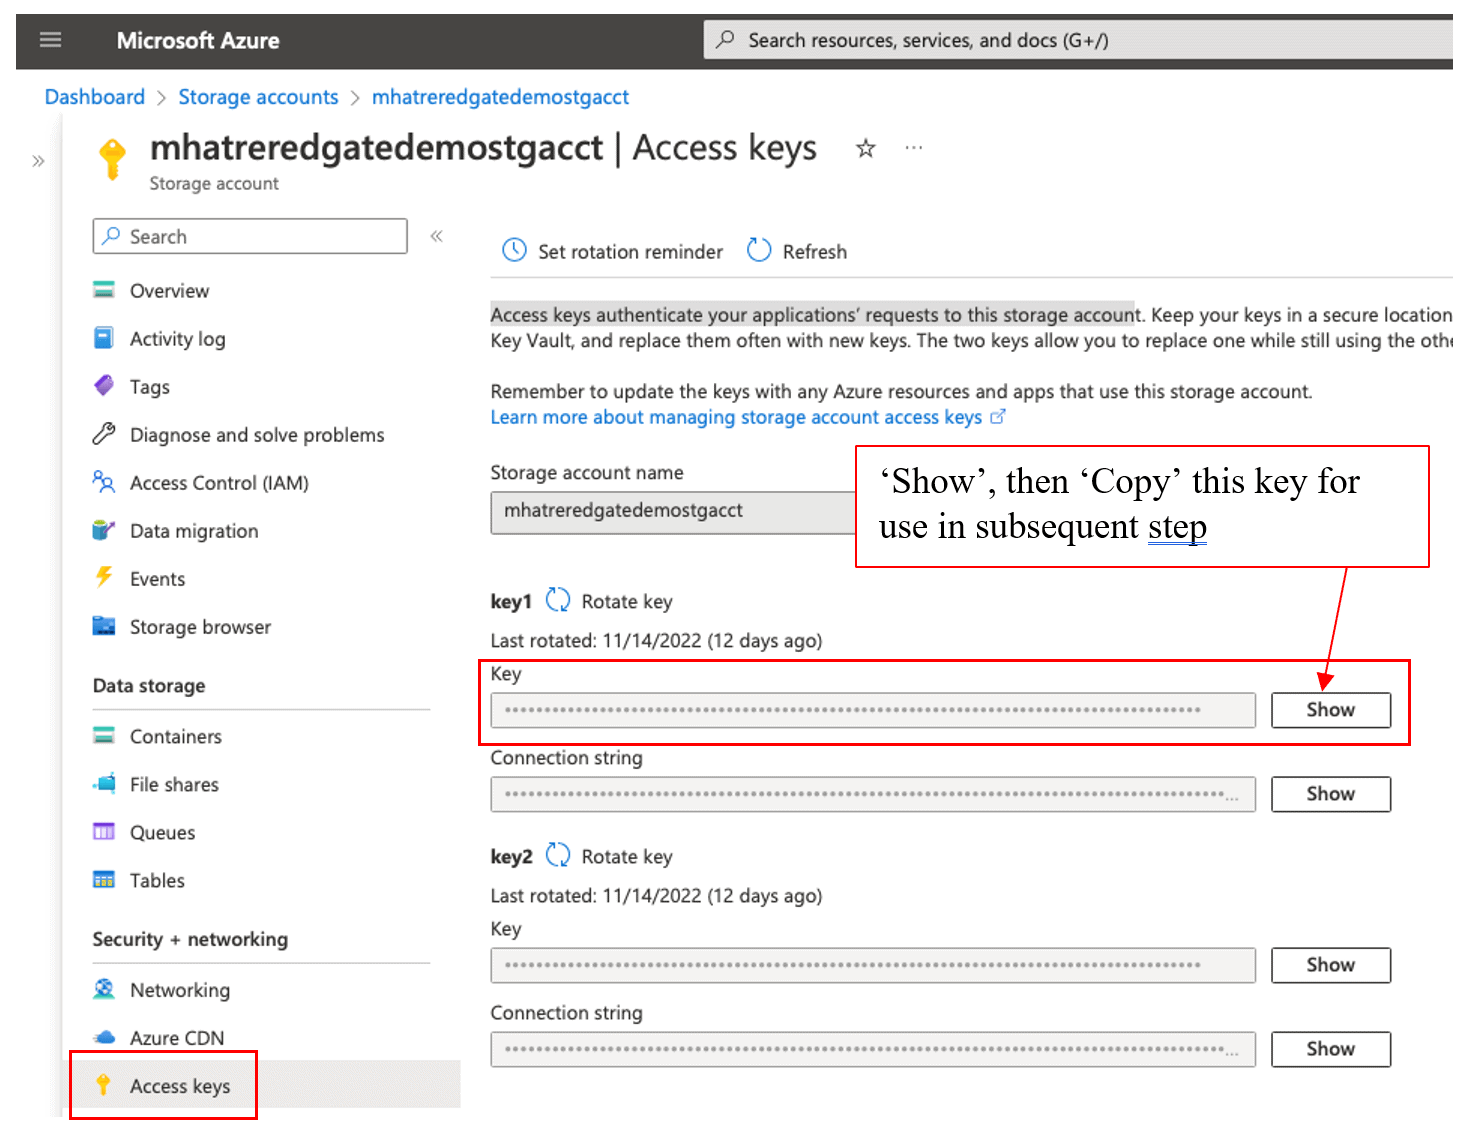
Figure 12. Copy the Storage account access key
Azure Machine Learning Studio
Azure ML Studio (the successor of Machine Learning Studio classic) is the pivotal platform for most machine learning tasks in Azure. This powerful platform enables a wide gamut of machine learning professionals with varying levels of skills and preferences, to work with a range of no-code to extensive-coding options.

Figure 13. Launch Azure Machine Learning Studio
Click on the ‘Launch Studio’ button to open the Azure ML Studio as shown in Figure 13 (Note: you may be prompted to log in again as you are going to a different tool in a different window.) This opens the tool as shown in Figure 14.
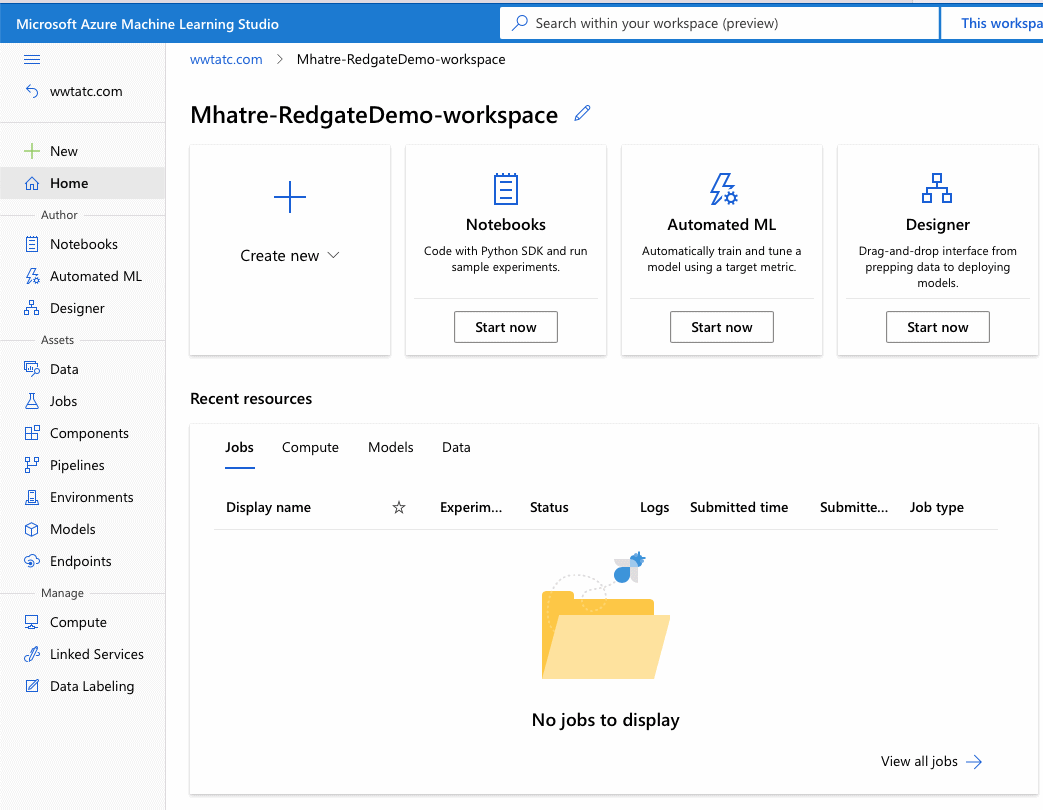
Figure 14. Azure Machine Learning Studio
The left side menu consists of three key sections: Author, Assets, and Manage
The “Author” section is geared towards creators of Machine learning pipelines and currently offers three authoring experiences.
- “Notebooks” is the code-first experience popular with seasoned machine learning professionals who are comfortable coding with Python. The notebooks created here are stored in the default storage account associated with the workspace. The notebook user interface experience is fully integrated within Azure ML studio. Azure offers numerous tutorials and samples to help accelerate model development
- “Designer” is the Drag and Drop tool for creating and deploying machine learning models. The Graphical User Interface look and feel is comparable to Azure Data Factory studio. Experiments are created using pipelines in the designer interface, which offers a wide array of pre-built and configurable components for numerous tasks.
- “Automated ML” is the no-code approach to building machine learning models. It takes dataset, problem class, evaluation metric, and prediction target as inputs and automatically performs steps of data preprocessing, feature selection and engineering, algorithm selection, model training, testing, and hyper-parameter tuning. A machine learning professional can review the performance of various models trained through this process and directly deploy the best one.
- The “Assets” section enables machine learning professionals to create, customize and manage the numerous assets generated during the authoring process.
- The “Data” sub-section is used to register and manage Datastores. Datastores enable a secure connection to storage services on Azure by storing the connection information, thus eliminating the need to provide credentials in scripts for data access. The “Dataset monitor” feature (currently in preview when this article was published) can be configured to detect data drift between training and inference data.
- The “Jobs” sub-section is used to create new experiments, or run sample experiments with Notebooks and with code using the Python SDK
- “Components” are the basic building blocks used to perform a given task like data processing, model training, scoring, etc. They have predefined input/output ports, parameters, and environments that can be shared and reused in multiple pipelines. This sub-section enables machine learning professionals to register code from GitHub, Azure DevOps, or local files to create shareable components that can be used as building blocks for several machine learning projects.
- Pipelines authored using the designer can be viewed and orchestrated via the “Pipelines” sub-section. The “Pipeline jobs” tab shows details of the pipeline run, while the “Pipeline drafts” tab list pipelines that have never run so far. When Azure ML pipelines are published as a REST endpoint (for parameterized reuse or invoking jobs from external systems), they are listed under the “Pipeline endpoints” tab.
- Environments specify the Docker image, Python packages, and software settings for executing your training and scoring scripts. They are managed and versioned entities that enable reproducible, auditable, and portable machine-learning workflows across different compute targets. The “Environments” sub-section contains a list of “curated environments”, and an option for machine learning professionals to create their own user-defined “custom environments”. Curated environments are predefined environments that offer good starting points for building your environments. Curated environments are backed by cached Docker images, providing a reduced run preparation cost. Custom environments are user-defined environments created from a Docker image, a Docker build context, and a conda specification with a Docker image.
- The “Models” sub-section enables machine learning professionals to create, manage and track their registered models. The model registry provides useful features like version tracking and metadata tagging. All models created under the workspace are listed here
- Azure Machine Learning “Endpoints” empower machine learning professionals to deploy machine learning models as web services.
- Real-time endpoints are endpoints that are used for real-time inferencing. Real-time endpoints contain deployments ready to receive data from clients and send responses back in real time. They are listed under the “Real-time endpoints” tab.
- Batch endpoints are used to run inference on large volumes of data in batch processing mode that could run for long durations. They take pointers to data and run batch jobs asynchronously to distribute the workload on compute clusters. Their outputs can be stored for further analysis in a data store. Batch endpoints are listed under the “batch endpoints” tab.
- The “Manage” section is equipped with options for creating and managing Compute, connecting with external Linked Services, and managing the labelling of data sets.
- Machine learning professionals use the “compute” sub-section to create and manage various types of compute targets like “compute instances”, “compute clusters” and “Inference clusters”. The “Attached computes” tab allows machine learning professionals to bring their own compute like HDInsight clusters, Virtual machines, Databricks clusters, etc. to use as compute targets in the Azure Machine Learning workspace.
- “Linked Services” is a collection of external (cloud services that are outside of the Azure ML workspace) Azure services that can connect with the Azure Machine learning workspace. The guided integrations experience for linked services is currently in preview.
- The “Data Labeling” sub-section helps machine learning professionals to create, scale, and manage labeling efforts for projects involving image classification, object identification, text classification, and text Named Entity Recognition. Its “ML Assist” feature improves the speed and accuracy of labeling large datasets by leveraging the power of machine learning.
Azure Machine Learning Datastore and Data asset
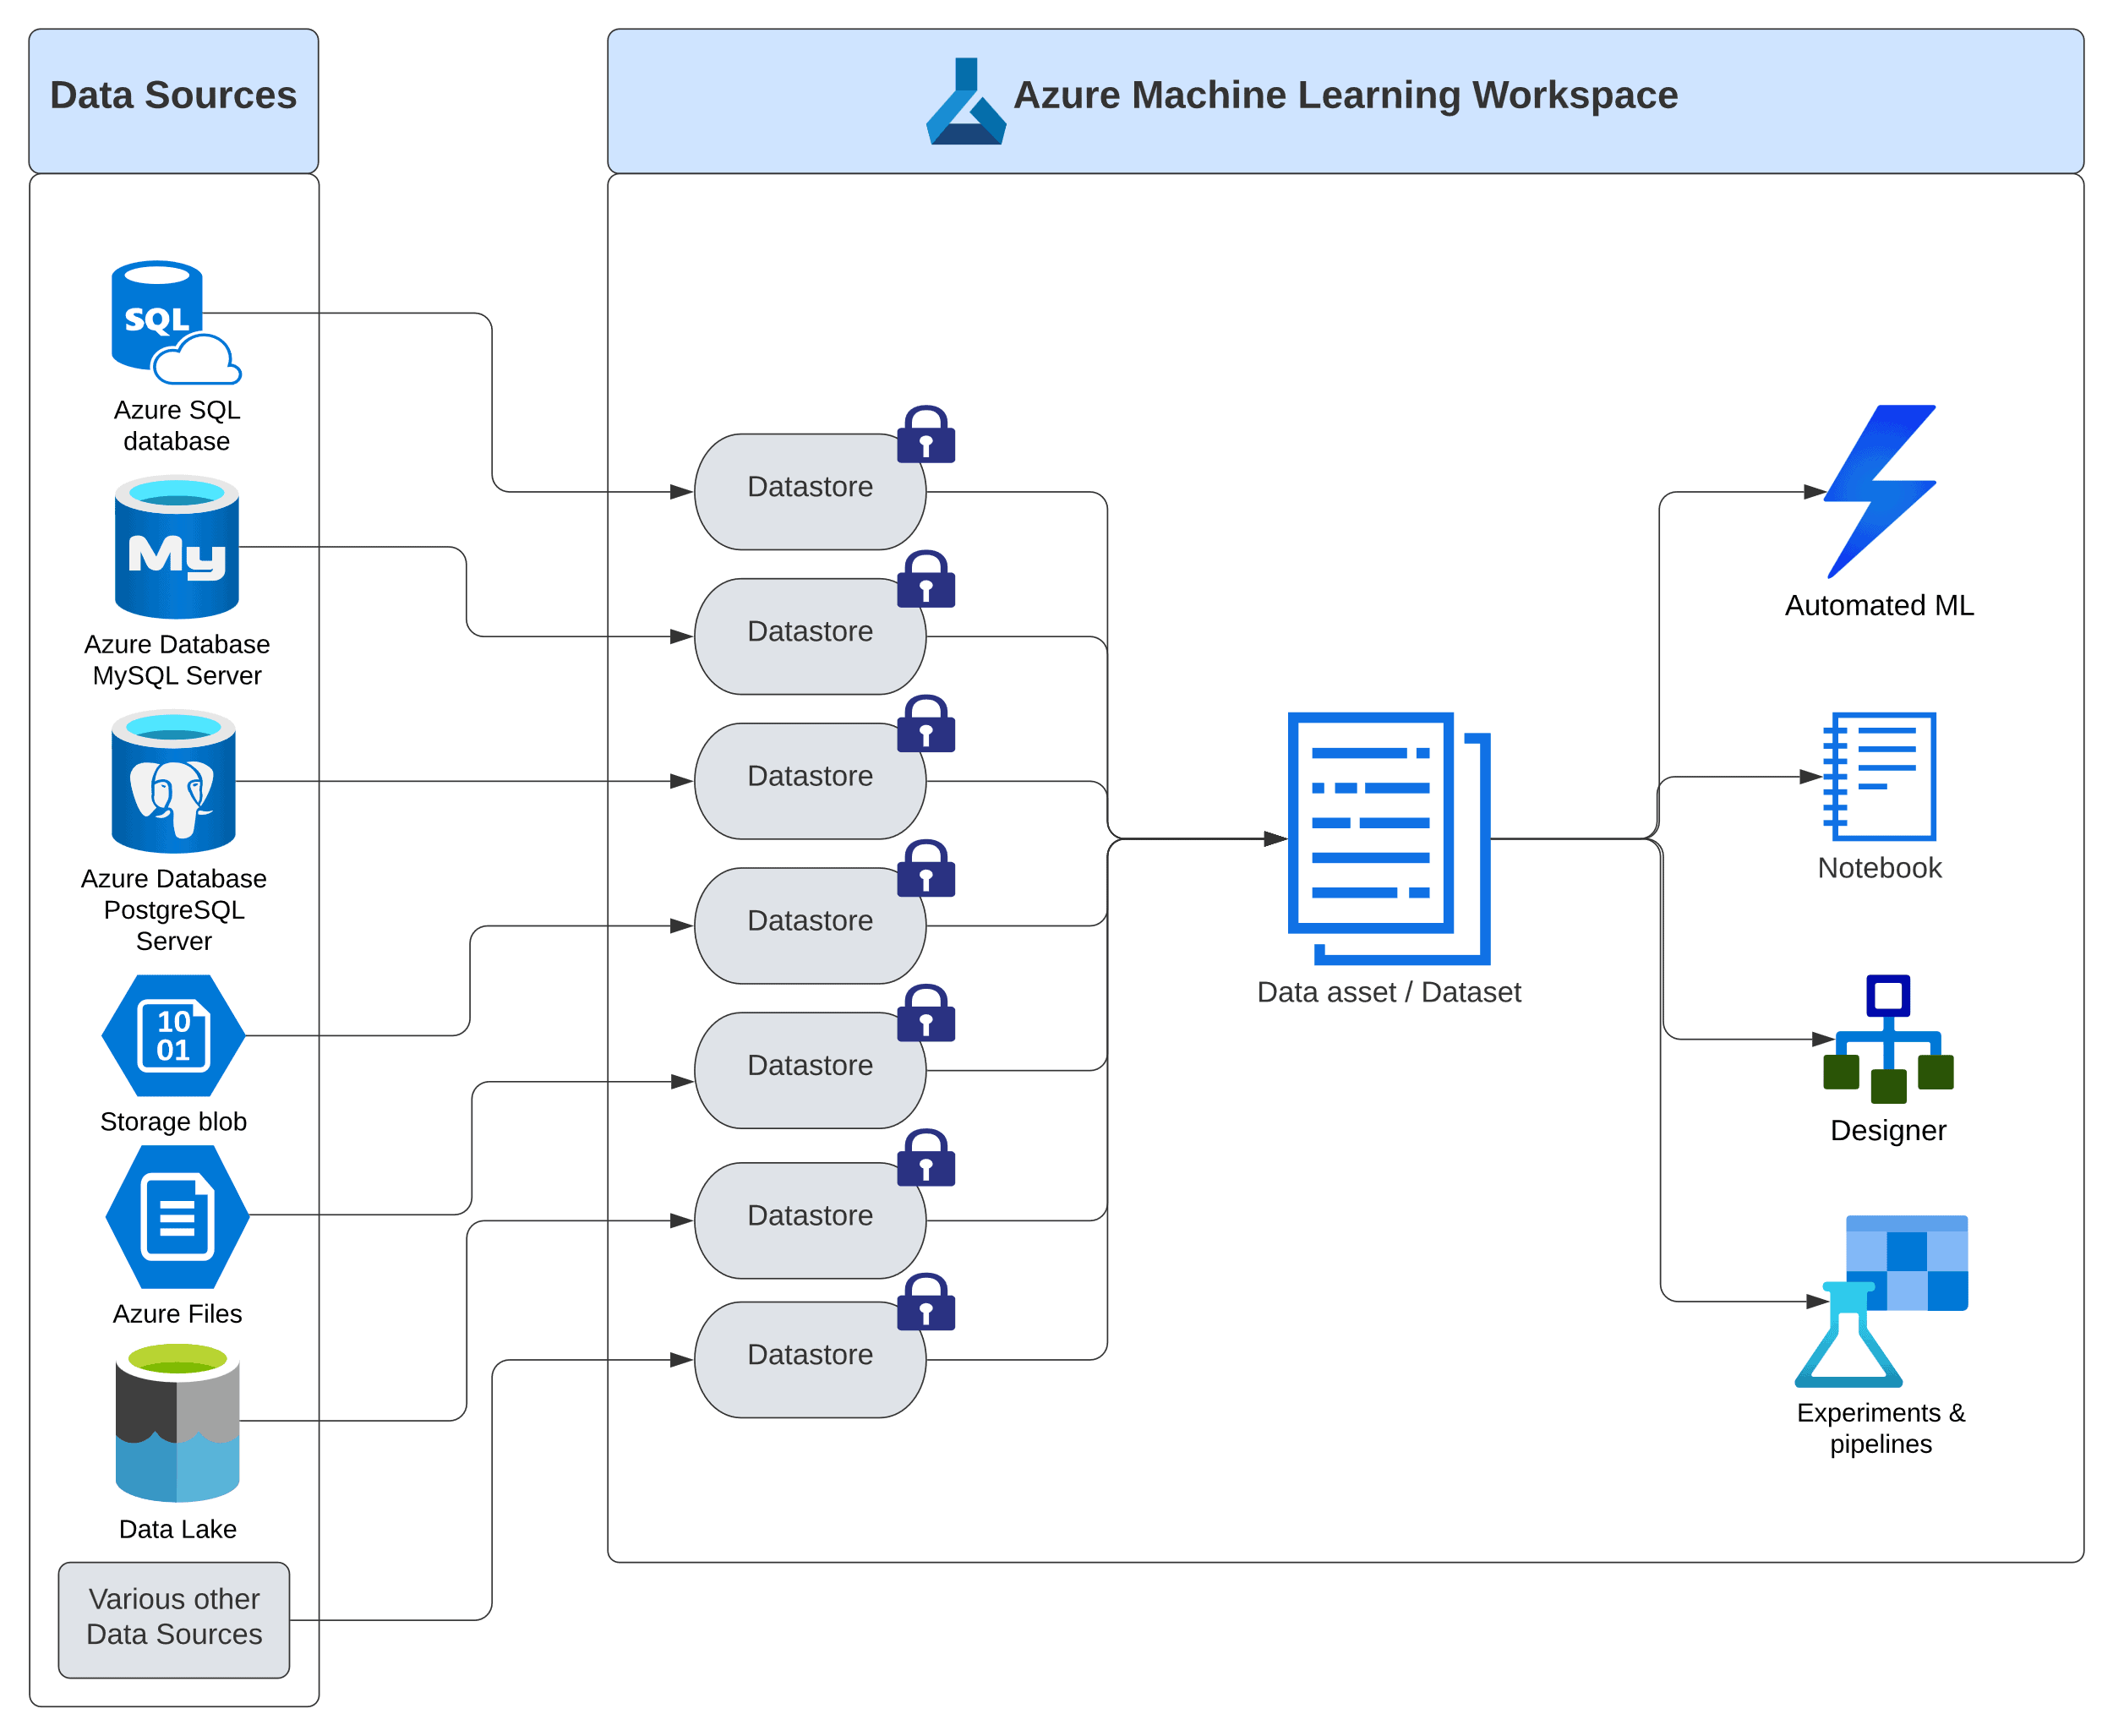
Figure 15. Azure Machine Learning Datastores and Data assets (Datasets)
Data Asset and Datastore are the two key components in Azure ML workspace, to connect the actual sources of data with the machine learning authoring tools. Figure 15 shows how Data Asset encompasses a logical representation of the actual sources of data, while the Datastore safeguards the connection details to the actual sources of data by keeping the credentials in a separate secure location (represented by the lock icon)
“Data asset” (also known as a dataset) in Azure Machine Learning studio is a reference to the collection of related data sources, used in various authoring mechanisms like Automated ML, Notebooks, Designer, and Experiments. The data referenced in any Data asset can come from a wide variety of Data Sources like local or web files, Azure blob storage and datastores, Azure Open Datasets, Azure Data Lake, numerous cloud databases, and an array of other data sources.
“Datastore” in Azure Machine Learning facilitates the connection between Data assets and the various sources of data, by securely storing the connection and authentication information. With Datastores in the picture, machine learning professionals no longer need to provide credentials and data source connection details in their scripts, pipelines, or any other authoring tools.
Azure best practices recommend storing business data in a separate storage account to store, manage, secure, and access control it separately from workspace data. However, for the simplicity of demonstrations in these articles, I am using the same storage account “mhatreredgatedemostgacct” for storing my demo files.
In Azure Machine Learning Studio, navigate to Data > Datastores as seen in Figure 16.
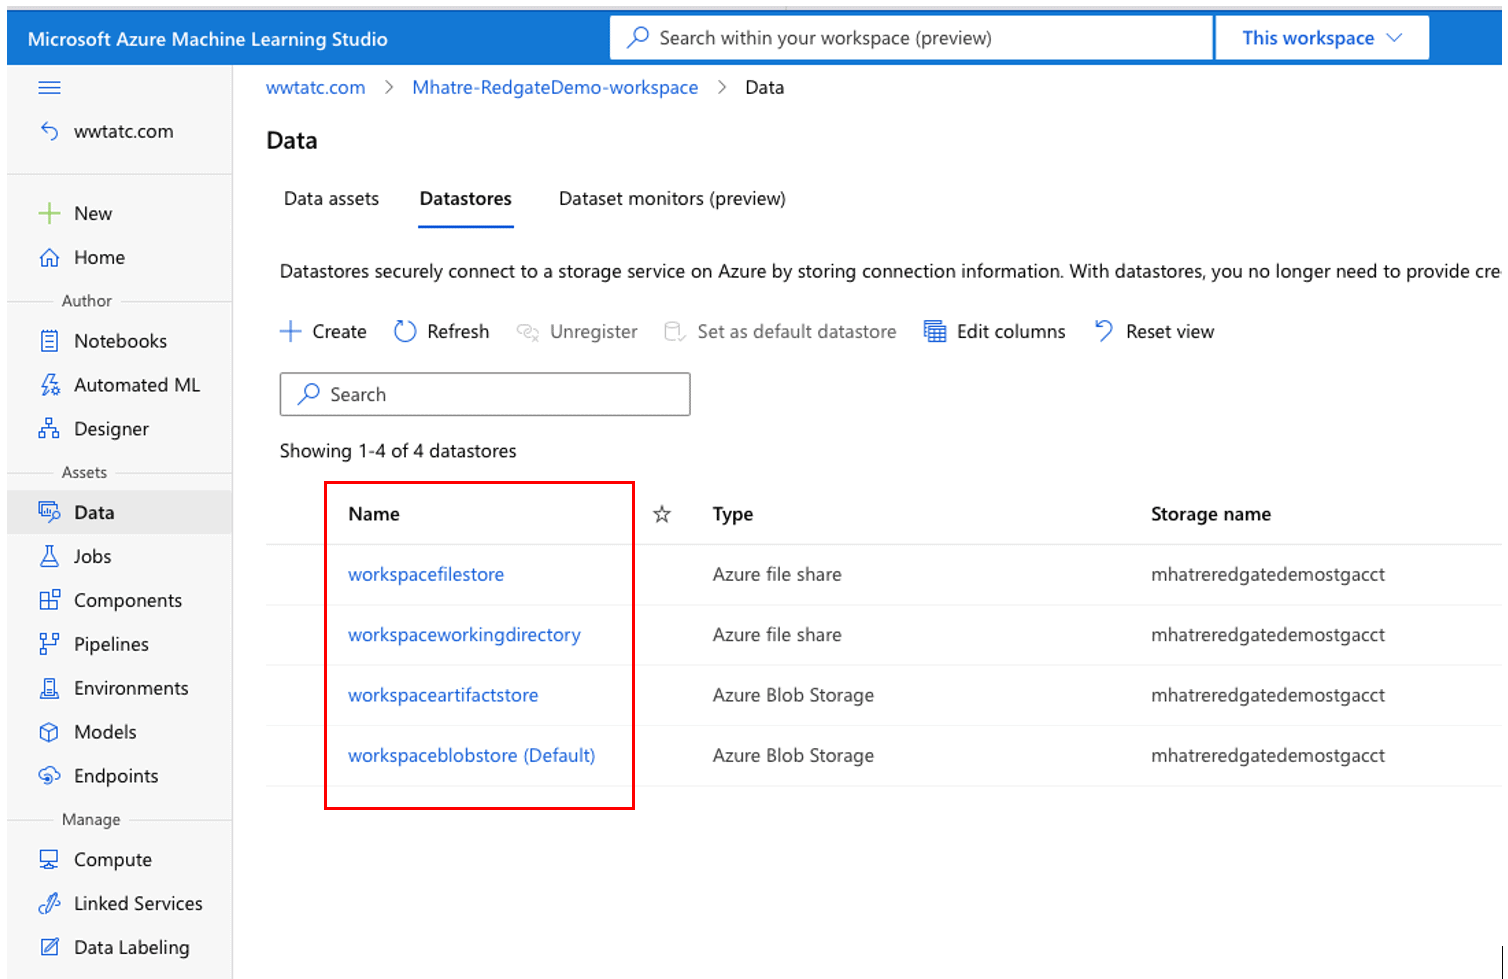
Figure 16. Azure Machine Learning Datastores list
The Azure Machine Learning workspace has a default Azure Blob Storage Datastore “woekspaceblobstorage(Default)” for temporarily saving various files generated during the authoring process. Three other Datastores “workspacefilestore”, “workspaceworkingdirectory” and “workspaceartifactstore” found in the Storage Account are set up as part of creating the workspace. Click on each one of them to reveal details such as storage account name, Storage URI and creation date.
To create a new datastore and link it to the blob storage container created previously, click on the ‘+ Create’ button as shown in Figure 17.
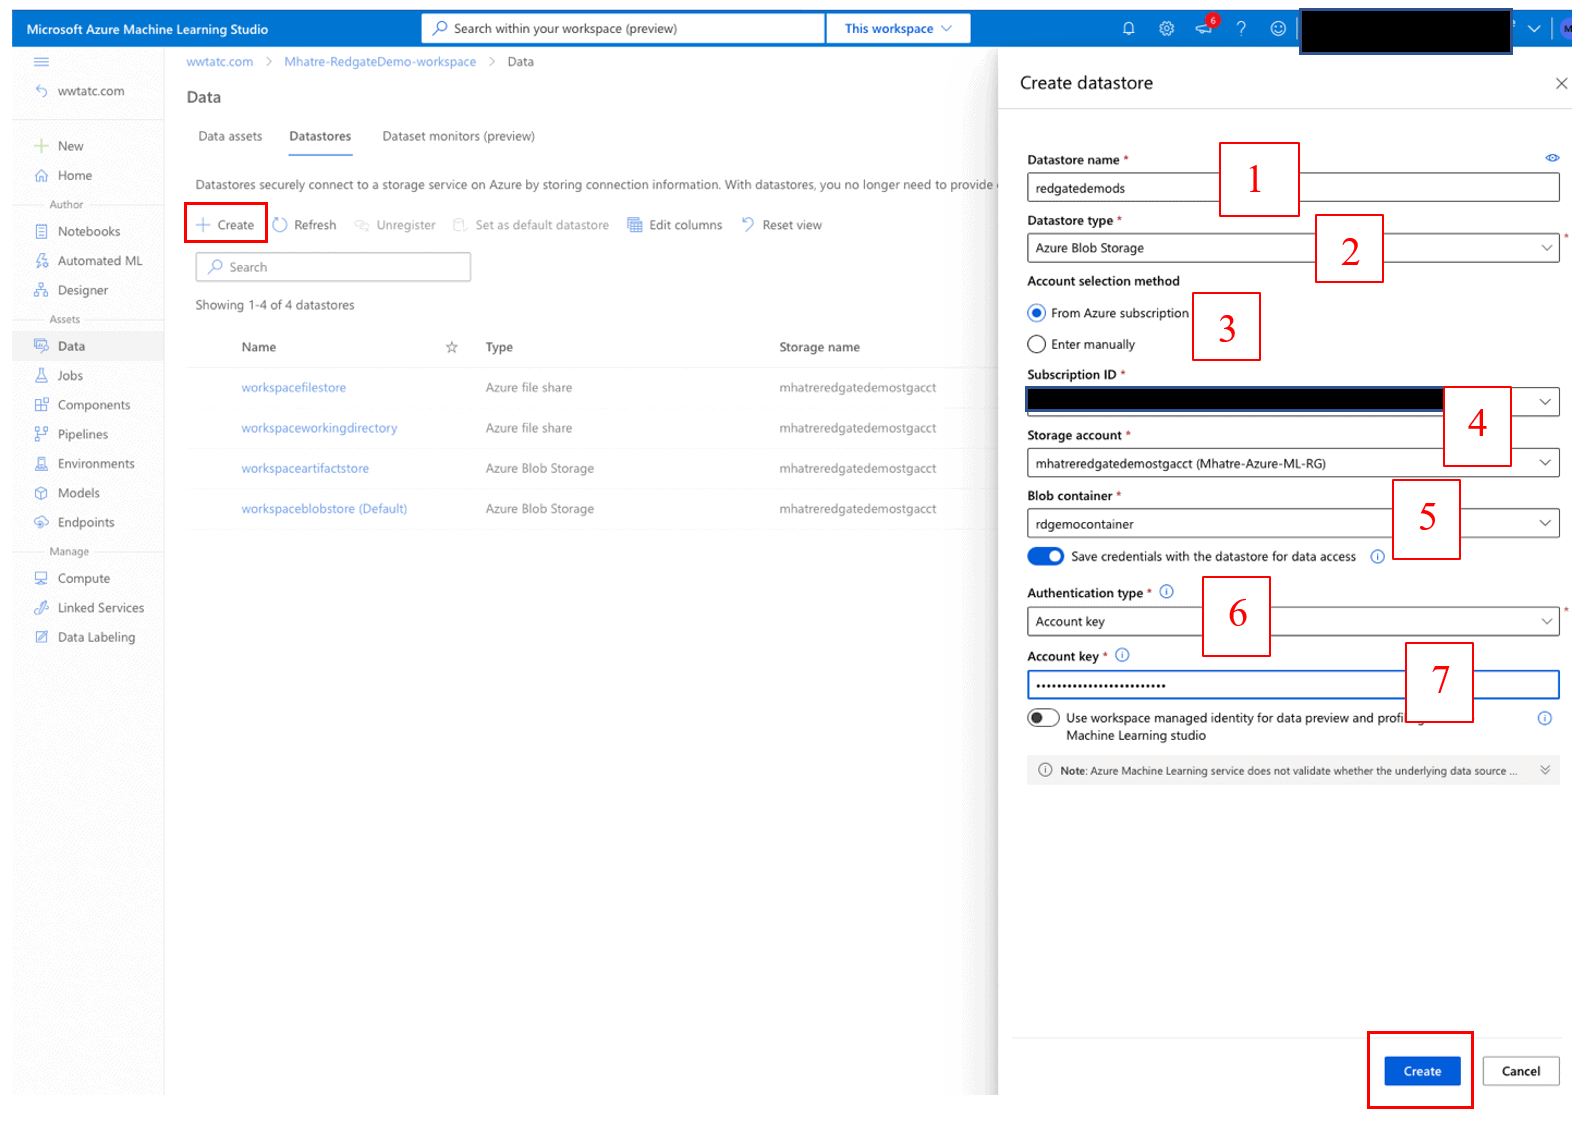
Figure 17. Create Azure Machine Learning Datastore
On the “Create datastore” screen
- Enter a name for the new datastore
- Select Datastore type “Azure Blob Storage” from the drop-down list.
- Choose “From Azure subscription” as the Account selection method.
- Select your “Subscription ID” and “Storage account” values from the drop-down list.
- Select the “Blob container” name from the drop-down list (I am using the blob container created earlier in this article, which is part of the Storage account)
- Set the “Authentication type” value as “Account key” from the drop-down list.
- Paste the Access Key copied from the earlier step, into the “Account Key” field.
- Then Click the ‘Create’ button at the bottom of the screen.
Once the new datastore is created, it shows up under the list of datastores. Click to open the “Overview” page > navigate to the “Browse preview” section to confirm the “datastore_test.txt” file is listed as shown in Figure 18.
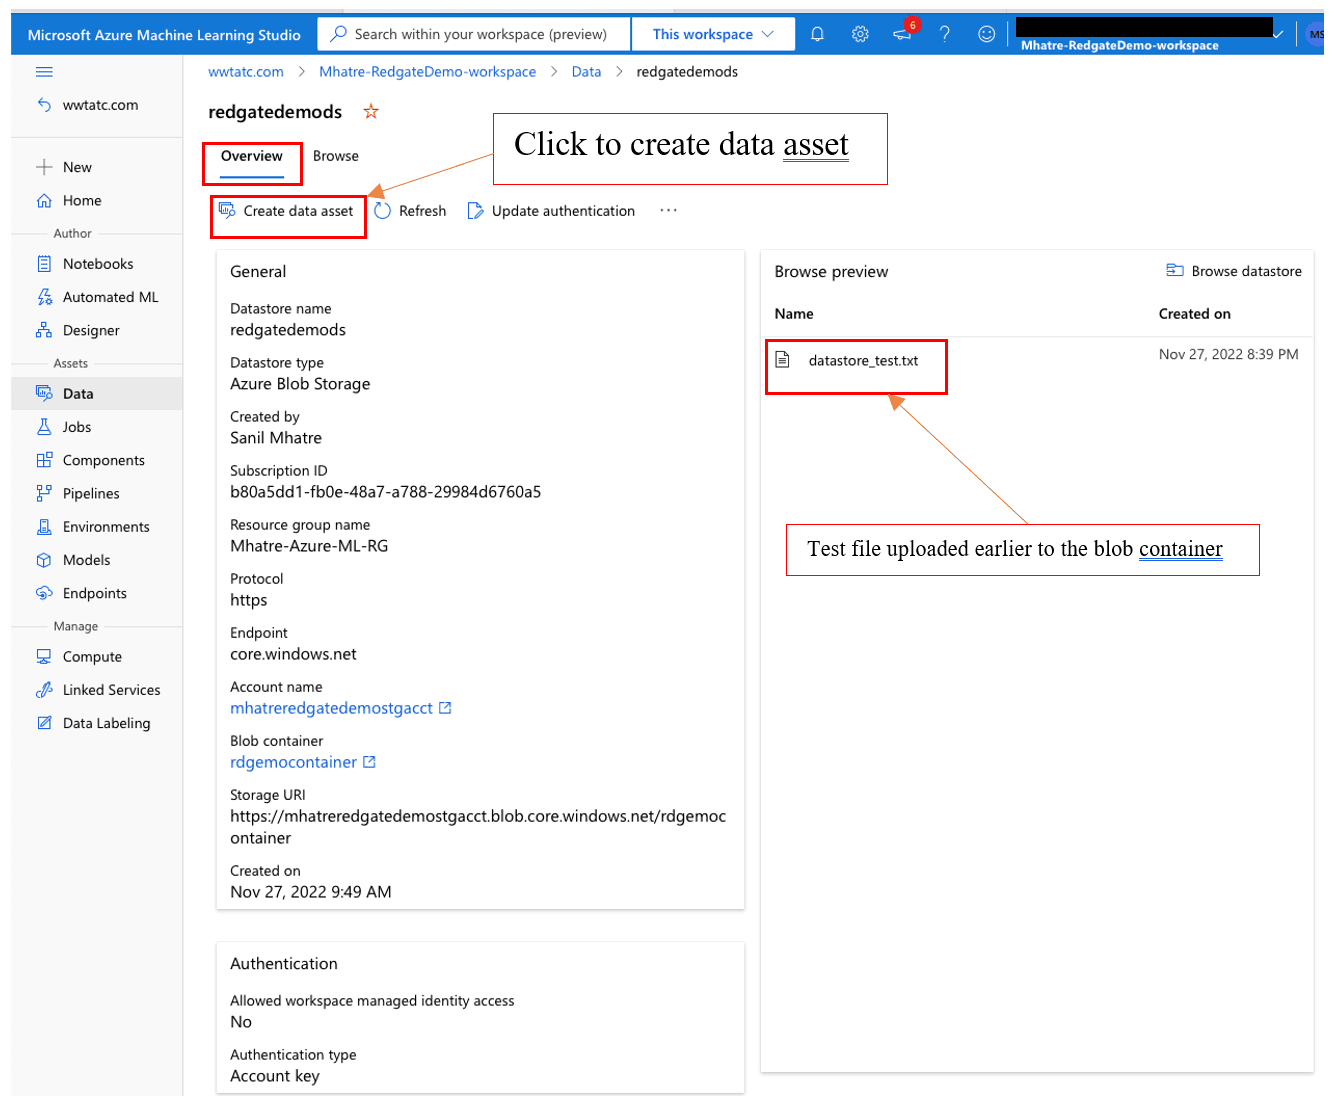
Figure 18. Datastore with test file from a blob container
To create the data asset from this datastore, click the ‘create data asset’ button and in the “Data type” section.
- enter a name for the new Data asset into the “Name” field.
- enter a description for the Data asset into the “Description” field.
- select “File (uri_file)” from the drop-down list in the “Type” field.
Click ‘Next’ to navigate to the “Storage path” section as seen in Figure 19.
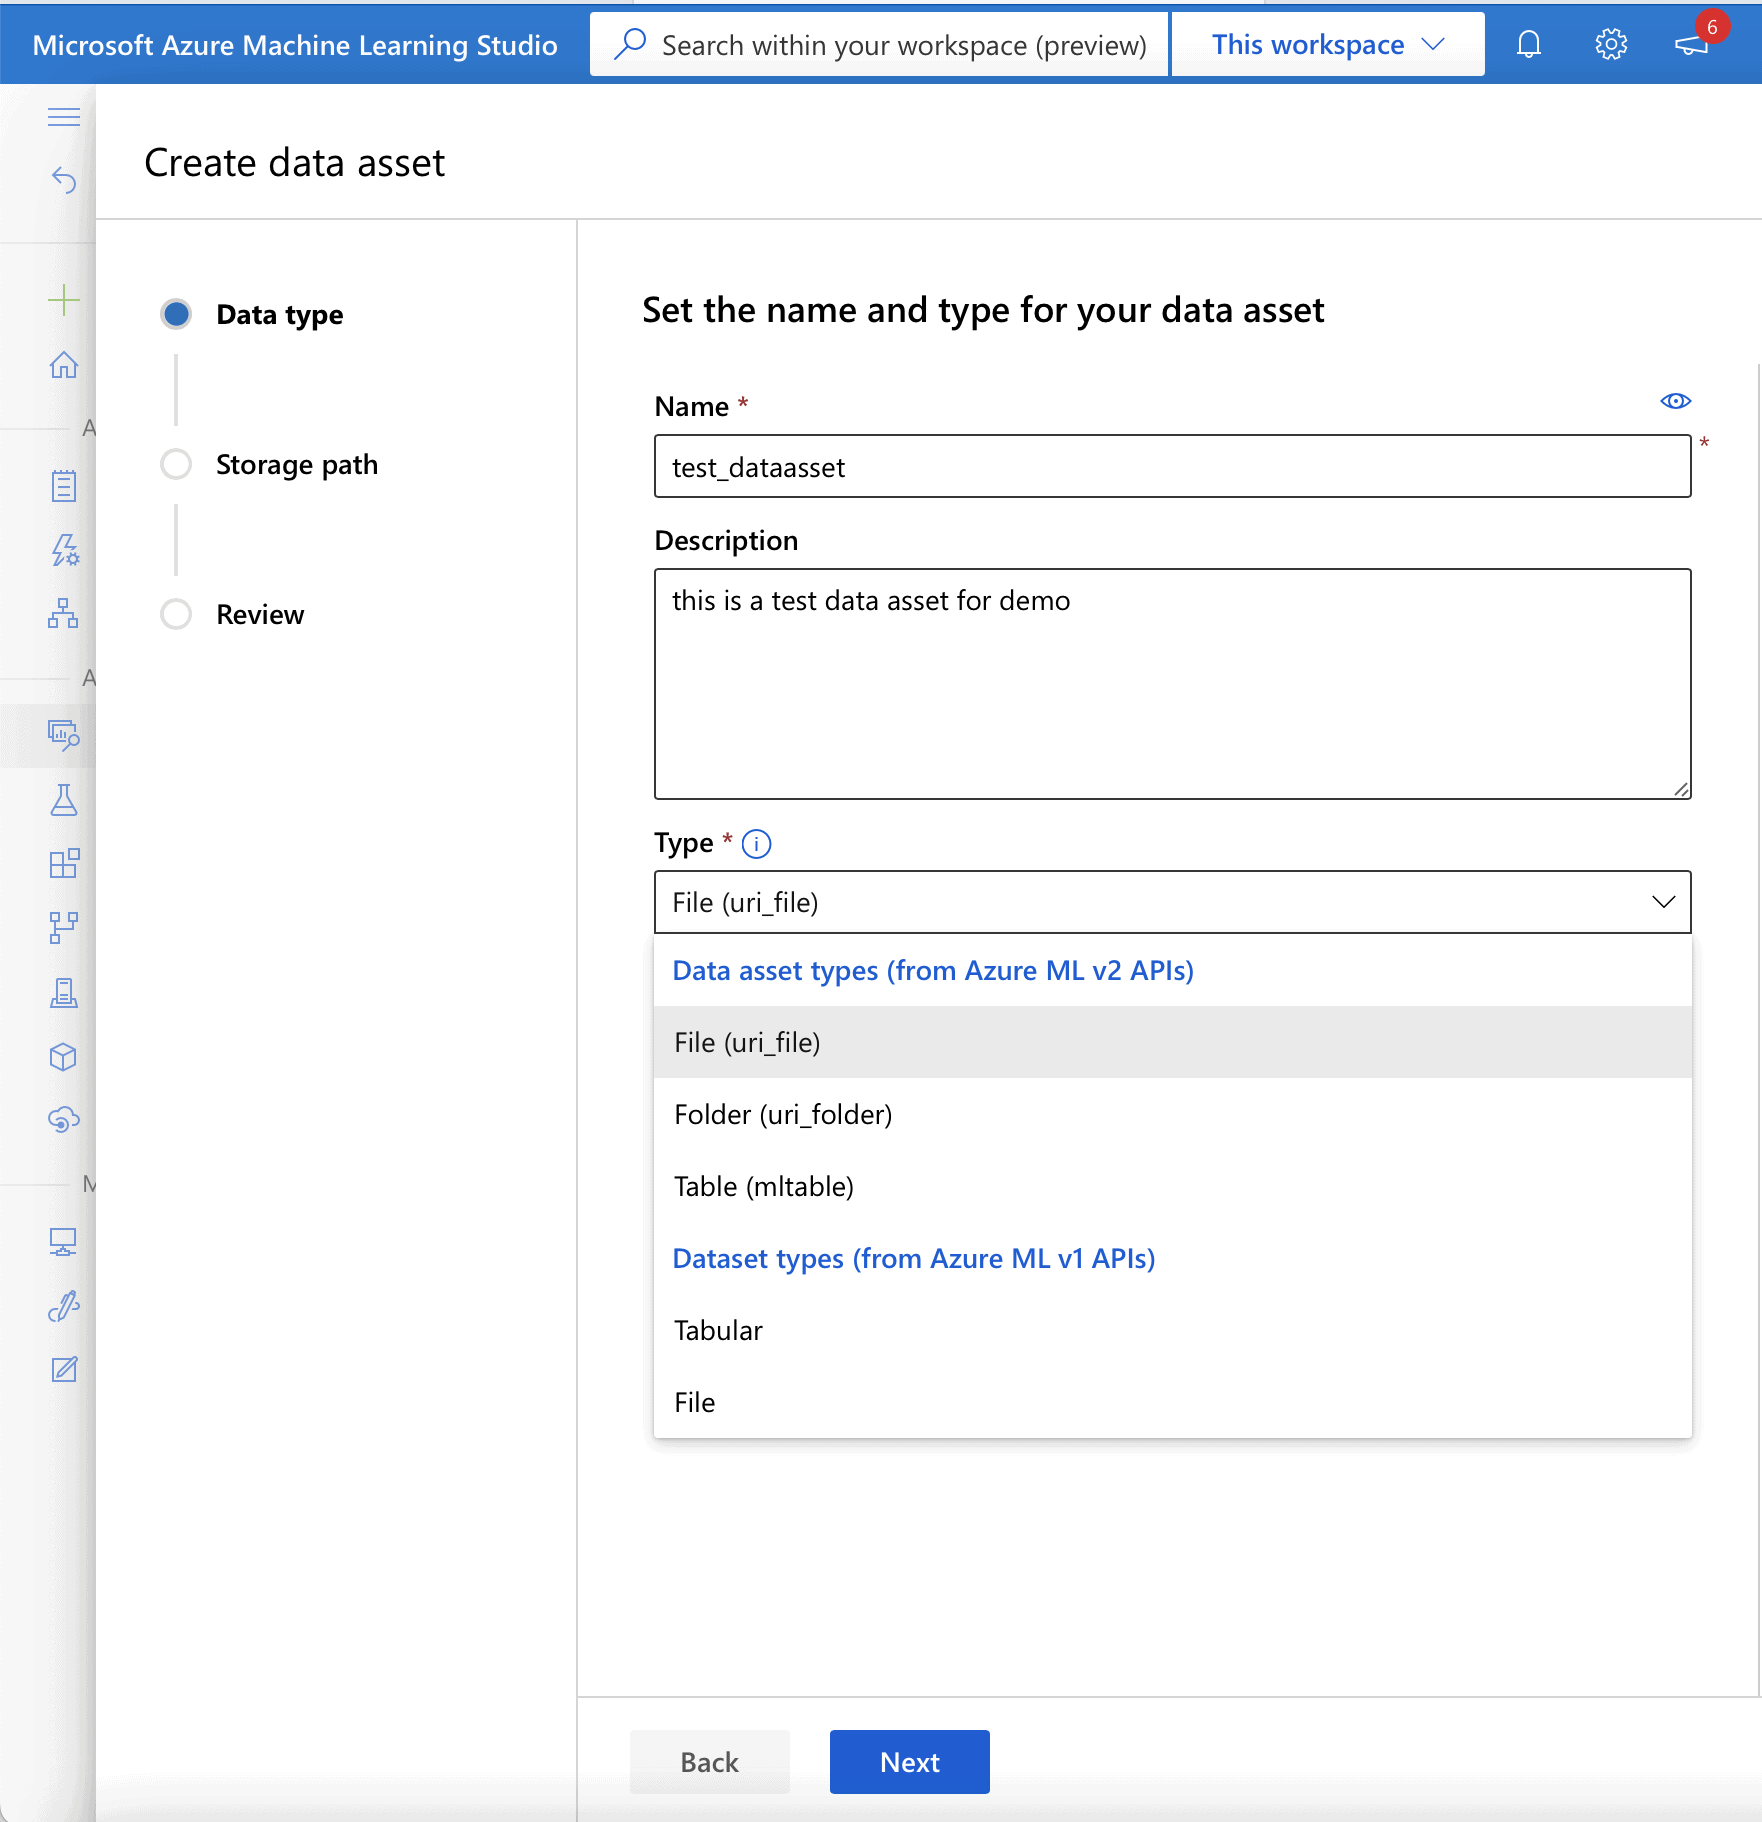
Figure 19. Create data asset
After setting the values, click Next to choose the storage path.
- Choose the “Browse to storage path” radio button option.
- Select the “datastore_text.txt” file.
Click Next to navigate to the “Review” section > Review the data asset settings > Click the ‘Create’ button.
This creates the data asset for the test_dataasset.txt file and makes it available for the machine learning authoring processes and tools in Azure Machine Learning.
Conclusion
This article introduced readers to Azure Machine Learning and gives an overview of its various components and high-level architecture. It showcases key features and capabilities of the platform that enable machine learning professionals to build, deploy and manage high-quality machine learning models. I demonstrated the steps for setting up an Azure Machine Learning workspace, Azure Blob storage container, Datastore, and Data asset and got readers familiar with the Azure Machine Learning studio.
References/Further reading:
- Azure Machine Learning Product overview: https://azure.microsoft.com/en-us/products/machine-learning/#product-overview
- Azure Machine Learning Documentation: https://learn.microsoft.com/en-us/azure/machine-learning/overview-what-is-azure-machine-learning
- Azure ML architecture and key concepts: https://learn.microsoft.com/en-us/azure/machine-learning/v1/concept-azure-machine-learning-architecture
- Compute targets in Azure Machine Learning: https://learn.microsoft.com/en-us/azure/machine-learning/concept-compute-target
- Creating Azure ML workspace – https://learn.microsoft.com/en-us/azure/machine-learning/quickstart-create-resources
- Azure ML Environments – https://learn.microsoft.com/en-us/azure/machine-learning/concept-environments
- Azure ML Data assets – https://learn.microsoft.com/en-us/azure/machine-learning/how-to-create-data-assets?tabs=cli
- Azure ML datastores – https://learn.microsoft.com/en-us/azure/machine-learning/how-to-datastore?tabs=cli-identity-based-access%2Ccli-adls-identity-based-access%2Ccli-azfiles-account-key%2Ccli-adlsgen1-identity-based-access