
Introduction
When a developer joins our team, we are faced with the problem that it can take up to two weeks setting up developer workstations and bringing them up to speed, to the point at which they can make a contribution. In my role as Development Manager, I’m very interested in reducing this time. An obvious way of doing this is to reduce the time spent provisioning the development workstation with the right tools. A newly-arrived Developer has to Install JDK, Oracle DB, WebLogic, Eclipse IDE, SVN, WinMerge, Notepad++ and Oracle Client. Often there are various admin rights required, and it takes time to give them temporary elevation of system privileges to allow them to do the installs. To get everything up-and-running, developers then have to tackle those data and configuration setup procedures on their local machines that would allow them to do development work. Usually this amounts to over a hundred configuration steps that are required before your entire stack – database, app server, code, dependencies – work in harmony.
There is often an engrained idea that each configuration is somehow unique and tailored to the individual. This is a fallacy which seems to follow from the very nature of this error-prone manual process to set up the machine. In reality, there are very few deviations from a standard development workstation. Certainly, a specialist may require certain additions but they still need the standard setup to start with.
So how can we cut down the time needed for the local machine setup from weeks down to minutes? You guessed it: We use a provisioning tool to do it for us.
Finding suitable tools
There are various tools in the market for provisioning PCs and VMs. When I set out to tackle the problem, I was quite perplexed as to how do we could devise a toolchain that tied these together into a meaningful architecture that would solve most of our common use cases. We ended up selecting three tools.
- Vagrant – Provides a setup environment for a workstation that is easy to configure, reproducible, and portable.
- Chocolatey – is a single, unified interface designed to easily work with all aspects of managing Windows software using a packaging framework that understands both versioning and dependency requirements.
- Boxstarter – Leverages Chocolatey packages to automate the installation of software and create repeatable, scripted Windows environments while providing reboot resiliency, windows customization, remote installations and automated windows updates.
These tools have proved really powerful weapons in our fight to solve some of the challenges we met along the way to creating a package management architecture that allowed us to do standard replicable installations. Being a Linux fan myself, I will start by describing a Linux installation with Vagrant; followed by a Windows installation utilizing Vagrant, BoxStarter and Chocolatey.
Vagrant provides a setup for a workstation that is easy to configure, reproducible, and portable. It is built on top of industry-standard technology and controlled by a single consistent workflow to help maximize the productivity and flexibility of you and your team. It stands on the shoulders of giants. Machines are provisioned on top of Virtual Box, VMware, AWS, or any other provider. Then, industry-standard provisioning tools such as shell scripts, Chef, or Puppet, can be used to automatically install and configure software on the machine.
Vagrant will isolate dependencies and their configuration within a single disposable, consistent environment. Once the developer creates a single Vagrantfile, which defines the dependencies, the working environment can be reproduced by doing a ‘vagrant up’ which will install and configure the application’s working environment whether it be on Linux, Mac OS X, or Windows, against the same dependencies, all configured the same way.
The overall process can be summarized into
- Set Up – Download and install Vagrant
- Configure – Create a configuration file which includes all steps with respect to your required software’s, configuration rules etc. This file can be placed in your repository such as GIT/Stash
- Work – Execute the single command — “vagrant up” and sit back while vagrant gets your machine ready to go.
- Taking Vagrant for a Spin
Just to demonstrate how easy it is, we will start by creating a virtual Machine on our local Linux workstation. The steps below depict how you can utilize VAGRANT to spin up and tear down a standard Ubuntu virtual machine in just a couple of minutes.
Step 1: Download and Install vagrant. Link at https://www.vagrantup.com/downloads.html
Step 2: We now create a virtual machine by using these two simple commands
|
1 |
$ vagrant init hashicorp/precise64 |
|
1 |
$ vagrant up |
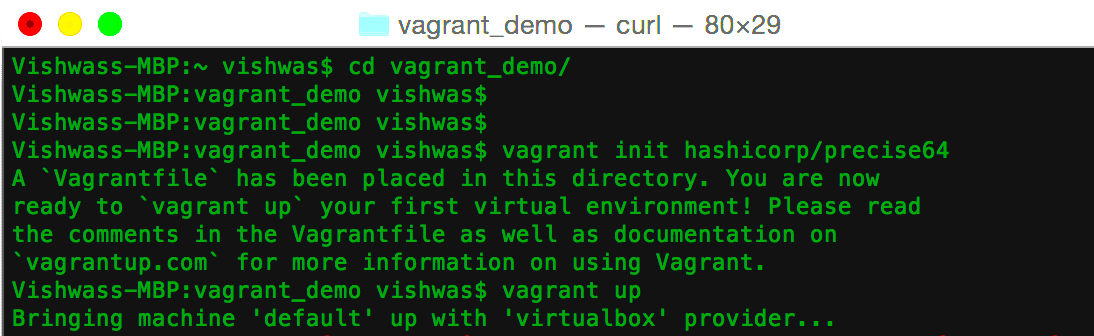
Figure 1: Initiating Vagrant
Vagrant at this point will create a virtual machine (VM) with standard Ubuntu 12.04 LTS 64-bit OS. Although I have used Ubuntu, there are various alternative images available on the Atlas Box Catalog, such as the evaluation version of Windows 2012 r2, Windows Nano Technical Preview 3, Debian or Centos.
It takes about 2 minutes to get your base VM up and you can ssh into your VM via
|
1 |
$ vagrant ssh |
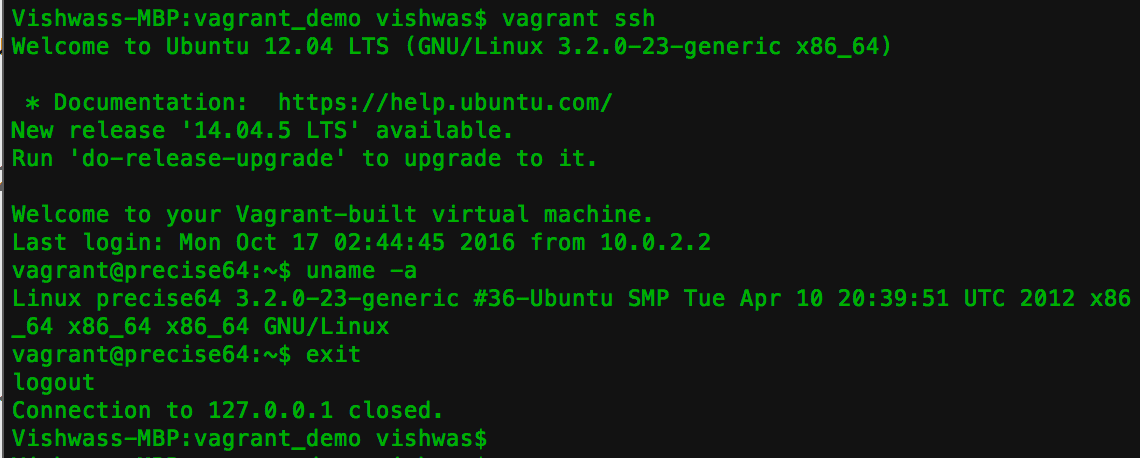
Figure 2: How to ssh into Vagrant VM
Note: Vagrant looks for an Oracle VM VirtualBox installation on the host machine. If it doesn’t find one, it would automatically download and install that before proceeding.
Step 3: You can destroy the VM By typing
|
1 |
$ vagrant destroy |

Figure 3: Destroying the VM
How easy was that? Now that we know how to get a basic VM up and running, we’ll make Vagrant automate our project setup.
The installation
I will show how to provision both a Linux Workstation and a Windows-based Workstation using combination of tools mentioned above. All the files I use are in a GitHub repository https://github.com/vishwas-parameshwarappa/vagrant_demo so you can use them to play along.
Linux Installation
In this tutorial, our aim is to automate the setup of a local machine for a 64 bit Linux OS with Tomcat Webserver with a sample Angular JS application deployed.
Step1: Ensure that your GitHub repository has the latest application code. I have created a sample Angular JS application for the purpose of this tutorial.
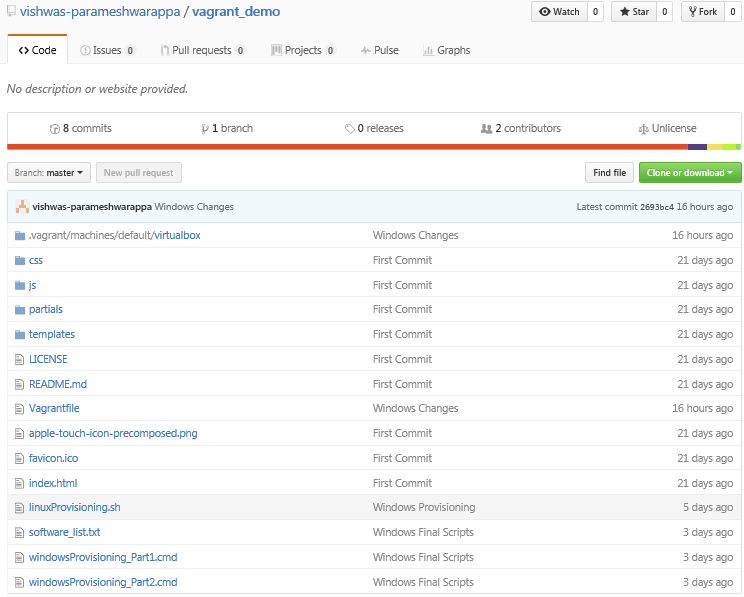
Figure 4: Sample GIT Repository
Step 2: Navigate to your project folder and initiate Vagrant. This would create a configuration file Vagrantfile in your project folder as shown in the figure below.
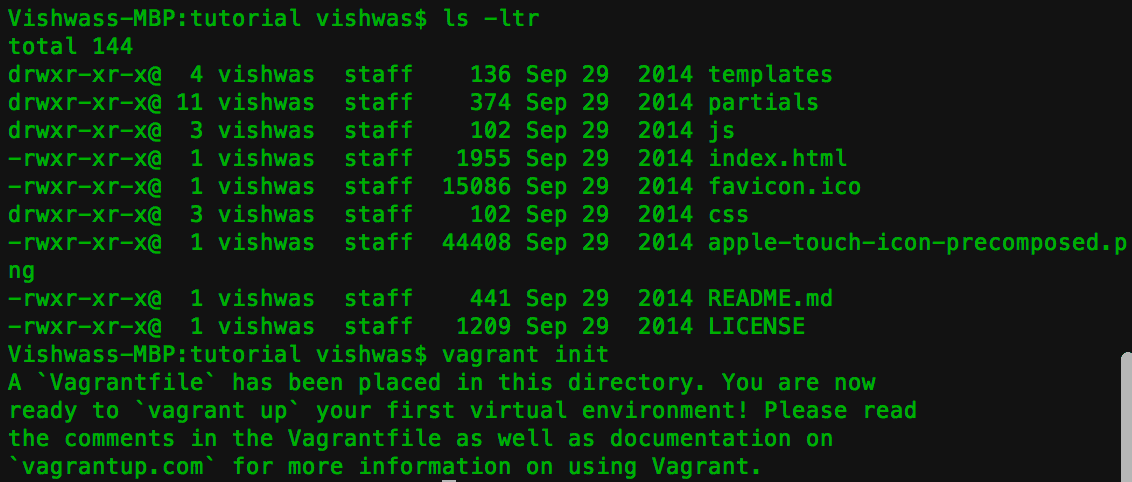
Figure 5: Creating Vagrant File in the project folder
Vagrantfile is basically a configuration guideline to Vagrant engine which must contain all the details that are relevant to your machine configuration i.e. The OS, the Network settings, the software’s and the app build path etc. – pretty much the complete set of steps to prepare the machine.
We now have to modify this Vagrantfile configuration file to …
- Define your Virtual Machine Operation System
1config.vm.box = "hashicorp/precise64" - Define a post-provisioning script to setup your VM. Typically this can be your shell script or any other provisioning tools such as Puppet, Chef, Ansible, Salt, Docker etc.
1config.vm.provision :shell, path: "linuxProvisioning.sh"In my file linuxProvisioning.sh, I include all the details relevant to what I want to be provisioned by Vagrant once my local machine virtual machine is created.
LINUXPROVISINING.SH
12345678910111213#!/usr/bin/env bashecho "*****************STARTING VM PREP****************"apt-get updateecho "*****************Installing JDK****************"sudo apt-get install -y openjdk-7-jdkecho "*****************Installing Tomcat****************"sudo apt-get install -y tomcat7echo "*****************Preparing War****************"cd /vagrantjar cvf tutorial.war *echo "*****************Deploying War*****************"sudo cp tutorial.war /var/lib/tomcat7/webapps/echo "*****************VM PREP COMPLETE************** - Ensure that you have port-forwarded the VM to access it from our MAC. Here port 4567 on my host forwards the traffic to port 8080 on my VM
1config.vm.network :forwarded_port, guest: 8080, host: 4567
Step 3: Go to your project folder and type-in
|
1 |
$vagrant up |
Vagrant at this point will perform the following actions based on configuration details in Vagrantfile
- Creates a 64-Bit Ubuntu virtual machine
- Forwards the port 4567 on your host to port 8080 on the virtual machine
- Invokes the linuxProvisioning.sh script which
- Downloads and install JDK & Tomcat software’s.
- Creates an application war file and deploys the war file on the Tomcat Webserver.
Sit back and relax while vagrant sets up your VM. You can see the application installed, deployed and accessible via your host machine browser at http://127.0.0.1:4567/tutorial.
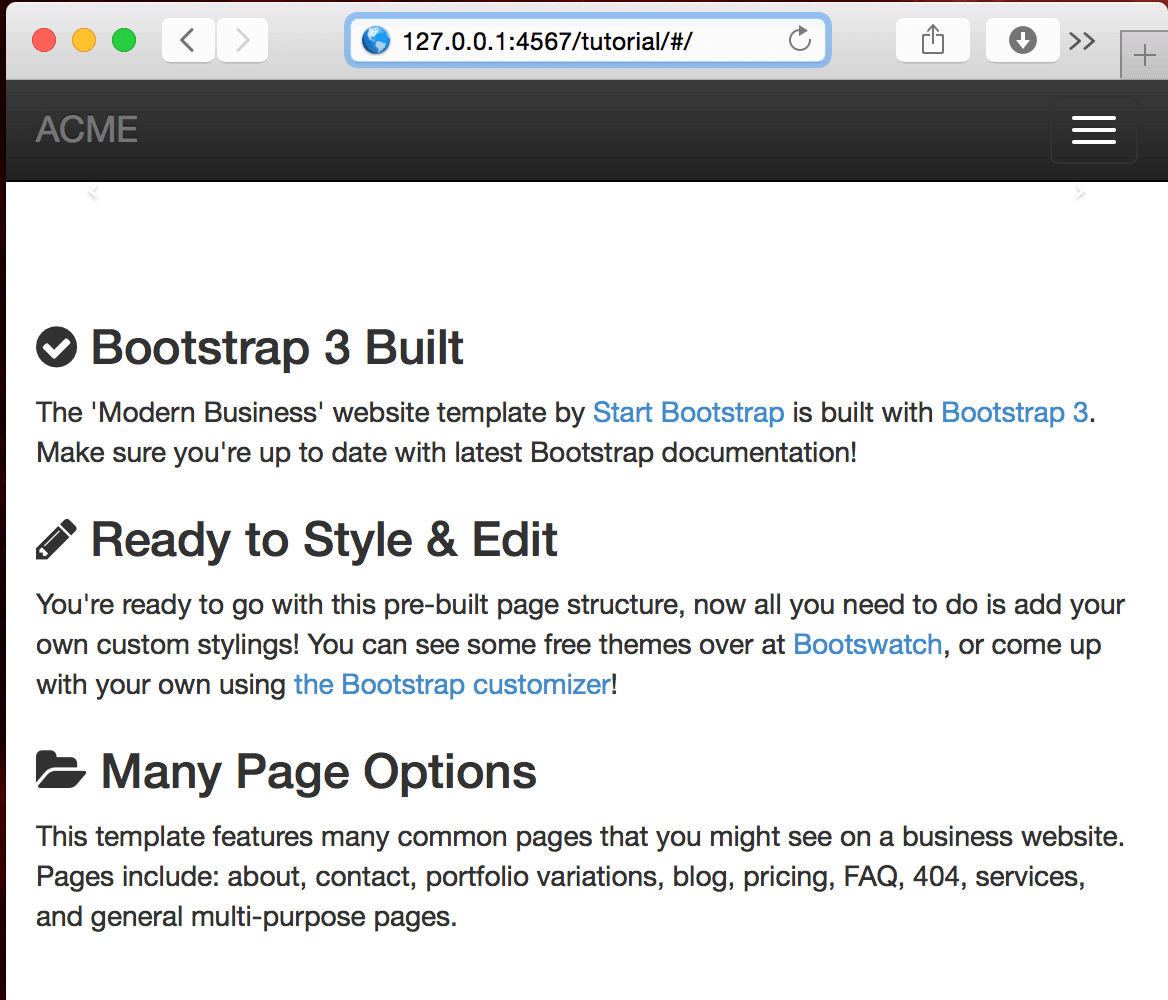
Figure 6: Deployed Application on Linux VM!!!
Step 6: Check-in Vagrant File and linuxProvisioning.sh into GIT along with your project.
That is it. A new developer on board now has to just perform the following three actions to get going on Linux
- Checkout to your code from GitHub
- Ensure VagrantFile is set to Linux Mode
- Install vagrant and type vagrant up
Windows Installation
Now that we have accomplished an automated Linux installation, let’s look at how do we utilize Vagrant to spin up a local machine for 64 bit Windows OS. In the same way that we had to provide additional shell scripting for Linux, we will need the help of Chocolatey and Boxstarter in order to provision the relevant software and deploy our application in a Windows workstation.
Step 1: We’ll need to change our Vagrantfile to support Windows configurations and point to this image. We do this in the following lines within the Vagrantfile.
|
1 2 3 4 5 6 7 8 9 10 11 12 13 14 15 16 |
config.vm.box = 'opentable/win-2012r2-standard-amd64-nocm' config.vm.guest = :windows config.vm.boot_timeout = 300 config.vm.communicator = "winrm" config.winrm.username = 'vagrant' config.winrm.password = 'vagrant' config.vm.provider :virtualbox do |vb| vb.name = "Win2012_Server" vb.gui = true vb.customize ["modifyvm", :id, "--memory", "1024"] vb.customize ["modifyvm", :id, "--vram", "64"] vb.customize ["modifyvm", :id, "--clipboard", "bidirectional"] end config.vm.network :forwarded_port, guest: 8080, host: 4567 |
This part of the configuration ensures that we are creating a 2012 64 Bit windows image and allocating 1 GIG RAM, 64 MB Video RAM, support bidirectional copy paste functionality and forwarding port 4567 on host to Port 8080 on the VM.
If you type vagrant up with just these lines in the Vagrantfile so far, you should be able to see a bare windows VM created. However, we will be adding more to the file in order to specify what software then needs to be loaded.
Step 2: Now that we are able to setup the base configuration of our windows VM the next job is to provision it by installing the software and setting it up as a development machine. We will be using Boxstarter. When we bulk-install using Boxstarter, it will detect any reboots that are triggered by MSI installers, reboot the machine and then run the Boxstarter script again. It will also allow us to do other configuration tasks such as
- Setting up remote desktop.
- Setting up Microsoft update.
- Providing user access control (UAC).
- Setting taskbar options like size, position, and lock the size.
- Setting Windows explorer options such as showing hidden files, protected OS files, and file extensions.
The provisioning activity on the windows machine is a two-step process
- Install Chocolatey which provides a baseline to install BoxStarter
- Install Boxstarter and then us this to install the rest of the software (such as the JDK and Tomcat)
Because the installation of Chocolatey means having to reopen the shell, I had to break my provisioning script into two scripts and utilize Vagrant to invoke these scripts one after the other.
windowsProvisioning_Part1.cmd
|
1 2 3 |
echo *****************Installing Chocolatey**************** @powershell -NoProfile -ExecutionPolicy Bypass -Command "iex ((New-Object System.Net.WebClient).DownloadString('https://chocolatey.org/install.ps1'))" && SET "PATH=%PATH%;%ALLUSERSPROFILE%\chocolatey\bin" echo "*****************WINDOWS VM PREP_1 COMPLETE****************" |
windowsProvisioning_Part2.cmd
|
1 2 3 4 5 6 7 8 9 10 11 12 |
echo *****************STARTING WINDOWS VM PREP_2**************** echo *****************Installing BoxStarter**************** choco install -y boxstarter echo *****************Installing Softwares**************** copy /Y "%systemdrive%\vagrant\software_list.txt" "%temp%\software_list.txt" @powershell -NoProfile -ExecutionPolicy Bypass -Command "Import-Module $env:appdata\boxstarter\boxstarter.chocolatey\boxstarter.chocolatey.psd1;Install-BoxStarterPackage -PackageName $env:temp\software_list.txt" echo *****************Preparing War**************** cd %systemdrive%\vagrant "C:\Program Files\Java\jdk1.8.0_112\bin\jar.exe" cvf tutorial.war * echo *****************Deploying War***************** MOVE tutorial.war "C:\Program Files\Apache Software Foundation\tomcat\apache-tomcat-8.0.33\webapps" echo "*****************WINDOWS VM PREP_2 COMPLETE****************" |
Step 3: Link our windows provisioning scripts to Vagrantfile Configuration as an instruction for provisioning activity. Also I had to make sure to modify the Max No of Shells and Concurrent Operations per user options because I ran into a threshold problem during the development.
|
1 2 3 4 |
config.vm.provision "shell", inline: <<-SCRIPT Set-Item WSMan:\\localhost\\Shell\\MaxShellsPerUser -Value 100 Set-Item WSMan:\\localhost\\Service\\MaxConcurrentOperationsPerUser -Value 100 SCRIPT |
Step 4: Go to your project folder and type-in
|
1 |
vagrant up |
Vagrant at this point will perform the following actions based on configuration details in Vagrantfile
- Creates a 64-Bit Windows 2012 virtual machine
- Forwards the port 4567 on your host to port 8080 on the virtual machine and sets the VM shell parameters
- Invokes the WindowsProvisioning_Part1.cmd script which downloads and installs Chocolatey
- Invokes the WindowsProvisioning_Part2.cmd script which
- installs Boxstarter
- Further utilizes Boxstarter to install JDK and Tomcat software’s mentioned in software_list.txt
- Creates an application war file and deploys the war file on the Tomcat Webserver.
Sit back and relax while vagrant sets up your local virtual machine. You can see the application installed, deployed and accessible via your local machine browser at http://127.0.0.1:4567/tutorial.
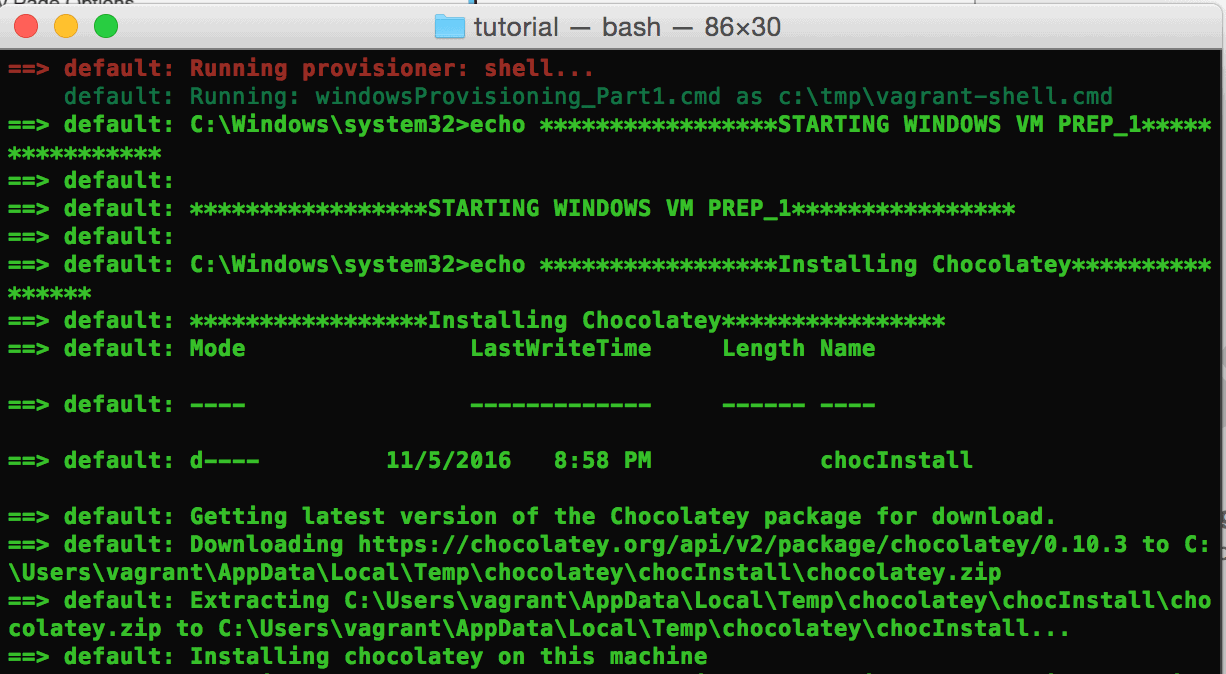
Figure 7: Vagrant installation on Chocolatey
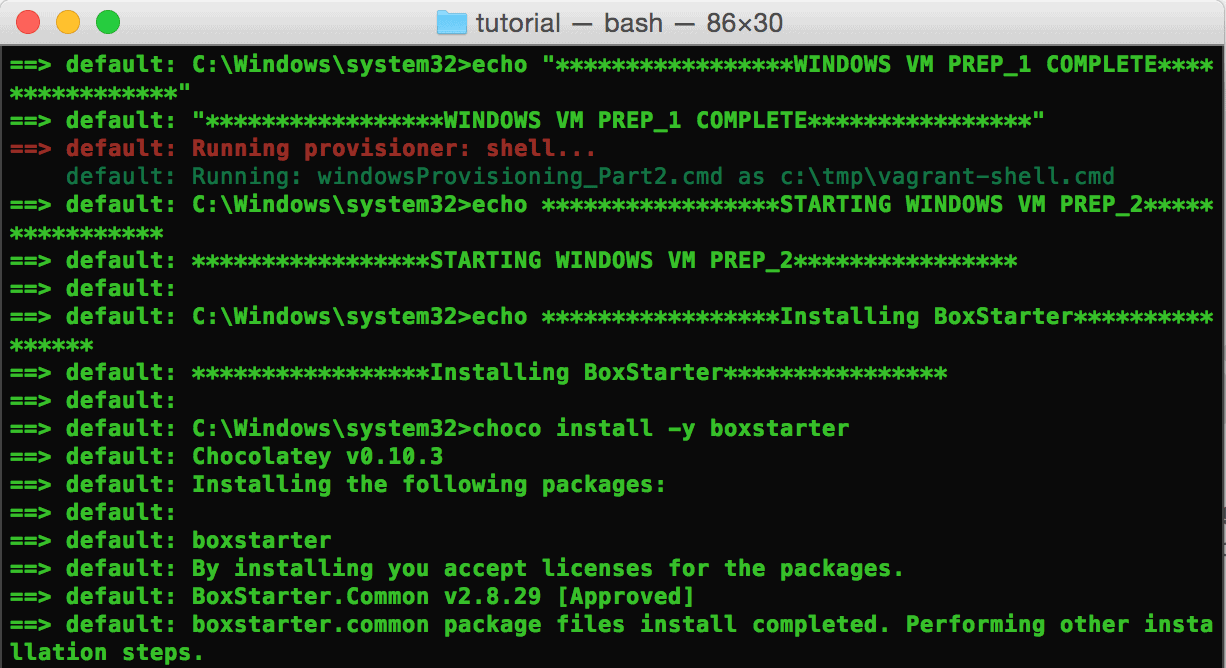
Figure 8: Installation of Boxstarter utilizing Chocolatey
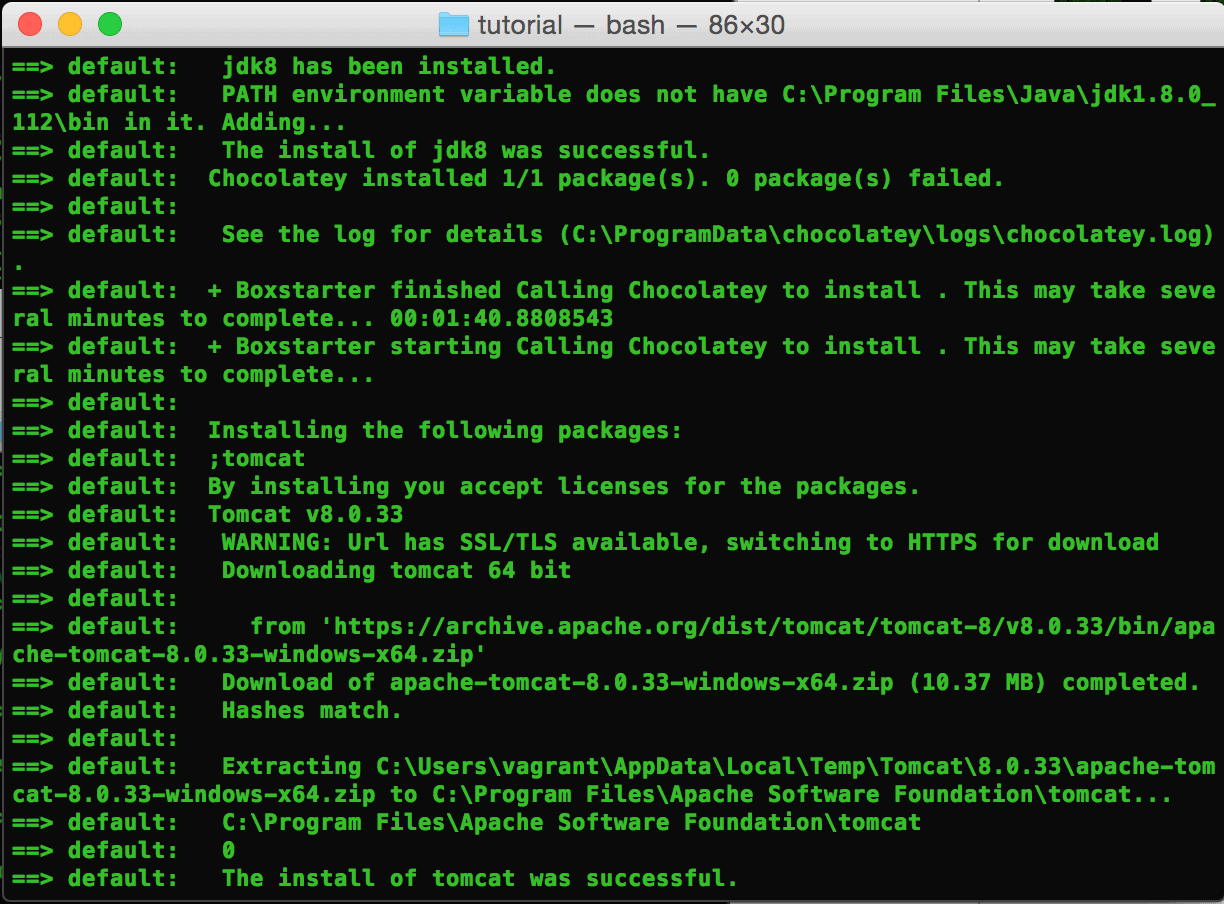
Figure 9: Installation of JDK and Tomcat utilizing Boxstarter
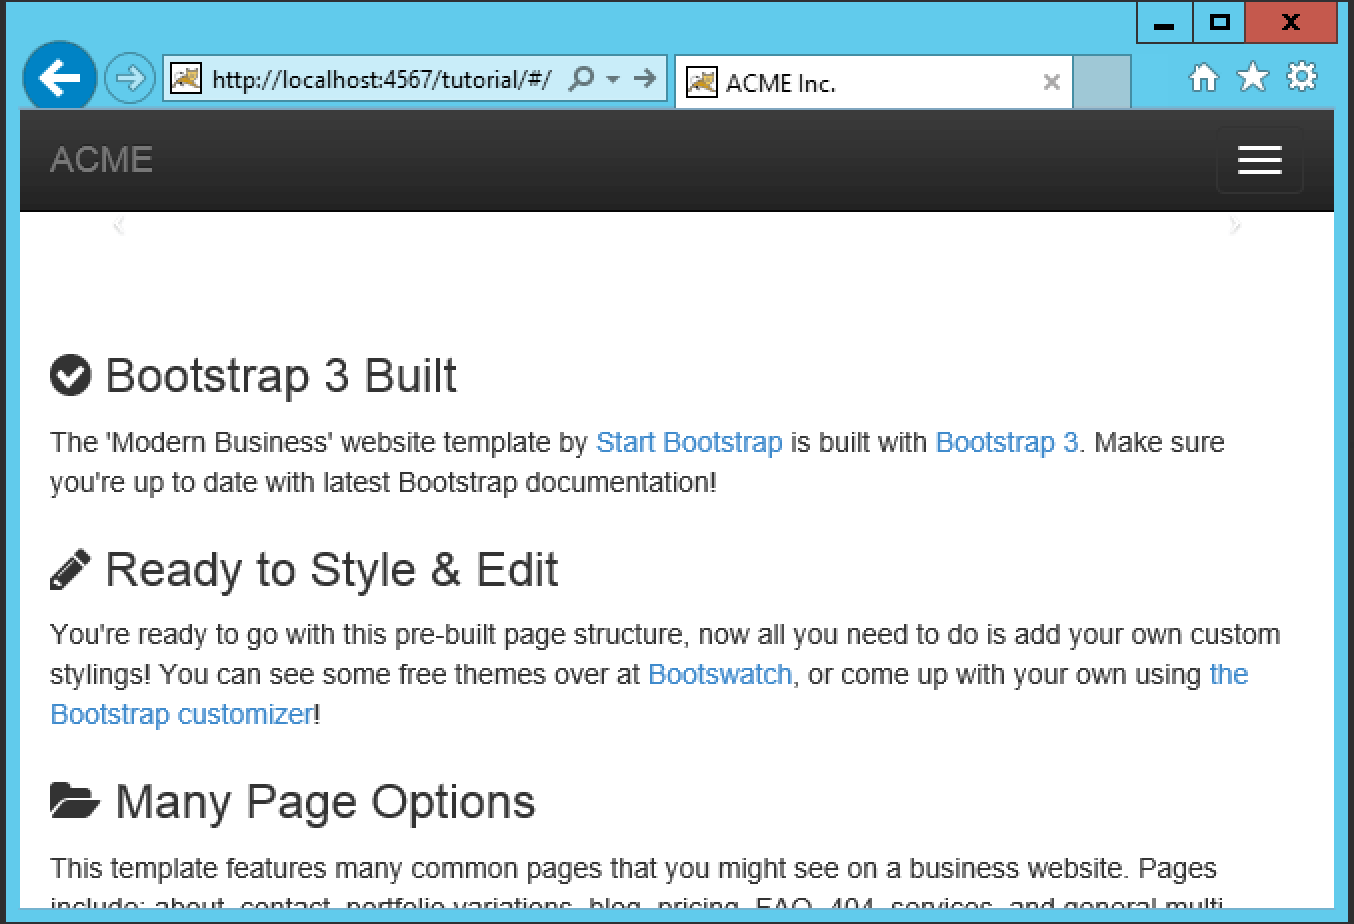
Figure 10: Deployed Application on Windows VM
Step 5: Check-in Vagrantfile, windowsProvisioning_Part1.cmd, windowsProvisioning_Part2.cmd , software_list.txt into GIT along with your project.
A new developer who joins the team just has to perform the following three actions to get going on Windows
- Checkout your code from GitHub
- Ensure Vagrantfile is set to Windows Mode
- Install vagrant and type vagrant up
Setting up developer workstations
Vagrant, Boxstarter & Chocolatey are powerful DevOps tools that are capable of automating the setup of your entire development machine in couple of clicks. This will eliminate developer frustrations; speed up the development lifecycle and save time and money for your organizations. In Linux, Vagrant alone can be sufficient if you then use the inbuilt Linux package manager. We would need to couple this with Chocolatey and Boxstarter for Windows. The number of required software packages is increasing in line with the increasing adoption of open stack software for development work, because most of the DevOps tools perform specific activities, such as logging, testing, deployment, build or providing code-quality metrics. Software package management is increasingly important to ensure that developers don’t spend too much time trying to figure out where to download from, which version to use and how to install. Instead, we can allow them to focus on delivery right from the start. Apart from alleviating the local machine setup, these packaged installations can be maintained centrally and versioned to suit to your organizations test and production configurations and horizontally scale your cloud instances.