
I like Phil Factor’s articles. The latest one, An Easier Way of Pivoting Data in SQL Server, inspired me to start exploring another option to transpose a result from a query.
There are many situations in which the results of a query look better when they are rotated. For example, when you execute the simple T-SQL SELECT * FROM sys.databases to get all databases on the current SQL Server instance, the results look better somehow rotated. In my opinion, the results look better rotated if the number of columns is greater than the number of rows.
In this article, I will show you how to accomplish this task by introducing a SQLCLR stored procedure MATRIX.Transposing that does all the magic with rotation. (NOTE: I am using the words transpose and rotation interchangeably as synonyms throughout the article.)
Therefore, if you would like to transpose the results of your query, you will run a query like that in the listing below once the solution is in place.
|
1 |
EXEC MATRIX.TRANSPOSING @query = 'SELECT * FROM SYS.DATABASES'; |
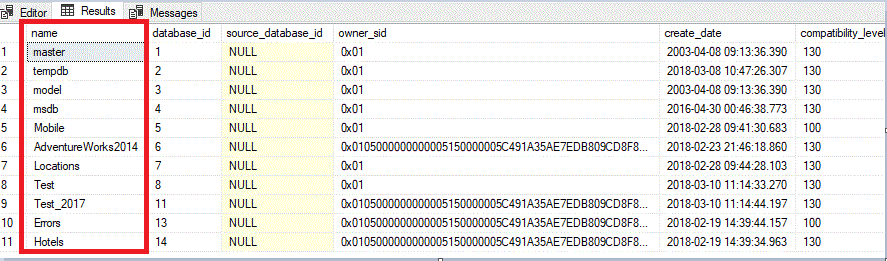
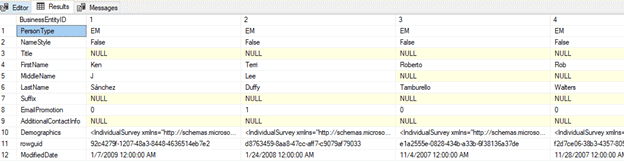
The result of SELECT * FROM sys.databases is displayed in the image below. The column on which rotation will take place after running the new code is outlined with red. (NOTE: The column is name.)
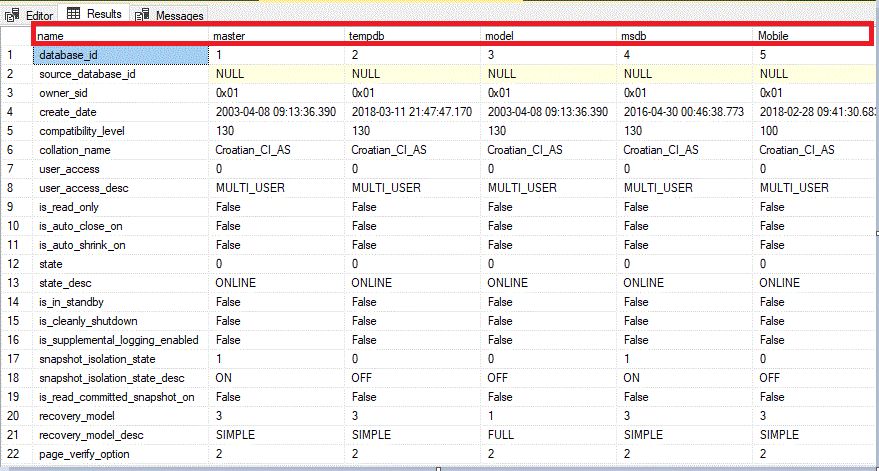
After transposing (executing the query from the listing above ), you will get the results as shown in the image below. The name values now become the column names. The properties of each database are listed vertically instead of horizontally.
In short, T-SQL is not suitable enough to transpose the query result. There is an option with pivoting which includes aggregation and only moves the values from one column to column headings. It doesn’t flip everything as shown here. However, to accomplish such a task of transposing without aggregation, you have to process your results row by row. That is not what T-SQL is designed for. Yes, you can use a cursor or maybe you can accomplish this task by using an XML transformation. I wrote maybe because, to be honest, I never tested such possibilities. So, in my opinion, there is no easy way to do it.
To run Phil’s solution, you must be running at least SQL Server 2016 version and make sure that the database is in 130 compatibility mode. Yes, I learned a lot about JSON support in SQL Server from his article, but that didn’t keep me from exploring other possibililties.
A SQLCLR Solution
Another possibility, as you might guess, is to use .NET. It means building a SQLCLR project. At first, you must enable CLR if not already enabled. To do this, execute the T-SQL script in the listing below.
|
1 2 3 4 5 6 7 8 9 |
-- Enable & Check CLR sp_configure N'clr enabled', 1 GO RECONFIGURE GO SELECT sc.* FROM sys.configurations AS sc WHERE sc.[name] = N'clr enabled' |
For those who do not want to play with .NET source code, there is a ZIP file in the attachment of the article. In the file, you can find two T-SQL scripts. One is for deploying the solution named Setup.sql and the other is for cleaning the environment after playing with the solution named CleanUp.sql.
Open Setup.sql in SSMS, just press F5, and the solution is deployed. I tested the solution on all SQL Server versions, starting with SQL 2005 until SQL 2017. (NOTE: To deploy to 2017, you will have to save the snk file and modify the path and password before running.)
Also, you can download the complete solution from GitHub and deploy the solution through Visual Studio. After deploying the solution from VS or running setup.sql, your database model will be extended with a newly created stored procedure named MATRIX.Transposing (NOTE: MATRIX is the database schema). In either case, you will need to modify the @Path and @Password variables for your environment.
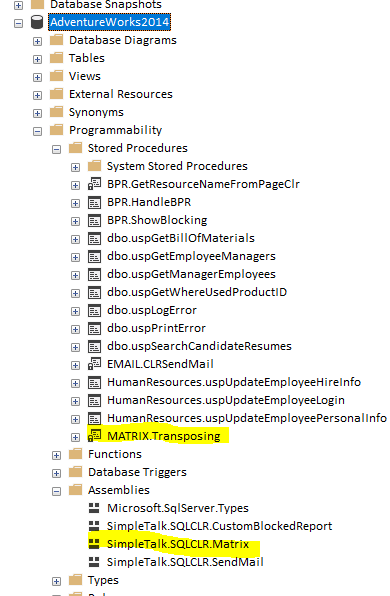
The examples in this article will use the AdventureWorks2014 database. To check your installation, expand the Programmability node to be sure the stored procedure is there as well as the SQLCLR assembly, as shown in the image below.
The stored procedure takes several parameters. In the image below, I outlined the mandatory parameter in red.
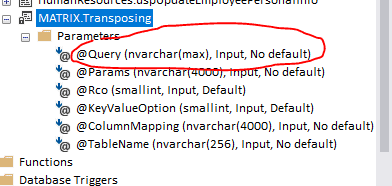
Yes, the @Query parameter is the query whose results we would like to transpose.
Stored Procedure Parameters
Attentive readers will notice that some parameters do not show a default value in SSMS, which is opposite to my statement that only one parameter is mandatory. In my opinion, it is a bug in SSMS. Run the following T-SQL query in order to check to see if there is a default value associated with the other parameters. This statement queries sys.objects and sys.parameters filtering by the stored procedure name.
|
1 2 3 4 5 6 7 8 9 10 11 12 13 14 15 16 17 18 19 20 21 |
SELECT SCHEMA_NAME(SCHEMA_ID) AS [Schema], SO.name AS [ObjectName], SO.Type_Desc AS [ObjectType (UDF/SP)], P.parameter_id AS [ParameterID], P.name AS [ParameterName], TYPE_NAME(P.user_type_id) AS [ParameterDataType], p.has_default_value, P.default_value FROM sys.objects AS SO INNER JOIN sys.parameters AS P ON SO.OBJECT_ID = P.OBJECT_ID WHERE SO.OBJECT_ID IN ( SELECT OBJECT_ID FROM sys.objects WHERE SCHEMA_NAME(SCHEMA_ID) = 'MATRIX' AND NAME = 'Transposing' ) ORDER BY [Schema], SO.name, P.parameter_id; GO |
The results are shown in the image below. You can see that the @Query parameter is the only one that does not have a default value.
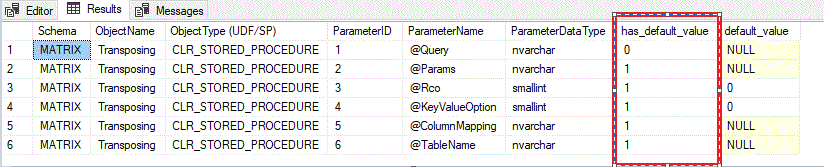
SSMS performs well when displaying standard T-SQL stored procedure parameters. It seems that SSMS is a little bit confused when has to display SQLCLR stored procedure parameters.
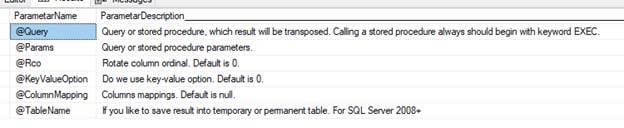
Now back to the main topic: in the table below, each parameter is explained in detail.
|
Parameter Name |
Parameter Description |
Parameter Type |
Default Value |
Can be null |
|
@Query |
Query or stored procedure, which result we will transpose. Calling a stored procedure always should begin with keyword EXEC |
Nvarchar(max) |
No default value |
No |
|
@Params |
Query or stored procedure parameters |
Nvarchar(4000) |
NULL |
Yes |
|
@Rco |
Rotate column ordinal |
Smallint |
0 |
No |
|
@KeyValueOption |
Do we specify custom headers with transposing |
Smallint |
0 |
No |
|
@ColumnMapping |
Custom header(s), column names are separated by a comma. |
Nvarchar(4000) |
NULL |
Yes |
|
@TableName |
If we like to save result into permanent table or temp table |
Nvarchar(256) |
NULL |
Yes |
Solution Deployment
In order to explore the solution, start up Visual Studio Community Edition (or any kind of licensed edition). I am using Visual Studio 2017, but the solution works fine with Visual Studio 2013 as well. The solution uses SQL Server Database Project as the template.
In the solution, there are several T-SQL scripts. The SQLCLR framework allows you to define only one T-SQL statement for pre-deployment. It must be executed before the assembly is published. Similarly, there is a post-deploy script that is executed after the assembly is published.
The pre-deployment script, named PreDeployment.sql, first creates the MATRIX schema and then depending on SQL Server version (only for SQL Server 2017+), it creates an asymmetric key based on the solution snk file. Then it creates a login and grants the unsafe assembly permission to that login.
In SQL Server 2017, there is a new instance level setting named clr strict security. By default, it is turned on, and it is not recommended to turn it off. This setting requires strong signing assembly, and that was not the case prior SQL Server 2017 version if we marked the project as SAFE. Therefore, to use this solution as a whole, I included support for signing the assembly by using the asymmetric key.
The pre-deployment script is located in PreDeployment.sql. You can see the whole script in the listing below.
|
1 2 3 4 5 6 7 8 9 10 11 12 13 14 15 16 17 18 19 20 21 22 23 24 25 26 27 28 29 30 31 32 33 34 35 36 37 38 39 40 41 42 43 44 45 46 47 48 49 50 51 52 53 54 55 56 57 58 59 60 61 62 |
-------------------------------------------------------------------------------------- --Create schema if not exists -------------------------------------------------------------------------------------- IF NOT EXISTS ( SELECT schema_name FROM information_schema.schemata WHERE schema_name = 'MATRIX' ) BEGIN EXEC sp_executesql N'CREATE SCHEMA MATRIX'; END; --------------------------------------------------------------------------------------- --- Only for SQL Server 2017+ ----------------------------------------------- IF SERVERPROPERTY('productversion') >= '14' AND SUBSTRING(CAST(SERVERPROPERTY('productversion') as nvarchar(10)),1,1) != '9' BEGIN -------------------------------------------------------------------------------------- --Create asymmetric key -- --!Replace the path 'D:\VS2017_PROJECTS\TransposingMatrix\TransposingMatrix\' with your path --!Replace password with more appropriate for your situation.!!!!!!!!!!!!!!!!!!!!!!!------- -- -------------------------------------------------------------------------------------- DECLARE @path nvarchar(260) = N'D:\VS2017_PROJECTS\TransposingMatrix\TransposingMatrix\askTransposingMatrix.snk' DECLARE @password nvarchar(128) = N'S#im@ple1Tal0k' DECLARE @tsqlToEval as nvarchar(max) = N'USE MASTER;' + CHAR(13) + 'CREATE ASYMMETRIC KEY [askTransposingMatrix]' + char(13 ) + 'FROM FILE = ''' + @path + ''' ENCRYPTION BY PASSWORD = '''+ @password+ ''''; --PRINT @tsqlToEval IF ( SELECT COUNT(*) FROM master.sys.asymmetric_keys WHERE name LIKE 'askTransposingMatrix%' ) = 0 BEGIN EXEC sp_executesql @tsqlToEval; END; IF NOT EXISTS ( SELECT loginname FROM master.dbo.syslogins WHERE name = 'loginTransposingMatrix' ) BEGIN DECLARE @sqlStatement AS NVARCHAR(1000); SELECT @SqlStatement = 'CREATE LOGIN [loginTransposingMatrix] FROM ASYMMETRIC KEY askTransposingMatrix'; EXEC sp_executesql @SqlStatement; EXEC sp_executesql N'USE MASTER; GRANT UNSAFE ASSEMBLY TO [loginTransposingMatrix];'; END; END; |
The post-deployment script transfers the resulting stored procedure from the default DBO schema to newly created MATRIX schema and creates some defaults. You can see the post-deployment script in the listing below.
The post-deployment script is located in the PostDeployment.sql file. You can see the entire script in the listing below.
|
1 2 3 4 5 6 7 8 9 10 11 12 13 14 15 16 17 18 19 20 21 22 23 24 25 26 |
ALTER PROCEDURE [dbo].[Transposing] @Query [nvarchar](max), @Params [nvarchar](4000)=NULL, @Rco [smallint]=1, @KeyValueOption [smallint]=0, @ColumnMapping [nvarchar](4000) = NULL, @TableName [nvarchar](128) = NULL AS EXTERNAL NAME [SimpleTalk.SQLCLR.Matrix].[StoredProcedures].[Transposing]; GO IF EXISTS ( SELECT * FROM sysobjects WHERE id = object_id(N'[MATRIX].[Transposing]') and OBJECTPROPERTY(id, N'IsProcedure') = 1 ) BEGIN DROP PROCEDURE [MATRIX].[Transposing] END ALTER SCHEMA [MATRIX] TRANSFER [dbo].[Transposing]; --Transfer function IF EXISTS ( SELECT * FROM sysobjects WHERE id = object_id(N'[MATRIX].[Help]') and type = N'FT' ) BEGIN DROP FUNCTION [MATRIX].[Help] END ALTER SCHEMA [MATRIX] TRANSFER dbo.Help; |
The .NET Solution
The query and its parameters are passed as parameters to the MATRIX.Transposing stored procedure. The code uses classic ADO.NET techniques to get an object of type Dataset. For those who are new to .NET, a Dataset should be considered as a table collection. When a dataset is formed, then it is easy to perform many types of transformations. The possible transformations include rotation, e.g., switching rows with columns.
In the solution, getting the data is accomplished in DataAccess.cs. It uses an almost classic ADO.NET approach. The most interesting thing here is the so-called context connection. According to Microsoft documentation, the context connection allows you to execute T-SQL statements in the same context that was used when your code was invoked in the first place. To obtain the context connection, you must use the context connection string keyword. The listing below shows how to get the dataset.
|
1 2 3 4 5 6 7 8 9 10 11 12 13 14 15 16 17 18 19 20 21 22 23 24 25 26 27 28 29 30 31 32 33 34 35 |
public static DataSet GetDataSet(string Query, bool isSp, SqlParameter[] listOfParams, ref string errorText) { DataSet ds = new DataSet(); try { using (SqlConnection cnn = new SqlConnection("context connection=true")) { using (SqlCommand command = new SqlCommand(Query, cnn)) { cnn.Open(); if (isSp) command.CommandType = CommandType.StoredProcedure; if (listOfParams != null) { foreach (SqlParameter p in listOfParams) { command.Parameters.Add(p); } } using (SqlDataAdapter sqlAdp = new SqlDataAdapter()) { sqlAdp.SelectCommand = command; sqlAdp.Fill(ds); } cnn.Close(); } } } catch (Exception ex) { errorText += ex.Message; } return ds; } |
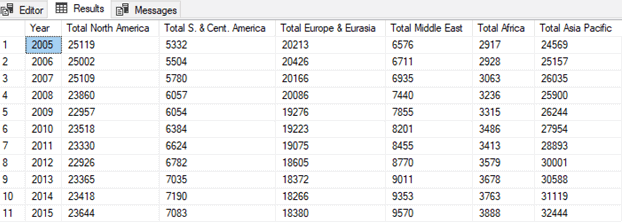
To explain the rest of the parameters, let us take the Phil example. (NOTE: To run it, you must install objects from his article.)
|
1 2 3 4 5 6 7 8 9 10 11 12 13 14 15 16 17 18 19 20 21 22 23 24 25 26 27 28 29 30 31 32 33 34 35 36 37 38 |
SELECT * FROM OPENJSON((SELECT dbo.TransposedJSONMatrix((SELECT * FROM (VALUES (25119, 25002, 25109, 23860, 22957, 23518, 23330, 22926, 23365, 23418, 23644), --'Total North America' (5332, 5504, 5780, 6057, 6054, 6384, 6624, 6782, 7035, 7190, 7083), --'Total S. & Cent. America (20213, 20426, 20166, 20086, 19276, 19223, 19075, 18605, 18372, 18266, 18380), --'Total Europe & Eurasia' (6576, 6711, 6935, 7440, 7855, 8201, 8455, 8770, 9011, 9353, 9570), --'Total Middle East',6576 (2917, 2928, 3063, 3236, 3315, 3486, 3413, 3579, 3678, 3763, 3888), --'Total Africa',2917,2928 (24569, 25157, 26035, 25900, 26244, 27954, 28893, 30001, 30588, 31119, 32444) --'Total Asia Pacific' ) oilConsumption ([2005], [2006], [2007], [2008], [2009], [2010], [2011], [2012], [2013], [2014], [2015]) FOR JSON AUTO) )) ) WITH ( [Year] INT '$.Col0', --remember that these are the column names of the original table [Total North America] INT '$.Col1', [Total S. & Cent. America] INT '$.Col2', [Total Europe & Eurasia] INT '$.Col3', [Total Middle East] INT '$.Col4', [Total Africa] INT '$.Col5', [Total Asia Pacific] INT '$.Col6' ); |
The result will look similar to what is shown in the image below.
In order to get the same result as in Phil’s example, you must call the MATRIX.Transposing stored procedure as shown in the listing bellow.
|
1 2 3 4 5 6 7 8 9 10 11 12 13 14 15 |
EXEC [MATRIX].[Transposing] @Query = 'SELECT * FROM (VALUES (25119, 25002, 25109, 23860, 22957, 23518, 23330, 22926, 23365, 23418, 23644), (5332, 5504, 5780, 6057, 6054, 6384, 6624, 6782, 7035, 7190, 7083), (20213, 20426, 20166, 20086, 19276, 19223, 19075, 18605, 18372, 18266, 18380), (6576, 6711, 6935, 7440, 7855, 8201, 8455, 8770, 9011, 9353, 9570), (2917, 2928, 3063, 3236, 3315, 3486, 3413, 3579, 3678, 3763, 3888), (24569, 25157, 26035, 25900, 26244, 27954, 28893, 30001, 30588, 31119, 32444) ) oilConsumption ([2005], [2006], [2007], [2008], [2009], [2010], [2011], [2012], [2013], [2014], [2015])' ,@keyvalueoption = 1 ,@columnMapping = N'[Year],[Total North America], [Total S. & Cent. America],[Total Europe & Eurasia], [Total Middle East],[Total Africa],[Total Asia Pacific]'; |
The key point here is to pass @columnMapping as a new table header and to set @keyValueOption to 1. If you set @keyValueOption to 0, @columnMapping is ignored, and the result will look like the image below.

The first row, from the earlier test, is now the header of our table. In the solution, there are two kinds of transformations which are determined by the parameter @keyValueOption.
If you specify @keyValueOption to 1 and submit @ColumnMapping as NULL, the result is shown in the image below.
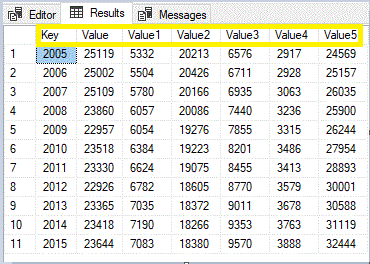
The generic header is displayed, highlighted with yellow in the image above. The first column is named Key, and the others are Value, Value1, and so on.
It’s easy to transform the DataTable object as shown in the listing below. All code connected with transposing the DataTable is located in TableManipulation.cs.
|
1 2 3 4 5 6 7 8 9 10 11 12 13 14 15 16 17 18 19 20 21 22 23 24 25 26 27 28 29 30 31 32 33 34 35 36 37 38 39 40 41 42 43 44 45 46 47 48 49 50 51 52 53 54 55 56 57 |
public static DataTable RotateTableWithKeyValue(DataTable oldTable, string columnMapping) { DataTable newTable = new DataTable(); DataRow dr = default(DataRow); if ( columnMapping == null ) { newTable.Columns.Add("Key"); int no = 0; foreach (DataRow row in oldTable.Rows) { newTable.Columns.Add("Value" + (no == 0 ? "" : no.ToString().Trim())); no++; } } else { string[] names = columnMapping.Split(','); foreach (string s in names) { newTable.Columns.Add(s); } if ( names.Length < oldTable.Rows.Count+1) { int no = names.Length;co while (no < oldTable.Rows.Count+1) { newTable.Columns.Add("Value" + no.ToString().Trim()); no++; } } } for (int col = 0; col <= oldTable.Columns.Count - 1; col++) { dr = newTable.NewRow(); dr[0] = oldTable.Columns[col].ColumnName; for (int row = 0; row <= oldTable.Rows.Count - 1; row++) { dr[row + 1] = oldTable.Rows[row][col]; } newTable.Rows.Add(dr); } return newTable; } |
When you transpose the original data and produce another table, the code must send the results. Sending results is where SQLCLR magic ‘comes to light.’
The whole task is accomplished by utilizing the SqlPipe class. SqlPipe allows managed stored procedures running in process in a SQL Server database to return results to the caller. This class cannot be inherited.
First is invoked SendResultsStart. SendResultStart marks the beginning of a result set to be sent back to the client and uses the record parameter to construct the metadata that describes the result set. For now, ignore the record parameter for a while.
SendResultStart comes in a pair with SendResultEnd. As you probably expect SendResultEnd marks the end of a result set and returns the SqlPipe instance to the initial state. The code that pipes the data table to the client is located in PipeUtilities.cs.
|
1 2 3 4 5 6 7 8 9 10 11 12 13 14 15 16 17 18 19 20 21 22 23 24 25 26 27 28 29 |
public static void PipeDataTable(DataTable dt) { SqlMetaData[] md = ExtractDataTableColumnMetaData(dt); SqlDataRecord r = new SqlDataRecord(md); SqlPipe p = SqlContext.Pipe; p.SendResultsStart(r); try { foreach (DataRow row in dt.Rows) { for (int i = 0; i < r.FieldCount; i++) { object v = row[i]; if (null != v) { v = v.ToString(); } r.SetValue(i, v); } p.SendResultsRow(r); } } finally { p.SendResultsEnd(); } } |
SendResultRow, as the name implies, sends a single row of data back to the client. Also, to conclude the part of sending the result back to the client, SqlDataRecord represents a single row of data and its metadata. This class cannot be inherited.
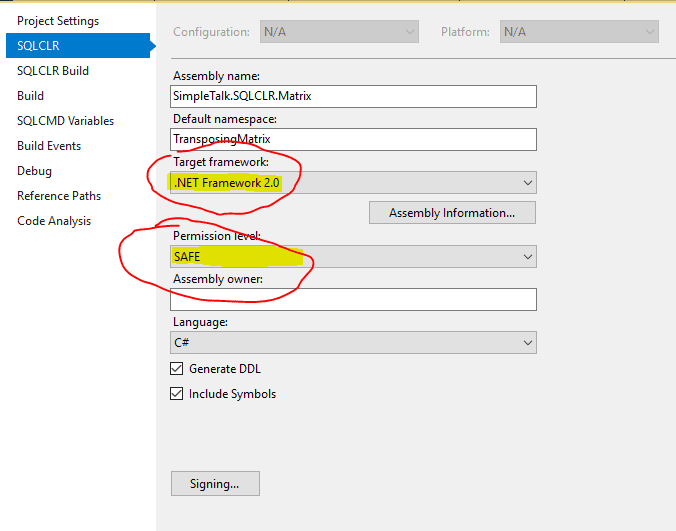
You are probably asking yourself if the solution limited to newest SQL Server version? To answer this question let’s take a look at the image below. Outlined in red is the project properties. The project uses .NET 2.0. It means that you can use the solution starting with SQL Server 2005!
There are a few things to write about the solution. Help is available at any point by executing
|
1 2 3 |
SELECT * FROM MATRIX.Help('MATRIX.Transposing'); |
The result is shown in the image below
Solution Limitations
The solution has some limitations. There is a maximum number of columns that you can have per SQL Server table; it could be up to 30000 columns. This solution is limited to 1000. If you try to transpose a table with more than 1000 rows, a warning is displayed in the message window, and you get first 1000 rows transposed. It means you get the table with 1000 columns.
For example, if we execute T-SQL like in the listing below
|
1 |
EXEC MATRIX.Transposing @Query = N'SELECT * FROM Person.Person'; |
To transpose table ‘Person.Person’ which has about 20K records, you will get the warning like in the image below.

However, you will get the result, as shown in the image below.
In this spot, I have to make a small digression and describe the term of an application domain. This is extremely important for understanding the performance of the stored procedure.
An application domain is a construct in the Microsoft .NET Framework common language runtime (CLR) that is the unit of isolation for an application. When a user asks for some functionality located in your assembly the first time, an application domain is created. The application domain is a lightweight process used to enforce isolation between running .NET code within the same SQLOS process. SQLCLR uses application domains to isolate execution of .NET code on a per database and per assembly owner basis.
This process of loading an application domain takes time (this is a performance penalty). Therefore, the first execution of your SQLCRL function is always much slower than the next execution.
So, let us get back to the main topic. If the application domain is loaded, I get the result, transpose first 1000 rows in 3 seconds. If the application domain is not loaded everything takes a little bit longer. Maybe, in the future, I will remove this limitation and create some configuration table in which users can decide what is a maximum number of rows to transpose. But in this place, you have to ask yourself why you need a table of thousands of columns?
In the solution, there are some interesting tests which are located in the Test.sql file.
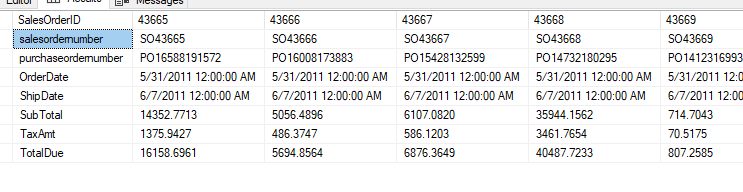
Execute the T-SQL script in the listing below. In the script, the table is filtered passing two parameters and the WHERE clause.
|
1 2 3 4 5 6 |
EXEC [MATRIX].[Transposing] @Query = N'SELECT SalesOrderID , salesordernumber , purchaseordernumber , OrderDate , ShipDate , SubTotal , TaxAmt , TotalDue FROM Sales.SalesOrderHeader WHERE SalesOrderId >= @salesId1 AND SalesOrderId <= @salesId2; ' ,@Params = N'@salesId1 int=43665,@salesId2 int=43671'; |
You can see the result in the image below. The filter is applied successfully.
Also, what we should do with our results? SSMS has powerful capabilities to copy the result and paste, for example, into an Excel file. Furthermore, the results could be saved into a temporary table or permanent table as is shown in the listing below.
|
1 2 3 4 5 6 7 8 9 |
EXEC MATRIX.TRANSPOSING @query = 'SELECT * FROM sys.databases' ,@tableName = N'##tempTable'; --We could pass permanent table as well --EXEC MATRIX.TRANSPOSING @query = 'SELECT * FROM sys.databases' -- ,@tableName = N'MATRIX.PERMANENT'; ---The same result as in the first query SELECT * FROM ##tempTable; |
The key point here was to pass a @tableName parameter. It could be a permanent or temporary table name. The result is shown in the image below. Notice the result of the second query is equal to the result of the first query.
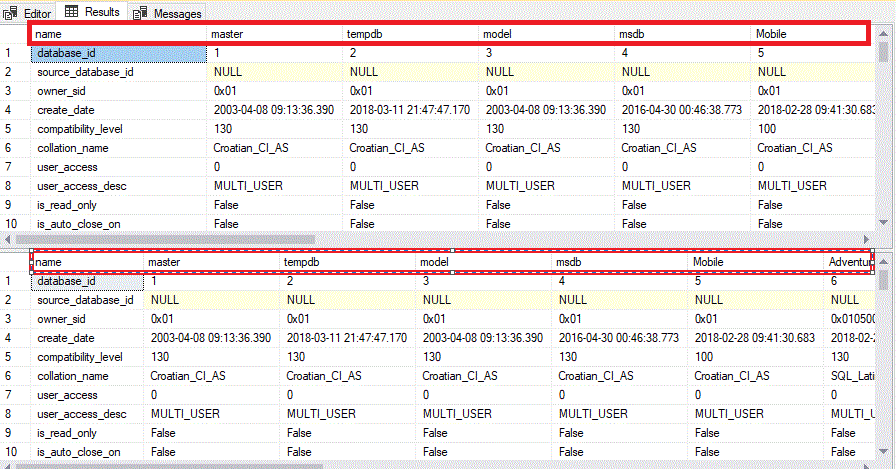
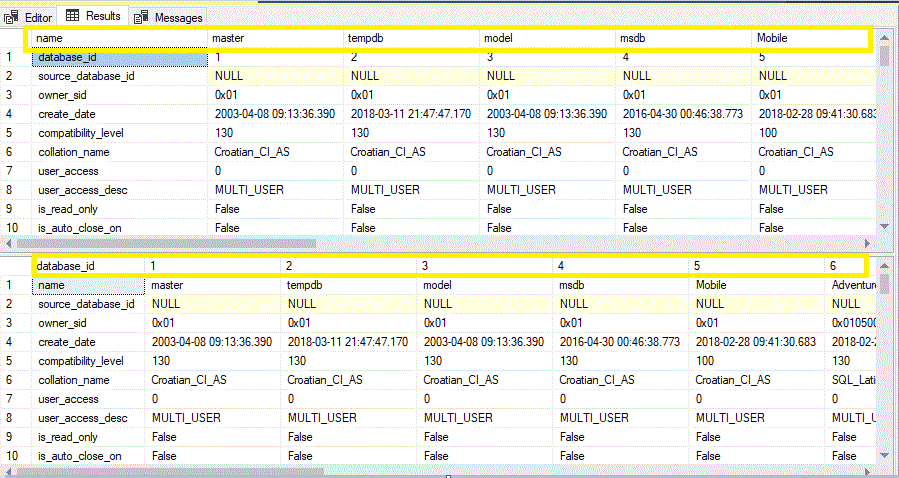
Finally, take a look at the @rco parameter. Execute the T-SQL displayed in the listing below.
|
1 2 3 4 |
EXEC MATRIX.Transposing @Query = N'SELECT * FROM sys.databases' ,@Rco = 0; EXEC MATRIX.Transposing @Query = N'SELECT * FROM sys.databases' ,@Rco = 1; |
The first and the second T-SQL statement differ by the @Rco parameter. In the first statement the @Rco value is 0 and in the second statement is 1. You can notice in the image below that in the first case the header is formed based on the database name. In the second case, the header is formed based on database ID.
If you woul like to clean up your environment after playing with this solution, there is a script for this purpose, located in Setup directory as well as in the attachment of the article.
Summary
Phil’s articles are not just educational but also inspiring. Without Phil, I would never start investigating how to do transposing the query result. In the article, I showed you how to use SQLCLR to accomplish this task. The solution works fine on SQL Server 2005+.
Although SQLCLR seems to be a second-class citizen on SQL Server, there are situations when could replace T-SQL. It is worth exploring and using in solving practical problems.
The solution source code can be found on GitHub here.