
As we’ve seen in the previous levels of this Stairway, SQL Server Agent jobs are made up of a series of job steps, with each step being a distinct type of work to be performed. SQL Server Agent also provides the capability of creating alerts, which can cause messages to be sent to designated operators as notifications. Those notifications will probably be sent via database mail, the built in capability of SQL Server and SQL Server Agent to send and receive email. In this level, you will learn how to configure database mail for send and receive operations, as well as review some basic troubleshooting steps for database mail.
A Brief Overview of Database Mail
In SQL Server 2000 and earlier versions of SQL Server, a mail system known as SQLMail was available. SQLMail (which will eventually be removed but is still around in SQL Server 2008 R2) uses the MAPI (Messaging Application Programming Interface) API set to send and receive email on behalf of an instance of SQL Server. There were several problems and limitations with this mail system, including:
- a lack of support for failover clustering
- dependency on the MAPI APIs being provided by another application (such as Microsoft Outlook)
- dependency on the SQL Server service having a MAPI profile
- Inability to resend mail if any failures occurred before the mail was sent
- No version of MAPI available that was supported for SQL Server
Because of these limitations, a new mail system was designed for SQL Server 2005. That new mail system, database mail, removed these limitations and greatly improved the reliability of mail for SQL Server. Database mail is fully supported in a failover cluster configuration. Database mail uses SMTP for communication with mail servers, eliminating any external dependency for mail API support. Database mail internally uses service broker to queue all mail requests, making the mail system much more robust.
Database mail runs as a separate executable that makes Transact-SQL calls into the msdb database, and then interacts with the SMTP mail server directly, using security information stored in msdb.
Database Mail Configuration
Database mail is not configured to be “on” by default (much like SQL Server Agent). You must enable Database mail before you can configure and use the capabilities it provides. There are three different ways you can enable database mail:
- The Database Mail Configuration Wizard
- This is a graphical wizard, launched from SSMS, that will enable database mail and configure the basic capabilities of the service. This is what we will use in this article
- sp_configure
- As with most server configuration options, you can use the sp_configure system stored procedure to enable or disable database mail. You specify the option ‘Database Mail XPs’ (an advanced option in sp_configure) to 1 to enable database mail, or 0 to disable database mail.
- Policy Based Management
- You can specify the Facet “@DatabaseMailEnabled” and set the value to True, then add this facet configuration to a policy, and then apply that policy to the specific SQL Server you want to work with. If you intend to manage many servers this is your best option from a scalability perspective. (Policy Based Management is available as of SQL Server 2008 and later versions.)
Enable Database Mail using the Database Mail Configuration Wizard
To get started with database mail, connect to your local instance of SQL Server with SQL Server Management Studio, then expand the Management folder, and right-click on the Database Mail entry. Select the option to “Configure Database Mail”, and the database mail configuration wizard will launch, displaying an introduction to the wizard. Click Next, and you will see the options available in the wizard, as shown in Figure 1.
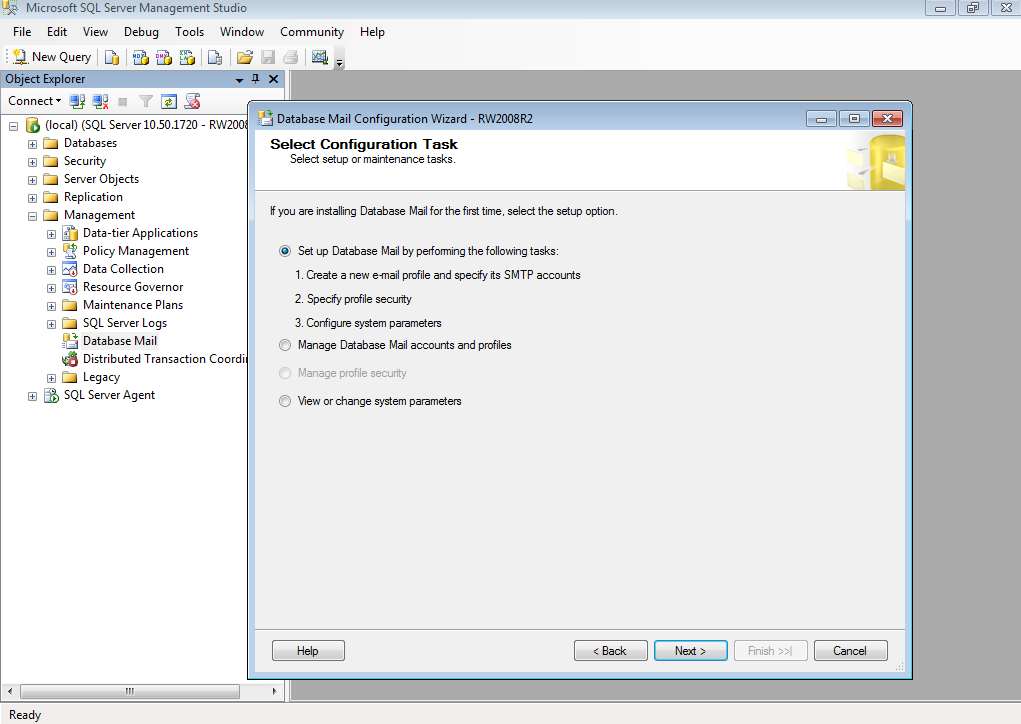
Figure 1 – Database Mail Configuration Wizard – Select Configuration Task
Since this is the first time the database mail configuration wizard has been run, you will need to keep the option to set up Database Mail. Click Next, and you are prompted to enable Database Mail, as shown in Figure 2.
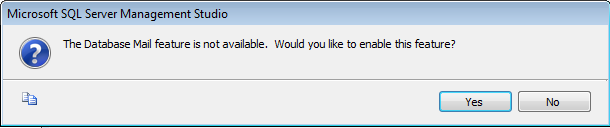
Figure 2 – Enable Database Mail?
Security hasn’t been mentioned yet, but you will need to be a member of the sysadmin server role to complete this task. Select Yes, and the appropriate sp_configure command is run on your behalf. You will then be presented the New Profile dialog. Enter a profile name and description, and then click on the Add… button next to the SMTP accounts list, as shown in Figure 3.
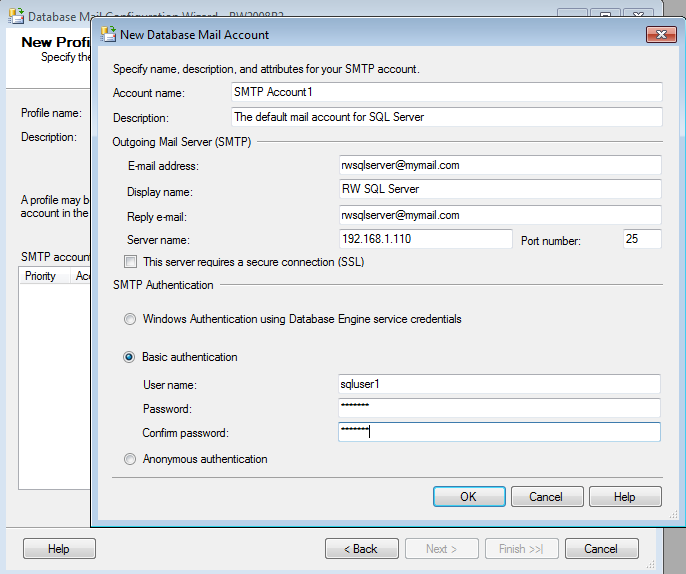
Figure 3: New Database Mail Account
The account name is for your benefit, so use something that makes sense to you. The email address will be what shows up in the “from” field in emails sent from SQL Server. It’s a good idea to have the name be something that allows you to tie back specifically to the sending SQL Server. The display name, however, may also be used for that purpose if you’d rather use common email addresses for SQL Server. You can set up the reply email to come back to a person if you’d rather see any accidental responses to mails sent to SQL Server.
The server name field may be either the DNS name or the IP address of the SMTP mail server you wish to use for this specific mail account. The port number defaults to 25, but your mail server may require you to use a custom port number. Finally, you have three options for authentication – you can either run using Windows Authentication (which will come to the SMTP server as the service account used by the SQL Server Database Engine service (mssqlservr.exe), use basic authentication (plain text username and password), or anonymous authentication (which really means no authentication). If you don’t know these settings, you can get them from either your corporate email administrator or your Internet Service Provider (ISP) if you are setting this up from a home connection. Most ISPs offer email service with your internet connection.
Once you’ve selected the appropriate authentication options, click OK to finalize the mail account configuration. You can create additional accounts in the wizard here to be associated with the mail profile you’re in the process of creating. If the first account fails to connect to the mail server and send email for some reason, the second account in the list will be used. You can have multiple accounts associated with a single mail profile. For now, stick with a single SMTP account, and click Next. You will be presented with the option to make the mail profile you’ve created a “public” profile (i.e. allow all authorized database mail users to send email using this mail profile), or you can keep it private (in which case you would have to associate the profile with a user id from the msdb database). Since this is the first profile, make it the default public profile (as in Figure 4).
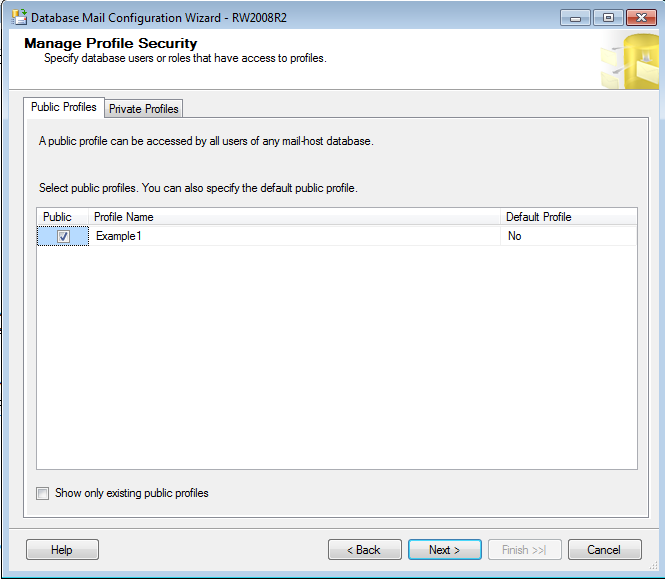
Figure 4: Set the database profile to public
Click Next, and you are finished with configuring your initial database profile. However, you are now presented with the “Configure System Parameters” dialog, which allows you to change system-wide settings for database mail (see Figure 5).
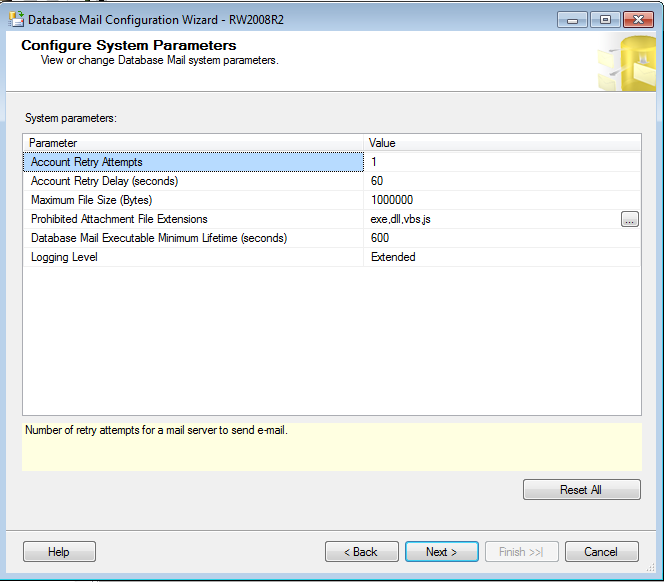
Figure 5: Database Mail system parameters
You can specify the following options here:
- Account Retry Attempts
The number of times database mail will attempt to use an email account before it will give up and switch to the next email account in the list of accounts for a given mail profile.
- Account Retry Delay (seconds)
The amount of time (in seconds) that database mail will wait before trying again to connect and use an SMTP mail account between retry attempts.
- Maximum File Size (Bytes)
The largest allowed attachment you can send with database mail. You can send the results of queries (among other things) as mail attachments from SQL Server, so you may want this to be larger than you might think. You may, however, have limitations on attachment size imposed by your mail server as well that will override this setting.
- Prohibited Attachment File Extensions
A list of file extensions that database mail will not be able to send. This is primarily used as a way to ensure your mail system doesn’t spread viruses via executables or scripts. However, you can add or remove extensions that you feel are appropriate for your SQL Server installation.
- Database Mail Executable Minimum Lifetime (seconds)
There is overhead associated with starting up the database mail process (since it runs externally and is not part of the database engine or SQL server agent). This setting determines how long database mail will remain running after it is last used by SQL Server Agent to send email. If you are using database mail frequently, keeping the process running longer may save you some startup overhead from database mail needing to re-query SQL Server and cache internal information (such as account profiles) that are used when sending email.
- Logging Level
There are three possible logging levels – Normal, extended, or verbose. If you are troubleshooting a problem or want to see as much information about database mail as possible, set the logging to verbose. You can then review the database mail logs in SSMS (or the sysmail_event_log view in the msdb database)
For now, accept the defaults, click Next, and then Finish to create the mail profile and account(s) specified on the profile page (Figure 6).
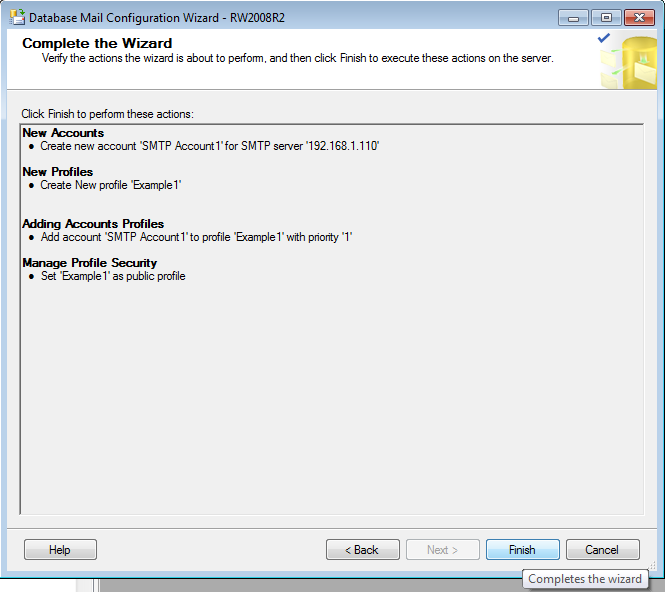
Figure 6: Completing the database mail wizard
Assuming everything works, you’ll see something like Figure 7, showing that the profile and account were created, the account is associated with the profile, and the profile was made public. If for some reason you experience a failure here, or later need to change the settings you have created for your mail setup, re-start the Database Mail Configuration Wizard, and on the first dialog (as shown in Figure 1), select the second radio button labeled “Manage Database Mail accounts and profiles.” You will then be able to modify everything you have just entered, or create new mail profiles or mail accounts.
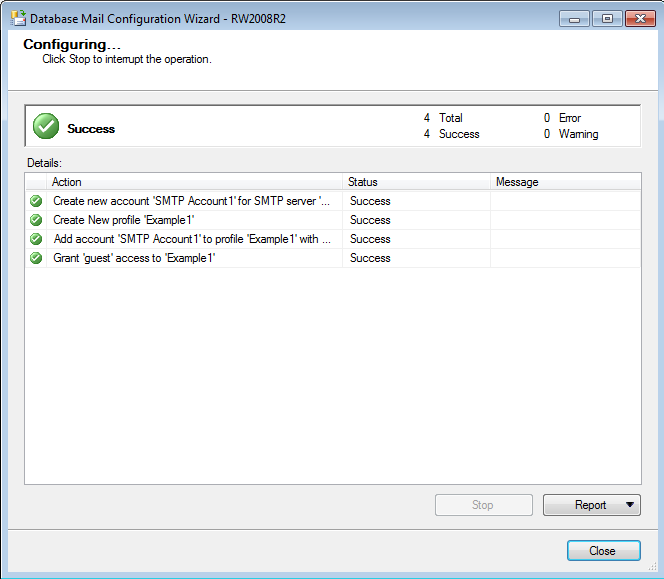
Figure 7: The wizard executes all commands successfully
Next Steps
Once the wizard is complete, there are a couple steps to do to confirm that you have database mail properly configured. First, you’ll want to send a test email. Then, you should review the logs to see the basic information about that test email that was recorded by database mail.
Send a test email
To send a test email, right click on the Database Mail node in SSMS, and select the menu option to “Send Test E-Mail…” and you will see a dialog like figure 8. Send the test email to yourself so you can see if the mail system is working correctly.
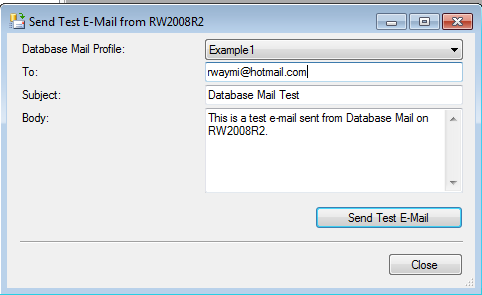
Figure 8: Sending a test email
If the mail sends successfully, click ok on the test e-mail dialog that comes up after clicking the Send Test E-Mail button. If you are not able to receive the email, click on the Troubleshoot… button and the help links for database mail troubleshooting will appear. A number of options are available as of SQL Server 2008 R2, as shown in Figure 9. Select the appropriate symptom and you can then follow the available troubleshooting guide.
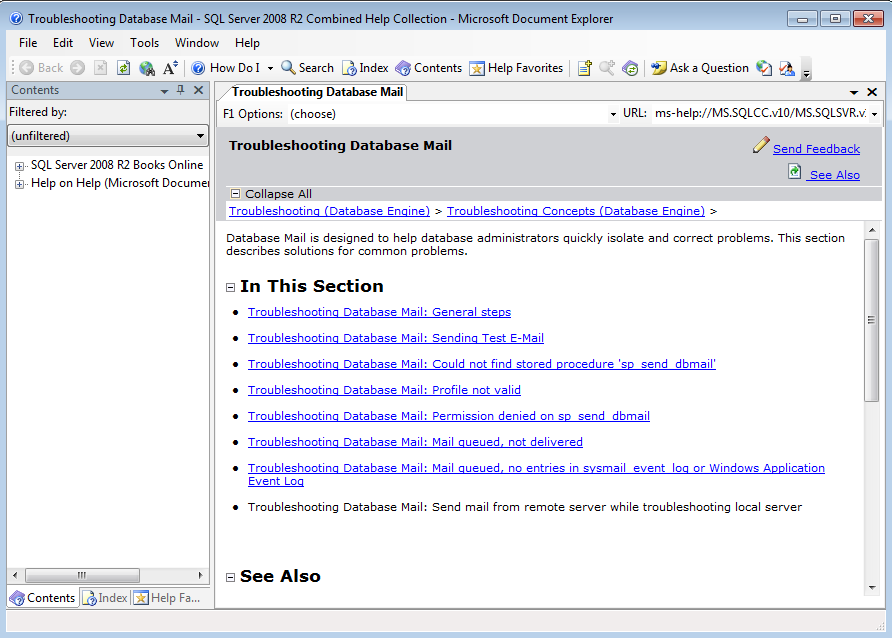
Figure 9: Help for Troubleshooting Database Mail
If things worked, you’ll see a mail message such as that shown in Figure 10. Once that’s set up, you can now use email operators as you saw in the third article in the series to send email alerts with SQL Server.
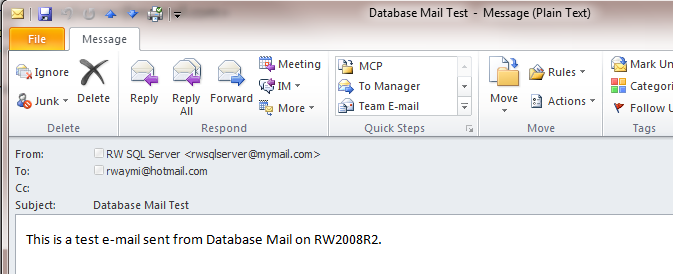
Figure 10: Test Email from SQL Server Database Mail
Review the Database Mail log
To view the Database Mail Log, you can either select directly from the msdb..sysmail_event_log view, or right-click on Database Mail in SSMS and select the “View Database Mail Log” menu option. You will be presented with the standard log file viewer, filtered to just view the Database Mail log. If you only had successful messages sent, you should simply see a message that the DatabaseMail process is started. If you have errors, you will see something like Figure 11. Notice that once you select an error message, the box at the bottom of the log screen will show detailed information about the error.
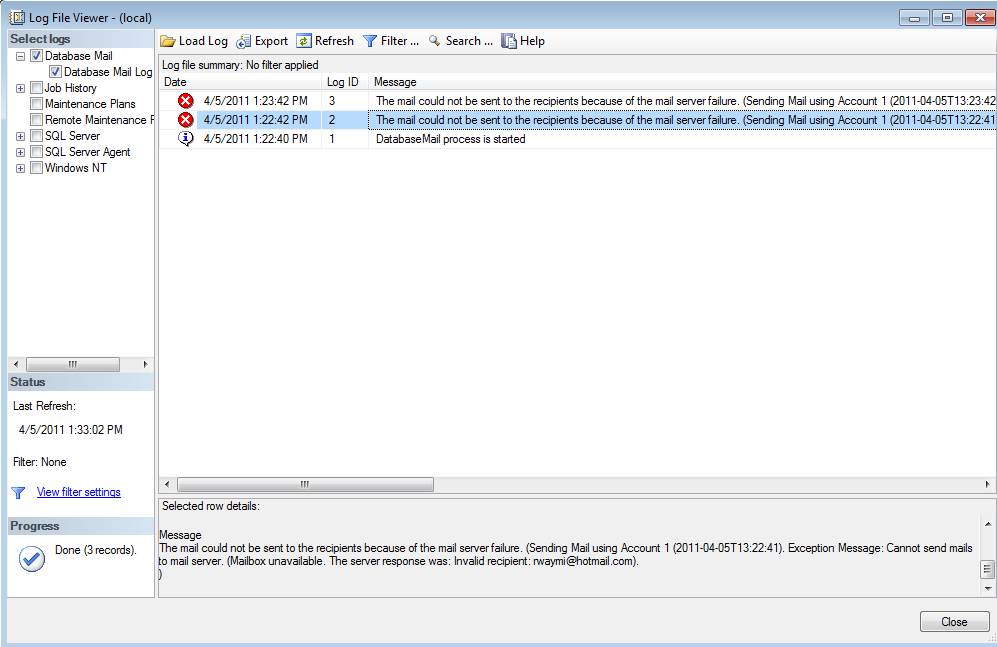
Figure 11: The Log File Viewer viewing Database Mail logs
If you are still having difficulty, you can adjust the logging level in database mail to Verbose. You can do that in one of two ways, either via SSMS or via the stored procedure sysmail_configure_sp in the msdb database. In SSMS, right-click on Database Mail, start the configuration wizard again, and select the Configuration Task “View or change system parameters.” You will see Figure 5 again, then select the logging level and change it to Verbose. Click Next and Finish the wizard, and try to send the email again. You will see all available logging information in the database mail log view.
Select name from sys.all_objects
What’s Next
As you have seen, database mail is reasonably straight-forward and flexible as long as you have an SMTP-compatible mail server that you can communicate with from your SQL Server machine. Database mail has security restrictions allowing you to configure who can send email (via the DatabaseMailUserRole in msdb), as well as the capability to restrict mail profiles to specific users. You can use database mail with SQL Server Agent to send alerts and otherwise help automate SQL Server administration.
Now that you have the basics of jobs, alerts, operators, and mail working, our next step will be to start to understand the types of entries that will appear in the SQL Server Agent error logs and understand how they can help you troubleshoot problems with SQL Server Agent.