
In this level we begin our journey into the SQL Server SMO space. SMO stands for Shared Management Objects and is a library written in .NET for use with SQL Server. These objects were mentioned in Level 1 and 2 in the getting started with SQL PowerShell articles. The SMO library is available when you install SQL Server Management Tools or you install it separately as described in level 1. The purpose of SMO is to allow automation or management of SQL Server without the use of Management Studio or other GUI tools available for use with SQL Server. In this level we will not cover the installation and loading of the libraries in detail as this has been covered in previous levels. If you have not installed these objects, please go back to level 1 and install these before continuing. We will also be using SQL Server Profiler in this level to peek behind the covers to see what SMO sends to SQL Server.
How SMO works
SMO is a set of libraries written in .NET and PowerShell can take advantage of them because it is written on top of .NET as well. In previous levels you have seen some basic information about how to use these libraries and others, but this section will help you understand how SMO works before we use it to perform tasks. This will hopefully help you see what happens behind the scenes so that you don’t think that it is all magic.
You should be aware of the fact that no library has any secret methods of executing commands or retrieving data from SQL Server without the use of Transact-SQL. There is no secret path that allows SMO to use binary language to get things done; SMO is just a T-SQL generator. In other words, when you retrieve a property or execute a method on an SMO object, it creates the T-SQL to get the property or execute the command and then sends it to the SQL engine to execute. When you retrieve a property in SMO you are essentially telling the library to retrieve it and SMO is generating the T-SQL to get that property from the SQL Server instance. No magic, sorry. When you set a property and call Alter(), the library is generating the T-SQL to alter that object based on the property you set in code. An example is shown in Listing 7.1, which we’ll see shortly.
SQL Server Profiler is used in Figure 7.1 to illustrate the commands that are being sent to SQL Server through the SMO automation code in this level. Profiler is a great tool to see what happens behind the scenes and to test your scenarios as you look to use SMO more in your work. I am just using a standard trace, which captures (among only a few other events) every batch sent to SQL Server for execution.
Memory to SQL and SQL to Memory
Before we look at an example, we need to understand a bit about how SMO works in PowerShell. PowerShell is a shell that has a memory space created when it starts up. In this shell you have the ability to load libraries to assist in accessing services or objects, or performing actions in scripts. SMO gets loaded into the memory space in PowerShell in an AppDomain (or Application Domain), which is the holding place in .NET for objects and variables in your session. There are more advanced mechanisms in PowerShell to manage these AppDomains, but this is outside of the scope of this level. SMO uses a disconnected model and therefore is not constantly connected to SQL Server. You may have an active connection to SQL Server assigned to the Database object, but SMO will open the connection and perform the action (retrieve or alter) and then close the connection. So there is no concept of a persistent connection like you may see in Management Studio. This means that when you create or use New-Object to get a Database object, it is technically disconnected from the server until you request an action or property from that object. PowerShell will keep these objects in memory and use them as you manipulate them in your script. The main thing to understand is that some operations that move information from memory to SQL Server and others that move information from SQL Server to memory. When properties of the database are retrieved they are put in the memory of your PowerShell session inside an SMO class. When you reference one of the properties that has been retrieved already, SMO will not connect to the server and retrieve the property again by default, because the object in memory already has the property there. This is illustrated in figures 7.1 and 7.2. You will notice that on the first retrieval the TSQL was generated and executed but the second time I reference the property, nothing happened in SQL Server, not even opening the connection. Let’s begin using SMO.
Beginning SMO Use
The first example involves changing the server configuration option ‘Max Server Memory’. This setting is in the Configuration collection in the SMO Server object. Listing 7.1 contains the code we will run and you will see the Profiler output in Figure 7.1 for the initial run to change the parameter. Basically it opens a server connection and alters a configuration property called MaxServerMemory of the Configuration collection. This is a parameter that you could see if you used the system stored procedure sp_configure.
You see in Figure 7.1 the Profiler output shows that SMO generated a call to sp_configure with “max server memory (MB)” as the parameter with the value set to 2048. This is what you would execute in TSQL, but we are using the SMO library so we need SMO to generate the TSQL to make the change. After the change is made, we can run the code in Listing 7.2 after we clear the Profiler window. This script retrieves the Max Server Memory property again, and because we had already retrieved it and set it in Listing 7.1, the object in memory has that value already. As seen in Figure 7.2 there is no activity in Profiler because the value is already in our $server object.
# Begin 1st Run script
Add-Type –AssemblyName "Microsoft.SqlServer.Smo, Version=11.0.0.0, Culture=neutral, PublicKeyToken=89845dcd8080cc91"
$server = New-Object –TypeName Microsoft.SqlServer.Management.Smo.Server –ArgumentList "localhost"
$server.Configuration.MaxServerMemory
$server.Configuration.MaxServerMemory.ConfigValue = 2048
$server.Alter()
# End 1st Run script
Listing 7.1 Making a Configuration Change to SQL Server
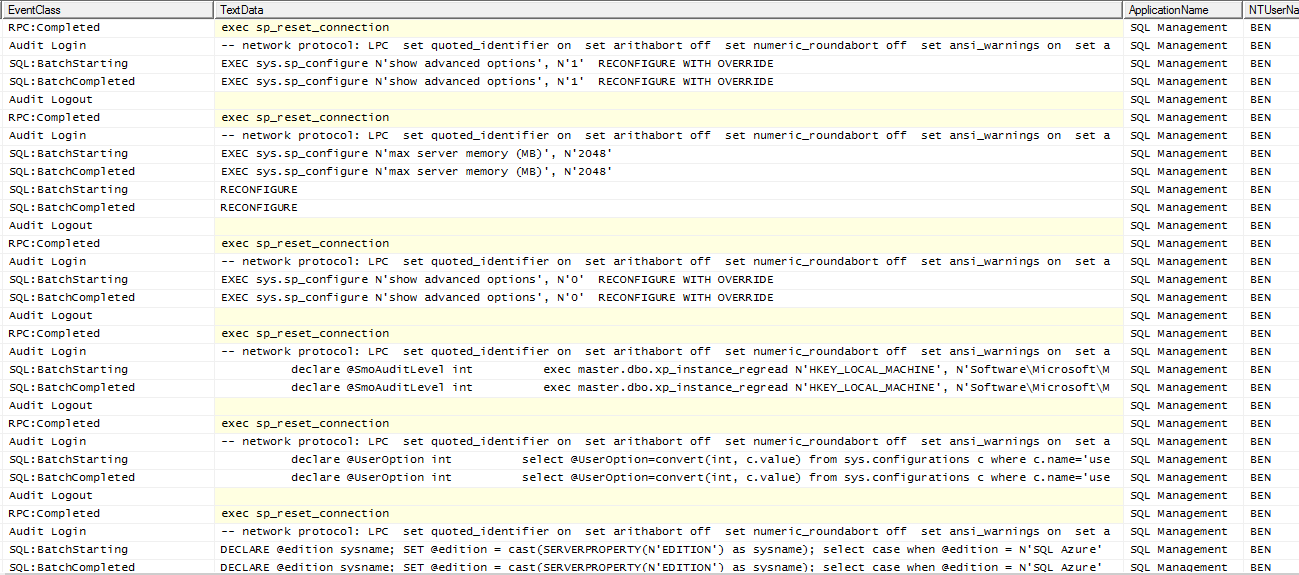
Figure 7.1 SQL Profiler Output on First Call to MaxServerMemory
# Clear the profiler window and run the following statement
# to see if the next statement produces any profiler output
$server.Configuration.MaxServerMemory
Listing 7.2 Retrieving a configuration value from SQL Server
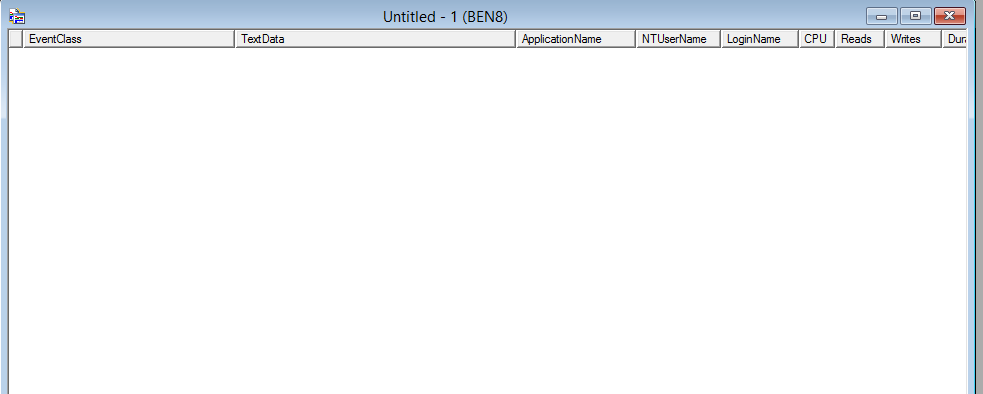
Figure 7.2 SQL Profiler Output on Second call to MaxServerMemory
SMO Database Use
Now let’s look at the SMO object Database. There are many other objects to use, but this will get you started in using SMO with PowerShell to retrieve some fundamental information and also to manage simple objects.
You can find all the information about the object Smo.Database at this location: http://technet.microsoft.com/en-us/library/microsoft.sqlserver.management.smo.database.aspx. We will cover the retrieval of properties first as this is usually the most used thing to do with SMO. Table 7.1 shows the properties and descriptions that we will look at in this level. There are many other properties listed in the link jus referenced .
| Property Name | Description |
| Name | Database name |
| ID | Database ID as stored in sys.databases |
| DataSpaceUsage | Total space used in the database |
| SpaceAvailable | Space available in the database |
| Size | Database size |
Table 7.1 – Sample of SMO Database Properties
We will now look at the code in Listing 7.3 and my results in Figure 7.3 to illustrate the use of SMO in a practical example. You will probably need to modify the code to replace UserDB1 with the name of a database on your SQL Server, and you may need to change “localhost” to a specific SQL Server instance name. And of course, the exact values you get for output will be different than the values shown in Figure 7.3. The results I got in the SQL Server Profiler are shown in Figure 7.4.
Add-Type –AssemblyName "Microsoft.SqlServer.Smo, Version=11.0.0.0, Culture=neutral, PublicKeyToken=89845dcd8080cc91"
$server = New-Object –TypeName Microsoft.SqlServer.Management.Smo.Server –ArgumentList "localhost"
$db = $server.Databases["UserDB1"]
$db | Select Name, ID, DataSpaceUsage, SpaceAvailable, Size | Format-Table –Auto
Listing 7.3 – Retrieval of Database Properties via SMO
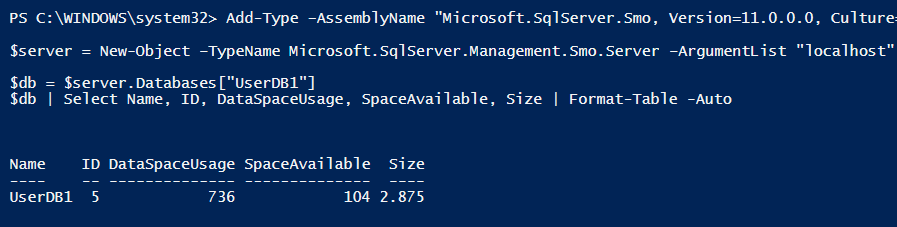
Figure 7.3 – Results of running above script in the PowerShell Console

Figure 7.4 – Profiler Output on first run of Listing 7.3
As above, a second execution of the same SMO query, as in Listing 7.4, will not need to make any calls to SQL Server, as shown in the trace output of Figure 7.5.
$db | Select Name, ID, DataSpaceUsage, SpaceAvailable, Size | Format-Table –Auto
Listing 7.4 – Second run to retrieve the properties after Listing 7.2 has been run
Figure 7.5 – Profiler Output on second retrieval of Database Properties, as shown in Listing 7.4
SMO Database Retrieval Summary
Databases have many properties that you can see in Management Studio by right clicking on a Database and choosing Properties, but there are many properties that you cannot access from that screen. The SMO Database object, as you have seen can be used to get a good view of a database using PowerShell. We retrieved the Name, ID, Size and Space Used for this database and viewed it in a grid-like format. You can see that we retrieved the properties once and saw activity in Profiler. Then when retrieving the properties a second time, there is no Profiler output because the properties are already in memory so SMO does not have to retrieve them from the SQL Server.
SMO Database Management
In this section we will work with a database object and change some properties of this database using SMO and PowerShell. Table 7.2 shows the properties that we will modify. In Listing 7.5 you will see the code to make the modifications. Figure 7.6 show the properties in SQL Server Management Studio before the change and Figure 7.7 shows the properties have changed. Figure 7.8 shows the Profiler output from SMO to alter the properties of the database. Be sure and edit the code in Listing 7.5 to specify a SQL Server instance and the database name.
Table 7.2 – Properties and Methods example of modifying an SMO Database object
Add-Type –AssemblyName "Microsoft.SqlServer.Smo, Version=11.0.0.0, Culture=neutral, PublicKeyToken=89845dcd8080cc91"
$server = New-Object –TypeName Microsoft.SqlServer.Management.Smo.Server –ArgumentList "localhost"
$db = $server.Databases["UserDB1"]
$db.PageVerify = "CHECKSUM"
$db.RecoveryModel = "Full"
$db.Alter()
Listing 7.5 Making a Database Property Change
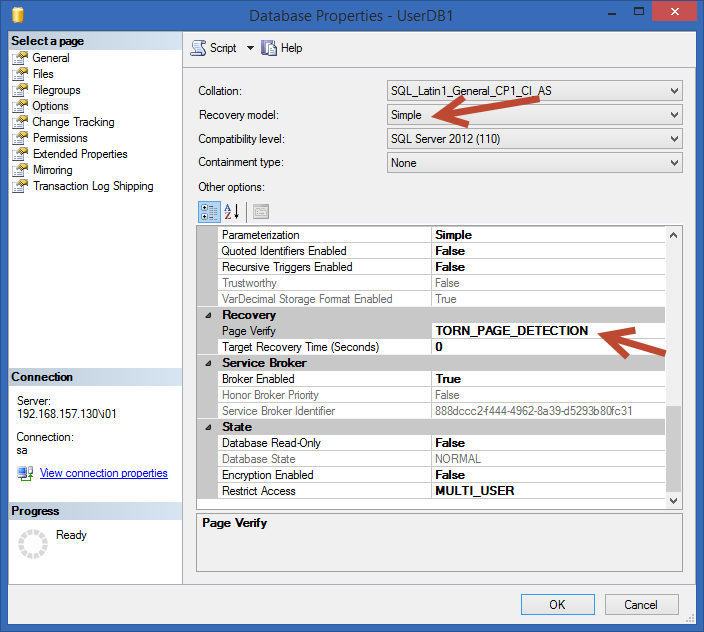
Figure 7.6 – Database Options Before Change
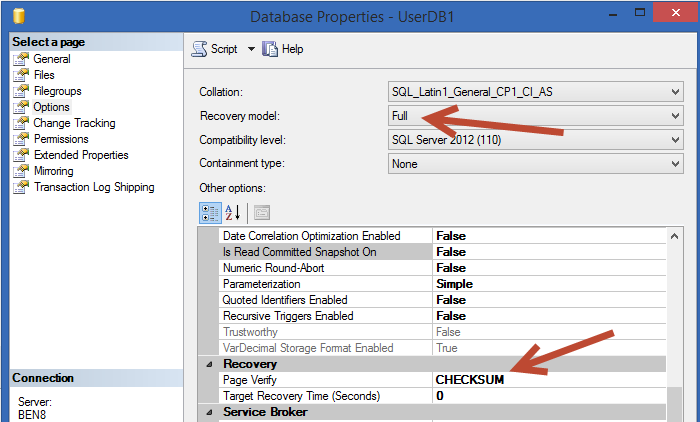
Figure 7.7 – Results graphic showing that the changes were made.

Figure 7.8 –T-SQL captured by SQL Profiler.
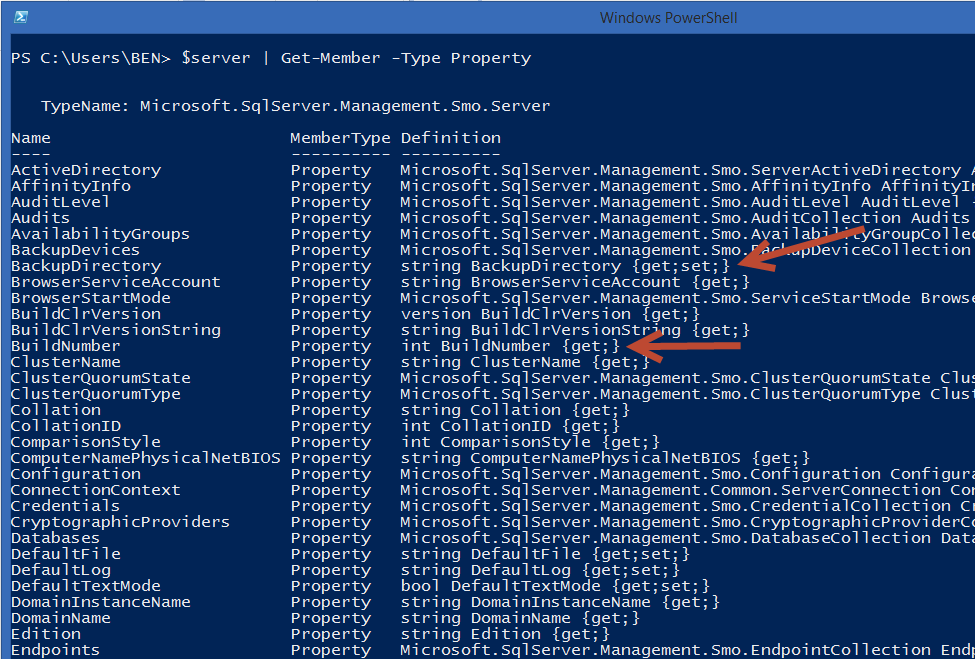
Figure 7.9 Using Get-Member to see the nature of the properties
Database Modification Summary
In this example you saw how to use the SMO Database object and how to modify the database properties using the Alter() method. When you specified a property and assigned it a new value, SMO stored this value in memory and marked it dirty (or modified). When Alter() was executed, it generated the TSQL to make the modification and connected to SQL Server to execute the T-SQL. In Figure 7.7 you see the results of that modification. In Figure 7.8 you saw the T-SQL generated to make the modification.
The concepts you have seen in the SMO Database object examples can be applied to a Table, Column, Server and many other objects. It is important to master the concept of looking for {set, get} or {get} when examining the properties in the SMO object members list (see Figure 7.9). Any property that you see set can be changed and those that only have get can only be retrieved. As documentation and objects change you should always check the documentation for each object to ensure that you know whether or not you can actually change the property in that version of SMO.

